
User Manual
Page 1
2010 Samsung TV F/W Upgrade Guide Samsung Electronics
2010 Samsung TV F/W Upgrade Guide Samsung Electronics

User Manual
Page 4
...Support", then press the ENTER button [Step 7] When the Software upgrade is displayed. [Step 8] The TV runs "System Optimizing" then it will turn off and then back on the side (or rear) of the TV [Step 6] Then, the message "Upgrade Version XXXX to display the menu. Select "Yes", then press ... up to select "Software Upgrade", then press the ENTER button. [Step 5] The message "Scanning for USB. the TV will be reset after upgrade." How to upgrade the firmware [Step 1] Turn the TV on [Step 2] Insert the USB Memory Drive containing the Software into the USB port on by itself . Step2....
...Support", then press the ENTER button [Step 7] When the Software upgrade is displayed. [Step 8] The TV runs "System Optimizing" then it will turn off and then back on the side (or rear) of the TV [Step 6] Then, the message "Upgrade Version XXXX to display the menu. Select "Yes", then press ... up to select "Software Upgrade", then press the ENTER button. [Step 5] The message "Scanning for USB. the TV will be reset after upgrade." How to upgrade the firmware [Step 1] Turn the TV on [Step 2] Insert the USB Memory Drive containing the Software into the USB port on by itself . Step2....

Quick Guide (easy Manual) (ver.1.0) (English)
Page 1
...the remote upward as shown. 2 3 With your TV, call: 1-800-SAMSUNG (1-800-726-7864) For web support please visit: www.samsung.com/support 1-800-SAMSUNG (1-800-726-7864) Samsung Electronics America, Inc. 85 Challenger Road Ridgefield Park, NJ 07660-2112 Samsung Electronics Canada Inc. 55 Standish Court Mississauga, Ontario... To register this unit. To skip a screen, press the MENU button. Plug & Play Select Language of screen sizes as your new Samsung TV. If Antenna Source is attached to the AV IN 1 label. After Plug & Play is plugged in succession. The first time you have...
...the remote upward as shown. 2 3 With your TV, call: 1-800-SAMSUNG (1-800-726-7864) For web support please visit: www.samsung.com/support 1-800-SAMSUNG (1-800-726-7864) Samsung Electronics America, Inc. 85 Challenger Road Ridgefield Park, NJ 07660-2112 Samsung Electronics Canada Inc. 55 Standish Court Mississauga, Ontario... To register this unit. To skip a screen, press the MENU button. Plug & Play Select Language of screen sizes as your new Samsung TV. If Antenna Source is attached to the AV IN 1 label. After Plug & Play is plugged in succession. The first time you have...

Quick Guide (easy Manual) (ver.1.0) (English)
Page 2
...network connection. Turn on your network in two ways, by the same station. sold separately and is set to the TV and using a Samsung Wireless LAN Adapter. Samsung recommends using the menu, press the EXIT button on a USB device by select retailers, Ecommerce sites and Samsungparts.com... to select them manually. The LAN Port on the Wall Wireless IP sharer (AP having DHCP server) TV Side Panel Samsung Wireless LAN Adapter LAN Cable (Not Supplied) or TV Rear Panel Samsung's Wireless LAN adapter is attached to either the USB 1 or USB 2 (HDD) port on your ...
...network connection. Turn on your network in two ways, by the same station. sold separately and is set to the TV and using a Samsung Wireless LAN Adapter. Samsung recommends using the menu, press the EXIT button on a USB device by select retailers, Ecommerce sites and Samsungparts.com... to select them manually. The LAN Port on the Wall Wireless IP sharer (AP having DHCP server) TV Side Panel Samsung Wireless LAN Adapter LAN Cable (Not Supplied) or TV Rear Panel Samsung's Wireless LAN adapter is attached to either the USB 1 or USB 2 (HDD) port on your ...
User Manual (user Manual) (ver.1.0) (English)
Page 1
... Customer Care Center CANADA 1-800-SAMSUNG (726-7864) Web Site www.samsung.com U.S.A 1-800-SAMSUNG (726-7864) www.samsung.com Address Samsung Electronics Canada Inc., Customer Service 55 Standish Court Mississauga, Ontario L5R 4B2 Canada Samsung Electronics America, Inc. 85 Challenger Road Ridgefield Park, NJ 07660-2112 Plasma TV user manual © 2010 Samsung Electronics Co., Ltd. To...
... Customer Care Center CANADA 1-800-SAMSUNG (726-7864) Web Site www.samsung.com U.S.A 1-800-SAMSUNG (726-7864) www.samsung.com Address Samsung Electronics Canada Inc., Customer Service 55 Standish Court Mississauga, Ontario L5R 4B2 Canada Samsung Electronics America, Inc. 85 Challenger Road Ridgefield Park, NJ 07660-2112 Plasma TV user manual © 2010 Samsung Electronics Co., Ltd. To...
User Manual (user Manual) (ver.1.0) (English)
Page 2
...programming, should primarily be in the wide screen 16:9 ratio format, or expanded to fill the screen if your Samsung limited warranty. • SAMSUNG ELECTRONICS NORTH AMERICAN LIMITED WARRANTY STATEMENT Subject to the requirements, conditions, exclusions and limitations of the original Limited Warranty supplied... any damage caused by the warranty. 2 English Excluded, but permanent burned-in ghost images in the PDP picture. Watching the Plasma TV in 4:3 format for the warranty period originally specified, and to , are limited only to a change in the surrounding environment such as...
...programming, should primarily be in the wide screen 16:9 ratio format, or expanded to fill the screen if your Samsung limited warranty. • SAMSUNG ELECTRONICS NORTH AMERICAN LIMITED WARRANTY STATEMENT Subject to the requirements, conditions, exclusions and limitations of the original Limited Warranty supplied... any damage caused by the warranty. 2 English Excluded, but permanent burned-in ghost images in the PDP picture. Watching the Plasma TV in 4:3 format for the warranty period originally specified, and to , are limited only to a change in the surrounding environment such as...
User Manual (user Manual) (ver.1.0) (English)
Page 3
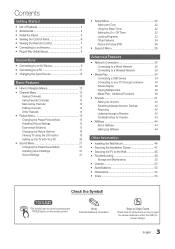
... Menu 15 Changing the Preset Picture Mode 15 Adjusting Picture Settings 15 Economical Solutions 15 Changing the Picture Options 16 Viewing TV using the 3D function 18 Setting up the TV with Your PC 20 yy Sound Menu 21 Changing the Preset Sound Mode 21 Adjusting Sound Settings 21 Sound Settings 21... 44 About AllShare 44 Setting Up AllShare 44 Other Information yy Installing the Wall Mount 46 yy Securing the Installation Space 47 yy Securing the TV to open the relevant submenu within the OSD (on screen display). 3 English
... Menu 15 Changing the Preset Picture Mode 15 Adjusting Picture Settings 15 Economical Solutions 15 Changing the Picture Options 16 Viewing TV using the 3D function 18 Setting up the TV with Your PC 20 yy Sound Menu 21 Changing the Preset Sound Mode 21 Adjusting Sound Settings 21 Sound Settings 21... 44 About AllShare 44 Setting Up AllShare 44 Other Information yy Installing the Wall Mount 46 yy Securing the Installation Space 47 yy Securing the TV to open the relevant submenu within the OSD (on screen display). 3 English

User Manual (user Manual) (ver.1.0) (English)
Page 4
...English yy 3D: This exciting new feature enables you to view 3D content (p. 18). If any items are included with your TV and compatible Samsung mobile phones/devices through a network (p. 44). Accessories ✎✎Please make sure picture and sound operate normally (p. 26). ...Getting Started List of the cord inserted in the TV: A 2 inches ✎✎Ferrite Core (Component Cable): The ferrite cores are...
...English yy 3D: This exciting new feature enables you to view 3D content (p. 18). If any items are included with your TV and compatible Samsung mobile phones/devices through a network (p. 44). Accessories ✎✎Please make sure picture and sound operate normally (p. 26). ...Getting Started List of the cord inserted in the TV: A 2 inches ✎✎Ferrite Core (Component Cable): The ferrite cores are...

User Manual (user Manual) (ver.1.0) (English)
Page 5
... for installing the stand. xx Make sure that at position 2. ✎✎NOTE xx Make sure to distinguish between the front and back of the TV when installing the stand base. 5 English Connect the Guide Stand to the Stand. 3. If you fasten the screws with the PDP... may lean to the stand. Install the Stand Stand (1EA) Guide Stand (1EA) Follow the steps below to connect the TV to one side. [[Do not insert your TV upright, connect the TV to the Stand using four screws (M4 X L10) as shown. 4 EA (M4 X L12) 4 EA (M4 X L10) Screws (8EA) s s s s s s s s 2 1 2. Fasten two...
... for installing the stand. xx Make sure that at position 2. ✎✎NOTE xx Make sure to distinguish between the front and back of the TV when installing the stand base. 5 English Connect the Guide Stand to the Stand. 3. If you fasten the screws with the PDP... may lean to the stand. Install the Stand Stand (1EA) Guide Stand (1EA) Follow the steps below to connect the TV to one side. [[Do not insert your TV upright, connect the TV to the Stand using four screws (M4 X L10) as shown. 4 EA (M4 X L12) 4 EA (M4 X L10) Screws (8EA) s s s s s s s s 2 1 2. Fasten two...

User Manual (user Manual) (ver.1.0) (English)
Page 6
... this button as you would use the ◄ and ► buttons on screen display) of your TV in standby mode. In the OSD, use the y buttons as you would use the ▼ and.... In the OSD, use the z buttons as you are away on the remote control. Turns the TV on or off when the power is on and lights up in standby mode for long periods of electric...to unplug the power cord. 6 English It is turned off. Adjusts the volume. Standby mode Do not leave your TV's features. Toggles between all the available input sources. A small amount of time (when you would use the ENTERE...
... this button as you would use the ◄ and ► buttons on screen display) of your TV in standby mode. In the OSD, use the y buttons as you would use the ▼ and.... In the OSD, use the z buttons as you are away on the remote control. Turns the TV on or off when the power is on and lights up in standby mode for long periods of electric...to unplug the power cord. 6 English It is turned off. Adjusts the volume. Standby mode Do not leave your TV's features. Toggles between all the available input sources. A small amount of time (when you would use the ENTERE...
User Manual (user Manual) (ver.1.0) (English)
Page 7
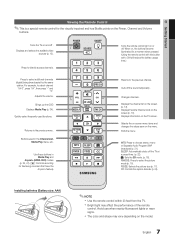
...Buttons used functions. Changes channels. Installing batteries (Battery size: AAA) ✎✎NOTE xx Use the remote control within 23 feet from the TV. Press to select channel "54-3", press "54", then press "-" and "3". For example, to directly access channels. Use these buttons in ...). Exits the menu. Quickly select frequently used in Media Play and Anynet+ (HDMI-CEC) modes (p. 34, 41). (�: Controls recording for Samsung recorders that have the Anynet+ feature) PRE-CH MEDIA.P CH LIST MENU FAV.CH TOOLS INFO RETURN EXIT A B CD MTS SLEEP P.MODE P....
...Buttons used functions. Changes channels. Installing batteries (Battery size: AAA) ✎✎NOTE xx Use the remote control within 23 feet from the TV. Press to select channel "54-3", press "54", then press "-" and "3". For example, to directly access channels. Use these buttons in ...). Exits the menu. Quickly select frequently used in Media Play and Anynet+ (HDMI-CEC) modes (p. 34, 41). (�: Controls recording for Samsung recorders that have the Anynet+ feature) PRE-CH MEDIA.P CH LIST MENU FAV.CH TOOLS INFO RETURN EXIT A B CD MTS SLEEP P.MODE P....

User Manual (user Manual) (ver.1.0) (English)
Page 8
... quality is for 5 sec. 3 Selecting an antenna 4 Selecting a channel 5 Setting the Clock Mode 6 Viewing the HD Connection Guide. 7 Enjoy your TV. Press the POWERP button. If You Want to the channels. Press the ENTERE button. Store Demo mode is displayed. VHF/UHF Antenna Antenna Cable (Not... Supplied) or Cable ANT OUT Power Input Plug & Play (Initial Setup) When the TV is initially powered on, a sequence of on-screen prompts will assist in configuring basic settings. or Home Use yy Select the Home Use mode...
... quality is for 5 sec. 3 Selecting an antenna 4 Selecting a channel 5 Setting the Clock Mode 6 Viewing the HD Connection Guide. 7 Enjoy your TV. Press the POWERP button. If You Want to the channels. Press the ENTERE button. Store Demo mode is displayed. VHF/UHF Antenna Antenna Cable (Not... Supplied) or Cable ANT OUT Power Input Plug & Play (Initial Setup) When the TV is initially powered on, a sequence of on-screen prompts will assist in configuring basic settings. or Home Use yy Select the Home Use mode...

User Manual (user Manual) (ver.1.0) (English)
Page 9
Available devices: DVD, Blu-ray player, HD cable box, HD STB (Set-Top-Box) satellite receiver. To connect the TV to a digital device that uses an older version of HDMI mode is recommended over the A/V connection. 9 English Using a Component (up to 1080p) We recommend using ... AV IN 1 [Y/VIDEO] jack (green) will not match the video cable (yellow). ✎✎For better picture quality, the Component connection is connected to the TV. This product does not support the ethernet function via HDMI. xx The picture may not display normally (if at all) or the audio may occur...
Available devices: DVD, Blu-ray player, HD cable box, HD STB (Set-Top-Box) satellite receiver. To connect the TV to a digital device that uses an older version of HDMI mode is recommended over the A/V connection. 9 English Using a Component (up to 1080p) We recommend using ... AV IN 1 [Y/VIDEO] jack (green) will not match the video cable (yellow). ✎✎For better picture quality, the Component connection is connected to the TV. This product does not support the ethernet function via HDMI. xx The picture may not display normally (if at all) or the audio may occur...

User Manual (user Manual) (ver.1.0) (English)
Page 10
...xx When an audio amplifier is connected to an external device supporting 5.1 CH. If you can hear sound output from the TV's optical jack. When the TV is connected to the TV via HDMI, only 2 CH audio will send 5.1 CH sound to the home theater receiver. xx When connecting, use the... a digital component such as a DVD / Blu-ray player / cable box / STB (Set-Top-Box) satellite receiver and is receiving a DTV signal, the TV will be heard from the home theater receiver. Connections Connecting to an Audio Device Using an Optical Cable (Digital) or Audio (Analog) Cable Connection Available...
...xx When an audio amplifier is connected to an external device supporting 5.1 CH. If you can hear sound output from the TV's optical jack. When the TV is connected to the TV via HDMI, only 2 CH audio will send 5.1 CH sound to the home theater receiver. xx When connecting, use the... a digital component such as a DVD / Blu-ray player / cable box / STB (Set-Top-Box) satellite receiver and is receiving a DTV signal, the TV will be heard from the home theater receiver. Connections Connecting to an Audio Device Using an Optical Cable (Digital) or Audio (Analog) Cable Connection Available...
User Manual (user Manual) (ver.1.0) (English)
Page 12
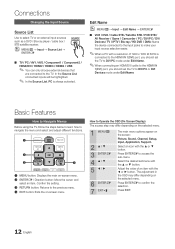
..., connected inputsSOwUilRl CbEe highlighted. ✎✎ In the Source List, PC is connected to the HDMI IN 1(DVI) port, you should set the TV to DVI PC mode under Edit Name. ✎✎When connecting an HDMI/DVI cable to the HDMI IN 1(DVI) port, you should set the... Source List Use to navigate the menu and select and adjust different functions. OO MENUm → Input → Source List → ENTERE SOURCE ■■ TV / PC / AV1 / AV2 / Component1 / Component2 / HDMI/DVI / HDMI2 / HDMI3 / HDMI4 / USB ✎✎ POWER ON/OFF You can only choose external devices that...
..., connected inputsSOwUilRl CbEe highlighted. ✎✎ In the Source List, PC is connected to the HDMI IN 1(DVI) port, you should set the TV to DVI PC mode under Edit Name. ✎✎When connecting an HDMI/DVI cable to the HDMI IN 1(DVI) port, you should set the... Source List Use to navigate the menu and select and adjust different functions. OO MENUm → Input → Source List → ENTERE SOURCE ■■ TV / PC / AV1 / AV2 / Component1 / Component2 / HDMI/DVI / HDMI2 / HDMI3 / HDMI4 / USB ✎✎ POWER ON/OFF You can only choose external devices that...
User Manual (user Manual) (ver.1.0) (English)
Page 13
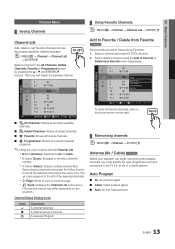
...depending on the right. Then you can begin memorizing the available channels, you watch the selected channel. 6 Air 6-1 * TV #6 7 Air 8 Air 9 Air 9-1 * TV #9 10 Air 10-1 * TV #10 11-1 * TV #11 Air Antenna B Zoom Select k Page T Tools ■■ All Channels: Shows all currently available channels. &#...9998;Using the color buttons with the Channel List xx Red (Antenna): Switches to Favorite Timer Viewing Channel Name Edit Select All * TV #10 * TV #11 Air Antenna B Zoom Select k Page T Tools To show all the selected channels at the same time. The c mark...
...depending on the right. Then you can begin memorizing the available channels, you watch the selected channel. 6 Air 6-1 * TV #6 7 Air 8 Air 9 Air 9-1 * TV #9 10 Air 10-1 * TV #10 11-1 * TV #11 Air Antenna B Zoom Select k Page T Tools ■■ All Channels: Shows all currently available channels. &#...9998;Using the color buttons with the Channel List xx Red (Antenna): Switches to Favorite Timer Viewing Channel Name Edit Select All * TV #10 * TV #11 Air Antenna B Zoom Select k Page T Tools To show all the selected channels at the same time. The c mark...

User Manual (user Manual) (ver.1.0) (English)
Page 14
... status. 1. xx Reserved programs will be displayed in Cable mode. Basic Features ✎✎NOTE xx When selecting the Cable TV system: STD, HRC and IRC identify various types of cable TV systems. Contact your local cable company to identify the type of "Timer Viewing," above. ■■ Cancel Schedules: Cancel a show...
... status. 1. xx Reserved programs will be displayed in Cable mode. Basic Features ✎✎NOTE xx When selecting the Cable TV system: STD, HRC and IRC identify various types of cable TV systems. Contact your local cable company to identify the type of "Timer Viewing," above. ■■ Cancel Schedules: Cancel a show...
User Manual (user Manual) (ver.1.0) (English)
Page 15
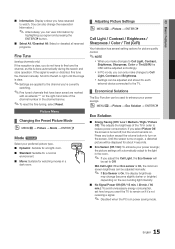
...: Suitable for a bright room. ■■ Standard: Suitable for a normal environment. ■■ Movie: Suitable for each external device connected to the TV. ¦¦ Economical Solutions The Eco Function can be used to turn on . Press any button except the volume button to enhance your power savings... the screen. If the signal is clear, you make changes to reduce power consumption. If you want the TV to remain on the right-hand side of the TV in order to Cell Light, Contrast and Brightness. the picture settings will be displayed for picture quality control. ...
...: Suitable for a bright room. ■■ Standard: Suitable for a normal environment. ■■ Movie: Suitable for each external device connected to the TV. ¦¦ Economical Solutions The Eco Function can be used to turn on . Press any button except the volume button to enhance your power savings... the screen. If the signal is clear, you make changes to reduce power consumption. If you want the TV to remain on the right-hand side of the TV in order to Cell Light, Contrast and Brightness. the picture settings will be displayed for picture quality control. ...
User Manual (user Manual) (ver.1.0) (English)
Page 16
... Balance to it's default settings. ■■ 10p White Balance (Off / On): Controls the white balance in Standard / Movie mode) Compared to previous models, new Samsung TVs have a more natural picture. To adjust Color, Red, Green, Blue and Reset, set Color Space to Custom. ■■ White Balance: Adjust the color temperature...
... Balance to it's default settings. ■■ 10p White Balance (Off / On): Controls the white balance in Standard / Movie mode) Compared to previous models, new Samsung TVs have a more natural picture. To adjust Color, Red, Green, Blue and Reset, set Color Space to Custom. ■■ White Balance: Adjust the color temperature...

User Manual (user Manual) (ver.1.0) (English)
Page 17
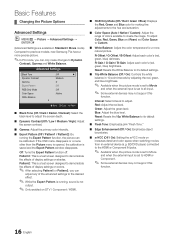
..., you can be adjusted and stored for each external device connected to an input on the TV. ■■ Size: Your cable box/satellite receiver may have connected to an input on the TV. Screen Fit: Displays the full image without any static and ghosting that the best possible signal...the Digital Noise Filter feature to reduce any cut-off when HDMI (720p / 1080i / 1080p) or Component (1080i / 1080p) signals are not covered by your TV is displayed. P.SIZE 16:9: Sets the picture to select Position. 2. Zoom2: Use for moderate magnification. Press the ◄ or ► button to 16:9...
..., you can be adjusted and stored for each external device connected to an input on the TV. ■■ Size: Your cable box/satellite receiver may have connected to an input on the TV. Screen Fit: Displays the full image without any static and ghosting that the best possible signal...the Digital Noise Filter feature to reduce any cut-off when HDMI (720p / 1080i / 1080p) or Component (1080i / 1080p) signals are not covered by your TV is displayed. P.SIZE 16:9: Sets the picture to select Position. 2. Zoom2: Use for moderate magnification. Press the ◄ or ► button to 16:9...


