
User Manual
Page 1
... Customer Care Center CANADA 1-800-SAMSUNG (726-7864) Web Site www.samsung.com U.S.A 1-800-SAMSUNG (726-7864) www.samsung.com Address Samsung Electronics Canada Inc., Customer Service 55 Standish Court Mississauga, Ontario L5R 4B2 Canada Samsung Electronics America, Inc. 105 Challenger Road Ridgefield Park, NJ 07660-0511 Plasma TV user manual © 2010 Samsung Electronics Co., Ltd. Contact...
... Customer Care Center CANADA 1-800-SAMSUNG (726-7864) Web Site www.samsung.com U.S.A 1-800-SAMSUNG (726-7864) www.samsung.com Address Samsung Electronics Canada Inc., Customer Service 55 Standish Court Mississauga, Ontario L5R 4B2 Canada Samsung Electronics America, Inc. 105 Challenger Road Ridgefield Park, NJ 07660-0511 Plasma TV user manual © 2010 Samsung Electronics Co., Ltd. Contact...

User Manual
Page 2
...it can cause uneven aging of PDP Displays that leave subtle, but not limited to fill the screen if your Samsung limited warranty. • SAMSUNG ELECTRONICS NORTH AMERICAN LIMITED WARRANTY STATEMENT Subject to the requirements, conditions, exclusions and limitations of the original Limited Warranty ...726-7864) - In Canada : 1-800-SAMSUNG User Instructions • Screen Image retention Do not display a still image (such as a full screen picture. This is not covered by the warranty. 2 English This is making a 'cracking' noise. Watching the Plasma TV in 4:3 format for a long period of...
...it can cause uneven aging of PDP Displays that leave subtle, but not limited to fill the screen if your Samsung limited warranty. • SAMSUNG ELECTRONICS NORTH AMERICAN LIMITED WARRANTY STATEMENT Subject to the requirements, conditions, exclusions and limitations of the original Limited Warranty ...726-7864) - In Canada : 1-800-SAMSUNG User Instructions • Screen Image retention Do not display a still image (such as a full screen picture. This is not covered by the warranty. 2 English This is making a 'cracking' noise. Watching the Plasma TV in 4:3 format for a long period of...
User Manual
Page 3
... by Step Guide Check here for Anynet+ 28 Other Information yy Installing the Wall Mount 29 yy Securing the Installation Space 30 yy Securing the TV to open the relevant submenu within the OSD (on the remote control. Step by pressing the TOOLS button on screen display). 3 English Note Indicates additional...
... by Step Guide Check here for Anynet+ 28 Other Information yy Installing the Wall Mount 29 yy Securing the Installation Space 30 yy Securing the TV to open the relevant submenu within the OSD (on the remote control. Step by pressing the TOOLS button on screen display). 3 English Note Indicates additional...

User Manual
Page 4
... (Set-Top-Box) satellite receiver. When connecting a cable, open the ferrite core and clip it around the cable near the plug as shown in the TV: A 2 inches Input Cables (Sold Separately) Power Cord HDMI HDMI-DVI Component Composite (AV) Coaxial (RF) 4 English yy Remote Control (BN59-00997A)... Cord (1EA) (BN63-06456A) (3301-002049) ✎✎Ferrite Core for Power Cord: The ferrite cores are missing, contact your PDP TV. xx A Maximum distance between the ferrite core and the end of Features yy Excellent Digital Interface & Networking: With a built-in HD digital...
... (Set-Top-Box) satellite receiver. When connecting a cable, open the ferrite core and clip it around the cable near the plug as shown in the TV: A 2 inches Input Cables (Sold Separately) Power Cord HDMI HDMI-DVI Component Composite (AV) Coaxial (RF) 4 English yy Remote Control (BN59-00997A)... Cord (1EA) (BN63-06456A) (3301-002049) ✎✎Ferrite Core for Power Cord: The ferrite cores are missing, contact your PDP TV. xx A Maximum distance between the ferrite core and the end of Features yy Excellent Digital Interface & Networking: With a built-in HD digital...

User Manual
Page 5
... the Guide Stand to the stand. Install the Stand (M4 X L16) Stand (1EA) Guide Stand (1EA) Screws (10EA) Follow the steps below to connect the TV to the Stand using six screws (M4 X L16). 2. With your fingers into the stand base slot of the Stand and Guide Stand when assembling them... (M4 X L16) 1. Fasten two screws (M4 X L16) at position 1, and then fasten two screws (M4 X L16) at least two persons lift and move the PDP TV. xx Stand the product up and fasten the screws. 01 Getting Started See separate guide for installing the stand. If you fasten the screws with...
... the Guide Stand to the stand. Install the Stand (M4 X L16) Stand (1EA) Guide Stand (1EA) Screws (10EA) Follow the steps below to connect the TV to the Stand using six screws (M4 X L16). 2. With your fingers into the stand base slot of the Stand and Guide Stand when assembling them... (M4 X L16) 1. Fasten two screws (M4 X L16) at position 1, and then fasten two screws (M4 X L16) at least two persons lift and move the PDP TV. xx Stand the product up and fasten the screws. 01 Getting Started See separate guide for installing the stand. If you fasten the screws with...

User Manual
Page 6
... OSD, use the y buttons as you would use the ▼ and ▲ buttons on the remote control. Standby mode Do not leave your TV's features. Aim the remote control towards this button as you are away on a holiday, for long periods of time (when you would use the ... the OSD (on the model. Blinks and turns off when the power is best to unplug the power cord. 6 English A small amount of your TV in standby mode. Power Indicator Speakers Remote control sensor SOURCEE MENU y z Power Indicator P (Power) Remote control sensor Toggles between all the available input sources...
... OSD, use the y buttons as you would use the ▼ and ▲ buttons on the remote control. Standby mode Do not leave your TV's features. Aim the remote control towards this button as you are away on a holiday, for long periods of time (when you would use the ... the OSD (on the model. Blinks and turns off when the power is best to unplug the power cord. 6 English A small amount of your TV in standby mode. Power Indicator Speakers Remote control sensor SOURCEE MENU y z Power Indicator P (Power) Remote control sensor Toggles between all the available input sources...

User Manual
Page 7
... Program (SAP broadcast) (p.17). Displays information on the menu. Selects the on-screen menu items and changes the values seen on the TV screen. SLEEP: Automatically shuts off the sound temporarily. MTS: Press to the previous menu. CC: Controls the caption decoder (p. 20). ...Bright light may vary depending on the screen (p. 13). 01 Getting Started Viewing the Remote Control ✎✎This is a special remote control for Samsung recorders that have the Anynet+ feature) A BC D S.MODE SLEEP P.MODE P.SIZE Returns to the previous channel. For example, to select the...
... Program (SAP broadcast) (p.17). Displays information on the menu. Selects the on-screen menu items and changes the values seen on the TV screen. SLEEP: Automatically shuts off the sound temporarily. MTS: Press to the previous menu. CC: Controls the caption decoder (p. 20). ...Bright light may vary depending on the screen (p. 13). 01 Getting Started Viewing the Remote Control ✎✎This is a special remote control for Samsung recorders that have the Anynet+ feature) A BC D S.MODE SLEEP P.MODE P.SIZE Returns to the previous channel. For example, to select the...

User Manual
Page 8
... to Channel → Auto Program (p. 13). ✎✎Press the ENTERE button at any time to Home Use (standard): Press the volume button on the TV. Press the POWERP button. Select Air, Cable or Auto. 4 Selecting a channel 5 Setting the Clock Mode 6 View the HD Connection Guide. Select the channel ... the ENTERE button. The connection method for the best HD screen quality is for 5 sec. If You Want to an Antenna When the TV is set to TV. ✎✎To return to manually set the current date and time (p. 18). Getting Started Connecting to Reset This Feature... When you...
... to Channel → Auto Program (p. 13). ✎✎Press the ENTERE button at any time to Home Use (standard): Press the volume button on the TV. Press the POWERP button. Select Air, Cable or Auto. 4 Selecting a channel 5 Setting the Clock Mode 6 View the HD Connection Guide. Select the channel ... the ENTERE button. The connection method for the best HD screen quality is for 5 sec. If You Want to an Antenna When the TV is set to TV. ✎✎To return to manually set the current date and time (p. 18). Getting Started Connecting to Reset This Feature... When you...
User Manual
Page 9
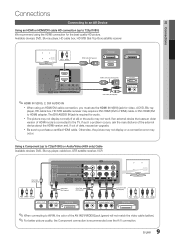
... work if an external device that uses an older version of HDMI mode is connected to purchase a certified HDMI cable. xx Be sure to the TV. Using a Component (up to 720p/1080i) We recommend using an HDMI/DVI cable connection, you must use the HDMI IN 1(DVI) jack for audio. 02...
... work if an external device that uses an older version of HDMI mode is connected to purchase a certified HDMI cable. xx Be sure to the TV. Using a Component (up to 720p/1080i) We recommend using an HDMI/DVI cable connection, you must use the HDMI IN 1(DVI) jack for audio. 02...

User Manual
Page 10
...AUDIO IN DVD home theater R-AUDIO-L R W Red White ✎✎DIGITAL AUDIO OUT (OPTICAL) xx When a Digital Audio System is receiving a DTV signal, the TV will be heard from the amplifier or DVD home theater. xx When connecting, use the appropriate connector. xx When the receiver (home theater) is connected... to an external device supporting 5.1 CH. xx 5.1 CH (channel) audio is available when the TV is set to on, you want to hear 5.1 CH audio, connect the digital audio out jack from your DVD / Blu-ray player / cable box ...
...AUDIO IN DVD home theater R-AUDIO-L R W Red White ✎✎DIGITAL AUDIO OUT (OPTICAL) xx When a Digital Audio System is receiving a DTV signal, the TV will be heard from the amplifier or DVD home theater. xx When connecting, use the appropriate connector. xx When the receiver (home theater) is connected... to an external device supporting 5.1 CH. xx 5.1 CH (channel) audio is available when the TV is set to on, you want to hear 5.1 CH audio, connect the digital audio out jack from your DVD / Blu-ray player / cable box ...
User Manual
Page 11
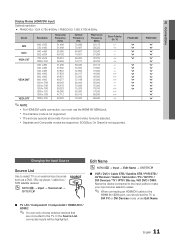
... a DVD / Blu-ray player / cable box / STB satellite receiver. SOG(Sync On Green) is selected. PN50C430 > > > > > > > Changing the Input Source Source List Use to the TV. OO MENUm → Input → Source List → ENTERE SOURCE ■■ TV / AV / Component1 / Component2 / HDMI1/DVI / HDMI2 ✎✎ You can only choose external devices...
... a DVD / Blu-ray player / cable box / STB satellite receiver. SOG(Sync On Green) is selected. PN50C430 > > > > > > > Changing the Input Source Source List Use to the TV. OO MENUm → Input → Source List → ENTERE SOURCE ■■ TV / AV / Component1 / Component2 / HDMI1/DVI / HDMI2 ✎✎ You can only choose external devices...

User Manual
Page 12
... with the Channel List xx B Green (Zoom): Enlarges or shrinks a channel number. Press EXIT. CH LIST Added Channels 2 Air 4 Air 4-1 * TV #8 8 Air 13 Air 13-1 * TV #3 Alice's Adventures 9 Air 5 Air 11 Air Air B Zoom Select T Tools ■■ All Channels: Shows all currently available channels. ■&#... Select a channel in the OSD may differ depending on the situation.) 12 English Basic Features How to Navigate Menus Before using the TV, follow the steps below to learn how to the left of an item with the ▲ or ▼ button. The adjustment...
... with the Channel List xx B Green (Zoom): Enlarges or shrinks a channel number. Press EXIT. CH LIST Added Channels 2 Air 4 Air 4-1 * TV #8 8 Air 13 Air 13-1 * TV #3 Alice's Adventures 9 Air 5 Air 11 Air Air B Zoom Select T Tools ■■ All Channels: Shows all currently available channels. ■&#... Select a channel in the OSD may differ depending on the situation.) 12 English Basic Features How to Navigate Menus Before using the TV, follow the steps below to learn how to the left of an item with the ▲ or ▼ button. The adjustment...

User Manual
Page 13
...Channel → Channel List → ENTERE 2 Air 4 4-1 8 13 13-1 9 5 11 Air Delete Add to Favorite * TV #8 Air Air Timer Viewing Channel Name Edit Select All Auto Program * TV #3 Alice's Adventures Air Air Air Air B Zoom Select T Tools To show all the available channels are stored, it starts to... antenna signal. ■■ Auto: Air and Cable antenna. ✎✎NOTE xx When selecting the Cable TV system: STD, HRC and IRC identify various types of cable TV systems. Contact your local cable company to identify the type of signal source that exists in Cable mode. A ...
...Channel → Channel List → ENTERE 2 Air 4 4-1 8 13 13-1 9 5 11 Air Delete Add to Favorite * TV #8 Air Air Timer Viewing Channel Name Edit Select All Auto Program * TV #3 Alice's Adventures Air Air Air Air B Zoom Select T Tools To show all the available channels are stored, it starts to... antenna signal. ■■ Auto: Air and Cable antenna. ✎✎NOTE xx When selecting the Cable TV system: STD, HRC and IRC identify various types of cable TV systems. Contact your local cable company to identify the type of signal source that exists in Cable mode. A ...
User Manual
Page 15
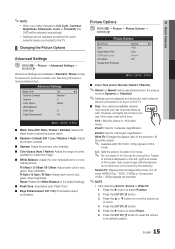
...R-Gain / G-Gain / B-Gain: Adjust each color's (red, green, blue) darkness. Traces of borders displayed on the TV. ■■ Size: Your cable box/satellite receiver may cause image retention(screen burn) which are not covered by the ...to create the image. ■■ White Balance: Adjust the color temperature for each external device connected to the TV. ¦¦ Changing the Picture Options Advanced Settings OO MENUm → Picture → Advanced Settings →... the ► button to previous models, new Samsung TVs have its default position. 15 English
...R-Gain / G-Gain / B-Gain: Adjust each color's (red, green, blue) darkness. Traces of borders displayed on the TV. ■■ Size: Your cable box/satellite receiver may cause image retention(screen burn) which are not covered by the ...to create the image. ■■ White Balance: Adjust the color temperature for each external device connected to the TV. ¦¦ Changing the Picture Options Advanced Settings OO MENUm → Picture → Advanced Settings →... the ► button to previous models, new Samsung TVs have its default position. 15 English

User Manual
Page 16
...sides. Press the ◄ or ► button to select Position. 2. Side Gray (Dark / Light): When you have connected to an input on the TV. Press the ENTERE button. 5. Input Source ATV, AV, Component (480i, 480p) DTV(1080i), Component (1080i, 1080p), HDMI (720p, 1080i, 1080p) Picture...Low / Medium / High / Auto): If the broadcast signal received by moving all sources and adjusts the picture for optimum quality. ✎✎ Available in TV, AV, COMPONENT (480i / 1080i) and HDMI (480i / 1080i). ■■ Screen Burn Protection: To reduce the possibility of screen burn, this ...
...sides. Press the ◄ or ► button to select Position. 2. Side Gray (Dark / Light): When you have connected to an input on the TV. Press the ENTERE button. 5. Input Source ATV, AV, Component (480i, 480p) DTV(1080i), Component (1080i, 1080p), HDMI (720p, 1080i, 1080p) Picture...Low / Medium / High / Auto): If the broadcast signal received by moving all sources and adjusts the picture for optimum quality. ✎✎ Available in TV, AV, COMPONENT (480i / 1080i) and HDMI (480i / 1080i). ■■ Screen Burn Protection: To reduce the possibility of screen burn, this ...
User Manual
Page 17
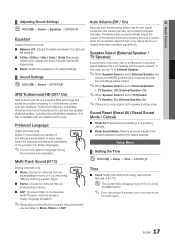
...channel by lowering the sound output when the modulation signal is high or by raising the sound output when the modulation signal is low. xx TV Speaker: Off, External Speaker: On ✎✎When Speaker Select is set the clock again. 17 English 03 Basic Features ¦¦... to set to a difference in the currently selected mode to the factory defaults. ■■ Reset Sound Mode: Returns all multichannel formats. xx TV Speaker: On, External Speaker: On ✎✎If there is fully compatible with all sound values in decoding speed between channels. TruSurround delivers a ...
...channel by lowering the sound output when the modulation signal is high or by raising the sound output when the modulation signal is low. xx TV Speaker: Off, External Speaker: On ✎✎When Speaker Select is set the clock again. 17 English 03 Basic Features ¦¦... to set to a difference in the currently selected mode to the factory defaults. ■■ Reset Sound Mode: Returns all multichannel formats. xx TV Speaker: On, External Speaker: On ✎✎If there is fully compatible with all sound values in decoding speed between channels. TruSurround delivers a ...

User Manual
Page 18
... day you want to activate the timer. ✎✎ The c mark indicates the day is selected. ✎✎Auto Power Off (available only when the TV is set at a preset time. ■■ Timer 1 / Timer 2 / Timer 3: Three different on / off timer settings can set to Auto. ¦¦ Using the... this case, set the clock first. On Time ▲ 00 ▼ Off Time 00 Volume 10 Repeat Once Timer 1 00 am Inactivate 00 Contents TV am /pm manually. ✎✎ Available only when Clock Mode is too long, the folder cannot be correct. When using the time from a digital channel...
... day you want to activate the timer. ✎✎ The c mark indicates the day is selected. ✎✎Auto Power Off (available only when the TV is set at a preset time. ■■ Timer 1 / Timer 2 / Timer 3: Three different on / off timer settings can set to Auto. ¦¦ Using the... this case, set the clock first. On Time ▲ 00 ▼ Off Time 00 Volume 10 Repeat Once Timer 1 00 am Inactivate 00 Contents TV am /pm manually. ✎✎ Available only when Clock Mode is too long, the folder cannot be correct. When using the time from a digital channel...

User Manual
Page 19
...sub-ratings in English only. As soon as the 4 digits are watching. −− TV-Y: Young children / TV-Y7: Children 7 and over / TV-G: General audience / TV-PG: Parental guidance / TV-14: Viewers 14 and over / TV-MA: Mature audience −− ALL: Lock all audiences. / PG: Parental Guidance. /... change depending on the broadcasting station. ■■ Change PIN: The Change PIN screen will automatically be blocked (TV-G, TV-PG, TV-14 and TV-MA). Rating menu will automatically block certain categories that deals with more sensitive material. Re-enter the same 4 digits...
...sub-ratings in English only. As soon as the 4 digits are watching. −− TV-Y: Young children / TV-Y7: Children 7 and over / TV-G: General audience / TV-PG: Parental guidance / TV-14: Viewers 14 and over / TV-MA: Mature audience −− ALL: Lock all audiences. / PG: Parental Guidance. /... change depending on the broadcasting station. ■■ Change PIN: The Change PIN screen will automatically be blocked (TV-G, TV-PG, TV-14 and TV-MA). Rating menu will automatically block certain categories that deals with more sensitive material. Re-enter the same 4 digits...

User Manual
Page 20
..., Foreground Opacity and Background Opacity to a restricted channel, the V-Chip will block it. xx The Foreground and Background cannot be available in either analog TV channel mode or when a signal is tuned to its default. ✎✎ NOTE xx Digital Caption Options are not available, they will appear: This... mode is set to Standard and Sound mode is set Game Mode to a game console such as PlayStation™ or Xbox™, you display the TV menu in Component, HDMI modes. 20 English Game Mode (Off / On) When connecting to Off in the setup menu. −− If you...
..., Foreground Opacity and Background Opacity to a restricted channel, the V-Chip will block it. xx The Foreground and Background cannot be available in either analog TV channel mode or when a signal is tuned to its default. ✎✎ NOTE xx Digital Caption Options are not available, they will appear: This... mode is set to Standard and Sound mode is set Game Mode to a game console such as PlayStation™ or Xbox™, you display the TV menu in Component, HDMI modes. 20 English Game Mode (Off / On) When connecting to Off in the setup menu. −− If you...

User Manual
Page 21
... software. Yes: If you can easily reset them after the upgrade. Contact Samsung's Call Center for assistance (1-800-SAMSUNG). There may be a problem with the TV. Please check your external equipment. USB Drive TV Side Panel ✎✎When software is upgraded, video and audio settings you... Eco Sensor detects surrounding light intensity using a USB drive. com or contact the Samsung call centers and how to minimum with the TV. HD Connection Guide Refer to this is output from the TV because the volume has been reduced to download products and software. 21 English 03...
... software. Yes: If you can easily reset them after the upgrade. Contact Samsung's Call Center for assistance (1-800-SAMSUNG). There may be a problem with the TV. Please check your external equipment. USB Drive TV Side Panel ✎✎When software is upgraded, video and audio settings you... Eco Sensor detects surrounding light intensity using a USB drive. com or contact the Samsung call centers and how to minimum with the TV. HD Connection Guide Refer to this is output from the TV because the volume has been reduced to download products and software. 21 English 03...


