

Open Source Guide (ENGLISH)
Page 2
IN NO EVENT UNLESS REQUIRED BY APPLICABLE LAW OR AGREED TO IN WRITING WILL ANY COPYRIGHT HOLDER, OR ANY OTHER PARTY WHO MAY MODIFY AND/OR REDISTRIBUTE THE LIBRARY AS PERMITTED ABOVE, BE LIABLE TO YOU FOR DAMAGES, INCLUDING ANY GENERAL, SPECIAL, INCIDENTAL OR CONSEQUENTIAL DAMAGES ARISING OUT OF THE USE OR INABILITY TO USE THE LIBRARY (INCLUDING BUT NOT LIMITED TO LOSS OF DATA OR DATA BEING RENDERED INACCURATE OR LOSSES SUSTAINED BY YOU OR THIRD PARTIES OR A FAILURE OF THE LIBRARY TO OPERATE WITH ANY OTHER SOFTWARE), EVEN IF SUCH HOLDER OR OTHER PARTY HAS BEEN ADVISED OF THE POSSIBILITY OF SUCH...
IN NO EVENT UNLESS REQUIRED BY APPLICABLE LAW OR AGREED TO IN WRITING WILL ANY COPYRIGHT HOLDER, OR ANY OTHER PARTY WHO MAY MODIFY AND/OR REDISTRIBUTE THE LIBRARY AS PERMITTED ABOVE, BE LIABLE TO YOU FOR DAMAGES, INCLUDING ANY GENERAL, SPECIAL, INCIDENTAL OR CONSEQUENTIAL DAMAGES ARISING OUT OF THE USE OR INABILITY TO USE THE LIBRARY (INCLUDING BUT NOT LIMITED TO LOSS OF DATA OR DATA BEING RENDERED INACCURATE OR LOSSES SUSTAINED BY YOU OR THIRD PARTIES OR A FAILURE OF THE LIBRARY TO OPERATE WITH ANY OTHER SOFTWARE), EVEN IF SUCH HOLDER OR OTHER PARTY HAS BEEN ADVISED OF THE POSSIBILITY OF SUCH...
User Manual (ENGLISH)
Page 4
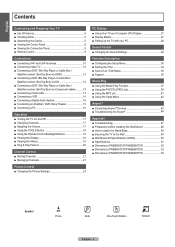
...21 Picture Control ■ Changing the Picture Settings 23 PC Display ■ Using Your TV as a Computer (PC) Display 27 ■ Display Modes 27 ■ Setting up the TV with your PC 28 Sound Control ■ Changing the Sound Settings 29 Function Description ■ Configuring the Setup ... before installing the Wall-Mount 48 ■ How to attach the Stand-Base 48 ■ Securing the TV to the Wall 49 ■ Wall Mount Kit Specifications (VESA 50 ■ Specifications 51 ■ Dimensions (PN50B550T2F/PN50B560T5F 52 ■ Dimensions (PN58B550T2F/PN58B560T5F 53 ■ ...
...21 Picture Control ■ Changing the Picture Settings 23 PC Display ■ Using Your TV as a Computer (PC) Display 27 ■ Display Modes 27 ■ Setting up the TV with your PC 28 Sound Control ■ Changing the Sound Settings 29 Function Description ■ Configuring the Setup ... before installing the Wall-Mount 48 ■ How to attach the Stand-Base 48 ■ Securing the TV to the Wall 49 ■ Wall Mount Kit Specifications (VESA 50 ■ Specifications 51 ■ Dimensions (PN50B550T2F/PN50B560T5F 52 ■ Dimensions (PN58B550T2F/PN58B560T5F 53 ■ ...

User Manual (ENGLISH)
Page 5
... depending on USB Mass Storage Class (MSC) devices. • HDMI/DVI connection of Features • Adjustable picture settings that the cables are included with no Cable Box/Satellite receiver (Set-Top Box) needed. • You can be viewed with your dealer. Power Cord Audio Cable / Video Cable... (PN58B550T2F/ PN58B560T5F only) Assembling the Cables Enclose the cables in the Holder-Wire Cable so that can be stored in the TV's memory. • Automatic...
... depending on USB Mass Storage Class (MSC) devices. • HDMI/DVI connection of Features • Adjustable picture settings that the cables are included with no Cable Box/Satellite receiver (Set-Top Box) needed. • You can be viewed with your dealer. Power Cord Audio Cable / Video Cable... (PN58B550T2F/ PN58B560T5F only) Assembling the Cables Enclose the cables in the Holder-Wire Cable so that can be stored in the TV's memory. • Automatic...

User Manual (ENGLISH)
Page 9
... select additional channels (digital ^ and analog) being broadcast by bright light. 1 POWER Turns the TV on the TV screen. @ COLOR BUTTONS Use these buttons in the figure. N Remove the batteries and store them... of about one year.) N Using the remote control with the light button set to On will 5 MMUTE reduce the battery usage time.) Press to temporarily cut off . $...is the power cord unplugged? 5. N The performance of the remote control may vary depending on Samsung recorders with the diagram inside the compartment. 3. f MTS Press to On will reduce the battery...
... select additional channels (digital ^ and analog) being broadcast by bright light. 1 POWER Turns the TV on the TV screen. @ COLOR BUTTONS Use these buttons in the figure. N Remove the batteries and store them... of about one year.) N Using the remote control with the light button set to On will 5 MMUTE reduce the battery usage time.) Press to temporarily cut off . $...is the power cord unplugged? 5. N The performance of the remote control may vary depending on Samsung recorders with the diagram inside the compartment. 3. f MTS Press to On will reduce the battery...

User Manual (ENGLISH)
Page 10
...; Connecting to the combiner. 2. N Because this cable to a cable TV system, follow the directions below. 1. Connect the other end of the TV. Connections Connecting VHF and UHF Antennas If your antenna has a set of the TV. ❑ Separate VHF and UHF Antennas If you have two antennas, ...that Descrambles All Channels 1. If your antenna has one UHF), you must combine the two antenna signals before connecting the antennas to the TV. This procedure requires an optional combiner-adaptor (available at most electronics shops). 1. ANT IN ANT OUT ANT IN English - 10 Continued...
...; Connecting to the combiner. 2. N Because this cable to a cable TV system, follow the directions below. 1. Connect the other end of the TV. Connections Connecting VHF and UHF Antennas If your antenna has a set of the TV. ❑ Separate VHF and UHF Antennas If you have two antennas, ...that Descrambles All Channels 1. If your antenna has one UHF), you must combine the two antenna signals before connecting the antennas to the TV. This procedure requires an optional combiner-adaptor (available at most electronics shops). 1. ANT IN ANT OUT ANT IN English - 10 Continued...

User Manual (ENGLISH)
Page 11
... cable between the ANT OUT terminal on the cable box and the B-IN terminal on your cable box. Set the A/B switch to the "B" position to view scrambled channels. (When you set the A/B switch to the "A" position for normal viewing. Incoming cable Splitter 3. Connect an Antenna cable between.... ❑ Connecting to a two-way splitter. You will need a two-way splitter, an RF (A/B) switch, and four lengths of the TV. Connect this connection, set the A/B switch to "B", you have made this cable to a Cable Box that is connected to the cable box's output channel, which is ...
... cable between the ANT OUT terminal on the cable box and the B-IN terminal on your cable box. Set the A/B switch to the "B" position to view scrambled channels. (When you set the A/B switch to the "A" position for normal viewing. Incoming cable Splitter 3. Connect an Antenna cable between.... ❑ Connecting to a two-way splitter. You will need a two-way splitter, an RF (A/B) switch, and four lengths of the TV. Connect this connection, set the A/B switch to "B", you have made this cable to a Cable Box that is connected to the cable box's output channel, which is ...

User Manual (ENGLISH)
Page 12
...HDMI IN 2(DVI) jack. DVD/Blu-Ray Player or Cable Box / Satellite receiver TV Rear Panel 2 Audio Cable (Not supplied) 1 HDMI/DVI Cable (Not supplied) N Each DVD / Blu-Ray Player or Cable Box / Satellite receiver (Set-Top Box) has a different back panel configuration. Connecting a DVD / Blu-Ray ... happens, contact the company that the HDMI device is no screen display. N When connecting a DVD Player or Cable Box / Satellite receiver (Set-Top Box), match the color of the TV. N When using a single cable. • The difference between the HDMI IN (1, 2(DVI), 3, or 4) jack on the...
...HDMI IN 2(DVI) jack. DVD/Blu-Ray Player or Cable Box / Satellite receiver TV Rear Panel 2 Audio Cable (Not supplied) 1 HDMI/DVI Cable (Not supplied) N Each DVD / Blu-Ray Player or Cable Box / Satellite receiver (Set-Top Box) has a different back panel configuration. Connecting a DVD / Blu-Ray ... happens, contact the company that the HDMI device is no screen display. N When connecting a DVD Player or Cable Box / Satellite receiver (Set-Top Box), match the color of the TV. N When using a single cable. • The difference between the HDMI IN (1, 2(DVI), 3, or 4) jack on the...

User Manual (ENGLISH)
Page 13
...cable to the cable. Connect a Video Cable between the AV IN 2 [L-AUDIO-R] jacks on the TV and the AUDIO OUT jacks on the DVD / Blu-Ray Player or Cable Box / Satellite receiver (Set-Top Box). N Each Camcorder has a different back panel configuration. N Each DVD / Blu-Ray ...65533;n��th�e� COMPONENT IN (1 or 2) [Y, PB, PR] jacks on the TV and the COMPONENT [Y, PB, PR] jacks on the DVD / Blu-Ray Player or Cable Box / Satellite receiver(Set-Top Box). 2. TV Side Panel Camcorder 1 Video Cable (Not supplied) 2 Audio Cable (Not supplied) N When connecting...
...cable to the cable. Connect a Video Cable between the AV IN 2 [L-AUDIO-R] jacks on the TV and the AUDIO OUT jacks on the DVD / Blu-Ray Player or Cable Box / Satellite receiver (Set-Top Box). N Each Camcorder has a different back panel configuration. N Each DVD / Blu-Ray ...65533;n��th�e� COMPONENT IN (1 or 2) [Y, PB, PR] jacks on the TV and the COMPONENT [Y, PB, PR] jacks on the DVD / Blu-Ray Player or Cable Box / Satellite receiver(Set-Top Box). 2. TV Side Panel Camcorder 1 Video Cable (Not supplied) 2 Audio Cable (Not supplied) N When connecting...

User Manual (ENGLISH)
Page 15
...hear 5.1 channel audio, connect the DIGITAL AUDIO OUT (OPTICAL) jack on the Digital Audio System. TV Rear Panel Digital Audio System Optical Cable (Not supplied) N 5.1CH audio is possible when the TV is set to On, you want to the Home theater receiver. Connecting an Amplifier / DVD Home Theater ...1. N When the receiver (home theater) is connected to your TV. 1. Connecting a Digital Audio System The rear panel jacks on the...
...hear 5.1 channel audio, connect the DIGITAL AUDIO OUT (OPTICAL) jack on the Digital Audio System. TV Rear Panel Digital Audio System Optical Cable (Not supplied) N 5.1CH audio is possible when the TV is set to On, you want to the Home theater receiver. Connecting an Amplifier / DVD Home Theater ...1. N When the receiver (home theater) is connected to your TV. 1. Connecting a Digital Audio System The rear panel jacks on the...

User Manual (ENGLISH)
Page 18
... button backlight on for a moment. N The button backlight will display the channel, the type of sound, and the status of certain picture and sound settings. TV #1 Fri, Dec 19 2:05 am O Press the INFO button once more detailed description of each function, refer to select a menu, then press the... ENTERE button. 3. Press the TOOLS button. If you are viewing. 1. The TV will not be turned on which external input mode you are unable to see page 28 Anynet+ (HDMI-CEC) Sound Mode : Custom Sleep Timer : ...
... button backlight on for a moment. N The button backlight will display the channel, the type of sound, and the status of certain picture and sound settings. TV #1 Fri, Dec 19 2:05 am O Press the INFO button once more detailed description of each function, refer to select a menu, then press the... ENTERE button. 3. Press the TOOLS button. If you are viewing. 1. The TV will not be turned on which external input mode you are unable to see page 28 Anynet+ (HDMI-CEC) Sound Mode : Custom Sleep Timer : ...

User Manual (ENGLISH)
Page 19
... RETURN button to return to items in the menu. Picture Mode Cell Light Contrast Brightness Sharpness Color Tint (G/R) : Standard : 4 : 95 : 45 : 50 : 50 : G50/R50 2. Press the ◄ or ► button until the Brightness changes to exit from the menu. N Press the EXIT button to 80.... button to enter items in the menu. 4. Press the ENTERE button. Press the ENTERE button to select Picture. 3. Confirm the setting. ❑ Example: Setting the TV's Brightness in the Picture Menu Adjusting the Brightness to select one of the icons. Press the ▲ or ▼...
... RETURN button to return to items in the menu. Picture Mode Cell Light Contrast Brightness Sharpness Color Tint (G/R) : Standard : 4 : 95 : 45 : 50 : 50 : G50/R50 2. Press the ◄ or ► button until the Brightness changes to exit from the menu. N Press the EXIT button to 80.... button to enter items in the menu. 4. Press the ENTERE button. Press the ENTERE button to select Picture. 3. Confirm the setting. ❑ Example: Setting the TV's Brightness in the Picture Menu Adjusting the Brightness to select one of the icons. Press the ▲ or ▼...

User Manual (ENGLISH)
Page 20
...Cable Start Auto Start U Move Plug & Play Auto Program in your particular area. Stop Plug & Play Enter Skip Enjoy your TV. The TV will be set. 2. Press the ENTERE button when channel memorization is automatically displayed. Press the ENTERE button. is displayed. The brief instruction on ...available in the Support menu. 10. Plug & Play Menu Language, Store Demo, Channels, and Time will be set to reset this TV in Progress. Press the ENTERE button, then Sets the menu language. Press the ENTERE button. Start Enter Plug & Play 3. Press the ◄ or &#...
...Cable Start Auto Start U Move Plug & Play Auto Program in your particular area. Stop Plug & Play Enter Skip Enjoy your TV. The TV will be set. 2. Press the ENTERE button when channel memorization is automatically displayed. Press the ENTERE button. is displayed. The brief instruction on ...available in the Support menu. 10. Plug & Play Menu Language, Store Demo, Channels, and Time will be set to reset this TV in Progress. Press the ENTERE button, then Sets the menu language. Press the ENTERE button. Start Enter Plug & Play 3. Press the ◄ or &#...

User Manual (ENGLISH)
Page 21
... do not store the fine-tuned channel in memory, adjustments are stored, it starts to remove scrambled channels. N To reset the fine tuning setting, press the ▼ button to select Yes, then press the ENTERE button. You can also switch the antenna by pressing the yellow button..... • Cable: Cable antenna signal. • Auto: Air and Cable antenna signals N STD, HRC and IRC identify various types of cable TV systems. Contact your particular area. Channel Control Storing Channels ❑ Antenna → Air / Cable Before your television can begin memorizing the available channels...
... do not store the fine-tuned channel in memory, adjustments are stored, it starts to remove scrambled channels. N To reset the fine tuning setting, press the ▼ button to select Yes, then press the ENTERE button. You can also switch the antenna by pressing the yellow button..... • Cable: Cable antenna signal. • Auto: Air and Cable antenna signals N STD, HRC and IRC identify various types of cable TV systems. Contact your particular area. Channel Control Storing Channels ❑ Antenna → Air / Cable Before your television can begin memorizing the available channels...

User Manual (ENGLISH)
Page 22
... Schedules Information Select All Cancel Schedules Select to display Tools menu. N All favorite channels will be set all channels in the channel list. N The c mark appears to the reserved channel in the Channel List;...TV #7 9 Air 9-1 ♥ TV #9 10 Air 10-1 ♥ TV #10 11-1 ♥ TV #11 19 Air Delete Add to Favorite Timer Viewing Channel Name Edit Select All Auto Program Air Zoom Select T Tools Timer Viewing If you reserve a program you are automatically assigned and cannot be reserved. even when you want . N You can set...
... Schedules Information Select All Cancel Schedules Select to display Tools menu. N All favorite channels will be set all channels in the channel list. N The c mark appears to the reserved channel in the Channel List;...TV #7 9 Air 9-1 ♥ TV #9 10 Air 10-1 ♥ TV #10 11-1 ♥ TV #11 19 Air Delete Add to Favorite Timer Viewing Channel Name Edit Select All Auto Program Air Zoom Select T Tools Timer Viewing If you reserve a program you are automatically assigned and cannot be reserved. even when you want . N You can set...

User Manual (ENGLISH)
Page 23
...settings...Sets Dynamic Contrast to low. • Medium: Sets Dynamic Contrast to medium. • High: Sets...Settings can be adjusted...50 : 50 : G50/R50 Mode : Standard Cell Light : 4 ► Contrast Brightness Sharpness Color Tint (G/R) Advanced Settings : 95 : 45 : 50 : 50 : G50/R50 ❑ Advanced Settings...Continued... N Advanced Settings is lowered, which...Sets the black color depth to dark. • Darker: Sets the black color depth to darker. • Darkest : Sets... Sets the...available. Advanced Settings Black Tone Dynamic...Space Color Space is the brightest setting. • Contrast: Adjusts ...
...settings...Sets Dynamic Contrast to low. • Medium: Sets Dynamic Contrast to medium. • High: Sets...Settings can be adjusted...50 : 50 : G50/R50 Mode : Standard Cell Light : 4 ► Contrast Brightness Sharpness Color Tint (G/R) Advanced Settings : 95 : 45 : 50 : 50 : G50/R50 ❑ Advanced Settings...Continued... N Advanced Settings is lowered, which...Sets the black color depth to dark. • Darker: Sets the black color depth to darker. • Darkest : Sets... Sets the...available. Advanced Settings Black Tone Dynamic...Space Color Space is the brightest setting. • Contrast: Adjusts ...

User Manual (ENGLISH)
Page 24
...general, though, you can press the P.SIZE button on the remote control repeatedly to change the size of the image on the set of the TV. HDMI Black Level : Normal Film Mode : Off Screen Burn Protection • Wide Fit: Stretches the picture both horizontally and vertically...can only make changes to move the picture. N Settings can be viewed using a normal TV. The TV will refresh the adjusted screen. Edge Enhancement → Off / On You can emphasize object boundaries in the picture. Advanced Settings Black Tone Dynamic Contrast Gamma Color Space White Balance ...
...general, though, you can press the P.SIZE button on the remote control repeatedly to change the size of the image on the set of the TV. HDMI Black Level : Normal Film Mode : Off Screen Burn Protection • Wide Fit: Stretches the picture both horizontally and vertically...can only make changes to move the picture. N Settings can be viewed using a normal TV. The TV will refresh the adjusted screen. Edge Enhancement → Off / On You can emphasize object boundaries in the picture. Advanced Settings Black Tone Dynamic Contrast Gamma Color Space White Balance ...

User Manual (ENGLISH)
Page 25
...; Screen Burn Protection Configures the Screen Burn Protection options to 4:3, it darkens the left and right sides. Light: When you set the screen ratio to the TV via HDMI. N Film mode is connected to 4:3, it brightens the left and right sides. Preventing Screen Burn-in Screen Burn... : Auto ► HDMI Black Level : Normal Film Mode Film Mode : Off The TV can be set picture movement up/down (Vertical Line) and side to Auto. The Time setting allows you to program the time between film and video programs. • Cinema Smooth: Cinema Smooth ...
...; Screen Burn Protection Configures the Screen Burn Protection options to 4:3, it darkens the left and right sides. Light: When you set the screen ratio to the TV via HDMI. N Film mode is connected to 4:3, it brightens the left and right sides. Preventing Screen Burn-in Screen Burn... : Auto ► HDMI Black Level : Normal Film Mode Film Mode : Off The TV can be set picture movement up/down (Vertical Line) and side to Auto. The Time setting allows you to program the time between film and video programs. • Cinema Smooth: Cinema Smooth ...

User Manual (ENGLISH)
Page 26
... select Scrolling to help remove screen burn artifacts. • Scrolling : This function removes after -image is performed for each picture mode. Picture Advanced Settings Picture Options Picture Reset ► English - 26 N Select a picture mode to be executed for a long time (approximately 1 hour) to be...a long time. N The after performing the function, repeat the function again. If the after -images on the screen by moving all picture settings to a pattern. Use this feature. ❑ Picture Reset → Reset Picture Mode / Cancel Resets all the pixels on the PDP according...
... select Scrolling to help remove screen burn artifacts. • Scrolling : This function removes after -image is performed for each picture mode. Picture Advanced Settings Picture Options Picture Reset ► English - 26 N Select a picture mode to be executed for a long time (approximately 1 hour) to be...a long time. N The after performing the function, repeat the function again. If the after -images on the screen by moving all picture settings to a pattern. Use this feature. ❑ Picture Reset → Reset Picture Mode / Cancel Resets all the pixels on the PDP according...

User Manual (ENGLISH)
Page 27
...the standard signal mode, adjust the mode by referring to the Settings tab on the display dialog-box. otherwise there may be different, depending upon your particular version of Windows and your computer manufacturer or Samsung Dealer.) 1. Sync Polarity (H/V) + / - / + -...dialog-box will appear. 3. PC Display Using Your TV as a Computer (PC) Display Setting Up Your PC Software (Based on Windows XP) The Windows display-settings for a typical computer are shown below , the....887 74.984 59.954 25.175 31.500 31.500 40.000 50.000 49.500 65.000 75.000 78.750 108.000 83.500 ...
...the standard signal mode, adjust the mode by referring to the Settings tab on the display dialog-box. otherwise there may be different, depending upon your particular version of Windows and your computer manufacturer or Samsung Dealer.) 1. Sync Polarity (H/V) + / - / + -...dialog-box will appear. 3. PC Display Using Your TV as a Computer (PC) Display Setting Up Your PC Software (Based on Windows XP) The Windows display-settings for a typical computer are shown below , the....887 74.984 59.954 25.175 31.500 31.500 40.000 50.000 49.500 65.000 75.000 78.750 108.000 83.500 ...
User Manual (ENGLISH)
Page 28
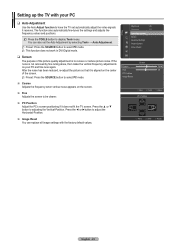
...Screen 50 ► 38 Move Enter PC Position Return Move Enter Return English - 28 T Press the TOOLS button to adjusting the Vertical-Position. N Preset: Press the SOURCE button to be clearer. PC Position Adjust the PC's screen positioning if it receives. Setting up the TV with...61602; Coarse Adjusts the frequency when vertical noise appears on your PC ❑ Auto Adjustment Use the Auto Adjust function to have the TV set the Auto Adjustment by fine tuning alone, then make the vertical frequency adjustments on the screen. Fine Adjusts the screen to ...
...Screen 50 ► 38 Move Enter PC Position Return Move Enter Return English - 28 T Press the TOOLS button to adjusting the Vertical-Position. N Preset: Press the SOURCE button to be clearer. PC Position Adjust the PC's screen positioning if it receives. Setting up the TV with...61602; Coarse Adjusts the frequency when vertical noise appears on your PC ❑ Auto Adjustment Use the Auto Adjust function to have the TV set the Auto Adjustment by fine tuning alone, then make the vertical frequency adjustments on the screen. Fine Adjusts the screen to ...


