Quick Guide (easy Manual) (ver.1.0) (English)
Page 1
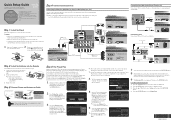
...Cable (Not Supplied) Very Good Connection HD connection (up to 720p/1080i) Using an HDMI to AV IN on the back of the Stand and Guide Stand when assembling them. Replace the cover. Step 5: Run Plug & Play When you live, and then press the ENTERE button. 8 After...Up, Down, Left or Right arrow buttons on your TV, call: 1-800-SAMSUNG (1-800-726-7864) For web support please visit: www.samsung.com/support 1-800-SAMSUNG (1-800-726-7864) Samsung Electronics America, Inc. 85 Challenger Road Ridgefield Park, NJ 07660-2112 Samsung Electronics Canada Inc. 55 Standish Court Mississauga, Ontario L5R...
...Cable (Not Supplied) Very Good Connection HD connection (up to 720p/1080i) Using an HDMI to AV IN on the back of the Stand and Guide Stand when assembling them. Replace the cover. Step 5: Run Plug & Play When you live, and then press the ENTERE button. 8 After...Up, Down, Left or Right arrow buttons on your TV, call: 1-800-SAMSUNG (1-800-726-7864) For web support please visit: www.samsung.com/support 1-800-SAMSUNG (1-800-726-7864) Samsung Electronics America, Inc. 85 Challenger Road Ridgefield Park, NJ 07660-2112 Samsung Electronics Canada Inc. 55 Standish Court Mississauga, Ontario L5R...
User Manual (user Manual) (ver.1.0) (English)
Page 3
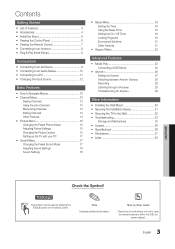
... Check here for Anynet+ 29 Other Information yy Installing the Wall Mount 30 yy Securing the Installation Space 31 yy Securing the TV to open the relevant submenu within the OSD (on the remote control. Note Indicates additional information. Contents Getting Started yy List ...of Features 4 yy Accessories 4 yy Install the Stand 5 yy Viewing the Control Panel 6 yy Viewing the Remote Control 7 yy Connecting to an Antenna 8 yy Plug & Play (Initial Setup 8...
... Check here for Anynet+ 29 Other Information yy Installing the Wall Mount 30 yy Securing the Installation Space 31 yy Securing the TV to open the relevant submenu within the OSD (on the remote control. Note Indicates additional information. Contents Getting Started yy List ...of Features 4 yy Accessories 4 yy Install the Stand 5 yy Viewing the Control Panel 6 yy Viewing the Remote Control 7 yy Connecting to an Antenna 8 yy Plug & Play (Initial Setup 8...

User Manual (user Manual) (ver.1.0) (English)
Page 5
... 2. ✎✎NOTE xx Make sure to distinguish between the front and back of the TV when installing the stand base. 5 English Install the Stand (M4 X L16) Stand (1EA) Screws (4EA) Follow the steps below to connect the TV to the Stand as shown. s s s s 2 1 Screws (M4 X L16) 2. Fasten two screws (M4 X L16) at ...X L16) at least two persons lift and move the PDP TV. If you fasten the screws with the PDP TV placed down, it may lean to one side. [[Do not insert your TV upright, connect the TV to the stand. xx Stand the product up and fasten the screws. With your fingers into...
... 2. ✎✎NOTE xx Make sure to distinguish between the front and back of the TV when installing the stand base. 5 English Install the Stand (M4 X L16) Stand (1EA) Screws (4EA) Follow the steps below to connect the TV to the Stand as shown. s s s s 2 1 Screws (M4 X L16) 2. Fasten two screws (M4 X L16) at ...X L16) at least two persons lift and move the PDP TV. If you fasten the screws with the PDP TV placed down, it may lean to one side. [[Do not insert your TV upright, connect the TV to the stand. xx Stand the product up and fasten the screws. With your fingers into...
User Manual (user Manual) (ver.1.0) (English)
Page 31
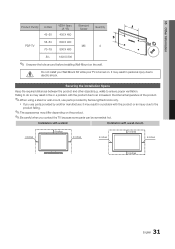
... PDP TV M8 4 70~79 800 X 400 80~ 1400 X 800 ✎✎ Unscrew the hole around before installing Wall-Mount on . Installation with a stand. walls) to an increase in the internal temperature of the product. ✎✎When using a stand or wall-mount, use parts provided by Samsung Electronics only...problem with the product due to ensure proper ventilation. Do not install your Wall Mount Kit while your TV is turned on the wall. xx If you contact the TV because some parts can be somewhat hot. Securing the Installation Space Keep the required distances between the ...
... PDP TV M8 4 70~79 800 X 400 80~ 1400 X 800 ✎✎ Unscrew the hole around before installing Wall-Mount on . Installation with a stand. walls) to an increase in the internal temperature of the product. ✎✎When using a stand or wall-mount, use parts provided by Samsung Electronics only...problem with the product due to ensure proper ventilation. Do not install your Wall Mount Kit while your TV is turned on the wall. xx If you contact the TV because some parts can be somewhat hot. Securing the Installation Space Keep the required distances between the ...
User Manual (user Manual) (ver.1.0) (English)
Page 35
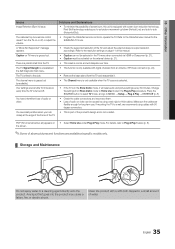
...• Remove the base stand from an Antenna / RF/Coax connection (p. 22). A "Mode Not Supported" message appears. • Check the supported resolution of the TV, and adjust the external device's output resolution accordingly. Your settings are flexible enough for the SAMSUNG TV code. Make sure the ...cables are lost after 30 minutes or every time the TV is turned off , or adjust the volume. • Program the Cable/Set remote ...
...• Remove the base stand from an Antenna / RF/Coax connection (p. 22). A "Mode Not Supported" message appears. • Check the supported resolution of the TV, and adjust the external device's output resolution accordingly. Your settings are flexible enough for the SAMSUNG TV code. Make sure the ...cables are lost after 30 minutes or every time the TV is turned off , or adjust the volume. • Program the Cable/Set remote ...


