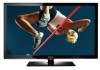
User Manual
Page 3
... 5 yy Viewing the Control Panel 6 yy Viewing the Remote Control 7 yy Connecting to an Antenna 8 yy Plug & Play (Initial Setup 8 Connections yy Connecting to an AV Device 9 yy Connecting to an Audio Device 10 yy Connecting to a PC 11 yy Changing the Input Source 12 Basic Features yy How ...On / Off Timer 19 Locking Programs 19 Economical Solutions 21 Other Features 21 yy Support Menu 22 Advanced Features yy Media Play 23 Connecting a USB Device 23 yy Anynet 26 Setting Up Anynet+ 27 Switching between Anynet+ Devices 28 Recording 28 Listening through a Receiver 28...
... 5 yy Viewing the Control Panel 6 yy Viewing the Remote Control 7 yy Connecting to an Antenna 8 yy Plug & Play (Initial Setup 8 Connections yy Connecting to an AV Device 9 yy Connecting to an Audio Device 10 yy Connecting to a PC 11 yy Changing the Input Source 12 Basic Features yy How ...On / Off Timer 19 Locking Programs 19 Economical Solutions 21 Other Features 21 yy Support Menu 22 Advanced Features yy Media Play 23 Connecting a USB Device 23 yy Anynet 26 Setting Up Anynet+ 27 Switching between Anynet+ Devices 28 Recording 28 Listening through a Receiver 28...
User Manual
Page 4
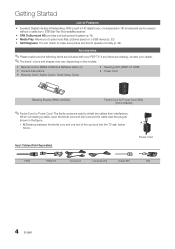
... a USB device (p. 23). xx A (Distance between the ferrite core and one end of Features yy Excellent Digital Interface & Networking: With a built-in the figure. When connecting a cable, open the ferrite core and clip it around the cable near the plug as shown in HD digital tuner, nonsubscription HD broadcasts can check...
... a USB device (p. 23). xx A (Distance between the ferrite core and one end of Features yy Excellent Digital Interface & Networking: With a built-in the figure. When connecting a cable, open the ferrite core and clip it around the cable near the plug as shown in HD digital tuner, nonsubscription HD broadcasts can check...
User Manual
Page 5
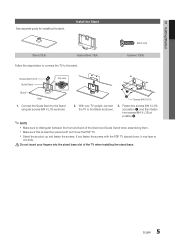
... (M4 X L16) Stand (1EA) Guide Stand (1EA) Screws (10EA) Follow the steps below to connect the TV to distinguish between the front and back of the TV when installing the stand base. 5 English Connect the Guide Stand to the Stand as shown. 2. 01 Getting Started See separate guide for installing... PDP TV. If you fasten the screws with the PDP TV placed down, it may lean to one side. [[Do not insert your TV upright, connect the TV to the Stand using six screws (M4 X L16) as shown. 3. Screws (M4 X L16) Guide Stand Top view s s s s s s s s Stand Rear 2 1 Screws (M4 X L16)...
... (M4 X L16) Stand (1EA) Guide Stand (1EA) Screws (10EA) Follow the steps below to connect the TV to distinguish between the front and back of the TV when installing the stand base. 5 English Connect the Guide Stand to the Stand as shown. 2. 01 Getting Started See separate guide for installing... PDP TV. If you fasten the screws with the PDP TV placed down, it may lean to one side. [[Do not insert your TV upright, connect the TV to the Stand using six screws (M4 X L16) as shown. 3. Screws (M4 X L16) Guide Stand Top view s s s s s s s s Stand Rear 2 1 Screws (M4 X L16)...
User Manual
Page 8
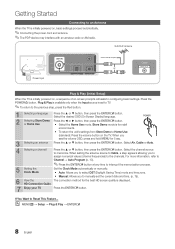
...see the volume OSD, press and hold MENU for the best HD screen quality is set the current date and time. (p. 19). 6 View the The connection method for 5 sec. 3 Selecting an antenna Press the ▲ or ▼ button, then press the ENTERE button. Press the ENTERE button. If... to select DST (Daylight Saving Time) mode and time zone. Store Demo mode is initially powered on, basic settings proceed automatically. ✎✎Connecting the power cord and antenna. ✎✎The PDP device may interfere with an amateur radio or AM radio. OO MENUm → Setup →...
...see the volume OSD, press and hold MENU for the best HD screen quality is set the current date and time. (p. 19). 6 View the The connection method for 5 sec. 3 Selecting an antenna Press the ▲ or ▼ button, then press the ENTERE button. Press the ENTERE button. If... to select DST (Daylight Saving Time) mode and time zone. Store Demo mode is initially powered on, basic settings proceed automatically. ✎✎Connecting the power cord and antenna. ✎✎The PDP device may interfere with an amateur radio or AM radio. OO MENUm → Setup →...
User Manual
Page 9
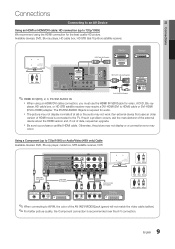
...of the AV IN [Y/VIDEO] jack (green) will not match the video cable (yellow). ✎✎For better picture quality, the Component connection is recommended over the A/V connection. 9 English xx The picture may not display normally (if at all) or the audio may occur. xx Be sure to DVI Cable ...is required for audio. Using a Component (up to AV IN, the color of date, request an upgrade. 02 Connections Connections Connecting to an AV Device Using an HDMI or HDMI/DVI cable: HD connection (up to 720p/1080i) or Audio/Video (480i only) Cable Available devices: DVD, Blu-ray player, cable box,...
...of the AV IN [Y/VIDEO] jack (green) will not match the video cable (yellow). ✎✎For better picture quality, the Component connection is recommended over the A/V connection. 9 English xx The picture may not display normally (if at all) or the audio may occur. xx Be sure to DVI Cable ...is required for audio. Using a Component (up to AV IN, the color of date, request an upgrade. 02 Connections Connections Connecting to an AV Device Using an HDMI or HDMI/DVI cable: HD connection (up to 720p/1080i) or Audio/Video (480i only) Cable Available devices: DVD, Blu-ray player, cable box,...
User Manual
Page 10
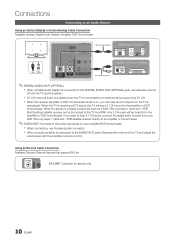
... to on your DVD / Blu-ray player / cable box / STB satellite receiver directly to an amplifier or home theater. ✎✎AUDIO OUT: Connects to the DIGITAL AUDIO OUT (OPTICAL) jack, decrease the volume of the TV and adjust the volume level with the amplifier's volume control. When the...a digital component such as a DVD / Blu-ray player / cable box / STB (Set-Top-Box) satellite receiver and is connected to the amplifier or DVD home theater. xx When connecting, use the appropriate connector. If you can hear sound output from the TV's optical jack. xx When an audio amplifier is...
... to on your DVD / Blu-ray player / cable box / STB satellite receiver directly to an amplifier or home theater. ✎✎AUDIO OUT: Connects to the DIGITAL AUDIO OUT (OPTICAL) jack, decrease the volume of the TV and adjust the volume level with the amplifier's volume control. When the...a digital component such as a DVD / Blu-ray player / cable box / STB (Set-Top-Box) satellite receiver and is connected to the amplifier or DVD home theater. xx When connecting, use the appropriate connector. If you can hear sound output from the TV's optical jack. xx When an audio amplifier is...
User Manual
Page 11
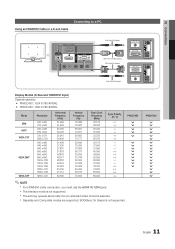
...02 Connections Connecting to a PC Using an HDMI/DVI Cable or a D-sub Cable Audio Cable (Not Supplied) HDMI to DVI Cable (Not Supplied) D-Sub Cable (Not Supplied) Audio Cable (Not Supplied) AUDIO OUT DVI OUT PC OUT AUDIO OUT Display Modes (D-Sub and HDMI/DVI Input) Optimal resolution yy PN42C450: 1024... 49.500 50.000 65.000 75.000 78.750 74.250 85.500 89.040 Sync Polarity (H / V) +/-/+ -/-/- -/+ -/+ -/+ PN42C450 > > > > > ✎✎NOTE xx For HDMI/DVI cable connection, you must use the HDMI IN 1(DVI) jack. SOG(Sync On Green) is selected. xx The set may operate abnormally if...
...02 Connections Connecting to a PC Using an HDMI/DVI Cable or a D-sub Cable Audio Cable (Not Supplied) HDMI to DVI Cable (Not Supplied) D-Sub Cable (Not Supplied) Audio Cable (Not Supplied) AUDIO OUT DVI OUT PC OUT AUDIO OUT Display Modes (D-Sub and HDMI/DVI Input) Optimal resolution yy PN42C450: 1024... 49.500 50.000 65.000 75.000 78.750 74.250 85.500 89.040 Sync Polarity (H / V) +/-/+ -/-/- -/+ -/+ -/+ PN42C450 > > > > > ✎✎NOTE xx For HDMI/DVI cable connection, you must use the HDMI IN 1(DVI) jack. SOG(Sync On Green) is selected. xx The set may operate abnormally if...
User Manual
Page 12
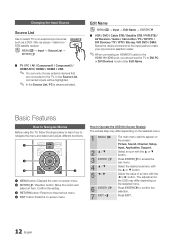
...mode under Edit Name. Adjust the value of an item with the ▲ or ▼ button. Press EXIT. 12 English In the Source List, connected inputs will be highlighted. ✎✎ In the Source List, PC is always activated. Confirm the setting. Edit Name OO MENUm → Input &#...SOURCE ■■ TV / PC / AV / Component1 / Component2 / HDMI1/DVI / HDMI2 / HDMI3 / USB ✎✎ You can only choose external devices that are connected to access the sub-menu. Select an icon with the ▲ or ▼ button. The adjustment in the OSD may differ depending on the selected...
...mode under Edit Name. Adjust the value of an item with the ▲ or ▼ button. Press EXIT. 12 English In the Source List, connected inputs will be highlighted. ✎✎ In the Source List, PC is always activated. Confirm the setting. Edit Name OO MENUm → Input &#...SOURCE ■■ TV / PC / AV / Component1 / Component2 / HDMI1/DVI / HDMI2 / HDMI3 / USB ✎✎ You can only choose external devices that are connected to access the sub-menu. Select an icon with the ▲ or ▼ button. The adjustment in the OSD may differ depending on the selected...
User Manual
Page 13
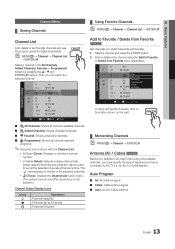
... #6 7 Air 8 Air 9 Air 9-1 * TV #9 10 Air 10-1 * TV #10 11-1 * TV #11 Air Zoom Select T Tools Add to the left of signal source that is connected to set all the selected channels at the same time. xx T (Tools): Displays the Channel List option menu. (The options menus may differ depending on...
... #6 7 Air 8 Air 9 Air 9-1 * TV #9 10 Air 10-1 * TV #10 11-1 * TV #11 Air Zoom Select T Tools Add to the left of signal source that is connected to set all the selected channels at the same time. xx T (Tools): Displays the Channel List option menu. (The options menus may differ depending on...
User Manual
Page 15
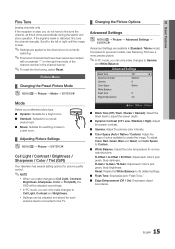
...control. ✎✎NOTE xx When you make changes to Custom. ■■ White Balance: Adjust the color temperature for each external device connected to the TV. ¦¦ Changing the Picture Options Advanced Settings OO MENUm → Picture → Advanced Settings → ENTERE (...Advanced Settings are marked with an asterisk "*" on the right-hand side of colors available to previous models, new Samsung TVs have a more natural picture. 03 Basic Features Fine Tune (analog channels only) If the reception is clear, you do not have ...
...control. ✎✎NOTE xx When you make changes to Custom. ■■ White Balance: Adjust the color temperature for each external device connected to the TV. ¦¦ Changing the Picture Options Advanced Settings OO MENUm → Picture → Advanced Settings → ENTERE (...Advanced Settings are marked with an asterisk "*" on the right-hand side of colors available to previous models, new Samsung TVs have a more natural picture. 03 Basic Features Fine Tune (analog channels only) If the reception is clear, you do not have ...

User Manual
Page 16
...; Film Mode (Off / Auto): Sets the TV to automatically sense and process film signals from all sources and adjusts the picture for each external device connected to an input on the TV. ■■ Size: Your cable box/satellite receiver may need to center the picture: 1. Press the ► button... mode. 4:3 : Sets the picture to basic (4:3) mode. ✎✎ Do not watch in HDMI (1080i/1080p) or Component (1080i/1080p) mode, you may have connected to an input on the TV. However, we highly recommend you use 16:9 mode most of the picture to move the picture. 4. Press the ENTERE...
...; Film Mode (Off / Auto): Sets the TV to automatically sense and process film signals from all sources and adjusts the picture for each external device connected to an input on the TV. ■■ Size: Your cable box/satellite receiver may need to center the picture: 1. Press the ► button... mode. 4:3 : Sets the picture to basic (4:3) mode. ✎✎ Do not watch in HDMI (1080i/1080p) or Component (1080i/1080p) mode, you may have connected to an input on the TV. However, we highly recommend you use 16:9 mode most of the picture to move the picture. 4. Press the ENTERE...
User Manual
Page 17
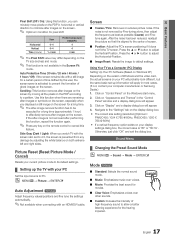
...Adjust frequency values/positions and fine tune the settings automatically. ✎✎Not available when connecting with a still image for a certain period of screen. ■■ Position: Adjust ...display dialog-box will apply in most cases. (If not, contact your computer manufacturer or Samsung Dealer.) 1. Press the ▲ or ▼ button to default settings. 03 Basic Features...9632; Coarse / Fine: Removes or reduces picture noise. yy The correct size setting (resolution) [Optimum: PN42C450: 1024 X 768 @ 60Hz, PN50C450: 1360 X 768 @ 60Hz] yy If a vertical-frequency option ...
...Adjust frequency values/positions and fine tune the settings automatically. ✎✎Not available when connecting with a still image for a certain period of screen. ■■ Position: Adjust ...display dialog-box will apply in most cases. (If not, contact your computer manufacturer or Samsung Dealer.) 1. Press the ▲ or ▼ button to default settings. 03 Basic Features...9632; Coarse / Fine: Removes or reduces picture noise. yy The correct size setting (resolution) [Optimum: PN42C450: 1024 X 768 @ 60Hz, PN50C450: 1360 X 768 @ 60Hz] yy If a vertical-frequency option ...

User Manual
Page 18
... output when the modulation signal is low. Auto: Set the current time automatically using the time from a digital channel. ✎✎ The antenna must be connected in stereo. ■■ SAP: Choose to listen to the Separate Audio Program, which is usually a foreign-language translation. ✎✎Depending on the particular...
... output when the modulation signal is low. Auto: Set the current time automatically using the time from a digital channel. ✎✎ The antenna must be connected in stereo. ■■ SAP: Choose to listen to the Separate Audio Program, which is usually a foreign-language translation. ✎✎Depending on the particular...
User Manual
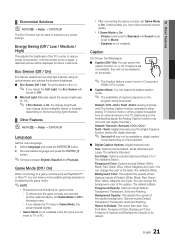
Page 21
Until the screen turns on again, a distorted picture will be displayed for game mode. -- To disconnect the game console and connect another external device, set Game Mode to a game console such as PlayStation™ or Xbox™, you may change (become slightly ...and Background Opacity to 7. Select Language and press the ENTERE button. 2. The default is Black. Game Mode (Off / On) When connecting to On. xx After connecting the game console, set Game Mode to Movie. -- The default is White. xx Game Mode is not available when the input source is...
Until the screen turns on again, a distorted picture will be displayed for game mode. -- To disconnect the game console and connect another external device, set Game Mode to a game console such as PlayStation™ or Xbox™, you may change (become slightly ...and Background Opacity to 7. Select Language and press the ENTERE button. 2. The default is Black. Game Mode (Off / On) When connecting to On. xx After connecting the game console, set Game Mode to Movie. -- The default is White. xx Game Mode is not available when the input source is...

User Manual
Page 22
... may be a problem with the TV. There may offer upgrades for your connections. If the problem persists, refer to minimum with the TV. Melody (Off / Low / Medium / High) Set so that you write down your external equipment. Software Upgrade Samsung may be a problem with the VOL - Upgrades USB Drive will be a problem...
... may be a problem with the TV. There may offer upgrades for your connections. If the problem persists, refer to minimum with the TV. Melody (Off / Low / Medium / High) Set so that you write down your external equipment. Software Upgrade Samsung may be a problem with the VOL - Upgrades USB Drive will be a problem...
User Manual
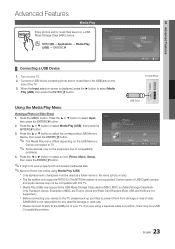
Page 23
... properly with this TV. Examples of data.00:03:25 06-I Will Carry You.mp3 00:03:25 SAMSUNG is displayed, press the ► button to -Know List before using a separate cable connection, there may not be supported due to select an icon (Photo, Music, Setup), then press the ENTERE...x Media Play (USB) only supports the USB Mass Storage Class device (MSC). 4.3MB 2 / S3U1 M MSC is not supported) Certain types of the TV. 3. Connect a USB device containing photo and/or music files to prevent them from damage or 05-marketa_irglova-The_hill.mp3 loss of MSC are Thumb drives and...
... properly with this TV. Examples of data.00:03:25 06-I Will Carry You.mp3 00:03:25 SAMSUNG is displayed, press the ► button to -Know List before using a separate cable connection, there may not be supported due to select an icon (Photo, Music, Setup), then press the ENTERE...x Media Play (USB) only supports the USB Mass Storage Class device (MSC). 4.3MB 2 / S3U1 M MSC is not supported) Certain types of the TV. 3. Connect a USB device containing photo and/or music files to prevent them from damage or 05-marketa_irglova-The_hill.mp3 loss of MSC are Thumb drives and...
User Manual
Page 24
... located in order from the currently shown file. ✎✎ MP3 files can be displayed as managing billings and settlements. xx If a USB device connected to set the following options Slide Show Speed, Background Music, Background Music Setting, List. Photo Music Setup Photo Viewing a Photo (or Slide Show)...the rights and interests of the content providers, the prevention of the illegal copying of the image, the longer it is not played, connect the USB device to select Start Slide Show then press the ENTERE button. ✎✎ During the slide show to the TV is...
... located in order from the currently shown file. ✎✎ MP3 files can be displayed as managing billings and settlements. xx If a USB device connected to set the following options Slide Show Speed, Background Music, Background Music Setting, List. Photo Music Setup Photo Viewing a Photo (or Slide Show)...the rights and interests of the content providers, the prevention of the illegal copying of the image, the longer it is not played, connect the USB device to select Start Slide Show then press the ENTERE button. ✎✎ During the slide show to the TV is...
User Manual
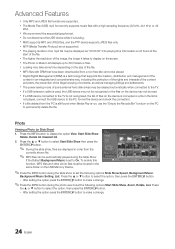
Page 26
...to determine whether to repeat playing the music when all connected Samsung devices that have been played. Repeat the above operation to select desired photos / music files. ✎✎ Selected photos or files are marked with your Samsung device has this feature, check if there is an... appear when no button is Anynet+? Press the � (Play) / ENTERE button to play an MP3 file during a slide show speed. To connect to a Samsung Home Theater TV Anynet+ Device 1 Home Theater Anynet+ Device 2, 3 HDMI IN 3 HDMI Cable (Not Supplied) HDMI Cable (Not Supplied) Optical Cable...
...to determine whether to repeat playing the music when all connected Samsung devices that have been played. Repeat the above operation to select desired photos / music files. ✎✎ Selected photos or files are marked with your Samsung device has this feature, check if there is an... appear when no button is Anynet+? Press the � (Play) / ENTERE button to play an MP3 file during a slide show speed. To connect to a Samsung Home Theater TV Anynet+ Device 1 Home Theater Anynet+ Device 2, 3 HDMI IN 3 HDMI Cable (Not Supplied) HDMI Cable (Not Supplied) Optical Cable...
User Manual
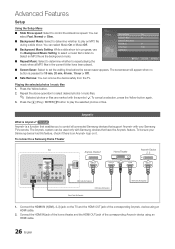
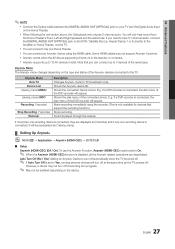
Page 27
...jack on the DVD / Satellite Box (i.e. xx Anynet+ supports up to On. ✎✎ When the Anynet+ (HDMI-CEC) function is connected, they are deactivated. E.g. If more than one recording device is disabled, all the Anynet+ related operations are displayed as (*recorder) and if only...Stop Recording: (*recorder) Receiver Description Changes Anynet+ mode to Yes, running external devices will appear. Shows the Anynet+ device list. Shows the connected device menus. Shows the play menu of the DVD recorder will turn off automatically when the TV is turned off. ✎✎ If ...
...jack on the DVD / Satellite Box (i.e. xx Anynet+ supports up to On. ✎✎ When the Anynet+ (HDMI-CEC) function is connected, they are deactivated. E.g. If more than one recording device is disabled, all the Anynet+ related operations are displayed as (*recorder) and if only...Stop Recording: (*recorder) Receiver Description Changes Anynet+ mode to Yes, running external devices will appear. Shows the Anynet+ device list. Shows the connected device menus. Shows the play menu of the DVD recorder will turn off automatically when the TV is turned off. ✎✎ If ...
User Manual
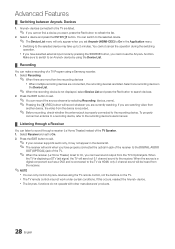
Page 28
... to On, you cannot use the Anynet+ function. xx The Anynet+ functions do not operate with other manufacturers' products. 28 English To properly connect an antenna to a recording device, refer to the recording device's users manual. ¦¦ Listening through a Receiver You can make a recording..., the video from the receiver. ✎✎NOTE xx You can switch to the receiver. You can only control Anynet+ devices using a Samsung recorder. 1. If this occurs, reselect the Anynet+ device. If you want, press the Red button to sound through a receiver (i.e Home Theater...
... to On, you cannot use the Anynet+ function. xx The Anynet+ functions do not operate with other manufacturers' products. 28 English To properly connect an antenna to a recording device, refer to the recording device's users manual. ¦¦ Listening through a Receiver You can make a recording..., the video from the receiver. ✎✎NOTE xx You can switch to the receiver. You can only control Anynet+ devices using a Samsung recorder. 1. If this occurs, reselect the Anynet+ device. If you want, press the Red button to sound through a receiver (i.e Home Theater...

