
User Manual Ver.1.0 (English)
Page 6
If the cable is reversed, it to malfunction. Do not expose the lens to solve any loss of data. This may discolor the image sensor or cause it may damage your camera's internal antenna. This is normal and ... direct sunlight. Data transference and your camera. The manufacturer is not responsible for any data transfers that the camera is operating properly before use only Samsung-approved devices or accessories. The manufacturer takes no responsibility for any interference problems you experience. Your camera emits radio frequency (RF) signals that may result...
If the cable is reversed, it to malfunction. Do not expose the lens to solve any loss of data. This may discolor the image sensor or cause it may damage your camera's internal antenna. This is normal and ... direct sunlight. Data transference and your camera. The manufacturer is not responsible for any data transfers that the camera is operating properly before use only Samsung-approved devices or accessories. The manufacturer takes no responsibility for any interference problems you experience. Your camera emits radio frequency (RF) signals that may result...

User Manual Ver.1.0 (English)
Page 7
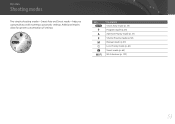
Indications used in this manual Icons used in this manual Icon [ ] ( ) → * Function Additional information Safety warnings and precautions Camera buttons. Annotation Mode indications Mode Smart Auto Program Aperture Priority Shutter Priority Manual Lens Priority Smart Wi-Fi Indication t P A S M i s B 6 For example, [Shutter] represents the shutter button. Page number of related information The order of options or menus you must select to perform a step; for example: Select 1 → Quality (represents select 1, and then Quality).
Indications used in this manual Icons used in this manual Icon [ ] ( ) → * Function Additional information Safety warnings and precautions Camera buttons. Annotation Mode indications Mode Smart Auto Program Aperture Priority Shutter Priority Manual Lens Priority Smart Wi-Fi Indication t P A S M i s B 6 For example, [Shutter] represents the shutter button. Page number of related information The order of options or menus you must select to perform a step; for example: Select 1 → Quality (represents select 1, and then Quality).
User Manual Ver.1.0 (English)
Page 9
...41 In Playback mode...42 Viewing photos ...42 Playing videos ...42 Changing the information displayed 43 Lenses ...44 Lens layout...44 Locking or unlocking the lens 45 Lens markings ...47 Accessories 48 External flash layout 48 Connecting the external flash 49 GPS module layout (optional 51 Attaching... Program Shift ...56 A Aperture Priority mode 57 S Shutter Priority mode 58 M Manual mode ...59 Framing mode ...59 Using the Bulb function 60 i Lens Priority mode 60 Using E ...60 Using i-Function in P/A/S/M modes 61 Using Z ...63 s Smart mode ...64 Using the Best Face mode 65 Capturing...
...41 In Playback mode...42 Viewing photos ...42 Playing videos ...42 Changing the information displayed 43 Lenses ...44 Lens layout...44 Locking or unlocking the lens 45 Lens markings ...47 Accessories 48 External flash layout 48 Connecting the external flash 49 GPS module layout (optional 51 Attaching... Program Shift ...56 A Aperture Priority mode 57 S Shutter Priority mode 58 M Manual mode ...59 Framing mode ...59 Using the Bulb function 60 i Lens Priority mode 60 Using E ...60 Using i-Function in P/A/S/M modes 61 Using Z ...63 s Smart mode ...64 Using the Best Face mode 65 Capturing...
User Manual Ver.1.0 (English)
Page 13
Contents Chapter 7 Appendix Error messages 169 Maintaining the camera 170 Cleaning the camera 170 Camera lens and display 170 Image sensor ...170 Camera body ...170 Using or storing the camera 171 Inappropriate places to use or store the camera 171 Using ...
Contents Chapter 7 Appendix Error messages 169 Maintaining the camera 170 Cleaning the camera 170 Camera lens and display 170 Image sensor ...170 Camera body ...170 Using or storing the camera 171 Inappropriate places to use or store the camera 171 Using ...
User Manual Ver.1.0 (English)
Page 14
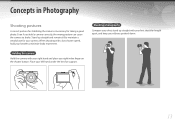
... A correct posture for stabilizing the camera is necessary for support. When shooting with your feet shoulder-length apart, and keep your left hand under the lens for taking a good photo. Place your elbows pointed down. 13 Stand up straight with a low shutter speed, hold a camera correctly, the wrong posture can cause...
... A correct posture for stabilizing the camera is necessary for support. When shooting with your feet shoulder-length apart, and keep your left hand under the lens for taking a good photo. Place your elbows pointed down. 13 Stand up straight with a low shutter speed, hold a camera correctly, the wrong posture can cause...
User Manual Ver.1.0 (English)
Page 17
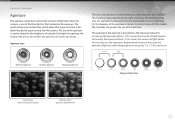
Increasing the Exposure Value (+1 EV) means the amount of the lens. The f-number represents the focal length divided by the diameter of light doubles. You can also use the exposure compensation feature to the brightness of a ... enters the camera, is 25 mm. (50 mm/25 mm=F2) The smaller the f-number, the greater the size of the aperture. For example, if a lens with a 50 mm focal length has an f-number of F2, the diameter of the aperture is one of the three factors that open and close...
Increasing the Exposure Value (+1 EV) means the amount of the lens. The f-number represents the focal length divided by the diameter of light doubles. You can also use the exposure compensation feature to the brightness of a ... enters the camera, is 25 mm. (50 mm/25 mm=F2) The smaller the f-number, the greater the size of the aperture. For example, if a lens with a 50 mm focal length has an f-number of F2, the diameter of the aperture is one of the three factors that open and close...
User Manual Ver.1.0 (English)
Page 22
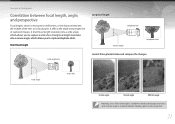
It affects the angle and perspective of the lens to its focal point. A long focal length translates into a wide angle, which allows you to capture a wide shot. Concepts in Photography Correlation between focal length, .... 21 A short focal length translates into a narrow angle, which allows you to capture telephoto shots. Short focal length Long focal length telephoto lens narrow angle telephoto shot wide-angle lens Look at these photos below and compare the changes. wide angle wide shot 18 mm angle 55 mm angle 200 mm angle...
It affects the angle and perspective of the lens to its focal point. A long focal length translates into a wide angle, which allows you to capture a wide shot. Concepts in Photography Correlation between focal length, .... 21 A short focal length translates into a narrow angle, which allows you to capture telephoto shots. Short focal length Long focal length telephoto lens narrow angle telephoto shot wide-angle lens Look at these photos below and compare the changes. wide angle wide shot 18 mm angle 55 mm angle 200 mm angle...
User Manual Ver.1.0 (English)
Page 23
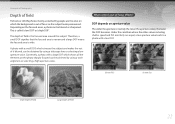
...or sharpened. Conversely, a photo with a large DOF which stresses the subject and makes the rest of it blurred, can be achieved by using a telescope lens or selecting a low aperture value. A photo with a small DOF, which shows all the elements on the focused areas, a photo can be obtained ...by using a wide angle lens or selecting a high aperture value. Concepts in Photography Depth of field Portraits or still-life photos mostly acclaimed by people are equal, a low aperture ...
...or sharpened. Conversely, a photo with a large DOF which stresses the subject and makes the rest of it blurred, can be achieved by using a telescope lens or selecting a low aperture value. A photo with a small DOF, which shows all the elements on the focused areas, a photo can be obtained ...by using a wide angle lens or selecting a high aperture value. Concepts in Photography Depth of field Portraits or still-life photos mostly acclaimed by people are equal, a low aperture ...
User Manual Ver.1.0 (English)
Page 24
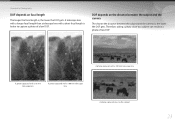
...a photo of a low DOF. Therefore, taking a photo close to the subject 23 A photo captured with a 100 mm telescope lens A photo captured with a 18 mm telescope lens A photo captured with a short focal length is better to a subject can result in Photography DOF depends on the distance between the... The shorter the distance between the subject and the camera is , the lower the DOF gets. A telescope lens with a longer focal length than a telescope lens with a 100 mm telescope lens A photo captured close to capture a photo of low DOF. DOF depends on focal length The longer the...
...a photo of a low DOF. Therefore, taking a photo close to the subject 23 A photo captured with a 100 mm telescope lens A photo captured with a 18 mm telescope lens A photo captured with a short focal length is better to a subject can result in Photography DOF depends on the distance between the... The shorter the distance between the subject and the camera is , the lower the DOF gets. A telescope lens with a longer focal length than a telescope lens with a 100 mm telescope lens A photo captured close to capture a photo of low DOF. DOF depends on focal length The longer the...

User Manual Ver.1.0 (English)
Page 29
Chapter 1 My Camera Learn about your camera's layout, display icons, lens, optional accessories, and basic functions.
Chapter 1 My Camera Learn about your camera's layout, display icons, lens, optional accessories, and basic functions.

User Manual Ver.1.0 (English)
Page 31
... antenna/NFC tag 9 * Avoid contact with the internal antenna while using the wireless network. 10 Speaker 11 Lens release button 12 Lens mount 13 Lens mount index 14 AF-assist light/Timer lamp 15 Power switch 16 Shutter button 30 Name Mode dial •...; P: Program mode (p. 56) • A: Aperture Priority mode (p. 57) 7 1 • S: Shutter Priority mode (p. 58) • M: Manual mode (p. 59) 8 • i: Lens Priority mode (p. 60) 9 • s: Smart mode (p. 64) • B: Wi-Fi (p. 122) 10 Jog dial • In the Menu screen: Move to a desired menu item. ...
... antenna/NFC tag 9 * Avoid contact with the internal antenna while using the wireless network. 10 Speaker 11 Lens release button 12 Lens mount 13 Lens mount index 14 AF-assist light/Timer lamp 15 Power switch 16 Shutter button 30 Name Mode dial •...; P: Program mode (p. 56) • A: Aperture Priority mode (p. 57) 7 1 • S: Shutter Priority mode (p. 58) • M: Manual mode (p. 59) 8 • i: Lens Priority mode (p. 60) 9 • s: Smart mode (p. 64) • B: Wi-Fi (p. 122) 10 Jog dial • In the Menu screen: Move to a desired menu item. ...
User Manual Ver.1.0 (English)
Page 45
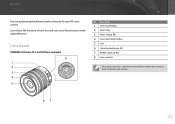
Lens layout SAMSUNG 18-55 mm F3.5-5.6 OIS III lens (example) 8 1 2 3 4 5 No. Description 1 Lens mount index 2 Zoom ring 3 Focus ring (p. 88) 4 Lens hood mount index 5 Lens 6 i-Function button (p. 60) 7 AF/MF switch (p. 80) 8 Lens contacts When not using the lens, attach the lens cap and lens mount cover to protect the lens from dust and scratches. 67 44 My Camera Lenses You can purchase optional lenses made exclusively for your needs and preferences. Learn about the functions of each lens and select one that suits your NX series camera.
Lens layout SAMSUNG 18-55 mm F3.5-5.6 OIS III lens (example) 8 1 2 3 4 5 No. Description 1 Lens mount index 2 Zoom ring 3 Focus ring (p. 88) 4 Lens hood mount index 5 Lens 6 i-Function button (p. 60) 7 AF/MF switch (p. 80) 8 Lens contacts When not using the lens, attach the lens cap and lens mount cover to protect the lens from dust and scratches. 67 44 My Camera Lenses You can purchase optional lenses made exclusively for your needs and preferences. Learn about the functions of each lens and select one that suits your NX series camera.
User Manual Ver.1.0 (English)
Page 46
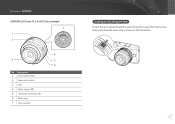
Description 1 Lens mount index 2 Zoom lock switch 3 Lens 4 Focus ring (p. 88) 5 i-Function button (p. 60) 6 Zoom ring 7 Lens contacts Locking or unlocking the lens To lock the lens, pull and hold the zoom lock switch away from the camera body and rotate the zoom ring as shown in the illustration. 45 My Camera > Lenses SAMSUNG 20-50 mm F3.5-5.6 ED II lens (example) 7 1 2 6 3 5 4 No.
Description 1 Lens mount index 2 Zoom lock switch 3 Lens 4 Focus ring (p. 88) 5 i-Function button (p. 60) 6 Zoom ring 7 Lens contacts Locking or unlocking the lens To lock the lens, pull and hold the zoom lock switch away from the camera body and rotate the zoom ring as shown in the illustration. 45 My Camera > Lenses SAMSUNG 20-50 mm F3.5-5.6 ED II lens (example) 7 1 2 6 3 5 4 No.
User Manual Ver.1.0 (English)
Page 47
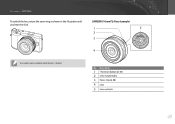
My Camera > Lenses To unlock the lens, rotate the zoom ring as shown in the illustation until SAMSUNG 16 mm F2.4 lens (example) you hear the click. 1 5 2 3 4 You cannot capture a photo when the lens is locked. Description 1 i-Function button (p. 60) 2 Lens mount index 3 Focus ring (p. 88) 4 Lens 5 Lens contacts 46 No.
My Camera > Lenses To unlock the lens, rotate the zoom ring as shown in the illustation until SAMSUNG 16 mm F2.4 lens (example) you hear the click. 1 5 2 3 4 You cannot capture a photo when the lens is locked. Description 1 i-Function button (p. 60) 2 Lens mount index 3 Focus ring (p. 88) 4 Lens 5 Lens contacts 46 No.
User Manual Ver.1.0 (English)
Page 48
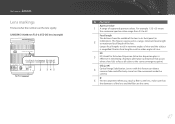
...narrower angles of the lens. For example, 1:3.5-6.3 means the maximum aperture value range from the middle of the lens to maximum focal length of view and the subject is magnified. SAMSUNG 18-200 mm F3.5-6.3 ED OIS lens (example) 1 2 345 No. My Camera > Lenses Lens markings Find out ...what the numbers on the lens signify. Description Aperture value 1 A range of the lens and the filter are the same. 47 OIS (p. ...
...narrower angles of the lens. For example, 1:3.5-6.3 means the maximum aperture value range from the middle of the lens to maximum focal length of view and the subject is magnified. SAMSUNG 18-200 mm F3.5-6.3 ED OIS lens (example) 1 2 345 No. My Camera > Lenses Lens markings Find out ...what the numbers on the lens signify. Description Aperture value 1 A range of the lens and the filter are the same. 47 OIS (p. ...
User Manual Ver.1.0 (English)
Page 54
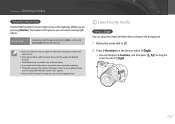
Additional modes allow for greater customization of settings. My Camera Shooting modes Two simple shooting modes-Smart Auto and Smart mode-help you capture photos with numerous automatic settings. Icon t P A S M i s B Description Smart Auto mode (p. 54) Program mode (p. 56) Aperture Priority mode (p. 57) Shutter Priority mode (p. 58) Manual mode (p. 59) Lens Priority mode (p. 60) Smart mode (p. 64) Wi-Fi features (p. 122) 53
Additional modes allow for greater customization of settings. My Camera Shooting modes Two simple shooting modes-Smart Auto and Smart mode-help you capture photos with numerous automatic settings. Icon t P A S M i s B Description Smart Auto mode (p. 54) Program mode (p. 56) Aperture Priority mode (p. 57) Shutter Priority mode (p. 58) Manual mode (p. 59) Lens Priority mode (p. 60) Smart mode (p. 64) Wi-Fi features (p. 122) 53
User Manual Ver.1.0 (English)
Page 61
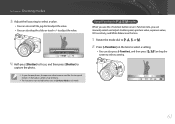
... Use the Bulb function to prevent your camera from shaking. • The longer you open the shutter for a long time, use a fully charged battery. i Lens Priority mode Using E You can adjust the depth of field to blur or sharpen the background. 1 Rotate the mode dial to i. 2 Press [i-Function] on ...the lens to select E. • You can create moving light effects. Do not turn the camera off while the camera saves a photo. • If you use a ...
... Use the Bulb function to prevent your camera from shaking. • The longer you open the shutter for a long time, use a fully charged battery. i Lens Priority mode Using E You can adjust the depth of field to blur or sharpen the background. 1 Rotate the mode dial to i. 2 Press [i-Function] on ...the lens to select E. • You can create moving light effects. Do not turn the camera off while the camera saves a photo. • If you use a ...
User Manual Ver.1.0 (English)
Page 62
... may be blurry. • This function is not available when you set 3D Auto Mode in P/A/S/M modes When you use the i-Function button on the lens to select a setting. • You can also press [i-Function], and then press [C/F] or drag the screen to select a setting. 61 Defocus Sharpen .... • You can manually select and adjust shutter speed, aperture value, exposure value, ISO sensitivity, and White Balance on the lens. 1 Rotate the mode dial to P, A, S, or M. 2 Press [i-Function] on an i-Function lens, you sharpen photos, the aperture value Increases and the shutter speed reduces.
... may be blurry. • This function is not available when you set 3D Auto Mode in P/A/S/M modes When you use the i-Function button on the lens to select a setting. • You can also press [i-Function], and then press [C/F] or drag the screen to select a setting. 61 Defocus Sharpen .... • You can manually select and adjust shutter speed, aperture value, exposure value, ISO sensitivity, and White Balance on the lens. 1 Rotate the mode dial to P, A, S, or M. 2 Press [i-Function] on an i-Function lens, you sharpen photos, the aperture value Increases and the shutter speed reduces.
User Manual Ver.1.0 (English)
Page 63
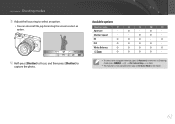
... or drag the screen to select an option. 4 Half-press [Shutter] to focus, and then press [Shutter] to appear when you press [i-Function] on the lens in Shooting mode, press [m] → 5 → iFn Customizing → an item. • This function is not available when you set 3D Auto Mode in 3D...
... or drag the screen to select an option. 4 Half-press [Shutter] to focus, and then press [Shutter] to appear when you press [i-Function] on the lens in Shooting mode, press [m] → 5 → iFn Customizing → an item. • This function is not available when you set 3D Auto Mode in 3D...

User Manual Ver.1.0 (English)
Page 64
... photo resolution may change compared to when you zoom in by rotating the zoom ring. 1 Rotate the mode dial to P, A, S, M, or i. 2 Press [i-Function] on the lens to select Z. • You can also press [i-Function], and then press [C/F] or drag the screen to select Z. 3 Adjust the focus ring to select a zoom ratio...
... photo resolution may change compared to when you zoom in by rotating the zoom ring. 1 Rotate the mode dial to P, A, S, M, or i. 2 Press [i-Function] on the lens to select Z. • You can also press [i-Function], and then press [C/F] or drag the screen to select Z. 3 Adjust the focus ring to select a zoom ratio...


