
User Manual
Page 5
... that the camera is normal and does not affect your camera's lens. Do not use . If you force the connectors, improperly connect cables, or improperly install batteries and memory cards, you charge batteries. Information stored on the card may result in noise in electric shock... camera may cause your files. This may damage your camera to malfunction. Protect your camera's overall performance. 4 Exercise caution when you connect cables and install batteries and memory cards. The flash is reversed, it to cool down . • High internal temperatures may be...
... that the camera is normal and does not affect your camera's lens. Do not use . If you force the connectors, improperly connect cables, or improperly install batteries and memory cards, you charge batteries. Information stored on the card may result in noise in electric shock... camera may cause your files. This may damage your camera to malfunction. Protect your camera's overall performance. 4 Exercise caution when you connect cables and install batteries and memory cards. The flash is reversed, it to cool down . • High internal temperatures may be...

User Manual
Page 8
... 33 Playing videos 33 Lenses 34 Lens layout 34 Locking or unlocking the lens 35 Lens markings 37 Accessories 38 External flash layout 38 Connecting the flash 39 GPS module layout (optional 41 Attaching the GPS module 41 7
... 33 Playing videos 33 Lenses 34 Lens layout 34 Locking or unlocking the lens 35 Lens markings 37 Accessories 38 External flash layout 38 Connecting the flash 39 GPS module layout (optional 41 Attaching the GPS module 41 7
User Manual
Page 11
... a WLAN 101 Setting network options 102 Manually setting the IP address 102 Using the login browser 103 Network connection tips 104 Entering text 105 Sending photos or videos to a smart phone 106 Using a smart phone as a remote shutter release 107 Using photo or video ...
... a WLAN 101 Setting network options 102 Manually setting the IP address 102 Using the login browser 103 Network connection tips 104 Entering text 105 Sending photos or videos to a smart phone 106 Using a smart phone as a remote shutter release 107 Using photo or video ...
User Manual
Page 12
... settings 137 Creating a print order (DPOF 137 DPOF options 138 Transferring files to your computer 139 Transferring files to your Windows computer 139 Connecting the camera as a removable disk 139 Disconnecting the camera (for Windows XP 140 Transferring files to your Mac computer 140 Using programs on a PC... contained on the CD 141 Using Intelli-studio 142 Requirements 142 Using the Intelli-studio Interface 143 Transferring files using Intelli-studio 144 Using Samsung RAW Converter 145 Requirements for Windows 145 Requirements for Mac 145 Using the...
... settings 137 Creating a print order (DPOF 137 DPOF options 138 Transferring files to your computer 139 Transferring files to your Windows computer 139 Connecting the camera as a removable disk 139 Disconnecting the camera (for Windows XP 140 Transferring files to your Mac computer 140 Using programs on a PC... contained on the CD 141 Using Intelli-studio 142 Requirements 142 Using the Intelli-studio Interface 143 Transferring files using Intelli-studio 144 Using Samsung RAW Converter 145 Requirements for Windows 145 Requirements for Mac 145 Using the...

User Manual
Page 30
...: Delete files. Status lamp Indicate the status of the camera. • Blinking: When saving a photo, shooting a video, sending data to a 5 computer or printer, or connecting to WLAN or sending a photo. • Steady: When there is complete. o button • In the Menu screen: Save the 7 selected options. • In Shooting mode...
...: Delete files. Status lamp Indicate the status of the camera. • Blinking: When saving a photo, shooting a video, sending data to a 5 computer or printer, or connecting to WLAN or sending a photo. • Steady: When there is complete. o button • In the Menu screen: Save the 7 selected options. • In Shooting mode...
User Manual
Page 31
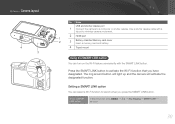
... when you have designated. Press the SMART LINK button to a computer or shutter release. My Camera > Camera layout 4 3 No. Name USB and shutter release port 1 Connect the camera to activate the Wi-Fi function that you press the SMART LINK button.
... when you have designated. Press the SMART LINK button to a computer or shutter release. My Camera > Camera layout 4 3 No. Name USB and shutter release port 1 Connect the camera to activate the Wi-Fi function that you press the SMART LINK button.
User Manual
Page 39
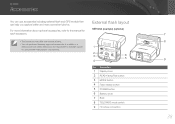
Samsung is not responsible for each accessory. • The illustrations may differ from the actual items. • You can help you capture better and more information ... layout SEF220A (example) (optional) 1 2 3 6 5 4 No. My Camera Accessories You can use accessories including external flash and GPS module that can purchase Samsung-approved accessories at a retailer or a Samsung service center. For more convenient photos. Description 1 Display icons 2 READY lamp/Test button 3 MODE button 4 Flash release button 5 POWER button 6 Battery cover 7 Bulb...
Samsung is not responsible for each accessory. • The illustrations may differ from the actual items. • You can help you capture better and more information ... layout SEF220A (example) (optional) 1 2 3 6 5 4 No. My Camera Accessories You can use accessories including external flash and GPS module that can purchase Samsung-approved accessories at a retailer or a Samsung service center. For more convenient photos. Description 1 Display icons 2 READY lamp/Test button 3 MODE button 4 Flash release button 5 POWER button 6 Battery cover 7 Bulb...
User Manual
Page 40
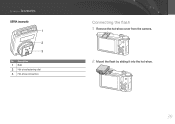
My Camera > Accessories SEF8A (example) 1 2 3 No. Description 1 Bulb 2 Hot-shoe fastening dial 3 Hot-shoe connection Connecting the flash 1 Remove the hot-shoe cover from the camera. 2 Mount the flash by sliding it into the hot-shoe. 39
My Camera > Accessories SEF8A (example) 1 2 3 No. Description 1 Bulb 2 Hot-shoe fastening dial 3 Hot-shoe connection Connecting the flash 1 Remove the hot-shoe cover from the camera. 2 Mount the flash by sliding it into the hot-shoe. 39
User Manual
Page 42
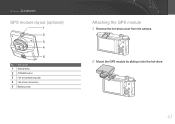
My Camera > Accessories GPS module layout (optional) 1 2 3 4 5 No. Description 1 Status lamp 2 POWER button 3 Hot-shoe fastening dial 4 Hot-shoe connection 5 Battery cover Attaching the GPS module 1 Remove the hot-shoe cover from the camera. 2 Mount the GPS module by sliding in into the hot-shoe. 41
My Camera > Accessories GPS module layout (optional) 1 2 3 4 5 No. Description 1 Status lamp 2 POWER button 3 Hot-shoe fastening dial 4 Hot-shoe connection 5 Battery cover Attaching the GPS module 1 Remove the hot-shoe cover from the camera. 2 Mount the GPS module by sliding in into the hot-shoe. 41

User Manual
Page 101
Chapter 4 Wireless network Learn how to connect to wireless local area networks (WLANs) and use functions.
Chapter 4 Wireless network Learn how to connect to wireless local area networks (WLANs) and use functions.

User Manual
Page 102
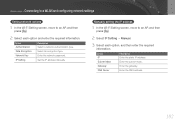
... the WLAN. You can also configure network settings. Wi-Fi Setting Refresh Samsung 1 Samsung 2 Samsung 3 Samsung 4 Exit Manual Icon/Option Refresh WPS button connection Add wireless network Description Refresh connectable APs. Add an AP manually. • Press [f] to the WLAN. • If you select a secured AP, a pop-up window appears. For information about entering...
... the WLAN. You can also configure network settings. Wi-Fi Setting Refresh Samsung 1 Samsung 2 Samsung 3 Samsung 4 Exit Manual Icon/Option Refresh WPS button connection Add wireless network Description Refresh connectable APs. Add an AP manually. • Press [f] to the WLAN. • If you select a secured AP, a pop-up window appears. For information about entering...
User Manual
Page 103
... each option and enter the required information. Option IP Subnet Mask Gateway DNS Server Description Enter the static IP address. Enter the gateway. Wireless network > Connecting to a WLAN and configuring network settings Setting network options 1 In the Wi-Fi Setting screen, move to an AP, and then press [f]. 2 Select...
... each option and enter the required information. Option IP Subnet Mask Gateway DNS Server Description Enter the static IP address. Enter the gateway. Wireless network > Connecting to a WLAN and configuring network settings Setting network options 1 In the Wi-Fi Setting screen, move to an AP, and then press [f]. 2 Select...
User Manual
Page 104
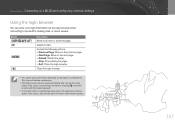
... If this occurs, close the login browser by pressing [ ], and then proceed with the desired operation. • It may not close automatically after you connected to an item or scroll the page. This does not indicate a malfunction. • The login browser may take longer to load the login page due... to the page size or network speed. Wireless network > Connecting to a WLAN and configuring network settings Using the login browser You can enter your login information via the login browser when...
... If this occurs, close the login browser by pressing [ ], and then proceed with the desired operation. • It may not close automatically after you connected to an item or scroll the page. This does not indicate a malfunction. • The login browser may take longer to load the login page due... to the page size or network speed. Wireless network > Connecting to a WLAN and configuring network settings Using the login browser You can enter your login information via the login browser when...
User Manual
Page 105
...on the encryption type, the number of your camera must make an autoip.txt file and copy it to the inserted memory card to connect to the network using the same radio frequency signal as your camera, it will be able to locate the device or the name may incur... differ, depending on your network administrator or network service provider. • If a WLAN requires authentication from the available AP list. • You can also connect to free WLANs in your camera to a network may appear incorrectly. • For network settings or a password, contact your camera. You cannot...
...on the encryption type, the number of your camera must make an autoip.txt file and copy it to the inserted memory card to connect to the network using the same radio frequency signal as your camera, it will be able to locate the device or the name may incur... differ, depending on your network administrator or network service provider. • If a WLAN requires authentication from the available AP list. • You can also connect to free WLANs in your camera to a network may appear incorrectly. • For network settings or a password, contact your camera. You cannot...
User Manual
Page 106
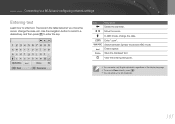
... only English alphabets, regardless of the display language. • To move the cursor, change the case. In ABC mode, change the case, etc. Wireless network > Connecting to a WLAN and configuring network settings Entering text Learn how to 64 characters. 105 Back Done Backspace Icon Done Description Delete the last letter. Use...
... only English alphabets, regardless of the display language. • To move the cursor, change the case. In ABC mode, change the case, etc. Wireless network > Connecting to a WLAN and configuring network settings Entering text Learn how to 64 characters. 105 Back Done Backspace Icon Done Description Delete the last letter. Use...
User Manual
Page 107
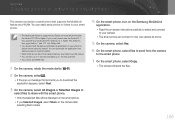
...the camera memory, you Selected Images, select Share on the camera after selecting files to share. 4 On the smart phone, turn on the Samsung MobileLink application. • Read the on your smart phone to the smart phone. 7 On the smart phone, select Copy. • The camera ...Android 2.2 or higher. This feature is supported by 7 and 10.1 inch Galaxy Tab. • You should install the Samsung MobileLink application on -screen instructions carefully to select and connect to your camera. • The smart phone can easily send photos or videos to your smart phone. • The ...
...the camera memory, you Selected Images, select Share on the camera after selecting files to share. 4 On the smart phone, turn on the Samsung MobileLink application. • Read the on your smart phone to the smart phone. 7 On the smart phone, select Copy. • The camera ...Android 2.2 or higher. This feature is supported by 7 and 10.1 inch Galaxy Tab. • You should install the Samsung MobileLink application on -screen instructions carefully to select and connect to your camera. • The smart phone can easily send photos or videos to your smart phone. • The ...

User Manual
Page 108
... this feature, some buttons are not available on your camera. • The zoom button and the shutter button on -screen instructions carefully to select and connect to your camera. • Touch the photo at the bottom of the screen to save it to B. 2 On the camera, select . • If the ...finder application. • Read the on your smart phone will be saved in your camera. • The smart phone can download the application from Samsung Apps or Android market. 1 On the camera, rotate the mode dial to the smart phone. Use the smart phone as a remote shutter release The camera...
... this feature, some buttons are not available on your camera. • The zoom button and the shutter button on -screen instructions carefully to select and connect to your camera. • Touch the photo at the bottom of the screen to save it to B. 2 On the camera, select . • If the ...finder application. • Read the on your smart phone will be saved in your camera. • The smart phone can download the application from Samsung Apps or Android market. 1 On the camera, rotate the mode dial to the smart phone. Use the smart phone as a remote shutter release The camera...
User Manual
Page 109
... may vary, depending on your surroundings. • The smart phone must be within 7 m of the camera or the smart phone turn off - either device loses connection to use this feature. • It will deactivate when: - the memory is poor or unstable 108 Wireless network > Using a smart phone as a remote shutter release...
... may vary, depending on your surroundings. • The smart phone must be within 7 m of the camera or the smart phone turn off - either device loses connection to use this feature. • It will deactivate when: - the memory is poor or unstable 108 Wireless network > Using a smart phone as a remote shutter release...
User Manual
Page 110
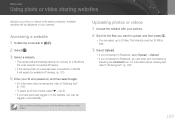
... use this feature. Accessing a website 1 Rotate the mode dial to B. 2 Select . 3 Select a website. • The camera will automatically attempt to connect to a WLAN via the most recently connected AP device. • If the camera has not previously been connected to a WLAN, it will be 10 MB or less. 3 Select Upload. • If you...
... use this feature. Accessing a website 1 Rotate the mode dial to B. 2 Select . 3 Select a website. • The camera will automatically attempt to connect to a WLAN via the most recently connected AP device. • If the camera has not previously been connected to a WLAN, it will be 10 MB or less. 3 Select Upload. • If you...

User Manual
Page 111
If the selected photo resolution is a video recorded using . If you connected to Facebook, the photo resolution will be automatically resized to 20 files at a time. • The maximum photo resolution you can upload is 2M, ... or network service provider. • Uploaded photos or videos may be automatically titled with the date they were captured. • The speed of your internet connection may affect how quickly photos upload or web pages open. • When there are no files in the camera memory, you cannot use this...
If the selected photo resolution is a video recorded using . If you connected to Facebook, the photo resolution will be automatically resized to 20 files at a time. • The maximum photo resolution you can upload is 2M, ... or network service provider. • Uploaded photos or videos may be automatically titled with the date they were captured. • The speed of your internet connection may affect how quickly photos upload or web pages open. • When there are no files in the camera memory, you cannot use this...


