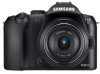
Quick Guide (easy Manual) (ver.1.2) (English)
Page 6
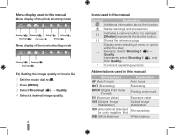
... the function Safety warnings and precautions [ ] Indicates a camera button, for example: [Shutter] represents the shutter button. ( ) Shows the reference page Display when selecting a menu or option within the step ª Example: Select Shooting 1 ( 1) ª Quality. (represents select Shooting 1 ( 1), and then Quality) * Comment explaining symbols Abbreviations used in this manual Abbreviations Explanation AF (Auto Focus) Auto focus BKT (Bracketing) Bracketing DPOF (Digital Print Order Format) Printing order mark EV (Exposure Value) Exposure value OIS (Optical Image...
... the function Safety warnings and precautions [ ] Indicates a camera button, for example: [Shutter] represents the shutter button. ( ) Shows the reference page Display when selecting a menu or option within the step ª Example: Select Shooting 1 ( 1) ª Quality. (represents select Shooting 1 ( 1), and then Quality) * Comment explaining symbols Abbreviations used in this manual Abbreviations Explanation AF (Auto Focus) Auto focus BKT (Bracketing) Bracketing DPOF (Digital Print Order Format) Printing order mark EV (Exposure Value) Exposure value OIS (Optical Image...

Quick Guide (easy Manual) (ver.1.2) (English)
Page 8
... each part 11 Diopter adjustment dial/Eye-cup/Status lamp.... 13 Description for each part of the lens 14 Preparations before shooting 15 Charging the battery 15 Installing the battery 16 Installing the memory card 17 Mounting/dismounting the lens 18 Connecting the strap 19 Turning on the power and initialization 20 Icons 22 Option/menu selection method 24 Using the dial 24 Using [Fn 25 Changing the display type 26 Changing the display type 26 Setting user display 26 Setting the screen display 27 Simple picture...
... each part 11 Diopter adjustment dial/Eye-cup/Status lamp.... 13 Description for each part of the lens 14 Preparations before shooting 15 Charging the battery 15 Installing the battery 16 Installing the memory card 17 Mounting/dismounting the lens 18 Connecting the strap 19 Turning on the power and initialization 20 Icons 22 Option/menu selection method 24 Using the dial 24 Using [Fn 25 Changing the display type 26 Changing the display type 26 Setting user display 26 Setting the screen display 27 Simple picture...
Quick Guide (easy Manual) (ver.1.2) (English)
Page 37
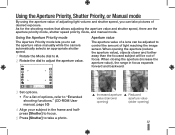
... half- When opening ) 37 Using the Aperture Priority mode The Aperture Priority mode lets you can be out of desired exposure. As for the shooting modes that allows adjusting the aperture value and shutter speed, there are the aperture priority mode, shutter speed priority mode, and manual mode. ISO RGB OIS A - + 20 F4 0001 3 2 1 0 1 2 3 3 Set options. • For a list of light reaching the image sensor. press [Shutter] to focus. 5 Press [Shutter] to "Extended shooting functions." (CD-ROM User manual, page 50) 4 Align...
... half- When opening ) 37 Using the Aperture Priority mode The Aperture Priority mode lets you can be out of desired exposure. As for the shooting modes that allows adjusting the aperture value and shutter speed, there are the aperture priority mode, shutter speed priority mode, and manual mode. ISO RGB OIS A - + 20 F4 0001 3 2 1 0 1 2 3 3 Set options. • For a list of light reaching the image sensor. press [Shutter] to focus. 5 Press [Shutter] to "Extended shooting functions." (CD-ROM User manual, page 50) 4 Align...

Quick Guide (easy Manual) (ver.1.2) (English)
Page 40
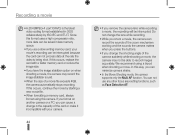
... aperture value. Using the landscape mode Landscape mode provides the optimal exposure and focus settings for dark or night time environments. 1 Rotate the Mode dial to . 2 Align your subject in the frame and half- We recommend you also use a tripod in case the camera selects a slow shutter speed setting. 40 press [Shutter] to focus. 3 Press [Shutter] to take a photo. press [Shutter] to focus. 3 Press [Shutter] to take a photo. press [Shutter] to focus. 3 Press [Shutter] to take a photo. Using the Night...
... aperture value. Using the landscape mode Landscape mode provides the optimal exposure and focus settings for dark or night time environments. 1 Rotate the Mode dial to . 2 Align your subject in the frame and half- We recommend you also use a tripod in case the camera selects a slow shutter speed setting. 40 press [Shutter] to focus. 3 Press [Shutter] to take a photo. press [Shutter] to focus. 3 Press [Shutter] to take a photo. press [Shutter] to focus. 3 Press [Shutter] to take a photo. Using the Night...
Quick Guide (easy Manual) (ver.1.2) (English)
Page 44
... starting a new movie file. • When formatting a memory card, always format using a tripod when shooting a movie. If you remove the camera lens while recording a movie, the recording will be able to record images accurately. In this camera. If this occurs, continue the movie by ISO-IEC and ITU-T. Do not change the lens while recording. • While you use any other focus area setting functions, such as Face Detection AF. If this occurs, replace the card with a faster memory card...
... starting a new movie file. • When formatting a memory card, always format using a tripod when shooting a movie. If you remove the camera lens while recording a movie, the recording will be able to record images accurately. In this camera. If this occurs, continue the movie by ISO-IEC and ITU-T. Do not change the lens while recording. • While you use any other focus area setting functions, such as Face Detection AF. If this occurs, replace the card with a faster memory card...
Quick Guide (easy Manual) (ver.1.2) (English)
Page 45
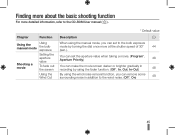
...-ROM User manual ( ). Finding more about the basic shooting function For more at the shutter speed of 30" 44 (sec.). Chapter Function Using the manual mode Using the bulb exposure Shooting a movie Setting the aperture value To fade out the screen Using the Wind Cut * Default value Description When using the wind noise removal function, you can remove some surrounding noise in recording by using the fader function. (Off*, In, Out, In-Out) 48 By using the manual mode, you can set to the bulb exposure mode...
...-ROM User manual ( ). Finding more about the basic shooting function For more at the shutter speed of 30" 44 (sec.). Chapter Function Using the manual mode Using the bulb exposure Shooting a movie Setting the aperture value To fade out the screen Using the Wind Cut * Default value Description When using the wind noise removal function, you can remove some surrounding noise in recording by using the fader function. (Off*, In, Out, In-Out) 48 By using the manual mode, you can set to the bulb exposure mode...
Quick Guide (easy Manual) (ver.1.2) (English)
Page 74
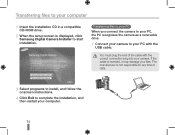
... connect the camera to your PC, the PC recognizes the camera as a removable drive. 1 Connect your camera to your PC with the correct connection plug into your camera. The manufacturer is not responsible for any loss of the cable with the USB cable. Transferring files to your computer 1 Insert the installation CD in a compatible CD-ROM drive. 2 When the setup screen is displayed, click Samsung Digital Camera Installer to complete the installation...
... connect the camera to your PC, the PC recognizes the camera as a removable drive. 1 Connect your camera to your PC with the correct connection plug into your camera. The manufacturer is not responsible for any loss of the cable with the USB cable. Transferring files to your computer 1 Insert the installation CD in a compatible CD-ROM drive. 2 When the setup screen is displayed, click Samsung Digital Camera Installer to complete the installation...
Quick Guide (easy Manual) (ver.1.2) (English)
Page 85
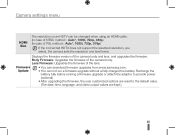
.... Camera settings menu HDMI Size The resolution on an HDTV can not run a firmware upgrade without a fully charged the battery. Displays the firmware version of the lens. Recharge the battery fully before running a firmware upgrade or attach the adaptor to provide power (optional) • After upgrading the firmware, the user customized options are reset to the default value. (The date, time, language, and video output values are kept.) 85 Firmware Update...
.... Camera settings menu HDMI Size The resolution on an HDTV can not run a firmware upgrade without a fully charged the battery. Displays the firmware version of the lens. Recharge the battery fully before running a firmware upgrade or attach the adaptor to provide power (optional) • After upgrading the firmware, the user customized options are reset to the default value. (The date, time, language, and video output values are kept.) 85 Firmware Update...
Quick Guide (easy Manual) (ver.1.2) (English)
Page 98
... adjustment dial 13 Display type 26 Depth Preview 34 Depth of field 34 Deleting a file 69 Display 81 Date&Time 83 E Eye sensor 12 Eye-cup 13 EV button 39 External flash 64 Error message 86 F Fn 25 Flash popup button 49 Focusing methods 53 Face detection 54 File protection 69 Face retouching 79 Format 82 File name 82 File number 82 Folder type 82 Firmware update 85 H Half-shutter 29 HDTV 79 HDMI Size 85 I Icons 22 Image...
... adjustment dial 13 Display type 26 Depth Preview 34 Depth of field 34 Deleting a file 69 Display 81 Date&Time 83 E Eye sensor 12 Eye-cup 13 EV button 39 External flash 64 Error message 86 F Fn 25 Flash popup button 49 Focusing methods 53 Face detection 54 File protection 69 Face retouching 79 Format 82 File name 82 File number 82 Folder type 82 Firmware update 85 H Half-shutter 29 HDTV 79 HDMI Size 85 I Icons 22 Image...
Quick Guide (easy Manual) (ver.1.2) (English)
Page 99
... P Program mode 36 Portrait mode 40 P Wiz BKT 61 Picture wizard 63 Playback 66 Photo printer 78 PictBridge 78 Picture editing 79 Picture style 79 Power save 83 Q Quality 47 QuickTime player 73 Quickview 81 R Recording a movie 43 Resolution 46 Red-eye reduction 50 RAW 77 Rotating 79 Reset 82 S Shooting mode 5 Subject 7 Status lamp 13 Strap 19 Setting the screen display 27 Smart Auto mode 35 Shutter Priority mode 38 Shutter speed 38 Scene mode 41 Self-portrait face Setting the...
... P Program mode 36 Portrait mode 40 P Wiz BKT 61 Picture wizard 63 Playback 66 Photo printer 78 PictBridge 78 Picture editing 79 Picture style 79 Power save 83 Q Quality 47 QuickTime player 73 Quickview 81 R Recording a movie 43 Resolution 46 Red-eye reduction 50 RAW 77 Rotating 79 Reset 82 S Shooting mode 5 Subject 7 Status lamp 13 Strap 19 Setting the screen display 27 Smart Auto mode 35 Shutter Priority mode 38 Shutter speed 38 Scene mode 41 Self-portrait face Setting the...
User Manual (user Manual) (ver.1.3) (English)
Page 9
... battery 18 Basic shooting 38 Installing the battery 19 Using the Smart Auto mode 39 Installing the memory card 20 Using the Program mode 40 9 Mounting/dismounting the lens 21 Connecting the strap 22 Using the Aperture Priority, Shutter Priority, or Manual mode 41 Turning on the power and initialization 23 Icons 25 Option/menu selection method 26 Using the dial 26 Using [Fn 27 Setting the display and sound 28 Changing the display type 28 Setting user display 29 Setting the sound 29 Setting the screen display 30 Simple picture...
... battery 18 Basic shooting 38 Installing the battery 19 Using the Smart Auto mode 39 Installing the memory card 20 Using the Program mode 40 9 Mounting/dismounting the lens 21 Connecting the strap 22 Using the Aperture Priority, Shutter Priority, or Manual mode 41 Turning on the power and initialization 23 Icons 25 Option/menu selection method 26 Using the dial 26 Using [Fn 27 Setting the display and sound 28 Changing the display type 28 Setting user display 29 Setting the sound 29 Setting the screen display 30 Simple picture...
User Manual (user Manual) (ver.1.3) (English)
Page 33
... movie shooting mode, you actually make a photo shot. Under the half-shutter state, press the [AEL] button of the camera to fix the exposure value and focus information at white wall behind the subject which does not have specific patterns. • When there is a fast moving the camera to Manual Focus (MF), this option differs, depending on the lens you are using. • When you adjust the focus manually, the picture...
... movie shooting mode, you actually make a photo shot. Under the half-shutter state, press the [AEL] button of the camera to fix the exposure value and focus information at white wall behind the subject which does not have specific patterns. • When there is a fast moving the camera to Manual Focus (MF), this option differs, depending on the lens you are using. • When you adjust the focus manually, the picture...

User Manual (user Manual) (ver.1.3) (English)
Page 41
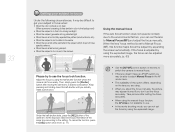
... focus. 41 Using the Aperture Priority, Shutter Priority, or Manual mode By using the aperture value of adjusting light volume and shutter speed, you to set the aperture value manually while the camera automatically selects an appropriate shutter speed. 1 Rotate the Mode dial to A. 2 Rotate the dial to adjust the aperture value. press [Shutter] to focus. 5 Press [Shutter] to take pictures of options, refer to "Extended shooting functions."(p. 50) 4 Align your subject in focus expands forward and backward. 14M SF ISO RGB...
... focus. 41 Using the Aperture Priority, Shutter Priority, or Manual mode By using the aperture value of adjusting light volume and shutter speed, you to set the aperture value manually while the camera automatically selects an appropriate shutter speed. 1 Rotate the Mode dial to A. 2 Rotate the dial to adjust the aperture value. press [Shutter] to focus. 5 Press [Shutter] to take pictures of options, refer to "Extended shooting functions."(p. 50) 4 Align your subject in focus expands forward and backward. 14M SF ISO RGB...
User Manual (user Manual) (ver.1.3) (English)
Page 44
... charging the battery. • When you use Bulb Exposure to take a photo. • The exposure time continues until you turn the Noise Reduction function on. This is complete. • To improve image stability in the frame and half- The Noise Reduction function operates when the shutter exposure exceeds 1 seconds. • When you use Bulb Exposure, the Successive Shooting function is unavailable. • When you use Bulb Exposure, you want. 1 Rotate the Mode dial to M. 2 Rotate the dial and set the shutter speed to Bulb...
... charging the battery. • When you use Bulb Exposure to take a photo. • The exposure time continues until you turn the Noise Reduction function on. This is complete. • To improve image stability in the frame and half- The Noise Reduction function operates when the shutter exposure exceeds 1 seconds. • When you use Bulb Exposure, the Successive Shooting function is unavailable. • When you use Bulb Exposure, you want. 1 Rotate the Mode dial to M. 2 Rotate the dial and set the shutter speed to Bulb...
User Manual (user Manual) (ver.1.3) (English)
Page 45
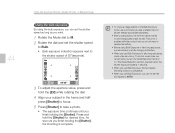
Using the landscape mode Landscape mode provides the optimal exposure and focus settings for dark or night time environments. 1 Rotate the Mode dial to take a photo. When you use Night mode, we recommended you use a tripod, shutter release, or Timer function (purchased separately) to minimize camera shake. press [Shutter] to focus. 3 Press [Shutter] to take a photo. In the landscape mode, the camera adjusts shutter speed automatically according to . 2 Align your subject in case the camera selects a slow shutter speed setting. We recommend you...
Using the landscape mode Landscape mode provides the optimal exposure and focus settings for dark or night time environments. 1 Rotate the Mode dial to take a photo. When you use Night mode, we recommended you use a tripod, shutter release, or Timer function (purchased separately) to minimize camera shake. press [Shutter] to focus. 3 Press [Shutter] to take a photo. In the landscape mode, the camera adjusts shutter speed automatically according to . 2 Align your subject in case the camera selects a slow shutter speed setting. We recommend you...
User Manual (user Manual) (ver.1.3) (English)
Page 94
... with the USB cable. ROM drive. 2 When the setup screen is displayed, click Samsung Digital Camera Installer to your files. The manufacturer is reversed, it may damage your computer 1 Insert the installation CD in a compatible CD- Transferring files to your PC When you connect the camera to your PC, the PC recognizes the camera as a removable drive. 1 Connect your camera to complete the installation, and then restart your camera. 94 Transferring files to start installation. You...
... with the USB cable. ROM drive. 2 When the setup screen is displayed, click Samsung Digital Camera Installer to your files. The manufacturer is reversed, it may damage your computer 1 Insert the installation CD in a compatible CD- Transferring files to your PC When you connect the camera to your PC, the PC recognizes the camera as a removable drive. 1 Connect your camera to complete the installation, and then restart your camera. 94 Transferring files to start installation. You...
User Manual (user Manual) (ver.1.3) (English)
Page 125
... 5 Diopter adjustment dial 16 Display type 28 Depth of field 37 Depth Preview 37 Deleting a file 82 Display 104 Date&Time 106 E Eye sensor 15 Eye-cup 16 EV button 43 External flash 58 Error message 110 F Fn 27 Flash popup button 55 Focusing methods 60 Face detection 64 File protection 82 Face retouching 88 Format 105 File name 105 File number 105 Folder type 105 Firmware update 108 H Half-shutter 32 HDTV 92 HDMI Size 108...
... 5 Diopter adjustment dial 16 Display type 28 Depth of field 37 Depth Preview 37 Deleting a file 82 Display 104 Date&Time 106 E Eye sensor 15 Eye-cup 16 EV button 43 External flash 58 Error message 110 F Fn 27 Flash popup button 55 Focusing methods 60 Face detection 64 File protection 82 Face retouching 88 Format 105 File name 105 File number 105 Folder type 105 Firmware update 108 H Half-shutter 32 HDTV 92 HDMI Size 108...
This Is The Upgrade Manual For Samsung Nx Lens. ( )
Page 1
... major repair charges. Should you need further detailed information, or if you use fully charged batteries for the size of downloading the firmware is taken to Upgrade the Firmware [Caution] If the batteries are not used, or the power is upgraded, all the files stored in camera malfunction. If camera malfunction is not possible to be deleted, ensure that you format the memory card on the memory to F/W version 1.15 3. Once the firmware is upgraded...
... major repair charges. Should you need further detailed information, or if you use fully charged batteries for the size of downloading the firmware is taken to Upgrade the Firmware [Caution] If the batteries are not used, or the power is upgraded, all the files stored in camera malfunction. If camera malfunction is not possible to be deleted, ensure that you format the memory card on the memory to F/W version 1.15 3. Once the firmware is upgraded...
This Is The Firmware Upgrade Guide For Samsung Nx-10 Camera. (ver. 1.20) ( )
Page 1
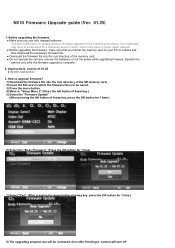
... operate the camera, remove the batteries, or cut the power while upgrading firmware. How to upgrade firmware? 1) Download the firmware file into the root directory of the SD memory card. 2) Insert the SD card on which may result in major repair charges. ● Before upgrading the firmware, make sure that you use fully charged batteries. Q[43#Ilupzduh#Xsjudgh#jxlgh +Yhu1#34158, 1. If camera malfunction is caused during a firmware upgrade for 1 time.) 8) The upgrading progress bar will turn off Operate...
... operate the camera, remove the batteries, or cut the power while upgrading firmware. How to upgrade firmware? 1) Download the firmware file into the root directory of the SD memory card. 2) Insert the SD card on which may result in major repair charges. ● Before upgrading the firmware, make sure that you use fully charged batteries. Q[43#Ilupzduh#Xsjudgh#jxlgh +Yhu1#34158, 1. If camera malfunction is caused during a firmware upgrade for 1 time.) 8) The upgrading progress bar will turn off Operate...
Win 2000 ( 0.19 )
Page 1
... charged batteries. Since all the camera settings are completely discharged during the lens firmware upgrade, camera or lens malfunction may be attached on the memory to "Setup Menu 3" (Press the left button of 4-wat key.) 5) Select the "Firmware Update" (After pressing the left button of lens firmware is upgraded, all the files stored in major repair charges. It is a difference between attached lens and lens firmware file, you format the memory card on your PC or camera and then download the necessary firmware file...
... charged batteries. Since all the camera settings are completely discharged during the lens firmware upgrade, camera or lens malfunction may be attached on the memory to "Setup Menu 3" (Press the left button of 4-wat key.) 5) Select the "Firmware Update" (After pressing the left button of lens firmware is upgraded, all the files stored in major repair charges. It is a difference between attached lens and lens firmware file, you format the memory card on your PC or camera and then download the necessary firmware file...


