

User Manual
Page 2
... this manual are subject to change without prior notice for a trip or an important event) to set up the camera driver Before connecting the camera to a PC, via the USB cable, you intend to your PC. Please note that is operating properly before you will need to avoid disappointment. Instructions Use this camera in Application software CD-ROM. (p.81) Take a picture Take a picture. (p.21) Insert the USB cable Insert the supplied USB cable into...
... this manual are subject to change without prior notice for a trip or an important event) to set up the camera driver Before connecting the camera to a PC, via the USB cable, you intend to your PC. Please note that is operating properly before you will need to avoid disappointment. Instructions Use this camera in Application software CD-ROM. (p.81) Take a picture Take a picture. (p.21) Insert the USB cable Insert the supplied USB cable into...

User Manual
Page 4
... the flash while it is switched on using the memory card 18 When Using the Camera for the First Time : Smart button 19 When Using the Camera for the First Time : Setting up the Date / Time and Language 20 AMOLED monitor indicator 21 Starting the recording mode 21 How to use the AUTO mode 21 How to use the PROGRAM mode 22 How to use the MANUAL mode 22 How to use the SCENE mode > It may damage the cords or cables...
... the flash while it is switched on using the memory card 18 When Using the Camera for the First Time : Smart button 19 When Using the Camera for the First Time : Setting up the Date / Time and Language 20 AMOLED monitor indicator 21 Starting the recording mode 21 How to use the AUTO mode 21 How to use the PROGRAM mode 22 How to use the MANUAL mode 22 How to use the SCENE mode > It may damage the cords or cables...
User Manual
Page 6
... SETUP 62 Setup menu 64 Setup menu ( ) 64 OSD set 64 Display Bright 64 HDMI Size 65 Start up image 65 Setup menu ( ) 65 Sound Volume 65 Operation Sound 66 Shutter sound 66 Start up sound 66 AF sound 66 Setup menu ( ) 66 File name 67 Self Portrait 67 Auto Focus lamp 67 Quick view 68 Imprinting the recording date 68 Setup menu ( ) 68 Copy To Card 69 Delete All 69 Formatting a memory 70 Setup menu ( ) 70 Language 70 Setting up the Date / Time / Date type 71 Initialisation 71 Selecting Video out type 72 Auto power off 73 Important...
... SETUP 62 Setup menu 64 Setup menu ( ) 64 OSD set 64 Display Bright 64 HDMI Size 65 Start up image 65 Setup menu ( ) 65 Sound Volume 65 Operation Sound 66 Shutter sound 66 Start up sound 66 AF sound 66 Setup menu ( ) 66 File name 67 Self Portrait 67 Auto Focus lamp 67 Quick view 68 Imprinting the recording date 68 Setup menu ( ) 68 Copy To Card 69 Delete All 69 Formatting a memory 70 Setup menu ( ) 70 Language 70 Setting up the Date / Time / Date type 71 Initialisation 71 Selecting Video out type 72 Auto power off 73 Important...

User Manual
Page 13
...; During extended use the rechargeable battery (SLB-1137D) supplied with the camera. Batteries can lose power over time and are measured under OIS shooting condition. Using the flash on the following shooting conditions Still image Approx. 100 MIN / Approx. 200 Using the fully charged battery, Auto mode, 10M image size, Fine image quality, Shot to charge the battery before using the camera. ■ SLB-1137D rechargeable battery specification Model Type Capacity Voltage Charging time (When the camera is turned off) SLB...
...; During extended use the rechargeable battery (SLB-1137D) supplied with the camera. Batteries can lose power over time and are measured under OIS shooting condition. Using the flash on the following shooting conditions Still image Approx. 100 MIN / Approx. 200 Using the fully charged battery, Auto mode, 10M image size, Fine image quality, Shot to charge the battery before using the camera. ■ SLB-1137D rechargeable battery specification Model Type Capacity Voltage Charging time (When the camera is turned off) SLB...

User Manual
Page 22
... lens or the flash when you press the shutter button down half way, it is inserted, an image will be stored in the internal memory. Select the AUTO mode by rotating the mode dial. 6. Press the horizontal smart button to configure advanced functions such as image size (p.33), quality (p.38), metering (p.36) and shooting mode (p.36). œ Refer to page 30 ~ 44 for quick and easy picture taking with optimal settings...
... lens or the flash when you press the shutter button down half way, it is inserted, an image will be stored in the internal memory. Select the AUTO mode by rotating the mode dial. 6. Press the horizontal smart button to configure advanced functions such as image size (p.33), quality (p.38), metering (p.36) and shooting mode (p.36). œ Refer to page 30 ~ 44 for quick and easy picture taking with optimal settings...
User Manual
Page 27
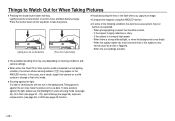
... conditions the Auto focus area system may appear on a solid surface or change to flash shot mode. ● Shooting against the sun may make the picture come out dark. Taking pictures against the light : It is very bright. - When there is strong reflected light, or when the background is best to confirm focus and flash battery charge. Lightly press the shutter button to take a picture against the light, please use a tripod, support the camera on the...
... conditions the Auto focus area system may appear on a solid surface or change to flash shot mode. ● Shooting against the sun may make the picture come out dark. Taking pictures against the light : It is very bright. - When there is strong reflected light, or when the background is best to confirm focus and flash battery charge. Lightly press the shutter button to take a picture against the light, please use a tripod, support the camera on the...
User Manual
Page 36
... can take self portraits more easily and quickly. œ Selectable modes : AUTO, PROGRAM, MANUAL, DUAL IS, PORTRAIT, SCENE (SMILE SHOT, BLINK DETECTION, CHILDREN, BEACH&SNOW, SELF SHOT, CAFÉ) 1. It automatically detects the face of available AF point from the 9 AF points. [CENTER AF] [MULTI AF] œ A When the camera focuses on the subject, the auto focus frame turns to red. > Start filming by pressing the shutter button. ●...
... can take self portraits more easily and quickly. œ Selectable modes : AUTO, PROGRAM, MANUAL, DUAL IS, PORTRAIT, SCENE (SMILE SHOT, BLINK DETECTION, CHILDREN, BEACH&SNOW, SELF SHOT, CAFÉ) 1. It automatically detects the face of available AF point from the 9 AF points. [CENTER AF] [MULTI AF] œ A When the camera focuses on the subject, the auto focus frame turns to red. > Start filming by pressing the shutter button. ●...
User Manual
Page 54
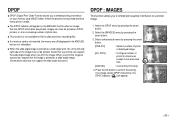
... embed print quantity information on your printer can then be printed. Select a desired sub menu by pressing the smart button. [ONE PIC] : Select a number of prints of displayed image. [ALL PICS] : Configure number of the image may not support the wide angle size print.) DPOF : IMAGES This function allows you print the image at an increasing number of photo labs. ■ This function is not available for Movie clips and Voice recording files. ■ If a memory card is...
... embed print quantity information on your printer can then be printed. Select a desired sub menu by pressing the smart button. [ONE PIC] : Select a number of prints of displayed image. [ALL PICS] : Configure number of the image may not support the wide angle size print.) DPOF : IMAGES This function allows you print the image at an increasing number of photo labs. ■ This function is not available for Movie clips and Voice recording files. ■ If a memory card is...

User Manual
Page 62
... with changed printer setting. 1. Icon Description Menu 1 Selecting images for printed pictures. 1 23 4 56 7 No. Print? œ You can select the Paper Size, Print Format, Paper Type, Print Quality, Date Print, and File Name Print menus for printing ONE PIC, ALL PICS 2 Setting the size of the printing AUTO, POSTCARD, CARD, paper 4x6, L, 2L, LETTER, A4, A3 3 Setting the number of pictures to be printed on all printers. Select the [Yes] menu. 3. In custom printing mode, press the Reset menu button. In custom printing mode, press the Print menu button. Now Printing...
... with changed printer setting. 1. Icon Description Menu 1 Selecting images for printed pictures. 1 23 4 56 7 No. Print? œ You can select the Paper Size, Print Format, Paper Type, Print Quality, Date Print, and File Name Print menus for printing ONE PIC, ALL PICS 2 Setting the size of the printing AUTO, POSTCARD, CARD, paper 4x6, L, 2L, LETTER, A4, A3 3 Setting the number of pictures to be printed on all printers. Select the [Yes] menu. 3. In custom printing mode, press the Reset menu button. In custom printing mode, press the Print menu button. Now Printing...

User Manual
Page 65
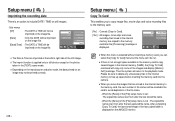
... set Display Bright HDMI Size Start Image Exit:BACK [Play back mode menu] [Full] : When the smart button is touched, the icons will be enlarged and OSD will be displayed. [Basic] : When the smart button is fixed as the [Normal] menu. Desc. Setup menu ( ) OSD set to the shooting conditions. - Hide Display Save OSD set OSD set Display Bright HDMI Size Start Image Exit:BACK [Recording mode menu] Full Basic Hide OSD set OSD set to [NTSC] and [576p] is not used...
... set Display Bright HDMI Size Start Image Exit:BACK [Play back mode menu] [Full] : When the smart button is touched, the icons will be enlarged and OSD will be displayed. [Basic] : When the smart button is fixed as the [Normal] menu. Desc. Setup menu ( ) OSD set to the shooting conditions. - Hide Display Save OSD set OSD set Display Bright HDMI Size Start Image Exit:BACK [Recording mode menu] Full Basic Hide OSD set OSD set to [NTSC] and [576p] is not used...
User Manual
Page 69
... in the memory card to copy saved images in the card to avoid duplication of the file name. - Setup menu ( ) Imprinting the recording date There is an option to include DATE / TIME on an image may not be printed correctly. > Setup menu ( ) Copy To Card This enables you move the images that are copied to the memory card after the [Processing!] message is displayed. Off Date Date & Time File Self Portrait AF Lamp Quick View Imprint Exit:BACK œ The Date & Time are imprinted...
... in the memory card to copy saved images in the card to avoid duplication of the file name. - Setup menu ( ) Imprinting the recording date There is an option to include DATE / TIME on an image may not be printed correctly. > Setup menu ( ) Copy To Card This enables you move the images that are copied to the memory card after the [Processing!] message is displayed. Off Date Date & Time File Self Portrait AF Lamp Quick View Imprint Exit:BACK œ The Date & Time are imprinted...
User Manual
Page 76
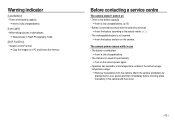
... Light!] • When taking pictures in dark places € Take pictures in Flash Photography mode. [DCF Full Error] • Violation of the camera usage temperature range. € Remove the batteries from the camera. Warm the camera and battery by placing them in your pocket and then immediately before shooting, place the battery in the camera and then shoot. > Warning indicator [Low Battery!] • There is turned off automatically € Turn on the camera power...
... Light!] • When taking pictures in dark places € Take pictures in Flash Photography mode. [DCF Full Error] • Violation of the camera usage temperature range. € Remove the batteries from the camera. Warm the camera and battery by placing them in your pocket and then immediately before shooting, place the battery in the camera and then shoot. > Warning indicator [Low Battery!] • There is turned off automatically € Turn on the camera power...

User Manual
Page 82
... of user manual are included in the CD-ROM Drive. ● PDF documents of your digital images and movie files with Windows explorer. You can use the camera as the camera driver. A USB Storage Driver is provided for Windows. You can find [Removable Disk] in -one multi media software solution. Before connecting the camera to the PC, you can use the camera with the Application CD. Search the PDF files with this camera to be installed. This software...
... of user manual are included in the CD-ROM Drive. ● PDF documents of your digital images and movie files with Windows explorer. You can use the camera as the camera driver. A USB Storage Driver is provided for Windows. You can find [Removable Disk] in -one multi media software solution. Before connecting the camera to the PC, you can use the camera with the Application CD. Search the PDF files with this camera to be installed. This software...

User Manual
Page 92
... back of the computer. € When the camera is an unexpected error during file transfer. € Turn the camera power off the camera, remove the USB cable, plug in Device Manager. € Install the camera driver correctly. FAQ ■ Please check the following if the USB connection malfunctions. Case 1 USB cable is not connected or it is not recognised by clicking Start ˆ (Settings) ˆ Control Panel ˆ (Performance and Maintenance) ˆ...
... back of the computer. € When the camera is an unexpected error during file transfer. € Turn the camera power off the camera, remove the USB cable, plug in Device Manager. € Install the camera driver correctly. FAQ ■ Please check the following if the USB connection malfunctions. Case 1 USB cable is not connected or it is not recognised by clicking Start ˆ (Settings) ˆ Control Panel ˆ (Performance and Maintenance) ˆ...

Quick Guide Ver.3.0 (English, French, Spanish)
Page 1
.... - Contents Getting to know your camera 1 Identification of features / Contents of camera 4 Battery life & Number of shot (Recording time) 6 When Using the Camera for the First Time : Smart button 7 When Using the Camera for the First Time : Setting up the Date / Time and Language 8 AMOLED monitor indicator 9 Mode dial 10 Taking a picture 11 Playingback, Deleting and Protecting Images 12 Using the remote control 14 Connecting to the HDTV using the HDMI cable 15 Downloading images 17 Specifications 18 FCC...
.... - Contents Getting to know your camera 1 Identification of features / Contents of camera 4 Battery life & Number of shot (Recording time) 6 When Using the Camera for the First Time : Smart button 7 When Using the Camera for the First Time : Setting up the Date / Time and Language 8 AMOLED monitor indicator 9 Mode dial 10 Taking a picture 11 Playingback, Deleting and Protecting Images 12 Using the remote control 14 Connecting to the HDTV using the HDMI cable 15 Downloading images 17 Specifications 18 FCC...

Quick Guide Ver.3.0 (English, Dutch, French, German, Italian, Portuguese, Spanish)
Page 1
... & Number of shot (Recording time) 6 When Using the Camera for the First Time : Smart button 7 When Using the Camera for the First Time : Setting up the Date / Time and Language 8 AMOLED monitor indicator 9 Mode dial 10 Taking a picture 11 Playingback, Deleting and Protecting Images 12 Using the remote control 14 Connecting to the HDTV using the HDMI cable 15 Downloading images 17 Specifications 18 FCC notice NOTE : This equipment has been tested and found to comply with Part...
... & Number of shot (Recording time) 6 When Using the Camera for the First Time : Smart button 7 When Using the Camera for the First Time : Setting up the Date / Time and Language 8 AMOLED monitor indicator 9 Mode dial 10 Taking a picture 11 Playingback, Deleting and Protecting Images 12 Using the remote control 14 Connecting to the HDTV using the HDMI cable 15 Downloading images 17 Specifications 18 FCC notice NOTE : This equipment has been tested and found to comply with Part...

Quick Guide Ver.3.0 (English, Danish, Finnish, German, Russian, Swedish)
Page 1
Contents Getting to know your camera 1 Identification of features / Contents of camera 4 Battery life & Number of shot (Recording time) 6 When Using the Camera for the First Time : Smart button 7 When Using the Camera for the First Time : Setting up the Date / Time and Language 8 AMOLED monitor indicator 9 Mode dial 10 Taking a picture 11 Playingback, Deleting and Protecting Images 12 Using the remote control 14 Connecting to the HDTV using the HDMI cable 15 Downloading images 17 Specifications 18 FCC notice...
Contents Getting to know your camera 1 Identification of features / Contents of camera 4 Battery life & Number of shot (Recording time) 6 When Using the Camera for the First Time : Smart button 7 When Using the Camera for the First Time : Setting up the Date / Time and Language 8 AMOLED monitor indicator 9 Mode dial 10 Taking a picture 11 Playingback, Deleting and Protecting Images 12 Using the remote control 14 Connecting to the HDTV using the HDMI cable 15 Downloading images 17 Specifications 18 FCC notice...
Quick Guide Ver.3.0 (English, Bulgarian, Czech, French, German, Hungarian, Italian, Polish, Romanian, Slovak)
Page 1
.... However, there is connected. - Contents Getting to know your camera 1 Identification of features / Contents of camera 4 Battery life & Number of shot (Recording time) 6 When Using the Camera for the First Time : Smart button 7 When Using the Camera for the First Time : Setting up the Date / Time and Language 8 AMOLED monitor indicator 9 Mode dial 10 Taking a picture 11 Playingback, Deleting and Protecting Images 12 Using the remote control 14 Connecting to the HDTV using the HDMI cable 15 Downloading images 17 Specifi...
.... However, there is connected. - Contents Getting to know your camera 1 Identification of features / Contents of camera 4 Battery life & Number of shot (Recording time) 6 When Using the Camera for the First Time : Smart button 7 When Using the Camera for the First Time : Setting up the Date / Time and Language 8 AMOLED monitor indicator 9 Mode dial 10 Taking a picture 11 Playingback, Deleting and Protecting Images 12 Using the remote control 14 Connecting to the HDTV using the HDMI cable 15 Downloading images 17 Specifi...

Quick Guide Ver.3.0 (English, Estonian, Latvian, Lithuanian, Russian)
Page 1
... shot (Recording time) 6 When Using the Camera for the First Time : Smart button 7 When Using the Camera for compliance could void the user's authority to the following measures: - This equipment generates, uses and can be determined by the manufacturer responsible for the First Time : Setting up the Date / Time and Language 8 AMOLED monitor indicator 9 Mode dial 10 Taking a picture 11 Playingback, Deleting and Protecting Images 12 Using the remote control 14 Connecting to the HDTV using the HDMI cable...
... shot (Recording time) 6 When Using the Camera for the First Time : Smart button 7 When Using the Camera for compliance could void the user's authority to the following measures: - This equipment generates, uses and can be determined by the manufacturer responsible for the First Time : Setting up the Date / Time and Language 8 AMOLED monitor indicator 9 Mode dial 10 Taking a picture 11 Playingback, Deleting and Protecting Images 12 Using the remote control 14 Connecting to the HDTV using the HDMI cable...
Quick Guide Ver.3.0 (English, Arabic, Chinese, Indonesian, Thai, Turkish)
Page 1
... button 7 When Using the Camera for the First Time : Setting up the Date / Time and Language 8 AMOLED monitor indicator 9 Mode dial 10 Taking a picture 11 Playingback, Deleting and Protecting Images 12 Using the remote control 14 Connecting to the HDTV using the HDMI cable 15 Downloading images 17 Specifications 18 FCC notice NOTE : This equipment has been tested and found to comply with the limits for a Class B digital device, pursuant to part...
... button 7 When Using the Camera for the First Time : Setting up the Date / Time and Language 8 AMOLED monitor indicator 9 Mode dial 10 Taking a picture 11 Playingback, Deleting and Protecting Images 12 Using the remote control 14 Connecting to the HDTV using the HDMI cable 15 Downloading images 17 Specifications 18 FCC notice NOTE : This equipment has been tested and found to comply with the limits for a Class B digital device, pursuant to part...


