
User Manual (ENGLISH)
Page 5
...Volume Control 28 Setting the Clock 29 Option 1: Setting the Clock Manually 29 Option 2: Using the Local PBS Channel to Automatically Set the TV Clock 30 Setting the On/Off Timer 32 Setting the Sleep Timer 34 Sleep timer 34 Viewing Closed Captions 35 Using the V-Chip (... Using the Anti-Theft Kensington Lock 53 Retractable Stand 54 Installing VESA compliant mounting devices 55 Installing the Wall Mount Kit (LT-P1545, LT-P1745, LT-P1745U) . .56 Installing the Wall Mount Kit (LT-P2045, LT-2045U 58 Display Mode 60 Using Your TV in Another Country 60 Specifications 61 CONTENTS 4
...Volume Control 28 Setting the Clock 29 Option 1: Setting the Clock Manually 29 Option 2: Using the Local PBS Channel to Automatically Set the TV Clock 30 Setting the On/Off Timer 32 Setting the Sleep Timer 34 Sleep timer 34 Viewing Closed Captions 35 Using the V-Chip (... Using the Anti-Theft Kensington Lock 53 Retractable Stand 54 Installing VESA compliant mounting devices 55 Installing the Wall Mount Kit (LT-P1545, LT-P1745, LT-P1745U) . .56 Installing the Wall Mount Kit (LT-P2045, LT-2045U 58 Display Mode 60 Using Your TV in Another Country 60 Specifications 61 CONTENTS 4

User Manual (ENGLISH)
Page 8
... Connect to an antenna or to the video output port on connecting equipment, see pages 6~12. < LT-P1745/ LT-P1745U > < LT-P1545 / LT-P2045 / LT-P2045U > POWER INPUT PC AUDIO IN (STEREO) PC VIDEO INPUT Connect to a cable TV system. For more information on your PC. VIDEO INPUT Connect a video signal from a camcorder or VCR. COMPONENT Connect a component...
... Connect to an antenna or to the video output port on connecting equipment, see pages 6~12. < LT-P1745/ LT-P1745U > < LT-P1545 / LT-P2045 / LT-P2045U > POWER INPUT PC AUDIO IN (STEREO) PC VIDEO INPUT Connect to a cable TV system. For more information on your PC. VIDEO INPUT Connect a video signal from a camcorder or VCR. COMPONENT Connect a component...
User Manual (ENGLISH)
Page 57
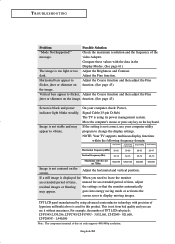
... the keyboard. video Adapter. Horizontal bars appear to vibrate. NOTE: Your TV supports multiscan display functions within the following frequency domain: 15"(LT-P1545) 17"(LT-P1745) 20"(LT-P2045) 20"(LT-P2045U) 17"(LT-P1745U) Horizontal frequency(kHz) 30~69 30~80 28~33 28~47 Vertical ... Screen is not correct, use it without uneasiness. For example, the number of TFT LCD sub pixels: LT-P1545-2,359,296, LT-P1745/LT-P1745U - 3,932,160, LT-P2045 - 921,600, LT-P2045U - 1,440,000 Note : The component terminal of the message. English-52 Image is not from bad...
... the keyboard. video Adapter. Horizontal bars appear to vibrate. NOTE: Your TV supports multiscan display functions within the following frequency domain: 15"(LT-P1545) 17"(LT-P1745) 20"(LT-P2045) 20"(LT-P2045U) 17"(LT-P1745U) Horizontal frequency(kHz) 30~69 30~80 28~33 28~47 Vertical ... Screen is not correct, use it without uneasiness. For example, the number of TFT LCD sub pixels: LT-P1545-2,359,296, LT-P1745/LT-P1745U - 3,932,160, LT-P2045 - 921,600, LT-P2045U - 1,440,000 Note : The component terminal of the message. English-52 Image is not from bad...
User Manual (ENGLISH)
Page 59
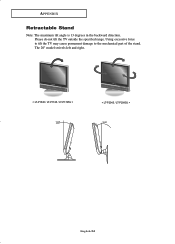
Please do not tilt the TV outside the specified range. Using excessive force to tilt the TV may cause permanent damage to the mechanical part of the stand. APPENDIX Retractable Stand Note: The maximum tilt angle is 13 degrees in the backward direction. The 20" model swivels left and right. < LT-P1545 / LT-P1745 / LT-P1745U > < LT-P2045 / LT-P2045U > English-54
Please do not tilt the TV outside the specified range. Using excessive force to tilt the TV may cause permanent damage to the mechanical part of the stand. APPENDIX Retractable Stand Note: The maximum tilt angle is 13 degrees in the backward direction. The 20" model swivels left and right. < LT-P1545 / LT-P1745 / LT-P1745U > < LT-P2045 / LT-P2045U > English-54
User Manual (ENGLISH)
Page 60
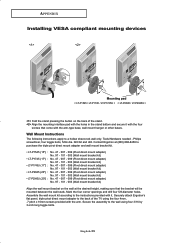
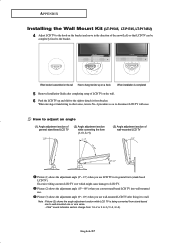
...099 (Pivot direct mount adapter) No. 97 - 101 - 003 (Wall mount bracket kit) Align the wall mount bracket on the back of the TV using four 3/16 by 3-inch long toggle bolts. Philips screwdriver, four toggle bolts, 5/8in dia. Mark the four corner openings and drill four ... stand bottom and secure it . Drill bit and drill. APPENDIX Installing VESA compliant mounting devices SCART SCART SCART Mounting pad < LT-P1545 / LT-P1745 / LT-P1745U > < LT-P2045 / LT-P2045U > Fold the stand pressing the button on the wall at the desired height, making sure that come with the arm-type...
...099 (Pivot direct mount adapter) No. 97 - 101 - 003 (Wall mount bracket kit) Align the wall mount bracket on the back of the TV using four 3/16 by 3-inch long toggle bolts. Philips screwdriver, four toggle bolts, 5/8in dia. Mark the four corner openings and drill four ... stand bottom and secure it . Drill bit and drill. APPENDIX Installing VESA compliant mounting devices SCART SCART SCART Mounting pad < LT-P1545 / LT-P1745 / LT-P1745U > < LT-P2045 / LT-P2045U > Fold the stand pressing the button on the wall at the desired height, making sure that come with the arm-type...
User Manual (ENGLISH)
Page 61
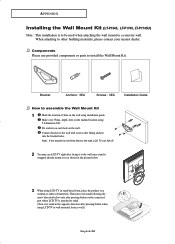
Bracket Anchors : 3EA Screws : 3EA Installation Guide How to install the Wall Mount Kit. Components Please use LCD TV right after fixing it to the wall with screws after fitting anchors into the bracket holes. Fix anchors on each hole on the marked... contact your nearest dealer. When attaching to stand. (Turn over 35mm- depth- APPENDIX Installing the Wall Mount Kit (LT-P1545, LT-P1745, LT-P1745U) Note : This installation is not firmly fixed to the wall, LCD TV can fall off. 2 You may use provided components or parts to assemble the Wall Mount Kit 1 Mark the location...
Bracket Anchors : 3EA Screws : 3EA Installation Guide How to install the Wall Mount Kit. Components Please use LCD TV right after fixing it to the wall with screws after fitting anchors into the bracket holes. Fix anchors on each hole on the marked... contact your nearest dealer. When attaching to stand. (Turn over 35mm- depth- APPENDIX Installing the Wall Mount Kit (LT-P1545, LT-P1745, LT-P1745U) Note : This installation is not firmly fixed to the wall, LCD TV can fall off. 2 You may use provided components or parts to assemble the Wall Mount Kit 1 Mark the location...
User Manual (ENGLISH)
Page 62
... or transferring to other areas, reverse No. 4 procedure so as to 2 (1->2, 3->2). Picture (3) shows the adjustment angle (0°~ 10°) when you convert stand-based LCD TV into wall-mounted one or vice versa. - Excessive tilting can be completely fixed to the bracket. Picture (2) shows the adjustment angle (13°~ 80°... assembled on the wall How to hang monitor up and shift to the right to detach it to wall. APPENDIX Installing the Wall Mount Kit (LT-P1545, LT-P1745, LT-P1745U) 4 Adjust LCD TV to the hook on the bracket and move in its general form (stand-based LCD...
... or transferring to other areas, reverse No. 4 procedure so as to 2 (1->2, 3->2). Picture (3) shows the adjustment angle (0°~ 10°) when you convert stand-based LCD TV into wall-mounted one or vice versa. - Excessive tilting can be completely fixed to the bracket. Picture (2) shows the adjustment angle (13°~ 80°... assembled on the wall How to hang monitor up and shift to the right to detach it to wall. APPENDIX Installing the Wall Mount Kit (LT-P1545, LT-P1745, LT-P1745U) 4 Adjust LCD TV to the hook on the bracket and move in its general form (stand-based LCD...
User Manual (ENGLISH)
Page 66
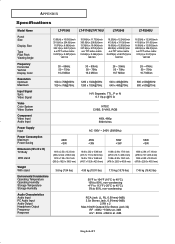
... Input 480i, 480p 500mVrms Power Supply Input AC 100V ~ 240V (50/60Hz) Power Consumption Maximum Power Saving Dimension (W x D x H) TV Body With stand Weight With stand 40W APPENDIX Specifications Model Name LT-P1545 LT-P1745/LT-P1745U LT-P2045 LT-P2045U Panel Size Display Size Type Pixel Pitch Viewing Angle 13.05(H) x 10.03(V)inch 331.6(H) x 254.9(V)mm 11...
... Input 480i, 480p 500mVrms Power Supply Input AC 100V ~ 240V (50/60Hz) Power Consumption Maximum Power Saving Dimension (W x D x H) TV Body With stand Weight With stand 40W APPENDIX Specifications Model Name LT-P1545 LT-P1745/LT-P1745U LT-P2045 LT-P2045U Panel Size Display Size Type Pixel Pitch Viewing Angle 13.05(H) x 10.03(V)inch 331.6(H) x 254.9(V)mm 11...


