

User Manual (ENGLISH)
Page 4
CONTENTS Chapter 1: Your New TV List of Features 1 List of Parts 1 Familiarizing Yourself with Your New TV 2 Front Panel Buttons 2 Rear Panel Jacks 3 Remote Control 4 Installing Batteries in the Remote Control 5 If remote control doesn't work 5 Chapter 2: Installation Connecting VHF and UHF Antennas 6 Antennas with 300-ohm Flat Twin Leads 6 Antennas with 75-ohm Round Leads 7 Separate...
CONTENTS Chapter 1: Your New TV List of Features 1 List of Parts 1 Familiarizing Yourself with Your New TV 2 Front Panel Buttons 2 Rear Panel Jacks 3 Remote Control 4 Installing Batteries in the Remote Control 5 If remote control doesn't work 5 Chapter 2: Installation Connecting VHF and UHF Antennas 6 Antennas with 300-ohm Flat Twin Leads 6 Antennas with 75-ohm Round Leads 7 Separate...

User Manual (ENGLISH)
Page 6
Remote Control (BN59-00429A) & Batteries (AAA x 2) 17" 15" / 20" Power Cord 17" : 3903-000144 15"/20" : 3903-... Chapter One YOUR NEW TV List of Parts Please make sure the following special features: • Easy-to-use remote control • Easy-to-use on-screen menu system • Automatic timer to turn the TV on and off &#... channels.(Air : 69 , STD : 125 ) • A special filter to reduce or eliminate reception problems • Fine tuning control for the sharpest picture possible • A built-in multi-channel sound decoder for stereo and bilingual listening • Built-in, dual...
Remote Control (BN59-00429A) & Batteries (AAA x 2) 17" 15" / 20" Power Cord 17" : 3903-000144 15"/20" : 3903-... Chapter One YOUR NEW TV List of Parts Please make sure the following special features: • Easy-to-use remote control • Easy-to-use on-screen menu system • Automatic timer to turn the TV on and off &#... channels.(Air : 69 , STD : 125 ) • A special filter to reduce or eliminate reception problems • Fine tuning control for the sharpest picture possible • A built-in multi-channel sound decoder for stereo and bilingual listening • Built-in, dual...

User Manual (ENGLISH)
Page 7
... more advanced features, you set of external headphones to make selections. These keys can also use the remote control. Green shows when you must use the SOURCE( ) button on the TV's control panel to this spot on . HEADPHONE JACK Connect a set Timer on or off after the power ...is on the TV. English-2 POWER Press to decrease or increase the volume. VOL + Press to turn the power on -screen menu. SPEAKERS REMOTE CONTROL SENSOR Aim the remote control towards this jack...
... more advanced features, you set of external headphones to make selections. These keys can also use the remote control. Green shows when you must use the SOURCE( ) button on the TV's control panel to this spot on . HEADPHONE JACK Connect a set Timer on or off after the power ...is on the TV. English-2 POWER Press to decrease or increase the volume. VOL + Press to turn the power on -screen menu. SPEAKERS REMOTE CONTROL SENSOR Aim the remote control towards this jack...

User Manual (ENGLISH)
Page 9
...the broadcast/cable channels that are compatible with VCR or DVD units that you receive. When using the remote, always point it directly at the TV. SLEEP(See Page 34) Press to select a time ...settings. CH and CH (Channel Up/Down) Press CH or CH to change menu values. (The remote control will only function with the LCD TV.) AUTO PROG. MUTE (See Page 13) Press to turn ...off the sound. EXIT Press the menu to the previous channel. YOUR NEW TV Remote Control You can use the remote control up to a distance of about 23 feet from memory. POWER (See Page 13) Turns the...
...the broadcast/cable channels that are compatible with VCR or DVD units that you receive. When using the remote, always point it directly at the TV. SLEEP(See Page 34) Press to select a time ...settings. CH and CH (Channel Up/Down) Press CH or CH to change menu values. (The remote control will only function with the LCD TV.) AUTO PROG. MUTE (See Page 13) Press to turn ...off the sound. EXIT Press the menu to the previous channel. YOUR NEW TV Remote Control You can use the remote control up to a distance of about 23 feet from memory. POWER (See Page 13) Turns the...

User Manual (ENGLISH)
Page 10
... "-" ends of the batteries reversed? 3. Remove the batteries and store them in the Remote Control 1 Slide the cover out completely. 2 Install two AAA size batteries. Did the batteries run out? 4. The remote control can be using the remote control for about one year.) If remote control doesn't work Check the following: 1. Is there a special fluorescent light or a neon...
... "-" ends of the batteries reversed? 3. Remove the batteries and store them in the Remote Control 1 Slide the cover out completely. 2 Install two AAA size batteries. Did the batteries run out? 4. The remote control can be using the remote control for about one year.) If remote control doesn't work Check the following: 1. Is there a special fluorescent light or a neon...

User Manual (ENGLISH)
Page 18
... screen changes automatically as in the lower-left corner of the screen. 2 To turn mute off . Adjusting the Volume 1 To control speaker volume. 2 To control headphone volume. - Changing Channels Using the Channel Buttons 1 Press the CH / buttons to quickly alternate between two channels that were ...-13 Press the VOL +/- The word " "will not see channels that are far apart, tune to one channel, then use the Power button on the remote control. Chapter Three S P E C I A L F E AT U R E S Turning the TV On and Off Press the POWER button on the front panel. You can ...
... screen changes automatically as in the lower-left corner of the screen. 2 To turn mute off . Adjusting the Volume 1 To control speaker volume. 2 To control headphone volume. - Changing Channels Using the Channel Buttons 1 Press the CH / buttons to quickly alternate between two channels that were ...-13 Press the VOL +/- The word " "will not see channels that are far apart, tune to one channel, then use the Power button on the remote control. Chapter Three S P E C I A L F E AT U R E S Turning the TV On and Off Press the POWER button on the front panel. You can ...

User Manual (ENGLISH)
Page 19
... current channel and the status of certain audio-video settings. 1 Press the INFO button on -screen displays disappear after about ten seconds. The on the control panel of the TV to his/her preference and shows the current settings. Then press ENTER to access the icon's sub-menu. 3 Press the EXIT... UP/DOWN buttons to exit. The TV will display the channel, the type of sound, and the status of the five icons. The on the remote control. Press the button once more or wait approximately 10 seconds and it disappears automatically.
... current channel and the status of certain audio-video settings. 1 Press the INFO button on -screen displays disappear after about ten seconds. The on the control panel of the TV to his/her preference and shows the current settings. Then press ENTER to access the icon's sub-menu. 3 Press the EXIT... UP/DOWN buttons to exit. The TV will display the channel, the type of sound, and the status of the five icons. The on the remote control. Press the button once more or wait approximately 10 seconds and it disappears automatically.
User Manual (ENGLISH)
Page 20
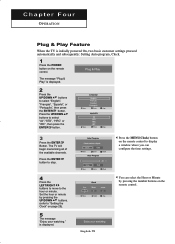
... ENTER Button. The TV will begin memorizing all of the available channels. Set the hour or minute by pressing the number buttons on the remote control to display a window where you can select the Hour or Minute by pressing the UP/DOWN buttons. (refer to select "English", "Fran...çais", "Español", or "Português", then press the ENTER button. Press the MENU(Clock) button on the remote control. Chapter Four O P E R AT I O N Plug & Play Feature When the TV is displayed. The message "Plug & Play" is displayed. 2 Press the UP/...
... ENTER Button. The TV will begin memorizing all of the available channels. Set the hour or minute by pressing the number buttons on the remote control to display a window where you can select the Hour or Minute by pressing the UP/DOWN buttons. (refer to select "English", "Fran...çais", "Español", or "Português", then press the ENTER button. Press the MENU(Clock) button on the remote control. Chapter Four O P E R AT I O N Plug & Play Feature When the TV is displayed. The message "Plug & Play" is displayed. 2 Press the UP/...
User Manual (ENGLISH)
Page 23
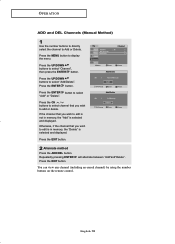
... EXIT button. 2 Alternate method Press the ADD/DEL button. You can view any channel (including an erased channel) by using the number buttons on the remote control. English-18 Otherwise, if the channel that you wish to display the menu.
... EXIT button. 2 Alternate method Press the ADD/DEL button. You can view any channel (including an erased channel) by using the number buttons on the remote control. English-18 Otherwise, if the channel that you wish to display the menu.
User Manual (ENGLISH)
Page 26
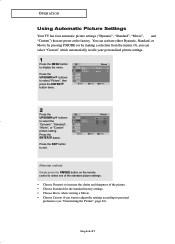
... has four automatic picture settings ("Dynamic", "Standard", "Movie", and "Custom") that are preset at the factory. Alternate method: Simply press the P.MODE button on the remote control to select one of the standard picture settings. • Choose Dynamic to increase the clarity and sharpness of the picture. • Choose Standard for the...
... has four automatic picture settings ("Dynamic", "Standard", "Movie", and "Custom") that are preset at the factory. Alternate method: Simply press the P.MODE button on the remote control to select one of the standard picture settings. • Choose Dynamic to increase the clarity and sharpness of the picture. • Choose Standard for the...

User Manual (ENGLISH)
Page 28
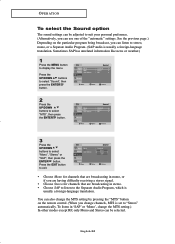
... -screen menu). Press the UP/DOWN buttons to select one of them by pressing the S.MODE button (or by making a selection from the on the remote control to select "Sound", then press the ENTER button.
... -screen menu). Press the UP/DOWN buttons to select one of them by pressing the S.MODE button (or by making a selection from the on the remote control to select "Sound", then press the ENTER button.
User Manual (ENGLISH)
Page 29
... in stereo. • Choose SAP to listen to the Separate Audio Program, which is set to "Stereo" automatically. See the previous page.) Depending on the remote control. (When you can listen to stereo, mono, or a Separate Audio Program. (SAP audio is usually a foreign-language translation. O P E R AT I O N To select the Sound option The...
... in stereo. • Choose SAP to listen to the Separate Audio Program, which is set to "Stereo" automatically. See the previous page.) Depending on the remote control. (When you can listen to stereo, mono, or a Separate Audio Program. (SAP audio is usually a foreign-language translation. O P E R AT I O N To select the Sound option The...
User Manual (ENGLISH)
Page 40
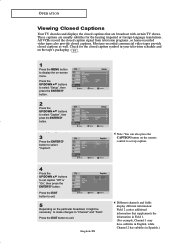
... button. Different channels and fields display different information: Field 2 carries additional information that are broadcast with certain TV shows. button to exit. 5 Depending on the remote control to set caption "Off" or In"Otenx",tthmeondpere, sisnftohremation unrelated toEtNheTEpRrograbmu,ttsounc.h as well. Check for the hearing impaired or foreign-language translations. English-35...
... button. Different channels and fields display different information: Field 2 carries additional information that are broadcast with certain TV shows. button to exit. 5 Depending on the remote control to set caption "Off" or In"Otenx",tthmeondpere, sisnftohremation unrelated toEtNheTEpRrograbmu,ttsounc.h as well. Check for the hearing impaired or foreign-language translations. English-35...
User Manual (ENGLISH)
Page 41
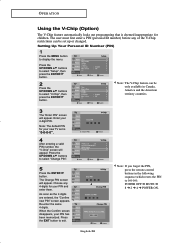
... PIN has been memorized. The Change PIN screen will appear. Press the EXIT button to exit. ➜ Note: If you forget the PIN, press the remote-control buttons in Canada, America and the American territory countries. 3 The "Enter PIN" screen will appear. The user must first enter a PIN (personal ID number) before...
... PIN has been memorized. The Change PIN screen will appear. Press the EXIT button to exit. ➜ Note: If you forget the PIN, press the remote-control buttons in Canada, America and the American territory countries. 3 The "Enter PIN" screen will appear. The user must first enter a PIN (personal ID number) before...
User Manual (ENGLISH)
Page 48
... the picture so that it is aligned to the center of the picture quality adjustment is not removed by pressing the SOURCE button on the remote control. 1 Press the MENU button to the utmost and fine tune again. English-43 Press the UP/DOWN buttons to select "Coarse" or "Fine", then press...
... the picture so that it is aligned to the center of the picture quality adjustment is not removed by pressing the SOURCE button on the remote control. 1 Press the MENU button to the utmost and fine tune again. English-43 Press the UP/DOWN buttons to select "Coarse" or "Fine", then press...
User Manual (ENGLISH)
Page 49
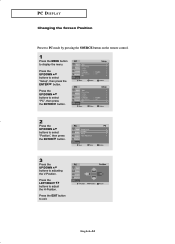
English-44 Press the UP/DOWN buttons to adjusting the V-Position. Press the UP/DOWN buttons to select "PC", then press the ENTER button. 2 Press the UP/DOWN buttons to select "Position", then press the ENTER button. 3 Press the UP/DOWN buttons to select "Setup", then press the ENTER button. PC DISPLAY Changing the Screen Position Preset to PC mode by pressing the SOURCE button on the remote control. 1 Press the MENU button to exit. Press the EXIT button to display the menu. Press the LEFT/RIGHT buttons to adjust the H-Position.
English-44 Press the UP/DOWN buttons to adjusting the V-Position. Press the UP/DOWN buttons to select "PC", then press the ENTER button. 2 Press the UP/DOWN buttons to select "Position", then press the ENTER button. 3 Press the UP/DOWN buttons to select "Setup", then press the ENTER button. PC DISPLAY Changing the Screen Position Preset to PC mode by pressing the SOURCE button on the remote control. 1 Press the MENU button to exit. Press the EXIT button to display the menu. Press the LEFT/RIGHT buttons to adjust the H-Position.
User Manual (ENGLISH)
Page 50
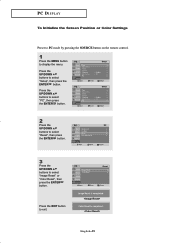
Press the UP/DOWN buttons to select "PC", then press the ENTER button. 2 Press the UP/DOWN buttons to select "Reset", then press the ENTER button. 3 Press the UP/DOWN buttons to select "Setup", then press the ENTER button. English-45 Press the UP/DOWN buttons to select "Image Reset" or "Color Reset", then press the ENTER button. PC DISPLAY To Initialize the Screen Position or Color Settings Preset to PC mode by pressing the SOURCE button on the remote control. 1 Press the MENU button to exit. Press the EXIT button to display the menu.
Press the UP/DOWN buttons to select "PC", then press the ENTER button. 2 Press the UP/DOWN buttons to select "Reset", then press the ENTER button. 3 Press the UP/DOWN buttons to select "Setup", then press the ENTER button. English-45 Press the UP/DOWN buttons to select "Image Reset" or "Color Reset", then press the ENTER button. PC DISPLAY To Initialize the Screen Position or Color Settings Preset to PC mode by pressing the SOURCE button on the remote control. 1 Press the MENU button to exit. Press the EXIT button to display the menu.

User Manual (ENGLISH)
Page 51
... the settings and adjusts the frequency values and positions. Press the EXIT button t o exit. Preset to PC mode by pressing the SOURCE button on the remote control. 1 Press the MENU button to select "Setup", then press the ENTER button. PC DISPLAY How to Auto Adjust Use the Auto Adjust function to select...
... the settings and adjusts the frequency values and positions. Press the EXIT button t o exit. Preset to PC mode by pressing the SOURCE button on the remote control. 1 Press the MENU button to select "Setup", then press the ENTER button. PC DISPLAY How to Auto Adjust Use the Auto Adjust function to select...

User Manual (ENGLISH)
Page 52
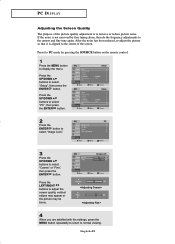
Press the EXIT button to select the "Entertain", "Internet", "Text", or "Custom" picture setting. English-47 Press ENTER button. Press the UP/DOWN buttons to select "Picture", then press the ENTER button twice. 2 Press the UP/DOWN buttons to exit. PC DISPLAY Using Automatic Picture Settings Preset to PC mode by pressing the SOURCE button on the remote control. 1 Press the MENU button to display the menu.
Press the EXIT button to select the "Entertain", "Internet", "Text", or "Custom" picture setting. English-47 Press ENTER button. Press the UP/DOWN buttons to select "Picture", then press the ENTER button twice. 2 Press the UP/DOWN buttons to exit. PC DISPLAY Using Automatic Picture Settings Preset to PC mode by pressing the SOURCE button on the remote control. 1 Press the MENU button to display the menu.

User Manual (ENGLISH)
Page 53
...,and sharpness according to personal preference. (Alternatively, you select "Contrast", pressing RIGHT increases it. PC DISPLAY Customizing the Picture You can use the on the remote control. 1 Press the MENU button to display the menu. English-48 For example, if you can use one of a particular item.
...,and sharpness according to personal preference. (Alternatively, you select "Contrast", pressing RIGHT increases it. PC DISPLAY Customizing the Picture You can use the on the remote control. 1 Press the MENU button to display the menu. English-48 For example, if you can use one of a particular item.

