User Manual (ENGLISH)
Page 3
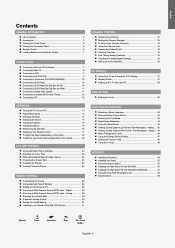
...DVD Player/Set-Top Box via DVI 10 Connecting a DVD Player/Set-Top Box via HDMI 11 Connecting a Digital Audio System 11 Connecting an Amplifier/DVD Home Theater 12 Connecting a PC 12 OPERATION Turning the TV On and Off 13 Plug & Play Feature 13 Changing Channels 14 Adjusting the Volume 15... the Digital-Signal Strength 36 LNA (Low Noise Amplifier 36 PC DISPLAY Using Your TV as a Computer (PC) Display 37 Display Modes 37 Setting up the TV with your PC 38 TIME SETTING Setting the Clock 40 FUNCTION DESCRIPTION Selecting a Menu Language 43 Setting the Blue Screen Mode 43 Selecting the...
...DVD Player/Set-Top Box via DVI 10 Connecting a DVD Player/Set-Top Box via HDMI 11 Connecting a Digital Audio System 11 Connecting an Amplifier/DVD Home Theater 12 Connecting a PC 12 OPERATION Turning the TV On and Off 13 Plug & Play Feature 13 Changing Channels 14 Adjusting the Volume 15... the Digital-Signal Strength 36 LNA (Low Noise Amplifier 36 PC DISPLAY Using Your TV as a Computer (PC) Display 37 Display Modes 37 Setting up the TV with your PC 38 TIME SETTING Setting the Clock 40 FUNCTION DESCRIPTION Selecting a Menu Language 43 Setting the Blue Screen Mode 43 Selecting the...
User Manual (ENGLISH)
Page 6
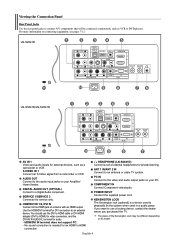
... dealer where you purchased the TV. COMPONENT IN Connect Component video/audio. Use the HDMI/DVI terminal for private listening. ANT 1 IN/ANT 2 IN Connect to a Digital Audio component. If you want to use the DVI to HDMI cable or DVI-HDMI adapter (DVI to HDMI) for video connection, and ...the DVI-IN 'R-AUDIO-L' terminal for service only. HDMI/DVI IN 1/2, DVI IN Connect to the HDMI jack of external headphones for DVI connection to an external device...
... dealer where you purchased the TV. COMPONENT IN Connect Component video/audio. Use the HDMI/DVI terminal for private listening. ANT 1 IN/ANT 2 IN Connect to a Digital Audio component. If you want to use the DVI to HDMI cable or DVI-HDMI adapter (DVI to HDMI) for video connection, and ...the DVI-IN 'R-AUDIO-L' terminal for service only. HDMI/DVI IN 1/2, DVI IN Connect to the HDMI jack of external headphones for DVI connection to an external device...
User Manual (ENGLISH)
Page 12
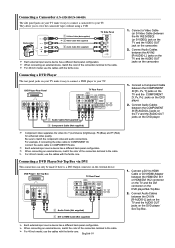
When connecting an external device, match the color of the connection terminal to HDMI Cable (Not supplied) 1. For 40 inch model, use the cables with the ferrite core. DVD Player / Set-Top Box TV Rear Panel 2 Audio Cable (Not supplied) 1 DVI to the cable. When connecting an external device, match the...easy to connect a camcorder to HDMI Cable or DVI-HDMI Adapter between the AV IN2 [VIDEO] (or S-VIDEO) jack on the TV and the VIDEO OUT jack on the DVD player/Set-Top Box. 2. Each external input source device has a different back panel configuration. For 40 inch model, use the cables...
When connecting an external device, match the color of the connection terminal to HDMI Cable (Not supplied) 1. For 40 inch model, use the cables with the ferrite core. DVD Player / Set-Top Box TV Rear Panel 2 Audio Cable (Not supplied) 1 DVI to the cable. When connecting an external device, match the...easy to connect a camcorder to HDMI Cable or DVI-HDMI Adapter between the AV IN2 [VIDEO] (or S-VIDEO) jack on the TV and the VIDEO OUT jack on the DVD player/Set-Top Box. 2. Each external input source device has a different back panel configuration. For 40 inch model, use the cables...

User Manual (ENGLISH)
Page 13
... Audio System The rear panel jacks on the DVD player/Set-Top Box. Connect an Optical Cable between the HDMI/DVI 1 or HDMI/DVI 2 connector on the TV and the HDMI connector on your TV. For 40 inch model, use the cables with the ferrite core. 1. English-11 Each external input source device has a different back...
... Audio System The rear panel jacks on the DVD player/Set-Top Box. Connect an Optical Cable between the HDMI/DVI 1 or HDMI/DVI 2 connector on the TV and the HDMI connector on your TV. For 40 inch model, use the cables with the ferrite core. 1. English-11 Each external input source device has a different back...
User Manual (ENGLISH)
Page 14
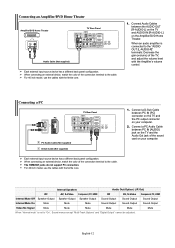
... Connecting a PC PC TV Rear Panel 2 PC Audio Cable (Not supplied) 1 D-Sub Cable (Not supplied) Each external input source device has a different back panel configuration. Internal Speakers Audio Out (Optical, L/R Out) RF AV, S-Video Component, PC, HDMI RF AV, S-Video Component, PC, HDMI Internal Mute Off Speaker...the cable. When connecting an external device, match the color of the TV, and adjust the volume level with the Amplifier's volume control. For 40 inch model, use the cables with the ferrite core. 1. For 40 inch model, use the cables with the ferrite core. 1. Connect a...
... Connecting a PC PC TV Rear Panel 2 PC Audio Cable (Not supplied) 1 D-Sub Cable (Not supplied) Each external input source device has a different back panel configuration. Internal Speakers Audio Out (Optical, L/R Out) RF AV, S-Video Component, PC, HDMI RF AV, S-Video Component, PC, HDMI Internal Mute Off Speaker...the cable. When connecting an external device, match the color of the TV, and adjust the volume level with the Amplifier's volume control. For 40 inch model, use the cables with the ferrite core. 1. For 40 inch model, use the cables with the ferrite core. 1. Connect a...
User Manual (ENGLISH)
Page 24
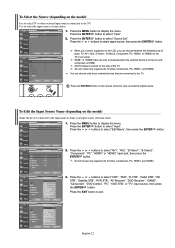
...your input source selection easier. 1. AV2/S-Video2 is turned on the TV's rear panel. You can choose between the following sets of jacks: TV, AV1, AV2, S-Video1, S-Video2, Component, PC, HDMI1, or HDMI2 on and connected via HDMI. Press the EXIT button to select "Source List". Press the ENTER... or buttons to select signal source, then press the ENTER button. When you connect equipment to the LCD, you can choose only those external devices that are connected to the TV. HDMI1 or HDMI2 input can only be selected when the external device is placed on the model) Use...
...your input source selection easier. 1. AV2/S-Video2 is turned on the TV's rear panel. You can choose between the following sets of jacks: TV, AV1, AV2, S-Video1, S-Video2, Component, PC, HDMI1, or HDMI2 on and connected via HDMI. Press the EXIT button to select "Source List". Press the ENTER... or buttons to select signal source, then press the ENTER button. When you connect equipment to the LCD, you can choose only those external devices that are connected to the TV. HDMI1 or HDMI2 input can only be selected when the external device is placed on the model) Use...

User Manual (ENGLISH)
Page 25
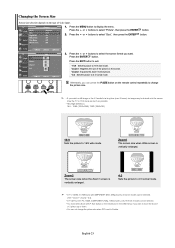
...press the ENTER button. 2. Press the ENTER button. Press the or buttons to be adjusted accordingly. Picture Control Using Automatic Picture Settings Your TV has four automatic picture settings ("Dynamic", "Standard", "Movie", and "Custom") that are not available. Press the EXIT button to exit. ...the factory. Press the ENTER button again. Choose Standard for each input. 3. When in HDMI, PC or any Component mode. • The Tint cannot be adjusted while watching Digital TV. • Each adjusted setting will be stored separately according to Contrast, Brightness, Sharpness, ...
...press the ENTER button. 2. Press the ENTER button. Press the or buttons to be adjusted accordingly. Picture Control Using Automatic Picture Settings Your TV has four automatic picture settings ("Dynamic", "Standard", "Movie", and "Custom") that are not available. Press the EXIT button to exit. ...the factory. Press the ENTER button again. Choose Standard for each input. 3. When in HDMI, PC or any Component mode. • The Tint cannot be adjusted while watching Digital TV. • Each adjusted setting will be stored separately according to Contrast, Brightness, Sharpness, ...
User Manual (ENGLISH)
Page 27
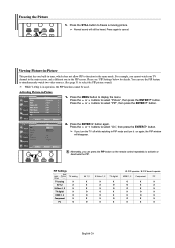
...the type of video input. 1. Zoom1 The screen size when Wide screen is vertically enlarged. 4:3 Sets the picture to 4:3 normal mode. • In TV, VIDEO, S-VIDEO,and all COMPONENT (480i, 480p) modes, all screen modes can be selected. (16:9 • Zoom1 • Zoom2 • 4:3). • ...In TV(DTV), DVI, PC, HDMI, COMPONENT (720p, 1080i) modes, only 16:9 & 4:3 modes can press the P.SIZE button on the remote (not in 16:9 mode as much as possible. •...
...the type of video input. 1. Zoom1 The screen size when Wide screen is vertically enlarged. 4:3 Sets the picture to 4:3 normal mode. • In TV, VIDEO, S-VIDEO,and all COMPONENT (480i, 480p) modes, all screen modes can be selected. (16:9 • Zoom1 • Zoom2 • 4:3). • ...In TV(DTV), DVI, PC, HDMI, COMPONENT (720p, 1080i) modes, only 16:9 & 4:3 modes can press the P.SIZE button on the remote (not in 16:9 mode as much as possible. •...
User Manual (ENGLISH)
Page 28
... Picture-in-Picture This product has one in the PIP screen. For example, you turn the TV off while watching in operation, the PIP function cannot be heard. Press the or buttons to ... and turn it on the remote control repeatedly to function in -Picture 1. PIP Settings Sub Main Picture Picture TV analog TV analog X AV 1,2 X S-Video 1, 2 X TV digital X HDMI 1, 2 O Component X PC O AV 1,2 X X X O O X O S-Video 1, 2 X X X O O X X TV digital X O O X X O X O: PIP operates / X: PIP doesn't operate HDMI 1, 2 Component PC O X X O X X O X X X O X X O X O...
... Picture-in-Picture This product has one in the PIP screen. For example, you turn the TV off while watching in operation, the PIP function cannot be heard. Press the or buttons to ... and turn it on the remote control repeatedly to function in -Picture 1. PIP Settings Sub Main Picture Picture TV analog TV analog X AV 1,2 X S-Video 1, 2 X TV digital X HDMI 1, 2 O Component X PC O AV 1,2 X X X O O X O S-Video 1, 2 X X X O O X X TV digital X O O X X O X O: PIP operates / X: PIP doesn't operate HDMI 1, 2 Component PC O X X O X X O X X X O X X O X O...
User Manual (ENGLISH)
Page 29
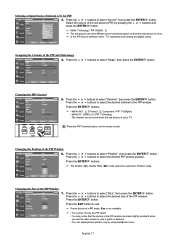
...select the desired size of the PIP window. Press the ENTER buttons. • MAIN: AV(1, 2), S-Video(1, 2), Component / PIP: TV(Digital) • MAIN: PC, HDMI(1,2) / PIP: TV(Analog) • The channel can serve different source selections based on the remote control. Press the ENTER button. English-27 Swapping the ...the sub picture (PIP) by using the size menu. Press the PIP Channel buttons on what the main picture is set to TV. MAIN: TV(Analog) / PIP: HDMI(1, 2) The sub picture can be selected in the PIP window. Changing the PIP Channel 5. Press the or buttons to select the...
...select the desired size of the PIP window. Press the ENTER buttons. • MAIN: AV(1, 2), S-Video(1, 2), Component / PIP: TV(Digital) • MAIN: PC, HDMI(1,2) / PIP: TV(Analog) • The channel can serve different source selections based on the remote control. Press the ENTER button. English-27 Swapping the ...the sub picture (PIP) by using the size menu. Press the PIP Channel buttons on what the main picture is set to TV. MAIN: TV(Analog) / PIP: HDMI(1, 2) The sub picture can be selected in the PIP window. Changing the PIP Channel 5. Press the or buttons to select the...
User Manual (ENGLISH)
Page 47
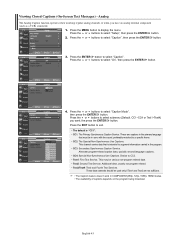
... sync with the sound, preferably matched to a specific frame. • CC2: The Special Non-Synchronous Use Captions. This may be in COMPONENT(480p, 720p, 1080i), HDMI modes. • The availability of captions depends on the program being broadcast. Analog The Analog Caption function operates when watching regular analog channels or when...
... sync with the sound, preferably matched to a specific frame. • CC2: The Special Non-Synchronous Use Captions. This may be in COMPONENT(480p, 720p, 1080i), HDMI modes. • The availability of captions depends on the program being broadcast. Analog The Analog Caption function operates when watching regular analog channels or when...


