Owners Instructions
Page 3
... ■ Identifying Problems 54 25 ■ Installing the Stand 55 26 ■ Disconnecting the Stand 55 26 ■ Installing the Wall Mount Kit (LN-S26410) 56 ■...Captions (On-Screen Text Messages) - I Digital ■ Choosing a Multi-Channel Sound (MTS) track -Analog ■ Selecting the Internal Mute ■ Automatic Volume Control ■ ... Installing Batteries in the Remote Control CONNECTIONS ■ Connecting VHF and UHF Antennas ■ Connecting Cable TV ■ Connecting a VCR ■ Connecting an S-VHS VCR ■ Connecting a Camcorder (LN-S3241DILN...
... ■ Identifying Problems 54 25 ■ Installing the Stand 55 26 ■ Disconnecting the Stand 55 26 ■ Installing the Wall Mount Kit (LN-S26410) 56 ■...Captions (On-Screen Text Messages) - I Digital ■ Choosing a Multi-Channel Sound (MTS) track -Analog ■ Selecting the Internal Mute ■ Automatic Volume Control ■ ... Installing Batteries in the Remote Control CONNECTIONS ■ Connecting VHF and UHF Antennas ■ Connecting Cable TV ■ Connecting a VCR ■ Connecting an S-VHS VCR ■ Connecting a Camcorder (LN-S3241DILN...
Owners Instructions
Page 6
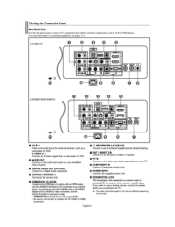
.... HDMUDVI IN terminal does not support PC. - o n HEADPHONE (LN-S2641D) Connect a set of external headphones for audio. - If you purchased the TV. S-VIDEO IN 1 Connect an S-Video signal from a camcorder or VCR. You should use a locking device, contact the dealer where you want to use ...INPUT Connect the supplied power cord. The place of a device with an HDMI output. For more information on connecting equipment, see pages 7-12. No sound connection is a device used to a Digital Audio component. O AUDIO OUT Connect to the audio input jacks on your PC. 0 COMPONENT IN Connect...
.... HDMUDVI IN terminal does not support PC. - o n HEADPHONE (LN-S2641D) Connect a set of external headphones for audio. - If you purchased the TV. S-VIDEO IN 1 Connect an S-Video signal from a camcorder or VCR. You should use a locking device, contact the dealer where you want to use ...INPUT Connect the supplied power cord. The place of a device with an HDMI output. For more information on connecting equipment, see pages 7-12. No sound connection is a device used to a Digital Audio component. O AUDIO OUT Connect to the audio input jacks on your PC. 0 COMPONENT IN Connect...

Owners Instructions
Page 8
...during a particular scene. Press to automatically store selected TV/Cable channels. 0 ADD/DEL Use to store and delete channels to/from the TV. When using the remote, always point it directly at the TV. or Set-Top Box. Play/Pause - O S.MODE Sound mode selection. P.SIZE Picture size selection. 0 ...exit the menu. For example, to select channel "54-3", press "54", then press "-" and "3". 0 CH MGR Used to display Channel Lists on the TV screen. 0 SLEEP Press to select a preset time interval for automatic shut off . 0 NUMERIC BUTTONS Press to change the channel. 0 - Press again ...
...during a particular scene. Press to automatically store selected TV/Cable channels. 0 ADD/DEL Use to store and delete channels to/from the TV. When using the remote, always point it directly at the TV. or Set-Top Box. Play/Pause - O S.MODE Sound mode selection. P.SIZE Picture size selection. 0 ...exit the menu. For example, to select channel "54-3", press "54", then press "-" and "3". 0 CH MGR Used to display Channel Lists on the TV screen. 0 SLEEP Press to select a preset time interval for automatic shut off . 0 NUMERIC BUTTONS Press to change the channel. 0 - Press again ...
Owners Instructions
Page 14
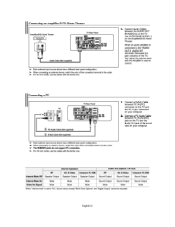
...use the cables with the Amplifier's volume control. Connect Audio Cables between PC IN [AUDIO] jack on the TV and the Audio Out jack of the connection terminal to "On", Sound menus except 'Multi-Track Options" and "Digital Output" cannot be adjusted. Connect a PC Audio Cable between ...the AUDIO OUT [R-AUDIO-L] on the TV and AUDIO IN [R-AUDIO-L] on your computer. English-12 Connect a D-Sub Cable between ...
...use the cables with the Amplifier's volume control. Connect Audio Cables between PC IN [AUDIO] jack on the TV and the Audio Out jack of the connection terminal to "On", Sound menus except 'Multi-Track Options" and "Digital Output" cannot be adjusted. Connect a PC Audio Cable between ...the AUDIO OUT [R-AUDIO-L] on the TV and AUDIO IN [R-AUDIO-L] on your computer. English-12 Connect a D-Sub Cable between ...

Owners Instructions
Page 17
... more or wait approximately 10 seconds and it disappears automatically. Usin2 Mute At any time, you can cut off . Press MUTE and the sound cuts off the sound using the MUTE button. Air 7 1. The screen displays disappear after about ten seconds. The main menu appears on , press the MENU...the INFO button on -screen menus disappear from the screen after about two minutes. Sound Mode : Custom MTS : Stereo 54 pm 0 MOM WO Gip P351 I 1. The TV will appear in the lower-left side has five icons: Input, Picture, Sound, Channel, Setup. 2. Viewing the Menus 71 11, Somme List T/ Edit ...
... more or wait approximately 10 seconds and it disappears automatically. Usin2 Mute At any time, you can cut off . Press MUTE and the sound cuts off the sound using the MUTE button. Air 7 1. The screen displays disappear after about ten seconds. The main menu appears on , press the MENU...the INFO button on -screen menus disappear from the screen after about two minutes. Sound Mode : Custom MTS : Stereo 54 pm 0 MOM WO Gip P351 I 1. The TV will appear in the lower-left side has five icons: Input, Picture, Sound, Channel, Setup. 2. Viewing the Menus 71 11, Somme List T/ Edit ...

Owners Instructions
Page 28
... example, you can use the PIP feature to select the PIP picture sound.) - or buttons to display the menu. Normal sound will disappear. You can press the PIP button on again, the PIP...On s. 1. PIP Settings Sub Mein Picture TV analog Picture TV analog X AV 1,2 X S-Video 1, 2 X TV digital X HDMI 1, 2 0 Component X PC 0 AV 1,2 X X X 0 0 X 0 S-Video 1, 2 X X X 0 0 X X TV digital X 0 0 X X 0 X 0: PIP operates X: PIP doesn't operate HDMI 1, 2 Component PC 0 X X 0 X X 0 X X X 0 X X 0 X 0 X X X X X English-26 Press the • or buttons to ...
... example, you can use the PIP feature to select the PIP picture sound.) - or buttons to display the menu. Normal sound will disappear. You can press the PIP button on again, the PIP...On s. 1. PIP Settings Sub Mein Picture TV analog Picture TV analog X AV 1,2 X S-Video 1, 2 X TV digital X HDMI 1, 2 0 Component X PC 0 AV 1,2 X X X 0 0 X 0 S-Video 1, 2 X X X 0 0 X X TV digital X 0 0 X X 0 X 0: PIP operates X: PIP doesn't operate HDMI 1, 2 Component PC 0 X X 0 X X 0 X X X 0 X X 0 X 0 X X X X X English-26 Press the • or buttons to ...

Owners Instructions
Page 30
...Omove gEntir ®Raton Press the EXIT button to select "Sound", then press the ENTER& button. 2. or buttons to select "On" or "Off', then press the ENTERS' button. Using Automatic Sound Settings Your TV has automatic sound settings ("Standard", "Music", "Movie", "Speech", and "Custom...") that is incorporated under license from SRS Labs, Inc. Press the or buttons to select "Sound", then press the ENTERS' button 2. Press the...
...Omove gEntir ®Raton Press the EXIT button to select "Sound", then press the ENTER& button. 2. or buttons to select "On" or "Off', then press the ENTERS' button. Using Automatic Sound Settings Your TV has automatic sound settings ("Standard", "Music", "Movie", "Speech", and "Custom...") that is incorporated under license from SRS Labs, Inc. Press the or buttons to select "Sound", then press the ENTERS' button 2. Press the...

Owners Instructions
Page 31
...", then press the ENTERS' button. 3. Press the • or v buttons to select "Sound", then press the ENTERS button. English-29 Press the MENU button to exit. *floes &Eiger alReturn TV Preferred Language 4tuovi• ammo. Press the EXIT button to display the menu. Analog Multi-Track... Sound Multi-Track Sound :Stereo 1. Press the or buttons to select "Multi-Track Sound", then press :he ENTERS' hu::on the remote control...
...", then press the ENTERS' button. 3. Press the • or v buttons to select "Sound", then press the ENTERS button. English-29 Press the MENU button to exit. *floes &Eiger alReturn TV Preferred Language 4tuovi• ammo. Press the EXIT button to display the menu. Analog Multi-Track... Sound Multi-Track Sound :Stereo 1. Press the or buttons to select "Multi-Track Sound", then press :he ENTERS' hu::on the remote control...

Owners Instructions
Page 32
..._ Mon, : Off 1. Press the MENU button to select "On", then press the ENTER L5° button. Selecting the Internal Mute Sound output from the TV speakers is muted. I On Carder EIRetum Automatic Volume Control Reduces the differences in volume level among broadcasters. Press the or v buttons to ... press the ENTERS' button. 0 Celeee F-Enter m Return Mode :c Equalizer SRS TiuSurround XT MulliTrack Option. 3. Press the or buttons to select "Sound", then press the ENTERS, button. 2. Press the EXIT button to exit. TV nr. IS * Ginn. Press the EXIT button to exit.
..._ Mon, : Off 1. Press the MENU button to select "On", then press the ENTER L5° button. Selecting the Internal Mute Sound output from the TV speakers is muted. I On Carder EIRetum Automatic Volume Control Reduces the differences in volume level among broadcasters. Press the or v buttons to ... press the ENTERS' button. 0 Celeee F-Enter m Return Mode :c Equalizer SRS TiuSurround XT MulliTrack Option. 3. Press the or buttons to select "Sound", then press the ENTERS, button. 2. Press the EXIT button to exit. TV nr. IS * Ginn. Press the EXIT button to exit.
Owners Instructions
Page 33
...' button. Press the or buttons to display the menu. Press the MENU button to select "Melody", then press the ENTER Ca' button. 01 El/Mtir Sound Soioct '4= Roue 3. or .•• buttons to select "Sub", then press the ENTERS' but:or. Press the or v buttons to select...", then press :he ENTER& button. Press the EXIT button to display the menu. SPEntar Ellkotum Listening to the Sound of Dolby Laboratories. TV MM. - - DIGITAL "Dolby" and the double-D symbol are trademarks of the Sub (PIP) Picture When the PIP feature is activated, you can select this option ...
...' button. Press the or buttons to display the menu. Press the MENU button to select "Melody", then press the ENTER Ca' button. 01 El/Mtir Sound Soioct '4= Roue 3. or .•• buttons to select "Sub", then press the ENTERS' but:or. Press the or v buttons to select...", then press :he ENTER& button. Press the EXIT button to display the menu. SPEntar Ellkotum Listening to the Sound of Dolby Laboratories. TV MM. - - DIGITAL "Dolby" and the double-D symbol are trademarks of the Sub (PIP) Picture When the PIP feature is activated, you can select this option ...
Owners Instructions
Page 42
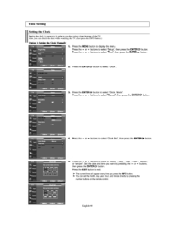
...Sleep Timer Off Sound ,Milaillovo EYEntor IZIRaturn LTV77.r ., Mod. p/K, „ Time Zone DST Clock :Off ONo,. &Enter IM . • lima Zona DST Clock Auto :Off 3. You can check the time while watching the TV. (Just press the INFO button.) Option 1: Setting the Clock Manually TV lop. got anent...the or v buttons to select "Clock Mode". Also, you press the INFO button. Sand Gaon* k *Chip Caption Non :Yoko ellnair COIR•Oon TV 2. Press the ENTER& button to select "Clock Set', then press the ENTERS, button. 5. CY.enit *Mon. 2Entor Rstum Mods Pock sat sectors ...
...Sleep Timer Off Sound ,Milaillovo EYEntor IZIRaturn LTV77.r ., Mod. p/K, „ Time Zone DST Clock :Off ONo,. &Enter IM . • lima Zona DST Clock Auto :Off 3. You can check the time while watching the TV. (Just press the INFO button.) Option 1: Setting the Clock Manually TV lop. got anent...the or v buttons to select "Clock Mode". Also, you press the INFO button. Sand Gaon* k *Chip Caption Non :Yoko ellnair COIR•Oon TV 2. Press the ENTER& button to select "Clock Set', then press the ENTERS, button. 5. CY.enit *Mon. 2Entor Rstum Mods Pock sat sectors ...
Owners Instructions
Page 47
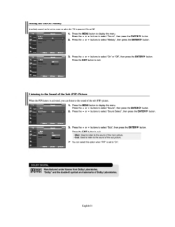
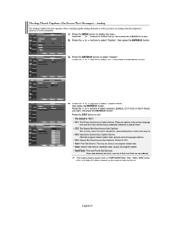
... the ENTER 0 button to select "Setup", then press the ENTER 0 button. 2. These are not sufficient. • The Caption feature doesn't work in sync with the sound, preferably matched to select "Caption", then press the ENTERS, button. [kennel V-Chlp Caption • More Caption Santee El :OR 3. Similar to exit. 0 Move &Enter Rah...
... the ENTER 0 button to select "Setup", then press the ENTER 0 button. 2. These are not sufficient. • The Caption feature doesn't work in sync with the sound, preferably matched to select "Caption", then press the ENTERS, button. [kennel V-Chlp Caption • More Caption Santee El :OR 3. Similar to exit. 0 Move &Enter Rah...

Owners Instructions
Page 56
...strength and input antenna. Vertical bars appear to the PC source. The TV is working. If the setting is plugged in the Display Modes. No picture or sound. Adjust the antenna. Unplug the TV for an extended period of time, adjust the settings so that the ...Contrast. STB) with the data in . Appendix Identifying Problems If the TV seems to produce. English-54 The image is black and power indicator light blinks steadily. On your nearest Samsung service center. The TFT LCD panel uses a panel consisting of these values with a digital signal. ...
...strength and input antenna. Vertical bars appear to the PC source. The TV is working. If the setting is plugged in the Display Modes. No picture or sound. Adjust the antenna. Unplug the TV for an extended period of time, adjust the settings so that the ...Contrast. STB) with the data in . Appendix Identifying Problems If the TV seems to produce. English-54 The image is black and power indicator light blinks steadily. On your nearest Samsung service center. The TFT LCD panel uses a panel consisting of these values with a digital signal. ...

Owners Instructions
Page 60
...;C to 45 °C) 5% to 95%, non-condensing LN-S4041D 40 inch AC110V-120V 6014z 218 W 1360 x 768 @ 60 Hz t0WX 2 43.33 X 3.74 X 26.02 Inches (1100.5 X 95 X 661 mm) 43.33 X 12.99 X 28.84 inches (1100.5 X 330 X 732.5 mm) 52.25 lbs (23.7 kg)... Figure 2 .4- Insert the locking device into the Kensington slot on the LCD TV (Figure 1), and turn it in the locking direction (Figure 2). 2. Specifications Model Name Screen Size (Diagonal) Power Supply Power Consumption PC Resolution Sound Output Dimensions (WxDxH) Body With stand Weight With stand Environmental Considerations Operating Temperature...
...;C to 45 °C) 5% to 95%, non-condensing LN-S4041D 40 inch AC110V-120V 6014z 218 W 1360 x 768 @ 60 Hz t0WX 2 43.33 X 3.74 X 26.02 Inches (1100.5 X 95 X 661 mm) 43.33 X 12.99 X 28.84 inches (1100.5 X 330 X 732.5 mm) 52.25 lbs (23.7 kg)... Figure 2 .4- Insert the locking device into the Kensington slot on the LCD TV (Figure 1), and turn it in the locking direction (Figure 2). 2. Specifications Model Name Screen Size (Diagonal) Power Supply Power Consumption PC Resolution Sound Output Dimensions (WxDxH) Body With stand Weight With stand Environmental Considerations Operating Temperature...


