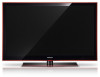

User Manual (ENGLISH)
Page 4
.........133 ■ Recording 134 ■ Listening through a Receiver (Home theater 134 ■ Troubleshooting for Anynet 135 Appendix ■ Troubleshooting 136 ■ Installing the Stand 138 ■ Disconnecting the Stand 138 ■ Auto Wall-Mount Adjustment (Sold separately 139 ■ Wall Mount Kit Specifications (VESA 140 ■ Using the Anti-Theft Kensington Lock...
.........133 ■ Recording 134 ■ Listening through a Receiver (Home theater 134 ■ Troubleshooting for Anynet 135 Appendix ■ Troubleshooting 136 ■ Installing the Stand 138 ■ Disconnecting the Stand 138 ■ Auto Wall-Mount Adjustment (Sold separately 139 ■ Wall Mount Kit Specifications (VESA 140 ■ Using the Anti-Theft Kensington Lock...
User Manual (ENGLISH)
Page 6
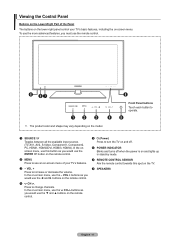
... control. 2 MENU Press to turn the TV on and off. 6 POWER INDICATOR Blinks and turns off when the power is on and lights up in stand-by mode. 7 REMOTE CONTROL SENSOR Aim the remote control towards this spot on -screen menu, use the CH buttons as you would use the - VOL...
... control. 2 MENU Press to turn the TV on and off. 6 POWER INDICATOR Blinks and turns off when the power is on and lights up in stand-by mode. 7 REMOTE CONTROL SENSOR Aim the remote control towards this spot on -screen menu, use the CH buttons as you would use the - VOL...
User Manual (ENGLISH)
Page 140
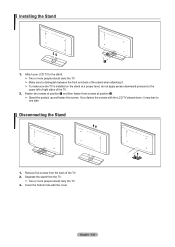
...; Two or more people should carry the TV. ➣ Make sure to distinguish between the front and back of the stand when attaching it may lean to one side. Separate the stand from the back of the TV. 2. If you fasten the screws with the cover. English - 138 Remove five screws from... carry the TV. 3. Cover the bottom hole with the LCD TV placed down, it . ➣ To make sure the TV is installed on the stand at position 2. ➣ Stand the product up and fasten the screws. Disconnecting the Stand 1. Attach your LCD TV to the upper left of right sides of the TV. 2.
...; Two or more people should carry the TV. ➣ Make sure to distinguish between the front and back of the stand when attaching it may lean to one side. Separate the stand from the back of the TV. 2. If you fasten the screws with the cover. English - 138 Remove five screws from... carry the TV. 3. Cover the bottom hole with the LCD TV placed down, it . ➣ To make sure the TV is installed on the stand at position 2. ➣ Stand the product up and fasten the screws. Disconnecting the Stand 1. Attach your LCD TV to the upper left of right sides of the TV. 2.

User Manual (ENGLISH)
Page 145
Specifications Model Name Screen Size (Diagonal) PC Resolution Sound Output Dimensions (WxDxH) Body With stand Weight With Stand Without Stand Environmental Considerations Operating Temperature Operating Humidity Storage Temperature Storage Humidity Stand Swivel (Left / Right) LN46A850S1F, LN46A860S2F 46 inches (45.9 inches measured diagonally) 1920 x 1080 @ 60 Hz LN52A850S1F, LN52A860S2F 52 inches (52.0 inches measured diagonally) 1920...
Specifications Model Name Screen Size (Diagonal) PC Resolution Sound Output Dimensions (WxDxH) Body With stand Weight With Stand Without Stand Environmental Considerations Operating Temperature Operating Humidity Storage Temperature Storage Humidity Stand Swivel (Left / Right) LN46A850S1F, LN46A860S2F 46 inches (45.9 inches measured diagonally) 1920 x 1080 @ 60 Hz LN52A850S1F, LN52A860S2F 52 inches (52.0 inches measured diagonally) 1920...


