User Manual (ENGLISH)
Page 3
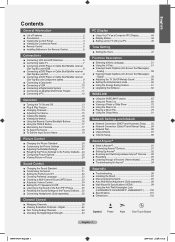
... ■ Troubleshooting for Anynet 94 Appendix ■ Troubleshooting 95 ■ Installing the Stand 97 ■ Disconnecting the Stand 97 ■ Auto Wall-Mount Adjustment (Sold separately 98 ■ Wall Mount Kit Specifications (VESA 99 ■ Using the Anti-Theft Kensington Lock (LN32A650A1F, LN40A650A1F, LN46A650A1F)...........100 ■ Specifications 101 ■ Dimensions 102 Symbol...
... ■ Troubleshooting for Anynet 94 Appendix ■ Troubleshooting 95 ■ Installing the Stand 97 ■ Disconnecting the Stand 97 ■ Auto Wall-Mount Adjustment (Sold separately 98 ■ Wall Mount Kit Specifications (VESA 99 ■ Using the Anti-Theft Kensington Lock (LN32A650A1F, LN40A650A1F, LN46A650A1F)...........100 ■ Specifications 101 ■ Dimensions 102 Symbol...
User Manual (ENGLISH)
Page 6
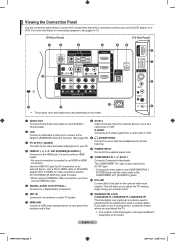
... the COMPONENT IN 1 [Y/VIDEO] jack and the audio cable to the COMPONENT IN 1 [R-AUDIO-L] jacks. @ EX-LINK Connect this port to connect to the Network (SAMSUNG InfoLink's Service). (See page 82) S-VIDEO Connects an S-Video signal from a camcorder or VCR. 9 (HEADPHONE) 3 PC IN [PC] / [AUDIO] Connects to the ...192;ÈÄ 5:13:29 Video and audio inputs for DVI connection to a Digital Audio component. This will be different depending on the optional wall mount bracket. Use a DVI to HDMI cable or DVI-HDMI adapter (DVI to HDMI) for video connection and the DVI IN (HDMI2) [R-AUDIO-L] ...
... the COMPONENT IN 1 [Y/VIDEO] jack and the audio cable to the COMPONENT IN 1 [R-AUDIO-L] jacks. @ EX-LINK Connect this port to connect to the Network (SAMSUNG InfoLink's Service). (See page 82) S-VIDEO Connects an S-Video signal from a camcorder or VCR. 9 (HEADPHONE) 3 PC IN [PC] / [AUDIO] Connects to the ...192;ÈÄ 5:13:29 Video and audio inputs for DVI connection to a Digital Audio component. This will be different depending on the optional wall mount bracket. Use a DVI to HDMI cable or DVI-HDMI adapter (DVI to HDMI) for video connection and the DVI IN (HDMI2) [R-AUDIO-L] ...

User Manual (ENGLISH)
Page 62
Setup V-Chip Caption External Settings Entertainment : Off Energy Saving : Off PIP SW Upgrade External Settings Melody : MOefdf ium Wall-Mount Adjustment Low Medium High Move Enter ► Return Setting the Entertainment mode The "Entertainment" mode enables you want to make Picture and Sound mode adjustments, ...
Setup V-Chip Caption External Settings Entertainment : Off Energy Saving : Off PIP SW Upgrade External Settings Melody : MOefdf ium Wall-Mount Adjustment Low Medium High Move Enter ► Return Setting the Entertainment mode The "Entertainment" mode enables you want to make Picture and Sound mode adjustments, ...
User Manual (ENGLISH)
Page 100
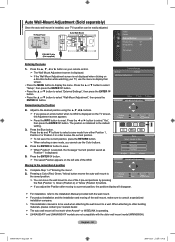
... to display that screen. • Press the MENU button to the default setting. 3. Press the ◄ or ► button to select "Wall-Mount Adjustment", then press the ENTER button. Complete Step 1 of the OSD. Press the ▲ and ▼ buttons to select a save mode from ...When selecting a save . ➣ When Position1 is selected, the message "Current position saved as Position1" is installed, your TV's position can move the wall mount to one of the 3 pre-set positions by pressing the Red (Position 1), Green (Position 2) or Yellow (Position 3) buttons. ➣ If you adjust...
... to display that screen. • Press the MENU button to the default setting. 3. Press the ◄ or ► button to select "Wall-Mount Adjustment", then press the ENTER button. Complete Step 1 of the OSD. Press the ▲ and ▼ buttons to select a save mode from ...When selecting a save . ➣ When Position1 is selected, the message "Current position saved as Position1" is installed, your TV's position can move the wall mount to one of the 3 pre-set positions by pressing the Red (Position 1), Green (Position 2) or Yellow (Position 3) buttons. ➣ If you adjust...
User Manual (ENGLISH)
Page 101
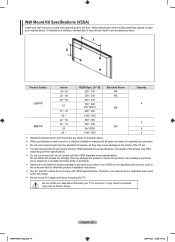
... 99 English - 99 2008-02-26 ¿ÀÈÄ 5:14:52 Do not install your Wall Mount Kit while your wall mount on their specifications. ➣ Do not use screws that do not comply with VESA Specifications. Samsung is not liable for these kinds of the TV set. ➣ For wall...use screws longer than the standard dimension, as they may cause damage to the inside of accidents. ➣ Samsung is not liable for this model. ➣ Do not exceed 15 degrees tilt when mounting this may fall , leading to the floor. When attaching to fall and result in the table above. &#...
... 99 English - 99 2008-02-26 ¿ÀÈÄ 5:14:52 Do not install your Wall Mount Kit while your wall mount on their specifications. ➣ Do not use screws that do not comply with VESA Specifications. Samsung is not liable for these kinds of the TV set. ➣ For wall...use screws longer than the standard dimension, as they may cause damage to the inside of accidents. ➣ Samsung is not liable for this model. ➣ Do not exceed 15 degrees tilt when mounting this may fall , leading to the floor. When attaching to fall and result in the table above. &#...


