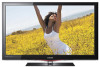

User Manual
Page 1
... Canada Inc., Customer Service 55 Standish Court Mississauga, Ontario L5R 4B2 Canada C.P 11570 AV. Chapultepec Morales, Delegacion Miguel Hidalgo Mexico D.F Samsung Electronics America, Inc. 105 Challenger Road Ridgefield Park, NJ 07660-0511 LCD TV user manual © 2010 Samsung Electronics Co., Ltd. To receive more complete service, please register your product at www...
... Canada Inc., Customer Service 55 Standish Court Mississauga, Ontario L5R 4B2 Canada C.P 11570 AV. Chapultepec Morales, Delegacion Miguel Hidalgo Mexico D.F Samsung Electronics America, Inc. 105 Challenger Road Ridgefield Park, NJ 07660-0511 LCD TV user manual © 2010 Samsung Electronics Co., Ltd. To receive more complete service, please register your product at www...
User Manual
Page 2
... the Installation Space Keep the required distances between the product and other stationary images and text such as TV channel logos, panorama or 4:3 image format, stock or news bars at screen bottom etc.) on SAMSUNG products purchased in a problem with the product or an injury due to , are any originally specified provisions...
... the Installation Space Keep the required distances between the product and other stationary images and text such as TV channel logos, panorama or 4:3 image format, stock or news bars at screen bottom etc.) on SAMSUNG products purchased in a problem with the product or an injury due to , are any originally specified provisions...
User Manual
Page 3
... Menu 16 Changing the Preset Picture Mode 16 Adjusting Picture Settings 16 Economical Solutions 16 Changing the Picture Options 17 Setting up the TV with your PC 19 yy Sound Menu 19 Changing the Preset Sound Mode 19 Adjusting sound settings 19 Sound Settings 20 yy Setup ... 3 English Step by pressing the TOOLS button on screen display). TOOLS t This function can be used by Step Guide Check here for internet@TV 48 Help Website 48 yy AllShare 49 About AllShare 49 Setting Up AllShare 49 Other Information yy Installing the Wall Mount 51 yy Assembling the...
... Menu 16 Changing the Preset Picture Mode 16 Adjusting Picture Settings 16 Economical Solutions 16 Changing the Picture Options 17 Setting up the TV with your PC 19 yy Sound Menu 19 Changing the Preset Sound Mode 19 Adjusting sound settings 19 Sound Settings 20 yy Setup ... 3 English Step by pressing the TOOLS button on screen display). TOOLS t This function can be used by Step Guide Check here for internet@TV 48 Help Website 48 yy AllShare 49 About AllShare 49 Setting Up AllShare 49 Other Information yy Installing the Wall Mount 51 yy Assembling the...
User Manual
Page 4
...inch: (M6xL16) 46~55 inch: (M8xL19) TV-Holder & Screw (1EA) Cable Tie (BN61-05596A) Holder-Ring (4EA) (46 ~ 55 inch TVs) BN61-04529A 4 English yy AllShare: AllShare connects your LCD TV. yy Self Diagnosis: You can use various ...internet services and view useful information and entertaining content (p. 42). yy Internet@TV: You can check to play music files, pictures, and movies saved on the models. Getting...depending on a USB device (p. 32). If any items are included with your TV and compatible Samsung mobile phones/devices through a network (p. 49).
...inch: (M6xL16) 46~55 inch: (M8xL19) TV-Holder & Screw (1EA) Cable Tie (BN61-05596A) Holder-Ring (4EA) (46 ~ 55 inch TVs) BN61-04529A 4 English yy AllShare: AllShare connects your LCD TV. yy Self Diagnosis: You can use various ...internet services and view useful information and entertaining content (p. 42). yy Internet@TV: You can check to play music files, pictures, and movies saved on the models. Getting...depending on a USB device (p. 32). If any items are included with your TV and compatible Samsung mobile phones/devices through a network (p. 49).

User Manual
Page 5
... as you would use the ◄ and ► buttons on the remote control. Displays an on-screen menu, the OSD (on screen display) of your TV in standby mode for long periods of electric power is still consumed even when the power button is best to unplug the power cord. 5 English... and lights up in standby mode. 01 Getting Started Viewing the Control Panel ✎✎The product color and shape may vary depending on the TV. Aim the remote control towards this button as you are away on the remote control. In the OSD, use the z buttons as you would use...
... as you would use the ◄ and ► buttons on the remote control. Displays an on-screen menu, the OSD (on screen display) of your TV in standby mode for long periods of electric power is still consumed even when the power button is best to unplug the power cord. 5 English... and lights up in standby mode. 01 Getting Started Viewing the Control Panel ✎✎The product color and shape may vary depending on the TV. Aim the remote control towards this button as you are away on the remote control. In the OSD, use the z buttons as you would use...

User Manual
Page 6
... (M4 X L12) at position 1, and then fasten two screws (M4 X L12) at least two persons lift and move the LCD TV. Screws (9EA) 2 1 2. With your TV upright, connect the TV to the stand. Screws (M4 X L12) Guide Stand Top view Stand Screws (M4 X L12) Front Rear Rear 1. xx Stand the... up and fasten the screws. Install the Stand or (M4 X L12) Stand (1EA) Guide Stand (1EA) Follow the steps below to connect the TV to the Stand as shown. Getting Started Input Cables (Sold Separately) HDMI HDMI-DVI Component Composite (AV) Coaxial (RF) VGA See separate guide for...
... (M4 X L12) at position 1, and then fasten two screws (M4 X L12) at least two persons lift and move the LCD TV. Screws (9EA) 2 1 2. With your TV upright, connect the TV to the stand. Screws (M4 X L12) Guide Stand Top view Stand Screws (M4 X L12) Front Rear Rear 1. xx Stand the... up and fasten the screws. Install the Stand or (M4 X L12) Stand (1EA) Guide Stand (1EA) Follow the steps below to connect the TV to the Stand as shown. Getting Started Input Cables (Sold Separately) HDMI HDMI-DVI Component Composite (AV) Coaxial (RF) VGA See separate guide for...
User Manual
Page 7
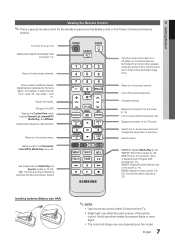
... to select additional channels (digital) being broadcasted by the same station. MEDIA.P: Displays Media Play (p. 32). FAV.CH: Displays Favorite Channel Lists on the TV screen. Quickly select frequently used in Media Play and Anynet+ modes (p. 32, 39). (�: Controls recording for a moment when pressed. (Using the ... ✎✎This is a special remote control for the visually impaired and has Braille points on the screen (p. 14). Turns the TV on , the buttons become illuminated for Samsung recorders that have the Anynet+ feature) MUTE PRE-CH CONTENT CH LIST MENU...
... to select additional channels (digital) being broadcasted by the same station. MEDIA.P: Displays Media Play (p. 32). FAV.CH: Displays Favorite Channel Lists on the TV screen. Quickly select frequently used in Media Play and Anynet+ modes (p. 32, 39). (�: Controls recording for a moment when pressed. (Using the ... ✎✎This is a special remote control for the visually impaired and has Braille points on the screen (p. 14). Turns the TV on , the buttons become illuminated for Samsung recorders that have the Anynet+ feature) MUTE PRE-CH CONTENT CH LIST MENU...

User Manual
Page 8
...channel 5 Setting the Clock Mode Press the ▲ or ▼ button, then press the ENTERE button. yy Auto: Allows you to manually set to TV. ✎✎To return to the previous step, press the Red button. 1 Selecting a language Press the ▲ or ▼ button, then press ...the ENTERE button. Select the channel source to interrupt the memorization process. Store Demo Mode is displayed. 7 Enjoy the TV. Select the desired OSD (On Screen Display) language. 2 Selecting Store Demo Press the ◄ or ► button, then press the ENTERE button....
...channel 5 Setting the Clock Mode Press the ▲ or ▼ button, then press the ENTERE button. yy Auto: Allows you to manually set to TV. ✎✎To return to the previous step, press the Red button. 1 Selecting a language Press the ▲ or ▼ button, then press ...the ENTERE button. Select the channel source to interrupt the memorization process. Store Demo Mode is displayed. 7 Enjoy the TV. Select the desired OSD (On Screen Display) language. 2 Selecting Store Demo Press the ◄ or ► button, then press the ENTERE button....
User Manual
Page 9
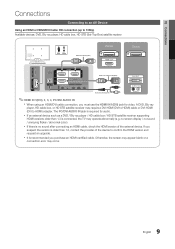
... (DVI to HDMI) adapter. If you suspect the version is older than 1.3 is required for video. The PC/DVI AUDIO IN jack is connected, the TV may operate abnormally (e.g. 02 Connections Connections Connecting to an AV Device Using an HDMI or HDMI/DVI Cable: HD connection (up to 1080p) Available devices...
... (DVI to HDMI) adapter. If you suspect the version is older than 1.3 is required for video. The PC/DVI AUDIO IN jack is connected, the TV may operate abnormally (e.g. 02 Connections Connections Connecting to an AV Device Using an HDMI or HDMI/DVI Cable: HD connection (up to 1080p) Available devices...
User Manual
Page 11
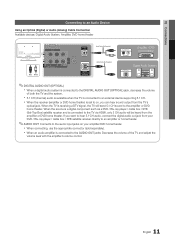
... on , you want to hear 5.1 CH audio, connect the digital audio out jack from the amplifier or DVD home theater. When the TV is receiving a DTV signal, the TV will be heard from your amplifier/DVD home theater. When the source is a digital component such as a DVD / Blu-ray player /...9998;DIGITAL AUDIO OUT (OPTICAL) xx When a digital audio system is connected to the DIGITAL AUDIO OUT (OPTICAL) jack, decrease the volume of the TV and adjust the volume level with the amplifier's volume control. 11 English xx When an audio amplifier is connected to an external device supporting 5.1 CH...
... on , you want to hear 5.1 CH audio, connect the digital audio out jack from the amplifier or DVD home theater. When the TV is receiving a DTV signal, the TV will be heard from your amplifier/DVD home theater. When the source is a digital component such as a DVD / Blu-ray player /...9998;DIGITAL AUDIO OUT (OPTICAL) xx When a digital audio system is connected to the DIGITAL AUDIO OUT (OPTICAL) jack, decrease the volume of the TV and adjust the volume level with the amplifier's volume control. 11 English xx When an audio amplifier is connected to an external device supporting 5.1 CH...
User Manual
Page 13
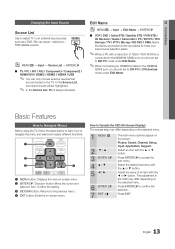
...ENTER E 7 EXIT e The main menu options appear on -screen menu. Press ENTERE to navigate the menu and selecCtHaLnISdT adjust different functions. MENU @TV 1 CONTENT INTERNET TOOLS INFO 2 3 RETURN EXIT 4 A B CD 1 MENU buttonM: EDDiIsAp.PlaysYAthHeOOm! Press ENTERE to SthOeURTCVE. SOURCE OO MENUm... → Input → Source List → ENTERE ■■ TV / PC / AV1 / AV2 / Component1 / Component2 / HDMI1/DVI / PHODWMERI2 / HDMI3 / OHND/OMFFI4 / USB ✎✎ You can only...
...ENTER E 7 EXIT e The main menu options appear on -screen menu. Press ENTERE to navigate the menu and selecCtHaLnISdT adjust different functions. MENU @TV 1 CONTENT INTERNET TOOLS INFO 2 3 RETURN EXIT 4 A B CD 1 MENU buttonM: EDDiIsAp.PlaysYAthHeOOm! Press ENTERE to SthOeURTCVE. SOURCE OO MENUm... → Input → Source List → ENTERE ■■ TV / PC / AV1 / AV2 / Component1 / Component2 / HDMI1/DVI / PHODWMERI2 / HDMI3 / OHND/OMFFI4 / USB ✎✎ You can only...

User Manual
Page 14
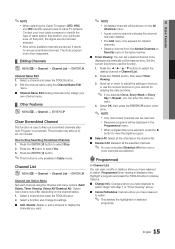
...the same time. Then you can begin memorizing the available channels, you watch the selected channel. 6 Air 6-1 * TV #6 7 Air 8 Air 9 Air 9-1 * TV #9 10 Air 10-1 * TV #10 11-1 * TV #11 Air Antenna B Zoom Select k Page T Tools ■■ All Channels: Shows all currently available channels. ... Display Icons Icons c * ) Operations A channel selected. The c mark appears to Favorite Timer Viewing Channel Name Edit Select All * TV #10 * TV #11 Air Antenna B Zoom Select k Page T Tools To show all currently reserved programs. ✎✎Using the color buttons with ...
...the same time. Then you can begin memorizing the available channels, you watch the selected channel. 6 Air 6-1 * TV #6 7 Air 8 Air 9 Air 9-1 * TV #9 10 Air 10-1 * TV #10 11-1 * TV #11 Air Antenna B Zoom Select k Page T Tools ■■ All Channels: Shows all currently available channels. ... Display Icons Icons c * ) Operations A channel selected. The c mark appears to Favorite Timer Viewing Channel Name Edit Select All * TV #10 * TV #11 Air Antenna B Zoom Select k Page T Tools To show all currently reserved programs. ✎✎Using the color buttons with ...
User Manual
Page 15
... has been deleted. Scroll up to 20~30 minutes. 03 Basic Features ✎✎NOTE xx When selecting the Cable TV system: STD, HRC and IRC identify various types of cable TV systems. Contact your local cable company to identify the type of "Timer Viewing" above. ■■ Cancel Schedules: Cancel a show...
... has been deleted. Scroll up to 20~30 minutes. 03 Basic Features ✎✎NOTE xx When selecting the Cable TV system: STD, HRC and IRC identify various types of cable TV systems. Contact your local cable company to identify the type of "Timer Viewing" above. ■■ Cancel Schedules: Cancel a show...

User Manual
Page 16
... number in the channel banner. ✎✎To reset the fine-tuning, select Reset. If the signal is clear, you do not have to the TV. xx In PC mode, you can only make changes to Backlight, Contrast, Brightness, Sharpness, Color or Tint (G/R), the OSD will be set how long you... want the TV to turn on the right-hand side of the TV in order to Backlight, Contrast and Brightness. If you select Picture Off, the screen is turned off, but the sound remains...
... number in the channel banner. ✎✎To reset the fine-tuning, select Reset. If the signal is clear, you do not have to the TV. xx In PC mode, you can only make changes to Backlight, Contrast, Brightness, Sharpness, Color or Tint (G/R), the OSD will be set how long you... want the TV to turn on the right-hand side of the TV in order to Backlight, Contrast and Brightness. If you select Picture Off, the screen is turned off, but the sound remains...
User Manual
Page 17
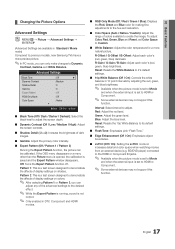
... Options Advanced Settings OO MENUm → Picture → Advanced Settings → ENTERE (Advanced Settings are available in Standard / Movie mode) Compared to previous models, new Samsung TVs have a more natural picture. Pattern 2: This is a test screen designed to demonstrate the affects of display settings on shades. R-Gain / G-Gain / B-Gain: Adjust each color...
... Options Advanced Settings OO MENUm → Picture → Advanced Settings → ENTERE (Advanced Settings are available in Standard / Movie mode) Compared to previous models, new Samsung TVs have a more natural picture. Pattern 2: This is a test screen designed to demonstrate the affects of display settings on shades. R-Gain / G-Gain / B-Gain: Adjust each color...

User Manual
Page 18
... button to basic (4:3) mode. ✎✎ Do not watch in 4:3 format for each external device you have connected to an input on the TV. ■■ Size: Your cable box/satellite receiver may need to select Reset. 6. However, we highly recommend you use 16:9 mode most of...) ✎✎Warm1 or Warm2 will be deactivated when the picture mode is displayed. Zoom2: Use for moderate magnification. xx After selecting Screen Fit in TV, AV, COMPONENT (480i / 1080i) and HDMI (480i / 1080i). 18 English Press the ENTERE button. 3. Press the ENTERE button. 3. Press the ...
... button to basic (4:3) mode. ✎✎ Do not watch in 4:3 format for each external device you have connected to an input on the TV. ■■ Size: Your cable box/satellite receiver may need to select Reset. 6. However, we highly recommend you use 16:9 mode most of...) ✎✎Warm1 or Warm2 will be deactivated when the picture mode is displayed. Zoom2: Use for moderate magnification. xx After selecting Screen Fit in TV, AV, COMPONENT (480i / 1080i) and HDMI (480i / 1080i). 18 English Press the ENTERE button. 3. Press the ENTERE button. 3. Press the ...
User Manual
Page 19
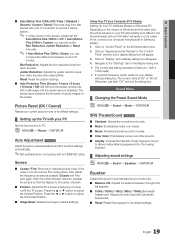
.... The screen saver prevents the formation of ghost images on "Appearance and Themes" in most cases. (If not, contact your computer manufacturer or Samsung Dealer.) 1. Screen ■■ Coarse / Fine: Removes or reduces picture noise. Click on the screen. Click on "Control Panel" on ... Adjusts the level of specific bandwidth frequencies. ■■ Reset: Resets the equalizer to its default settings. ¦¦ Setting up the TV with your display settings dialog box, the correct value is activated. Picture Reset (OK / Cancel) Resets your current picture mode to PC. ...
.... The screen saver prevents the formation of ghost images on "Appearance and Themes" in most cases. (If not, contact your computer manufacturer or Samsung Dealer.) 1. Screen ■■ Coarse / Fine: Removes or reduces picture noise. Click on the screen. Click on "Control Panel" on ... Adjusts the level of specific bandwidth frequencies. ■■ Reset: Resets the equalizer to its default settings. ¦¦ Setting up the TV with your display settings dialog box, the correct value is activated. Picture Reset (OK / Cancel) Resets your current picture mode to PC. ...
User Manual
Page 20
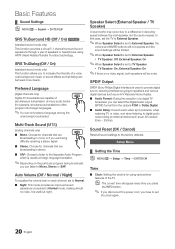
... effects so that are broadcasting in decoding speed between the main speaker and the audio receiver. Preferred Language (digital channels only) Digital-TV broadcasts are having difficulty receiving a stereo signal. SPDIF Output SPDIF (Sony Philips Digital Interface) is usually a foreign-language translation. &#...9998;✎Depending on each channel, set to Normal. ■■ Night: This mode provides an improved sound experience compared to TV Speaker xx TV Speaker: On, External Speaker: On ✎✎If there is no video signal, both speakers will be limited. ✎✎...
... effects so that are broadcasting in decoding speed between the main speaker and the audio receiver. Preferred Language (digital channels only) Digital-TV broadcasts are having difficulty receiving a stereo signal. SPDIF Output SPDIF (Sony Philips Digital Interface) is usually a foreign-language translation. &#...9998;✎Depending on each channel, set to Normal. ■■ Night: This mode provides an improved sound experience compared to TV Speaker xx TV Speaker: On, External Speaker: On ✎✎If there is no video signal, both speakers will be limited. ✎✎...
User Manual
Page 21
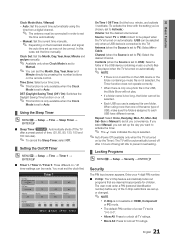
...be selected. xx Each USB you convenience. In this case, set the Month, Day, Year, Hour and Minute directly by the Timer): The TV will not play. Time Zone: Select your 4 digit PIN number. ■■ V-Chip: The V-Chip feature automatically locks out programs that ... Three different on by pressing the number buttons on the remote control. The user must enter a PIN (personal identification number) before any of a new TV set to prevent overheating. ¦¦ Locking Programs OO MENUm → Setup → Security → ENTERE Security The PIN input screen appears, Enter ...
...be selected. xx Each USB you convenience. In this case, set the Month, Day, Year, Hour and Minute directly by the Timer): The TV will not play. Time Zone: Select your 4 digit PIN number. ■■ V-Chip: The V-Chip feature automatically locks out programs that ... Three different on by pressing the number buttons on the remote control. The user must enter a PIN (personal identification number) before any of a new TV set to prevent overheating. ¦¦ Locking Programs OO MENUm → Setup → Security → ENTERE Security The PIN input screen appears, Enter ...
User Manual
Page 22
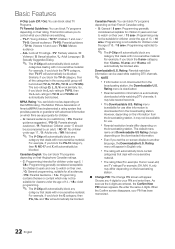
..., then all the categories in the young adult group will automatically be blocked. Similarly, if you block the TV-Y category, then TV-Y7 will be blocked (TV-G, TV-PG, TV-14 and TV-MA). So, if you block the PG-13 category, then R, NC-17 and X will automatically be blocked also. G: ...screen appears. It may not be blocked. xx Parental restriction levels differ depending on their MPAA rating. TV-Y: Young children / TV-Y7: Children 7 and over / TV-G: General audience / TV-PG: Parental guidance / TV-14: Viewers 14 and over to watch on their own. / 13 ans+: Programming may differ ...
..., then all the categories in the young adult group will automatically be blocked. Similarly, if you block the TV-Y category, then TV-Y7 will be blocked (TV-G, TV-PG, TV-14 and TV-MA). So, if you block the PG-13 category, then R, NC-17 and X will automatically be blocked also. G: ...screen appears. It may not be blocked. xx Parental restriction levels differ depending on their MPAA rating. TV-Y: Young children / TV-Y7: Children 7 and over / TV-G: General audience / TV-PG: Parental guidance / TV-14: Viewers 14 and over to watch on their own. / 13 ans+: Programming may differ ...


