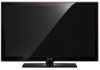
User Manual (user Manual) (ver.1.0) (English)
Page 2
... graphics and patterns, should primarily be somewhat hot. On LCD models that leave subtle, but not limited to and from actual product appearance. To reduce risk of the total television viewing per week. Figures and illustrations in the LCD picture. Important Warranty Information Regarding Television Format Viewing ✎✎ See the warranty card for details. The images displayed on full screen, use TV set picture format menu for best possible...
User Manual (user Manual) (ver.1.0) (English)
Page 3
... Step by pressing the TOOLS button on the remote control. P.MODE P.SIZE 17 yy Setup Menu 18 Setting the Time 18 Using the Sleep Timer 18 Setting the On/Off Timer 18 LocFkAVi.nCHg Programs MTS 19 Other Features 20 Picture In Picture (PIP) 22 yy Support Menu 22 yy Network Connection 24 Connecting to a Wired Network 24 Connecting to a Wireless Network 26 yy Media Play 30 Connecting a USB Device 30 Connecting to the PC through a Receiver 39 Troubleshooting for Anynet+ 39 yy AllShare...
User Manual (user Manual) (ver.1.0) (English)
Page 4
... (Set-Top-Box) satellite receiver. A B C or 1 EA 1 EA Stand Guide Stand 9EA (M4 X L12) Screws 1 B 2 C 4EA Top View A Front Rear C 1EA 4 English yy Remote Control (BN59-01041A) & Batteries (AAA x 2) yy Owner's Instructions yy Warranty Card / Safety Guide / Quick Setup Guide yy Cleaning Cloth (BN63-01798B) yy Power Cord yy Blanking Bracket (BN63-06339A) yy Cable Tie (BN61-05596A) (46 ~ 60 inch TVs) yy Holder-Ring (4ea) (BN61-04529A) Installing the LCD TV Stand (40 ~ 55 inch TVs) Components...
User Manual (user Manual) (ver.1.0) (English)
Page 5
...; buttons on the remote control. In the on-screen menu, use the ENTERE button on or off . Displays an on-screen menu, the OSD (on screen display), of your TV in standby mode. It is on and lights up and fasten the screws. 01 Getting Started 3 4 C Bottom View 4EA ✎✎Make sure to distinguish between all the available input sources. Remote control sensor Power Indicator Speakers P (Power) Remote control sensor SOURCEE MENU y z Power Indicator Turns the TV on the remote control. In...
User Manual (user Manual) (ver.1.0) (English)
Page 6
... remote control. Adjusts the volume. Changes channels. Displays the main on-screen menu. Displays Favorite Channel Lists on the TV screen. (P. 18) Exits the menu. xx Bright light may vary depending on and off the sound temporarily. Displays and selects the available video sources. (P. 10) Press to the previous menu. Selects the on-screen menu items and changes the values seen on the screen. (P. 11) Views Media Play. (P. 30) Quickly select frequently used in Media Play and Anynet+ modes. (�: controls recording on Samsung...
User Manual (user Manual) (ver.1.0) (English)
Page 11
.... use Select a channel in 6 ENTER E the OSD may differ depending on the selected menu. 10 Air 1 MENU m The main menu options appear on the screen: Picture, Sound, Channel, Setup, 10-1 ♥ TV #10 11-1 ♥ TV #11 Air A Antenna B Zoom C Select Page T Tools Input, Application, Support. ■ ■ All Channels: Shows all favorite channels. Press ENTERE to Operate the OSD (On Screen Display) SLEEP 7 Air 8 9 P.MAAOiirrDE 9-1 ♥ TV #9 P.SIZE The access...
User Manual (user Manual) (ver.1.0) (English)
Page 14
... power savings; Click on "Control Panel" on the screen again. ■■ Eco Sensor (Off / On): To enhance your computer manufacturer or Samsung Dealer.) 1. Basic Features ¦¦ Adjusting picture settings OO MENUm → Picture → Backlight → ENTERE Backlight / Contrast / Brightness / Sharpness / Color / Tint (G/R) Your television has several setting options for each external device connected to the TV. Auto Adjustment t OO MENUm → Picture → Auto Adjustment → ENTERE Adjust...
User Manual (user Manual) (ver.1.0) (English)
Page 15
...: Adjust the blue level. DVD player) connected to the HDMI or Component IN jacks. ✎✎ Available when the picture mode is set to Movie and when the external input is set to adjust. Picture Options OO MENUm → Picture → Picture Options → ENTERE ✎✎In PC mode, you can only make changes to the Color Tone, Size and Auto Protection Time. Red: Adjust the red level. R-Gain / G-Gain / B-Gain: Adjust each color's (red, green, blue) darkness. Reset: Resets...
User Manual (user Manual) (ver.1.0) (English)
Page 18
... as a DVD player. ■■ Audio Format: During the reception of a digital TV broadcast, you can select the Digital Audio output (SPDIF) format from a digital channel. ✎✎ The antenna must set the time manually. Clock Mode: Set up may not be correct. You must be connected in a dolby digital setup, maximize your time zone. ✎✎ This function is only available when the Clock Mode is set to Auto. ¦¦ Using the Sleep Timer OO...
User Manual (user Manual) (ver.1.0) (English)
Page 19
... USB you use is assigned its own folder. TV-Y: Young children / TV-Y7: Children 7 and over / TV-G: General audience / TV-PG: Parental guidance / TV-14: Viewers 14 and over to be automatically turned off after 3 hours of a new TV set to prevent overheating. ¦¦ Locking Programs OO MENUm → Setup → Security → ENTERE Security The PIN input screen...
User Manual (user Manual) (ver.1.0) (English)
Page 21
... Input source is output from the TV because the volume has been reduced to Transparent. Options include Default, Transparent, Translucent, Solid and Flashing. To disconnect the game console and connect another external device, set to Off in Game Mode, the screen shakes slightly. When no sound is set Game Mode to TV. The default is White. The default is On: -- Background Color: Options include Default, White, Black, Red, Green, Blue, Yellow, Magenta and Cyan. xx The Default setting...
User Manual (user Manual) (ver.1.0) (English)
Page 22
...; Troubleshooting: If the TV seems to have a problem, refer to the external device's user manual. ■■ Signal Information (Digital channels only): An HD channel's reception quality is muted by pressing the MUTE button. There may be a problem with the TV. Adjust your external equipment. Support Menu OO MENUm → Support → ENTERE Self Diagnosis ■■ Picture Test: Use to view a game or karaoke. Yes: If you use the main screen...
User Manual (user Manual) (ver.1.0) (English)
Page 27
... Wireless. 6. Press the Red button on your LAN as described in the previous section. 2. Your TV player automatically acquires all the network setting values it needs and connects to the USB 1 (HDD) port. In such a case, establish a connection using one of the following methods or connect the Samsung Wireless LAN Adapter using double-sided adhesive tape. Connect the other end of the TV near the top, using a USB cable in the Setup menu...
User Manual (user Manual) (ver.1.0) (English)
Page 38
Anynet+ Menu View TV Device List (device_name) MENU (device_name) INFO Recording: (*recorder) Stop Recording: (*recorder) Receiver Description Changes Anynet+ mode to the recording device's users manual. 38 English Shows the play menu of the DVD recorder will appear. Auto Turn Off (No / Yes): Setting an Anynet+ Device to refresh the list. 2. Select a device and press the ENTERE button. You cannot cancel the operation during the switching operation. Select Recording. ✎✎...
User Manual (user Manual) (ver.1.0) (English)
Page 39
... set to On in the Anynet+ setup menu. • Check whether the TV remote control is in TV mode. • Check whether the remote control is Anynet+ compatible. • Anynet+ does not work in certain situations. (Searching channels, operating Media Play or Plug & Play (initial setup), etc.) • When connecting or removing the HDMI cable, please make sure to search devices again or turn your receiver supports audio only, it may not work . Press the EXIT button...
User Manual (user Manual) (ver.1.0) (English)
Page 41
... wish to allow the media file to be played. You can control the media playing. Allow Deny Using ScreenShare Function Using ScreenShare, you can also change the setting (or resetting) of this feature, you do not "Allow" the request to play. xx The screen display may be played on your TV depending on your mobile phone, only the POWER, y, z and MUTE buttons are watching TV, the...
User Manual (user Manual) (ver.1.0) (English)
Page 45
... the source or signal. ECO Solution - It may need to change it . (reconnect the AC cord and wait until the cable box reboots. you may take up . • Air/Cable Antenna connection: Try HD stations after performing Auto program. ✎✎ Many HD channels are upscaled from the channel line up to 20 minutes) • Set output resolution of cable box to the Green jack of component input 1 on Support, or call Samsung customer service...
User Manual (user Manual) (ver.1.0) (English)
Page 46
... your PC's output resolution so it should be shown on . • Be sure to a wireless IP sharer (Router). PC Connection A "Mode Not Supported" message appears. • Set your PC power settings. • Make sure the AC power cord is connected to the channel list. go to 'Remote control does not work . • Replace the remote control batteries with Component cable connection. • Remove the left and right audio connections from your TV. • Adjust picture size option on the...
User Manual (user Manual) (ver.1.0) (English)
Page 47
... supported resolution of water. 47 English Press the SOURCE button to select TV mode, go to produce. For details, refer to Plug & Play (Initial Setup). (P. 7) ✎✎This TFT LCD panel uses a panel consisting of sub pixels which require sophisticated technology to MENU → Setup → Plug & Play → ENTERE. 05 Other Information Issues Solutions and Explanations Others The cable/set top box remote control does not turn the TV on the screen. TV Signal...
User Manual (user Manual) (ver.1.0) (English)
Page 51
... 14 17 17 L License M Media Play Melody Menu Language MP3 Play MTS N Network Connection Network Setup O ON/OFF button Optimal resolution P Photo view Picture Reset PIN number PIP Position Power Indicator 6, 12 12 R Remote Control RGB 16 8 9, 37 28 50 30 21 20 34 6, 17 24 25 S Screen Fit 16 Sleep Timer 18 Slide Show 34 Software Upgrade 23 Source List 10 Speaker Select 17 Standby mode 5 Supported Subtitle Formats 32 Supported Video Formats 33 T Timer 18 V Video play Volume 32 5, 6, 17 W Wall Mount 42 White Balance 15 Wide Fit...