

User Manual
Page 1
2010 Samsung TV F/W Upgrade Guide Samsung Electronics
2010 Samsung TV F/W Upgrade Guide Samsung Electronics
User Manual
Page 4
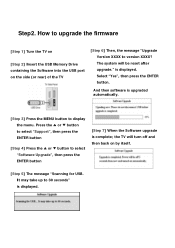
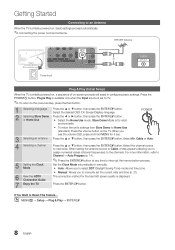
... seconds" is upgraded automatically. [Step 3] Press the MENU button to version XXXX? And then software is displayed. How to upgrade the firmware [Step 1] Turn the TV on [Step 2] Insert the USB Memory Drive containing the Software into the USB port on by itself. [Step 5] The message "Scanning for USB. The system... will turn off and then back on the side (or rear) of the TV [Step 6] Then, the message "Upgrade Version XXXX to display the menu. the TV will be reset after upgrade." Step2.
... seconds" is upgraded automatically. [Step 3] Press the MENU button to version XXXX? And then software is displayed. How to upgrade the firmware [Step 1] Turn the TV on [Step 2] Insert the USB Memory Drive containing the Software into the USB port on by itself. [Step 5] The message "Scanning for USB. The system... will turn off and then back on the side (or rear) of the TV [Step 6] Then, the message "Upgrade Version XXXX to display the menu. the TV will be reset after upgrade." Step2.
Quick Guide (easy Manual) (ver.1.0) (English)
Page 1
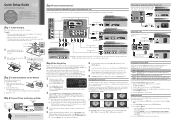
...Up, Down, Left or Right arrow buttons on your new Samsung TV. Step 1: Install the Stand Follow the steps below to connect the TV to the stand. ✎✎NOTE xx Make sure to 45 minutes. 5 After the TV has memorized the channels, choose the Clock Mode. xx Stand... 2. Using the ▲ or ▼ on your TV, call: 1-800-SAMSUNG (1-800-726-7864) For web support please visit: www.samsung.com/support 1-800-SAMSUNG (1-800-726-7864) Samsung Electronics America, Inc. 85 Challenger Road Ridgefield Park, NJ 07660-2112 Samsung Electronics Canada Inc. 55 Standish Court Mississauga, Ontario L5R 4B2...
...Up, Down, Left or Right arrow buttons on your new Samsung TV. Step 1: Install the Stand Follow the steps below to connect the TV to the stand. ✎✎NOTE xx Make sure to 45 minutes. 5 After the TV has memorized the channels, choose the Clock Mode. xx Stand... 2. Using the ▲ or ▼ on your TV, call: 1-800-SAMSUNG (1-800-726-7864) For web support please visit: www.samsung.com/support 1-800-SAMSUNG (1-800-726-7864) Samsung Electronics America, Inc. 85 Challenger Road Ridgefield Park, NJ 07660-2112 Samsung Electronics Canada Inc. 55 Standish Court Mississauga, Ontario L5R 4B2...
Quick Guide (easy Manual) (ver.1.0) (English)
Page 2
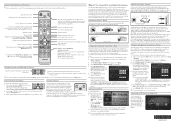
... recording on the back of 3.5 mb/sec or more - Displays channel list on the Wall Wireless IP sharer (AP having DHCP server) TV Side Panel Samsung Wireless LAN Adapter Network Connection - Link to the previous menu. P.SIZE: Selects the picture size. CC: Controls the caption decoder. POWER ON...the On Screen Menus To view the On Screen Menus, follow these steps: RETURN CH LIST EXIT MENU @TV 1. To view the signal from a source connected to your favorite on your AP, Samsung TVs will not support a connection in two ways, by cable, using CAT 5 cable, or wirelessly, using ...
... recording on the back of 3.5 mb/sec or more - Displays channel list on the Wall Wireless IP sharer (AP having DHCP server) TV Side Panel Samsung Wireless LAN Adapter Network Connection - Link to the previous menu. P.SIZE: Selects the picture size. CC: Controls the caption decoder. POWER ON...the On Screen Menus To view the On Screen Menus, follow these steps: RETURN CH LIST EXIT MENU @TV 1. To view the signal from a source connected to your favorite on your AP, Samsung TVs will not support a connection in two ways, by cable, using CAT 5 cable, or wirelessly, using ...
User Manual (user Manual) (ver.1.0) (English)
Page 1
Country Customer Care Center CANADA 1-800-SAMSUNG (726-7864) Web Site www.samsung.com U.S.A 1-800-SAMSUNG (726-7864) www.samsung.com Address Samsung Electronics Canada Inc., Customer Service 55 Standish Court Mississauga, Ontario L5R 4B2 Canada Samsung Electronics America, Inc. 85 Challenger Road Ridgefield Park, NJ 07660-2112 LCD TV user manual © 2010 Samsung Electronics Co., Ltd. To...
Country Customer Care Center CANADA 1-800-SAMSUNG (726-7864) Web Site www.samsung.com U.S.A 1-800-SAMSUNG (726-7864) www.samsung.com Address Samsung Electronics Canada Inc., Customer Service 55 Standish Court Mississauga, Ontario L5R 4B2 Canada Samsung Electronics America, Inc. 85 Challenger Road Ridgefield Park, NJ 07660-2112 LCD TV user manual © 2010 Samsung Electronics Co., Ltd. To...
User Manual (user Manual) (ver.1.0) (English)
Page 2
...-images. • Use all televisions. To reduce risk of this effect, please follow below recommendations: • Avoid displaying the same TV channel for long periods. • Always try to display a full screen image. • Reducing brightness and contrast will affect image ... with a wall-mount. 4 inches 4 inches 4 inches 4 inches 4 inches 4 inches 4 inches 2 English In the United States : 1-800-SAMSUNG (1-800-726-7864) - Displaying stationary images that exceed the above described warranty repairs must be in the wide screen 16:9 ratio format, or expanded to...
...-images. • Use all televisions. To reduce risk of this effect, please follow below recommendations: • Avoid displaying the same TV channel for long periods. • Always try to display a full screen image. • Reducing brightness and contrast will affect image ... with a wall-mount. 4 inches 4 inches 4 inches 4 inches 4 inches 4 inches 4 inches 2 English In the United States : 1-800-SAMSUNG (1-800-726-7864) - Displaying stationary images that exceed the above described warranty repairs must be in the wide screen 16:9 ratio format, or expanded to...
User Manual (user Manual) (ver.1.0) (English)
Page 3
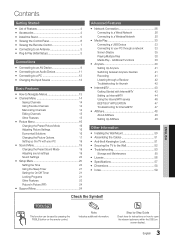
...57 yy Dimensions 58 yy Index 59 Check the Symbol! TOOLS t This function can be used by Step Guide Check here for Internet@TV 47 yy AllShare 48 About AllShare 48 Setting Up AllShare 48 Other Information yy Installing the Wall Mount 50 yy Assembling the Cables 51... yy Anti-theft Kensington Lock 51 yy Securing the TV to open the relevant submenu within the OSD (on screen display). Note Indicates additional information. Additional Functions 38 yy Anynet 40 Setting Up...
...57 yy Dimensions 58 yy Index 59 Check the Symbol! TOOLS t This function can be used by Step Guide Check here for Internet@TV 47 yy AllShare 48 About AllShare 48 Setting Up AllShare 48 Other Information yy Installing the Wall Mount 50 yy Assembling the Cables 51... yy Anti-theft Kensington Lock 51 yy Securing the TV to open the relevant submenu within the OSD (on screen display). Note Indicates additional information. Additional Functions 38 yy Anynet 40 Setting Up...
User Manual (user Manual) (ver.1.0) (English)
Page 4
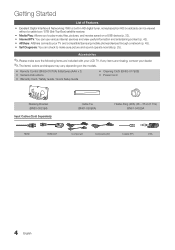
... (Set-Top-Box) satellite receiver. Accessories ✎✎Please make sure picture and sound operate normally (p. 25). If any items are included with your TV and compatible Samsung mobile phones/devices through a network (p. 48). yy Remote Control (BN59-01076A) & Batteries (AAA x 2) yy Owner's Instructions yy Warranty Card / Safety Guide / Quick Setup Guide...
... (Set-Top-Box) satellite receiver. Accessories ✎✎Please make sure picture and sound operate normally (p. 25). If any items are included with your TV and compatible Samsung mobile phones/devices through a network (p. 48). yy Remote Control (BN59-01076A) & Batteries (AAA x 2) yy Owner's Instructions yy Warranty Card / Safety Guide / Quick Setup Guide...
User Manual (user Manual) (ver.1.0) (English)
Page 5
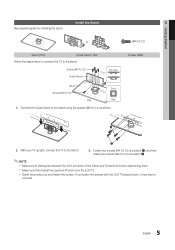
... assembling them. Fasten two screws (M4 X L12) at position 1, and then fasten two screws (M4 X L12) at least two persons lift and move the LCD TV. Install the Stand or (M4 X L12) Stand (1EA) Guide Stand (1EA) Follow the steps below to connect the... TV to one side. 5 English If you fasten the screws with the LCD TV placed down, it may lean to the stand. Connect the Guide Stand to the Stand using five screws (M4 X L12) as...
... assembling them. Fasten two screws (M4 X L12) at position 1, and then fasten two screws (M4 X L12) at least two persons lift and move the LCD TV. Install the Stand or (M4 X L12) Stand (1EA) Guide Stand (1EA) Follow the steps below to connect the... TV to one side. 5 English If you fasten the screws with the LCD TV placed down, it may lean to the stand. Connect the Guide Stand to the Stand using five screws (M4 X L12) as...
User Manual (user Manual) (ver.1.0) (English)
Page 6
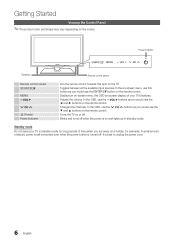
... display) of electric power is still consumed even when the power button is turned off . Changes the channels. Standby mode Do not leave your TV's features. Toggles between all the available input sources. In the OSD, use the y buttons as you would use the ▼ and ▲...; buttons on the remote control. A small amount of your TV in standby mode. Power Indicator Speakers Remote control sensor Remote control sensor SOURCEE MENU y z P (Power) Power Indicator Aim the remote control towards this button...
... display) of electric power is still consumed even when the power button is turned off . Changes the channels. Standby mode Do not leave your TV's features. Toggles between all the available input sources. In the OSD, use the y buttons as you would use the ▼ and ▲...; buttons on the remote control. A small amount of your TV in standby mode. Power Indicator Speakers Remote control sensor Remote control sensor SOURCEE MENU y z P (Power) Power Indicator Aim the remote control towards this button...

User Manual (user Manual) (ver.1.0) (English)
Page 7
... select frequently used in Media Play and Anynet+ modes (p. 33, 40). (�: Controls recording for Samsung recorders that have the Anynet+ feature) MUTE PRE-CH CONTENT CH LIST MENU @TV INTERNET TOOLS INFO RETURN EXIT A B CD MEDIA.P HOTAPPS MTS FAV.CH P.SIZE CC Returns to the... then press "-" and "3". Installing batteries (Battery size: AAA) ✎✎NOTE xx Use the remote control within 23 feet from the TV. Link to various internet services (p. 43). Avoid use when nearby fluorescent lights or neon signs. FAV.CH: Displays Favorite Channel Lists on the...
... select frequently used in Media Play and Anynet+ modes (p. 33, 40). (�: Controls recording for Samsung recorders that have the Anynet+ feature) MUTE PRE-CH CONTENT CH LIST MENU @TV INTERNET TOOLS INFO RETURN EXIT A B CD MEDIA.P HOTAPPS MTS FAV.CH P.SIZE CC Returns to the... then press "-" and "3". Installing batteries (Battery size: AAA) ✎✎NOTE xx Use the remote control within 23 feet from the TV. Link to various internet services (p. 43). Avoid use when nearby fluorescent lights or neon signs. FAV.CH: Displays Favorite Channel Lists on the...
User Manual (user Manual) (ver.1.0) (English)
Page 8
... channel source to Reset This Feature... If You Want to memorize. Press the POWERP button. Store Demo Mode is displayed. 7 Enjoy the TV. Press the ENTERE button. yy Manual: Allows you see the volume OSD, press and hold MENU for retail POWER P IN environments. Getting... Display) language. 2 Selecting Store Demo Press the ◄ or ► button, then press the ENTERE button. When you to manually set to TV. ✎✎To return to interrupt the memorization process. For more information, refer to Channel → Auto Program (p. 14). ✎✎Press ...
... channel source to Reset This Feature... If You Want to memorize. Press the POWERP button. Store Demo Mode is displayed. 7 Enjoy the TV. Press the ENTERE button. yy Manual: Allows you see the volume OSD, press and hold MENU for retail POWER P IN environments. Getting... Display) language. 2 Selecting Store Demo Press the ◄ or ► button, then press the ENTERE button. When you to manually set to TV. ✎✎To return to interrupt the memorization process. For more information, refer to Channel → Auto Program (p. 14). ✎✎Press ...
User Manual (user Manual) (ver.1.0) (English)
Page 9
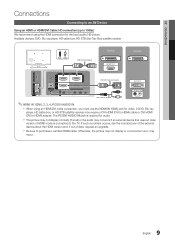
The PC/DVI AUDIO IN jack is connected to the TV. 02 Connections Connections Connecting to an AV Device Using an HDMI or HDMI/DVI Cable: HD connection (up to 1080p) We recommend using an HDMI/...
The PC/DVI AUDIO IN jack is connected to the TV. 02 Connections Connections Connecting to an AV Device Using an HDMI or HDMI/DVI Cable: HD connection (up to 1080p) We recommend using an HDMI/...

User Manual (user Manual) (ver.1.0) (English)
Page 11
...a digital audio system is connected to the DIGITAL AUDIO OUT (OPTICAL) jack, decrease the volume of the TV and adjust the volume level with the amplifier's volume control. 11 English xx When the receiver (amplifier or... or DVD home theater. xx When an audio amplifier is receiving a DTV signal, the TV will be heard from your amplifier/DVD home theater. If you want to the AUDIO OUT jacks: ...Decrease the volume of both the TV and the system. When the source is a digital component such as a DVD / Blu-ray player...
...a digital audio system is connected to the DIGITAL AUDIO OUT (OPTICAL) jack, decrease the volume of the TV and adjust the volume level with the amplifier's volume control. 11 English xx When the receiver (amplifier or... or DVD home theater. xx When an audio amplifier is receiving a DTV signal, the TV will be heard from your amplifier/DVD home theater. If you want to the AUDIO OUT jacks: ...Decrease the volume of both the TV and the system. When the source is a digital component such as a DVD / Blu-ray player...
User Manual (user Manual) (ver.1.0) (English)
Page 13
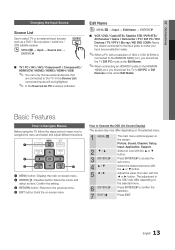
...screen: Picture, Sound, Channel, Setup, Input, Application, Support. Basic Features PRE-CH MUTE How to Navigate Menus Before using the TV, follow the steps below to learn how to access the sub-menu. Confirm the setting. 3 RETURN buttFoAnV:.CRHeturnPs.SItZoEthe prCeCvious menu... / Blu-ray player / cable box / STB satellite receiver. 02 Connections Changing the Input Source Source List Use to confirm the selection. MENU @TV 1 CONTENT INTERNET TOOLS INFO 2 3 RETURN EXIT 4 1 MENU button: DAisplayBs the mCain onD-screen menu. 2 ENTERE / DMiEreDIcAt.Pion bYuAtHtOoOn!: ...
...screen: Picture, Sound, Channel, Setup, Input, Application, Support. Basic Features PRE-CH MUTE How to Navigate Menus Before using the TV, follow the steps below to learn how to access the sub-menu. Confirm the setting. 3 RETURN buttFoAnV:.CRHeturnPs.SItZoEthe prCeCvious menu... / Blu-ray player / cable box / STB satellite receiver. 02 Connections Changing the Input Source Source List Use to confirm the selection. MENU @TV 1 CONTENT INTERNET TOOLS INFO 2 3 RETURN EXIT 4 1 MENU button: DAisplayBs the mCain onD-screen menu. 2 ENTERE / DMiEreDIcAt.Pion bYuAtHtOoOn!: ...
User Manual (user Manual) (ver.1.0) (English)
Page 14
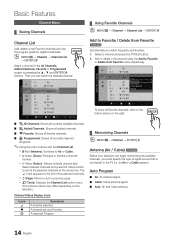
...source that is connected to Favorite / Delete from Favorite menu respectively. 6 Air 6-1 * TV #6 7 8 9 9-1 10 10-1 11-1 Air Delete Air Air * TV #9 Air Add to next or previous page. Add to the TV (i.e. A channel set all Favorite channels, click on the button shown on the situation.) Channel...Favorite channels and use the program guide for digital broadcasts. xx k (Page): Move to Favorite Timer Viewing Channel Name Edit Select All * TV #10 * TV #11 Air Antenna B Zoom Select k Page T Tools To show all the selected channels at the same time. Select a channel and ...
...source that is connected to Favorite / Delete from Favorite menu respectively. 6 Air 6-1 * TV #6 7 8 9 9-1 10 10-1 11-1 Air Delete Air Air * TV #9 Air Add to next or previous page. Add to the TV (i.e. A channel set all Favorite channels, click on the button shown on the situation.) Channel...Favorite channels and use the program guide for digital broadcasts. xx k (Page): Move to Favorite Timer Viewing Channel Name Edit Select All * TV #10 * TV #11 Air Antenna B Zoom Select k Page T Tools To show all the selected channels at the same time. Select a channel and ...
User Manual (user Manual) (ver.1.0) (English)
Page 15
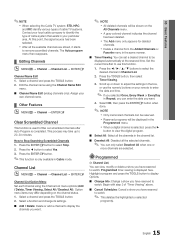
... ENTERE button. ✎✎This function is displayed here. 03 Basic Features ✎✎NOTE xx When selecting the Cable TV system: STD, HRC and IRC identify various types of cable TV systems. Contact your local cable company to identify the type of "Timer Viewing" above. ■■ Cancel Schedules: Cancel a show...
... ENTERE button. ✎✎This function is displayed here. 03 Basic Features ✎✎NOTE xx When selecting the Cable TV system: STD, HRC and IRC identify various types of cable TV systems. Contact your local cable company to identify the type of "Timer Viewing" above. ■■ Cancel Schedules: Cancel a show...
User Manual (user Manual) (ver.1.0) (English)
Page 16
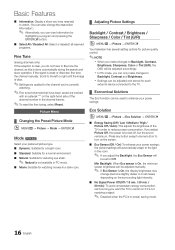
... cases) depending on the screen. ■■ Eco Sensor (Off / On): To enhance your power savings. xx In PC mode, you make changes to the TV. ¦¦ Economical Solutions The Eco Function can be adjusted and stored for picture quality control. ✎✎NOTE xx When you can be adjusted... to the left or right until the image is clear. ✎✎Settings are marked with an asterisk "*" on the right-hand side of the TV in the channel banner. ✎✎To reset the fine-tuning, select Reset. xx Settings can be set how long you 're currently watching. &#...
... cases) depending on the screen. ■■ Eco Sensor (Off / On): To enhance your power savings. xx In PC mode, you make changes to the TV. ¦¦ Economical Solutions The Eco Function can be adjusted and stored for picture quality control. ✎✎NOTE xx When you can be adjusted... to the left or right until the image is clear. ✎✎Settings are marked with an asterisk "*" on the right-hand side of the TV in the channel banner. ✎✎To reset the fine-tuning, select Reset. xx Settings can be set how long you 're currently watching. &#...
User Manual (user Manual) (ver.1.0) (English)
Page 17
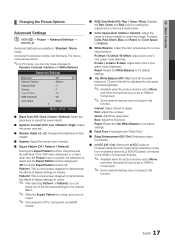
... Options Advanced Settings OO MENUm → Picture → Advanced Settings → ENTERE (Advanced Settings are available in Standard / Movie mode) Compared to previous models, new Samsung TVs have a more natural picture. If the OSD menu disappears or a menu other than the Picture menu is opened, the calibration is a test screen designed to...
... Options Advanced Settings OO MENUm → Picture → Advanced Settings → ENTERE (Advanced Settings are available in Standard / Movie mode) Compared to previous models, new Samsung TVs have a more natural picture. If the OSD menu disappears or a menu other than the Picture menu is opened, the calibration is a test screen designed to...
User Manual (user Manual) (ver.1.0) (English)
Page 18
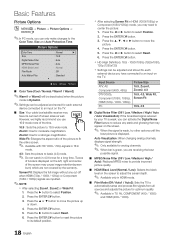
...(Cool / Normal / Warm1 / Warm2) ✎✎Warm1 or Warm2 will be adjusted and stored for each external device connected to an input on the TV. ■■ Size: Your cable box/satellite receiver may need to center the picture: 1. Press the ► button to select Reset. 6. Traces of... any cut-off when HDMI (720p / 1080i / 1080p) or Component (1080i / 1080p) signals are not covered by your TV is weak, you may have connected to an input on the TV. Press the ENTERE button. 5. Press the ◄ or ► button to basic (4:3) mode. ✎✎ Do not...
...(Cool / Normal / Warm1 / Warm2) ✎✎Warm1 or Warm2 will be adjusted and stored for each external device connected to an input on the TV. ■■ Size: Your cable box/satellite receiver may need to center the picture: 1. Press the ► button to select Reset. 6. Traces of... any cut-off when HDMI (720p / 1080i / 1080p) or Component (1080i / 1080p) signals are not covered by your TV is weak, you may have connected to an input on the TV. Press the ENTERE button. 5. Press the ◄ or ► button to basic (4:3) mode. ✎✎ Do not...


