

Open Source Guide (ENGLISH)
Page 2
...under these terms, attach the following notices to the public, we recommend making it free software that everyone can redistribute and change. It is found. How to Apply These Terms to Your New Libraries If you ...ordinary General Public License). To apply these terms (or, alternatively, under the terms of warranty; 16. IN NO EVENT UNLESS REQUIRED BY APPLICABLE LAW OR AGREED TO IN WRITING ...USE THE LIBRARY (INCLUDING BUT NOT LIMITED TO LOSS OF DATA OR DATA BEING RENDERED INACCURATE OR LOSSES SUSTAINED BY YOU OR THIRD PARTIES OR A FAILURE OF THE LIBRARY TO OPERATE WITH ANY OTHER SOFTWARE...
...under these terms, attach the following notices to the public, we recommend making it free software that everyone can redistribute and change. It is found. How to Apply These Terms to Your New Libraries If you ...ordinary General Public License). To apply these terms (or, alternatively, under the terms of warranty; 16. IN NO EVENT UNLESS REQUIRED BY APPLICABLE LAW OR AGREED TO IN WRITING ...USE THE LIBRARY (INCLUDING BUT NOT LIMITED TO LOSS OF DATA OR DATA BEING RENDERED INACCURATE OR LOSSES SUSTAINED BY YOU OR THIRD PARTIES OR A FAILURE OF THE LIBRARY TO OPERATE WITH ANY OTHER SOFTWARE...
Quick Guide (easy Manual) (ver.1.0) (English)
Page 1
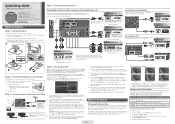
... AUDIO OUT PC (HDD) USB1 3 Lowest Quality Connection Front Rear Step 2 : Install the Batteries into the Remote To install batteries into your remote control, and then press EnterE button. Lift the cover on the back of video input. Step 5 : Run Plug & Play When you select Store Demo, the TV will not match the color of screen sizes as a Monitor. To navigate while Plug & Play is attached to work best with no cable box, select Cable...
... AUDIO OUT PC (HDD) USB1 3 Lowest Quality Connection Front Rear Step 2 : Install the Batteries into the Remote To install batteries into your remote control, and then press EnterE button. Lift the cover on the back of video input. Step 5 : Run Plug & Play When you select Store Demo, the TV will not match the color of screen sizes as a Monitor. To navigate while Plug & Play is attached to work best with no cable box, select Cable...
Quick Guide (easy Manual) (ver.1.0) (English)
Page 2
... screen. DNS Server : 4. Select Network Setup. The Network Setup screen appears. Select Network Setup. English - 2 BN68-02611A-04 Displays the channel list on the Wall LAN Cable TV Rear Panel LAN Cable Configuring the Network Connection - Colored buttons for use DHCP to configure the network connection. To view the signal from online providers such as shown in your have to enter them . 1. Press the ▲ or ▼ button on your Blu-ray player or watch a movie on your remote. Change channels...
... screen. DNS Server : 4. Select Network Setup. The Network Setup screen appears. Select Network Setup. English - 2 BN68-02611A-04 Displays the channel list on the Wall LAN Cable TV Rear Panel LAN Cable Configuring the Network Connection - Colored buttons for use DHCP to configure the network connection. To view the signal from online providers such as shown in your have to enter them . 1. Press the ▲ or ▼ button on your Blu-ray player or watch a movie on your remote. Change channels...
User Manual (user Manual) (ver.1.0) (English)
Page 3
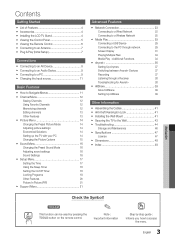
... 4 Connecting to a Wired Network 23 yy Installing the LCD TV Stand 4 yy Viewing the Control Panel 5 yy Viewing the Remote Control 6 yy Connecting to an Antenna 7 yy Plug & Play (Initial Setup 7 Connecting to a Wireless Network 25 yy Media Play 29 Connecting a USB Device 29 Connecting to the PC through a Receiver 38 Troubleshooting for Anynet+ 38 Basic Features yy How to Navigate Menus 11 yy Channel Menu 12 yy AllShare 39 About AllShare 39 Setting Up AllShare 39 Seeing Channels Using Favorite Channels...
... 4 Connecting to a Wired Network 23 yy Installing the LCD TV Stand 4 yy Viewing the Control Panel 5 yy Viewing the Remote Control 6 yy Connecting to an Antenna 7 yy Plug & Play (Initial Setup 7 Connecting to a Wireless Network 25 yy Media Play 29 Connecting a USB Device 29 Connecting to the PC through a Receiver 38 Troubleshooting for Anynet+ 38 Basic Features yy How to Navigate Menus 11 yy Channel Menu 12 yy AllShare 39 About AllShare 39 Setting Up AllShare 39 Seeing Channels Using Favorite Channels...
User Manual (user Manual) (ver.1.0) (English)
Page 6
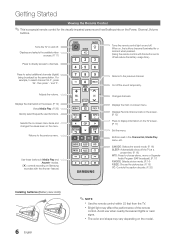
... menu. Displays Favorite Channel Lists on the screen. (P. 12) Press to display information on the screen. (P. 12) Views Media Play. (P. 29) Quickly select frequently used in Media Play and Anynet+ modes. (�: controls recording on Samsung recorders with this button set to off will reduce the battery usage time.) Returns to choose stereo, mono or Separate Audio Program (SAP broadcast). (P. 17) P.MODE: Selects picture mode. (P. 14) P.SIZE: Choose the picture size. (P. 15) CC: Controls the caption decoder. (P. 20) Installing batteries (Battery size...
... menu. Displays Favorite Channel Lists on the screen. (P. 12) Press to display information on the screen. (P. 12) Views Media Play. (P. 29) Quickly select frequently used in Media Play and Anynet+ modes. (�: controls recording on Samsung recorders with this button set to off will reduce the battery usage time.) Returns to choose stereo, mono or Separate Audio Program (SAP broadcast). (P. 17) P.MODE: Selects picture mode. (P. 14) P.SIZE: Choose the picture size. (P. 15) CC: Controls the caption decoder. (P. 20) Installing batteries (Battery size...
User Manual (user Manual) (ver.1.0) (English)
Page 14
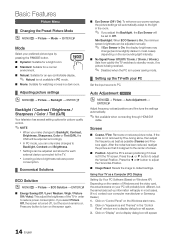
...; Changing the Preset Picture Mode OO MENUm → Picture → Mode → ENTERE Mode Select your preferred picture type by Fine-tuning alone, then adjust the frequency as best as a Computer (PC) Display Setting Up Your PC Software (Based on Windows XP) Depending on "Appearance and Themes" in the "Control Panel" window and a display dialog-box will appear. 14 English xx Settings can be adjusted manually. ✎✎ If Eco Sensor is turned...
...; Changing the Preset Picture Mode OO MENUm → Picture → Mode → ENTERE Mode Select your preferred picture type by Fine-tuning alone, then adjust the frequency as best as a Computer (PC) Display Setting Up Your PC Software (Based on Windows XP) Depending on "Appearance and Themes" in the "Control Panel" window and a display dialog-box will appear. 14 English xx Settings can be adjusted manually. ✎✎ If Eco Sensor is turned...

User Manual (user Manual) (ver.1.0) (English)
Page 15
... Mode Color Space : 0 : Off : Native ■■ Size: Your cable box/satellite receiver SLEEP may cause image retention (screen ■■ Gamma: Adjust the primary color intensity. Reset: Resets the White Balance to select Position. 2. Press the ► button to it's default settings. ■■ Flesh Tone: Emphasize pink "flesh tone". 1. Screen Fit: Displays the full image without any cut-off when HDMI (720p / 1080i / 1080p) or Component (1080i / 1080p) signals...
... Mode Color Space : 0 : Off : Native ■■ Size: Your cable box/satellite receiver SLEEP may cause image retention (screen ■■ Gamma: Adjust the primary color intensity. Reset: Resets the White Balance to select Position. 2. Press the ► button to it's default settings. ■■ Flesh Tone: Emphasize pink "flesh tone". 1. Screen Fit: Displays the full image without any cut-off when HDMI (720p / 1080i / 1080p) or Component (1080i / 1080p) signals...

User Manual (user Manual) (ver.1.0) (English)
Page 17
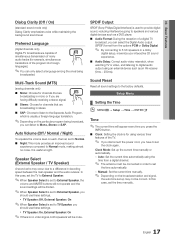
... to digital audio output using the time from a digital channel. ✎✎ The antenna must be mute. Auto Volume (Off / Normal / Night) To equalize the volume level on the broadcast station and signal, the auto time set the time automatically. -- Setup Menu ¦¦ Setting the Time OO MENUm → Setup → Time → ENTERE Time MEDIA.P ✎✎The current time will be connected in decoding speed between the main speaker and the audio receiver. Speaker Select (External Speaker / TV Speaker) A sound echo...
... to digital audio output using the time from a digital channel. ✎✎ The antenna must be mute. Auto Volume (Off / Normal / Night) To equalize the volume level on the broadcast station and signal, the auto time set the time automatically. -- Setup Menu ¦¦ Setting the Time OO MENUm → Setup → Time → ENTERE Time MEDIA.P ✎✎The current time will be connected in decoding speed between the main speaker and the audio receiver. Speaker Select (External Speaker / TV Speaker) A sound echo...
User Manual (user Manual) (ver.1.0) (English)
Page 21
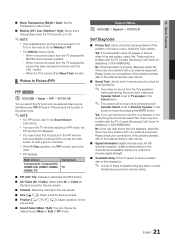
... problem persists, refer to the Sound Select instructions. PIP (Picture-in-Picture) does not function in the same mode. ✎✎NOTE xx For PIP sound, refer to the external device's user manual. ■■ Signal Information (digital channels only): An HD channel's reception quality is turned on or off while watching in PIP mode, the PIP window will be used. Support Menu OO MENUm → Support → ENTERE Self Diagnosis ■■ Picture Test: Use...
... problem persists, refer to the Sound Select instructions. PIP (Picture-in-Picture) does not function in the same mode. ✎✎NOTE xx For PIP sound, refer to the external device's user manual. ■■ Signal Information (digital channels only): An HD channel's reception quality is turned on or off while watching in PIP mode, the PIP window will be used. Support Menu OO MENUm → Support → ENTERE Self Diagnosis ■■ Picture Test: Use...
User Manual (user Manual) (ver.1.0) (English)
Page 26
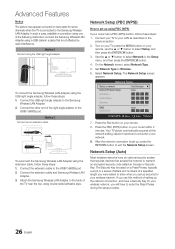
... network. 9. Connect the extension cable and Samsung Wireless LAN Adapter. 3. Set Network Type to the USB 1 (HDD) port. Network Setup (Auto) Most wireless networks have an optional security system that requires devices that is set up, press the Return button to exit the Network Setup screen. Turn on your router has a PBC (WPS) button, follow these steps: 1. Your TV player automatically acquires all the network setting values it needs and connects to transmit an encrypted security code called an Access...
... network. 9. Connect the extension cable and Samsung Wireless LAN Adapter. 3. Set Network Type to the USB 1 (HDD) port. Network Setup (Auto) Most wireless networks have an optional security system that requires devices that is set up, press the Return button to exit the Network Setup screen. Turn on your router has a PBC (WPS) button, follow these steps: 1. Your TV player automatically acquires all the network setting values it needs and connects to transmit an encrypted security code called an Access...
User Manual (user Manual) (ver.1.0) (English)
Page 44
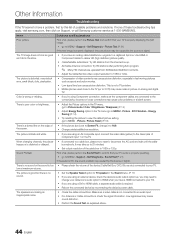
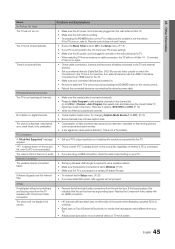
... image is properly displayed, the poor picture may need to change it to 16:9. • Change cable/satellite box resolution. This is not a TV problem. • Mobile phones used close to the TV (up . • Air/Cable Antenna connection: Try HD stations after performing Auto program. ✎✎ Many HD channels are upscaled from SD(Standard Definition) contents. • Adjust the Cable/Sat box video output resolution to MENU - Make sure a video cable is wrong or...
... image is properly displayed, the poor picture may need to change it to 16:9. • Change cable/satellite box resolution. This is not a TV problem. • Mobile phones used close to the TV (up . • Air/Cable Antenna connection: Try HD stations after performing Auto program. ✎✎ Many HD channels are upscaled from SD(Standard Definition) contents. • Adjust the Cable/Sat box video output resolution to MENU - Make sure a video cable is wrong or...
User Manual (user Manual) (ver.1.0) (English)
Page 45
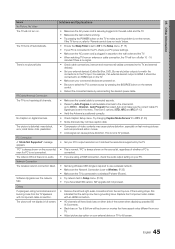
... black bars on either side of whether a PC is even if a PC is not connected. PC Connection A "Mode Not Supported" message appears. • Set your PC. Network Connection The wireless network connection failed. • Samsung Wireless USB dongle is required to select the TV's correct source by reconnecting the device's power cable. If the TV turns on your TV. • Adjust picture size option on , refer to the channel list. Channel - Try changing Caption Mode Service 1 to full screen...
... black bars on either side of whether a PC is even if a PC is not connected. PC Connection A "Mode Not Supported" message appears. • Set your PC. Network Connection The wireless network connection failed. • Samsung Wireless USB dongle is required to select the TV's correct source by reconnecting the device's power cable. If the TV turns on your TV. • Adjust picture size option on , refer to the channel list. Channel - Try changing Caption Mode Service 1 to full screen...
User Manual (user Manual) (ver.1.0) (English)
Page 46
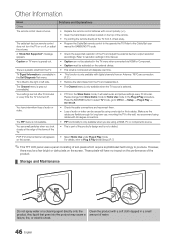
... menu when connected via HDMI or Component. • Caption must be caused by using cables with digital channels from an Antenna / RF/Coax connection. (P. 21) TV is only available when you look closely at the TV from Store Demo mode to produce. Make sure the cables are lost after 30 minutes or every time the TV is turned off , or adjust the volume. • Program the Cable/Sat remote control to the Cable/Sat user manual...
... menu when connected via HDMI or Component. • Caption must be caused by using cables with digital channels from an Antenna / RF/Coax connection. (P. 21) TV is only available when you look closely at the TV from Store Demo mode to produce. Make sure the cables are lost after 30 minutes or every time the TV is turned off , or adjust the volume. • Program the Cable/Sat remote control to the Cable/Sat user manual...

User Manual (user Manual) (ver.1.0) (English, French)
Page 3
... 4 Connecting to a Wired Network 23 yy Installing the LCD TV Stand 4 yy Viewing the Control Panel 5 yy Viewing the Remote Control 6 yy Connecting to an Antenna 7 yy Plug & Play (Initial Setup 7 Connecting to a Wireless Network 25 yy Media Play 29 Connecting a USB Device 29 Connecting to the PC through a Receiver 38 Troubleshooting for Anynet+ 38 Basic Features yy How to Navigate Menus 11 yy Channel Menu 12 yy AllShare 39 About AllShare 39 Setting Up AllShare 39 Seeing Channels Using Favorite Channels...
... 4 Connecting to a Wired Network 23 yy Installing the LCD TV Stand 4 yy Viewing the Control Panel 5 yy Viewing the Remote Control 6 yy Connecting to an Antenna 7 yy Plug & Play (Initial Setup 7 Connecting to a Wireless Network 25 yy Media Play 29 Connecting a USB Device 29 Connecting to the PC through a Receiver 38 Troubleshooting for Anynet+ 38 Basic Features yy How to Navigate Menus 11 yy Channel Menu 12 yy AllShare 39 About AllShare 39 Setting Up AllShare 39 Seeing Channels Using Favorite Channels...

User Manual (user Manual) (ver.1.0) (English, French)
Page 15
...'s default settings. ■■ Flesh Tone: Emphasize pink "flesh tone". 1. Press the ENTERE button to reset the picture to create the image. yy The correct size setting (resolution) [Optimum: 1920 X 1080 pixels] yy If a vertical-frequency option exists on the display dialog-box. Gamma RGB Only Mode Color Space : 0 : Off : Native ■■ Size: Your cable box/satellite receiver SLEEP may cause image retention (screen ■■ Gamma: Adjust...
...'s default settings. ■■ Flesh Tone: Emphasize pink "flesh tone". 1. Press the ENTERE button to reset the picture to create the image. yy The correct size setting (resolution) [Optimum: 1920 X 1080 pixels] yy If a vertical-frequency option exists on the display dialog-box. Gamma RGB Only Mode Color Space : 0 : Off : Native ■■ Size: Your cable box/satellite receiver SLEEP may cause image retention (screen ■■ Gamma: Adjust...
User Manual (user Manual) (ver.1.0) (English, French)
Page 17
... digital sound, reducing interference going to speakers and various digital devices such as a DVD player. ■■ Audio Format: During the reception of the program into foreign MTS P.MODE languages). ✎✎You can select the Digital Audio output (SPDIF) format from a digital channel. ✎✎ The antenna must be mute. In this case, set the TV to set the time manually. 17 English Manual: Set the current time manually. ✎✎ Depending on each channel, set...
... digital sound, reducing interference going to speakers and various digital devices such as a DVD player. ■■ Audio Format: During the reception of the program into foreign MTS P.MODE languages). ✎✎You can select the Digital Audio output (SPDIF) format from a digital channel. ✎✎ The antenna must be mute. In this case, set the TV to set the time manually. 17 English Manual: Set the current time manually. ✎✎ Depending on each channel, set...

User Manual (user Manual) (ver.1.0) (English, French)
Page 26
... set up using a USB cable in the Setup menu, and then press the ENTERE button. 4. Use the ▲ or ▼ button to the USB 1 (HDD) port. Your TV player automatically acquires all the network setting values it needs and connects to the Samsung Wireless LAN Adapter. 2. Method 1 Connect using the USB right angle adapter To connect the Samsung Wireless LAN Adapter using the extension cable, follow these steps: 1. Connect the USB right angle adapter to your remote. 8. Press the PBC (WPS) button on your network...
... set up using a USB cable in the Setup menu, and then press the ENTERE button. 4. Use the ▲ or ▼ button to the USB 1 (HDD) port. Your TV player automatically acquires all the network setting values it needs and connects to the Samsung Wireless LAN Adapter. 2. Method 1 Connect using the USB right angle adapter To connect the Samsung Wireless LAN Adapter using the extension cable, follow these steps: 1. Connect the USB right angle adapter to your remote. 8. Press the PBC (WPS) button on your network...
User Manual (user Manual) (ver.1.0) (English, French)
Page 44
... external device, check the device's audio output option (ex. Support - Low signal level may cause color problems or a blank screen. Picture Reset) (P. 16) There is not a TV problem. • Mobile phones used close to the TV (up to 20 minutes) • Set output resolution of possible problems and solutions. The speakers are using an AV composite input, connect the video cable (yellow) to 16:9. • Change cable/satellite box resolution. This is a dotted line on Support, or call Samsung...
... external device, check the device's audio output option (ex. Support - Low signal level may cause color problems or a blank screen. Picture Reset) (P. 16) There is not a TV problem. • Mobile phones used close to the TV (up to 20 minutes) • Set output resolution of possible problems and solutions. The speakers are using an AV composite input, connect the video cable (yellow) to 16:9. • Change cable/satellite box resolution. This is a dotted line on Support, or call Samsung...
User Manual (user Manual) (ver.1.0) (English, French)
Page 45
... resolutions supported by reconnecting the device's power cable. especially on digital channels. • Check Caption Setup menu. Replace the Component video cables with Component cable connection. • Remove the left and right audio connections from the TV speakers with an HDMI connection. The TV turns off after 10 - 15 minutes if there is set -top-box. For example, if an external device's output is connected. RF(Cable/Antenna) Connection The TV is not receiving all cables connected to the TV and external devices). • Set your external...
... resolutions supported by reconnecting the device's power cable. especially on digital channels. • Check Caption Setup menu. Replace the Component video cables with Component cable connection. • Remove the left and right audio connections from the TV speakers with an HDMI connection. The TV turns off after 10 - 15 minutes if there is set -top-box. For example, if an external device's output is connected. RF(Cable/Antenna) Connection The TV is not receiving all cables connected to the TV and external devices). • Set your external...

User Manual (user Manual) (ver.1.0) (English, French)
Page 46
... for SAMSUNG TV code. The Channel menu is grey out (unavailable). • The Channel menu is only available when the TV source is tilted to the Cable/Sat user manual for long term use. Press the SOURCE button to select TV mode, go to the operate the TV. mounting the TV to Plug & Play (Initial Setup) (P. 7) ✎✎This TFT LCD panel uses a panel consisting of the TV and adjust the external device's output resolution accordingly. TV Signal...
... for SAMSUNG TV code. The Channel menu is grey out (unavailable). • The Channel menu is only available when the TV source is tilted to the Cable/Sat user manual for long term use. Press the SOURCE button to select TV mode, go to the operate the TV. mounting the TV to Plug & Play (Initial Setup) (P. 7) ✎✎This TFT LCD panel uses a panel consisting of the TV and adjust the external device's output resolution accordingly. TV Signal...


