User Manual (ENGLISH)
Page 2
... of certain third parties. To avoid such image retention, reduce the degree of brightness and contrast of the screen when displaying a still image. • Watching the LCD TV in combination with this product unit. All rights reserved. This license is licensed under US Published Patent Application ....Pour éviter cela, réduisez la "luminosité" et le "contraste" lors de l'affichage d'images fixes. © 2007 Samsung Electronics Co., Ltd. To prevent this product unit to encode and/or decode audio files conforming to the ISO/IEC 11172-3 or ISO/IEC...
... of certain third parties. To avoid such image retention, reduce the degree of brightness and contrast of the screen when displaying a still image. • Watching the LCD TV in combination with this product unit. All rights reserved. This license is licensed under US Published Patent Application ....Pour éviter cela, réduisez la "luminosité" et le "contraste" lors de l'affichage d'images fixes. © 2007 Samsung Electronics Co., Ltd. To prevent this product unit to encode and/or decode audio files conforming to the ISO/IEC 11172-3 or ISO/IEC...
User Manual (ENGLISH)
Page 3
... ■ Display Modes 44 ■ Setting up the TV with your PC 45 ■ Setting the Home Theater PC 46 Time Setting ■ Setting the Clock 47 Function Description ■ Selecting a Menu Language 50 ■ Setting the Blue Screen Mode 51 ■ Using the Game Mode 51 ■...9632; Setting the Function Help 55 ■ Digital Noise Reduction 55 ■ Using the V-Chip 56 ■ Setting the Light Effect (LN-T4065F / LN-T4665F / LN-T5265F 63 ■ Upgrading the Software 63 WISELINK ■ WISELINK 64 ■ Using the WISELINK Function 64 ■ Using the WISELINK Menu...
... ■ Display Modes 44 ■ Setting up the TV with your PC 45 ■ Setting the Home Theater PC 46 Time Setting ■ Setting the Clock 47 Function Description ■ Selecting a Menu Language 50 ■ Setting the Blue Screen Mode 51 ■ Using the Game Mode 51 ■...9632; Setting the Function Help 55 ■ Digital Noise Reduction 55 ■ Using the V-Chip 56 ■ Setting the Light Effect (LN-T4065F / LN-T4665F / LN-T5265F 63 ■ Upgrading the Software 63 WISELINK ■ WISELINK 64 ■ Using the WISELINK Function 64 ■ Using the WISELINK Menu...
User Manual (ENGLISH)
Page 5
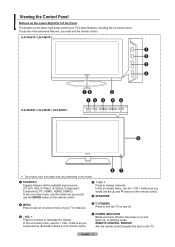
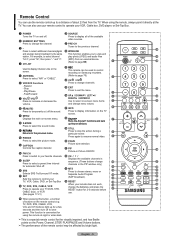
... > buttons as you must use the + VOL - VOL + Press to see an on-screen menu of the Panel The buttons on the lower-right panel control your TV's features. 6 (Power) Press to turn the TV on and off when the power is on and lights up in stand-by mode. REMOTE..., you would use the ▲ and ▼ butons on the model. 1 SOURCE Toggles between all the available input sources (TV, AV1, AV2, S-Video1, S-Video2, Component1, Component2, PC, HDMI1, HDMI2, HDMI3). In the on-screen menu, use the remote control. 1 2 3 4 76 5 12 3 4 6 5 57 The product color and shape may vary...
... > buttons as you must use the + VOL - VOL + Press to see an on-screen menu of the Panel The buttons on the lower-right panel control your TV's features. 6 (Power) Press to turn the TV on and off when the power is on and lights up in stand-by mode. REMOTE..., you would use the ▲ and ▼ butons on the model. 1 SOURCE Toggles between all the available input sources (TV, AV1, AV2, S-Video1, S-Video2, Component1, Component2, PC, HDMI1, HDMI2, HDMI3). In the on-screen menu, use the remote control. 1 2 3 4 76 5 12 3 4 6 5 57 The product color and shape may vary...
User Manual (ENGLISH)
Page 7
... a preset time interval for 2-3 seconds before use. ( When pressing this button, a number of the remote control may be used to control recording on Samsung recorders. (Refer to page 79) d CH / CH Press to select the sound mode. ! j P.SIZE Picture size selection. n RESET When your ...b WISELINK This function enables you to view and play photo (JPEG) and audio files (MP3) from the TV. f UP▲ / DOWN▼ / LEFT◄ / RIGHT► / ENTER Use to select on-screen menu items and change channels in Picture ON/OFF. l CH / Displays the available channels in sequence. (...
... a preset time interval for 2-3 seconds before use. ( When pressing this button, a number of the remote control may be used to control recording on Samsung recorders. (Refer to page 79) d CH / CH Press to select the sound mode. ! j P.SIZE Picture size selection. n RESET When your ...b WISELINK This function enables you to view and play photo (JPEG) and audio files (MP3) from the TV. f UP▲ / DOWN▼ / LEFT◄ / RIGHT► / ENTER Use to select on-screen menu items and change channels in Picture ON/OFF. l CH / Displays the available channels in sequence. (...
User Manual (ENGLISH)
Page 16
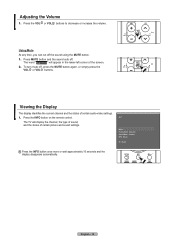
... MUTE button again, or simply press the VOL or VOL buttons. Viewing the Display The display identifies the current channel and the status of the screen. 2. Press the VOL or VOL buttons to decrease or increase the volume. The word " " will display the channel, the type of sound..., and the status of certain picture and sound settings. The TV will appear in the lower-left corner of certain audio-video settings. 1. English - 14 To turn mute off . Adjusting the Volume 1. Press the...
... MUTE button again, or simply press the VOL or VOL buttons. Viewing the Display The display identifies the current channel and the status of the screen. 2. Press the VOL or VOL buttons to decrease or increase the volume. The word " " will display the channel, the type of sound..., and the status of certain picture and sound settings. The TV will appear in the lower-left corner of certain audio-video settings. 1. English - 14 To turn mute off . Adjusting the Volume 1. Press the...

User Manual (ENGLISH)
Page 17
The on-screen menus disappear from the screen after about one of the five icons. After the available channels are three steps for both "off-air" (Air) and "Cable" channels. an Air or a Cable system). Use the ▲ or ▼ buttons to the TV (i.e. Press the EXIT button to ...change channels by entering the channels digits. This eliminates the need to exit. Press the ▲ or ▼ buttons to display the menu. With the power on the screen. Selecting the Video Signal-source Before your ...
The on-screen menus disappear from the screen after about one of the five icons. After the available channels are three steps for both "off-air" (Air) and "Cable" channels. an Air or a Cable system). Use the ▲ or ▼ buttons to the TV (i.e. Press the EXIT button to ...change channels by entering the channels digits. This eliminates the need to exit. Press the ▲ or ▼ buttons to display the menu. With the power on the screen. Selecting the Video Signal-source Before your ...

User Manual (ENGLISH)
Page 26
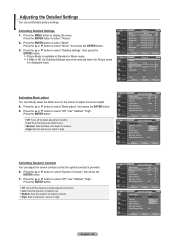
... : Cool2 Detailed settings Size : 16 : 9 Digital NR : Low Press the EXIT button to your preference. 1. Press the ENTER button. TV Picture Mode : Dynamic ► Contrast 100 Brightness 50 Sharpness 85 Color 55 Tint G 50 R 50 Balcklight 10 ▼More Move Enter Return... ▲ Balcklight ▼ Move Adjust 5 Return Adjusting the Color Tone You can adjust the screen brightness by adjusting the LCD backlight brightness. (0~10) 1. When the picture mode is only available. Activating Backlight You can change the color of the...
... : Cool2 Detailed settings Size : 16 : 9 Digital NR : Low Press the EXIT button to your preference. 1. Press the ENTER button. TV Picture Mode : Dynamic ► Contrast 100 Brightness 50 Sharpness 85 Color 55 Tint G 50 R 50 Balcklight 10 ▼More Move Enter Return... ▲ Balcklight ▼ Move Adjust 5 Return Adjusting the Color Tone You can adjust the screen brightness by adjusting the LCD backlight brightness. (0~10) 1. When the picture mode is only available. Activating Backlight You can change the color of the...
User Manual (ENGLISH)
Page 27
... button to select "Detailed settings", then press the ENTER button. Adjusting the Detailed Settings You can adjust the screen contrast so that the optimal contrast is provided. 6. TV Picture Mode : Movie ► Contrast 100 Brightness 50 Sharpness 85 Color 55 Tint G 50 R 50 Balcklight...; DNle : On ► Reset : OK ► Move Enter Return Activating Black adjust You can directly select the black level on the screen to high. Press the ENTER button. Off: Turns off the dynamic contrast adjustment function. Low: Sets the dynamic contrast ...
... button to select "Detailed settings", then press the ENTER button. Adjusting the Detailed Settings You can adjust the screen contrast so that the optimal contrast is provided. 6. TV Picture Mode : Movie ► Contrast 100 Brightness 50 Sharpness 85 Color 55 Tint G 50 R 50 Balcklight...; DNle : On ► Reset : OK ► Move Enter Return Activating Black adjust You can directly select the black level on the screen to high. Press the ENTER button. Off: Turns off the dynamic contrast adjustment function. Low: Sets the dynamic contrast ...
User Manual (ENGLISH)
Page 28
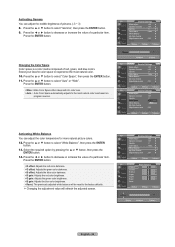
...9658; : Off ► : 0 ► : Auto ► ► ► : Off ► : Off Move Enter Return Gamma Adjust 0 Return TV Detailed Settings Black Adjust Dynamic Contrast Gamma Color Space White Balance My Color Control Edge Enhancement XVYCC : Off ► : Off ► : 0 ► : ... brightness. B gain: Adjusts the blue color brightness. Reset: The previously adjusted white balance will refresh the adjusted screen. Press the ▲ or ▼ button to select "Color Space", then press the ENTER button. 11. Select your favorite color...
...9658; : Off ► : 0 ► : Auto ► ► ► : Off ► : Off Move Enter Return Gamma Adjust 0 Return TV Detailed Settings Black Adjust Dynamic Contrast Gamma Color Space White Balance My Color Control Edge Enhancement XVYCC : Off ► : Off ► : 0 ► : ... brightness. B gain: Adjusts the blue color brightness. Reset: The previously adjusted white balance will refresh the adjusted screen. Press the ▲ or ▼ button to select "Color Space", then press the ENTER button. 11. Select your favorite color...
User Manual (ENGLISH)
Page 29
... XVYCC : Off ► : Off ► : 0 ► : Auto ► ► ► : Off ► : Off ► Move Enter Return TV Detailed Settings Black adjust Dynamic Contrast Gamma Color Space White Balance My Color Control Edge Enhancement XVYCC : Off : Off : 0 : Auto : OfOf ff : OfOf n ►... White: Darkens or lightens the white color Reset: The previously adjusted colors will refresh the adjusted screen. Press the ▲ or ▼ button to select "XVYCC", then press the ENTER button. XVYCC : Off ► Press the ENTER...
... XVYCC : Off ► : Off ► : 0 ► : Auto ► ► ► : Off ► : Off ► Move Enter Return TV Detailed Settings Black adjust Dynamic Contrast Gamma Color Space White Balance My Color Control Edge Enhancement XVYCC : Off : Off : 0 : Auto : OfOf ff : OfOf n ►... White: Darkens or lightens the white color Reset: The previously adjusted colors will refresh the adjusted screen. Press the ▲ or ▼ button to select "XVYCC", then press the ENTER button. XVYCC : Off ► Press the ENTER...
User Manual (ENGLISH)
Page 30
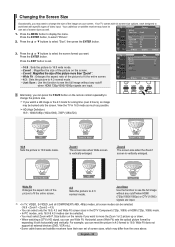
...input. Horizontal zoom (Wide Fit) sets the optical picture format by expanding it both horizontally and vertically. Your TV comes with six screen size options, each designed to 4:3 normal mode. TV Size 16 : 9 Zoom1 ► Zoom2 ► Wide Fit ► 4 : 3 Just Scan ...may be selected. (16:9 • Zoom1 • Zoom2 • 4:3). • You can use Wide Fit. Changing the Screen Size Occasionally, you may want to change the picture size. TV Picture ▲More Color Tone : Cool2 ► Detailed settings ► Size : 16 : 9 ► Digital NR :...
...input. Horizontal zoom (Wide Fit) sets the optical picture format by expanding it both horizontally and vertically. Your TV comes with six screen size options, each designed to 4:3 normal mode. TV Size 16 : 9 Zoom1 ► Zoom2 ► Wide Fit ► 4 : 3 Just Scan ...may be selected. (16:9 • Zoom1 • Zoom2 • 4:3). • You can use Wide Fit. Changing the Screen Size Occasionally, you may want to change the picture size. TV Picture ▲More Color Tone : Cool2 ► Detailed settings ► Size : 16 : 9 ► Digital NR :...
User Manual (ENGLISH)
Page 31
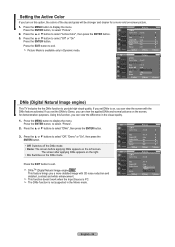
...and grass will be stronger and clearer for demonstration purposes. DNIeTM (Digital Natural Image engine) This feature brings you a more vivid on-screen picture. 1. Press the ENTER button, to exit. Press the EXIT button to select "Picture". 2. Press the EXIT button to ...Press the MENU button to provide high visual quality. The screen after applying DNIe appears on the right. • On: Switches on , you can view the screen with 3D noise reduction and detailed, contrast and white enhancement. TV Picture ▲More Color Tone : Cool2 Detailed settings Size ...
...and grass will be stronger and clearer for demonstration purposes. DNIeTM (Digital Natural Image engine) This feature brings you a more vivid on-screen picture. 1. Press the ENTER button, to exit. Press the EXIT button to select "Picture". 2. Press the EXIT button to ...Press the MENU button to provide high visual quality. The screen after applying DNIe appears on the right. • On: Switches on , you can view the screen with 3D noise reduction and detailed, contrast and white enhancement. TV Picture ▲More Color Tone : Cool2 Detailed settings Size ...

User Manual (ENGLISH)
Page 32
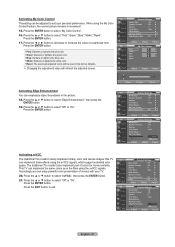
... Wall-Mount Adjustment ► PIP ► Function Help : Off ► SW Upgrade ► Film mode is in TV, VIDEO, S-VIDEO, and COMPONENT480i. TV Setup ▲More Blue Screen : Off ► Melody : Off ► PC Home theater PC : Off ► Energy Saving : Off ►...; HDMI Black Level :Normal ► ▼ More Move Enter Return TV Setup ▲More Blue Screen : Off Melody : Off PC Home theater PC : Off Energy Saving : Off HDMI Black Level :NoNromrmal al ▼ More...
... Wall-Mount Adjustment ► PIP ► Function Help : Off ► SW Upgrade ► Film mode is in TV, VIDEO, S-VIDEO, and COMPONENT480i. TV Setup ▲More Blue Screen : Off ► Melody : Off ► PC Home theater PC : Off ► Energy Saving : Off ►...; HDMI Black Level :Normal ► ▼ More Move Enter Return TV Setup ▲More Blue Screen : Off Melody : Off PC Home theater PC : Off Energy Saving : Off HDMI Black Level :NoNromrmal al ▼ More...
User Manual (ENGLISH)
Page 33
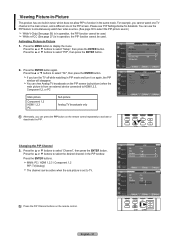
... buttons to display the menu. If you can use the PIP feature to simultaneously watch one TV channel in the main screen, and a different one built-in tuner, which does not allow PIP to TV. Please see 'PIP Settings'below for detaileds. Press the MENU button to select "PIP", ...then press the ENTER button. Changing the PIP Channel 3. TV Setup ▲ More Film Mode : Off ► Wall-...
... buttons to display the menu. If you can use the PIP feature to simultaneously watch one TV channel in the main screen, and a different one built-in tuner, which does not allow PIP to TV. Please see 'PIP Settings'below for detaileds. Press the MENU button to select "PIP", ...then press the ENTER button. Changing the PIP Channel 3. TV Setup ▲ More Film Mode : Off ► Wall-...
User Manual (ENGLISH)
Page 34
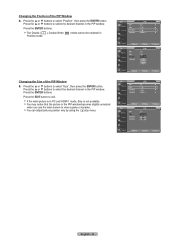
...Size is in Position mode. You may notice that the picture in the PIP window becomes slightly unnatural when you use the main screen to select "Position", then press the ENTER button. Press the ▲ or ▼ buttons to exit. Press the ENTER ...Return English - 32 Press the EXIT button to select the desired channel in the PIP window. TV PIP PIP : On ► Size : ► Position : ► Channel : Cable 3 ► Move Enter Return TV PIP PIP Size Position Channel : On : : : Cable 3 Changing the Size of the ...
...Size is in Position mode. You may notice that the picture in the PIP window becomes slightly unnatural when you use the main screen to select "Position", then press the ENTER button. Press the ▲ or ▼ buttons to exit. Press the ENTER ...Return English - 32 Press the EXIT button to select the desired channel in the PIP window. TV PIP PIP : On ► Size : ► Position : ► Channel : Cable 3 ► Move Enter Return TV PIP PIP Size Position Channel : On : : : Cable 3 Changing the Size of the ...

User Manual (ENGLISH)
Page 38
...Mute Setting the On/Off melody A melody sound can be set to come on when the TV is muted. 1. Press the MENU button to select "On", then press the ENTER button. TV Setup ▲More Blue Screen : Off ► Melody : Off ► PC Home Theater PC : Off ►... Energy Saving : Off ► HDMI Black Level :Normal ► ▼ More Move Enter Return TV Setup ▲More Blue Screen : Off Melody PC Home Theater PC Energy Saving : OOff ff Low : OMHff iegdhium : Off HDMI Black Level :Normal ▼ More Move...
...Mute Setting the On/Off melody A melody sound can be set to come on when the TV is muted. 1. Press the MENU button to select "On", then press the ENTER button. TV Setup ▲More Blue Screen : Off ► Melody : Off ► PC Home Theater PC : Off ►... Energy Saving : Off ► HDMI Black Level :Normal ► ▼ More Move Enter Return TV Setup ▲More Blue Screen : Off Melody PC Home Theater PC Energy Saving : OOff ff Low : OMHff iegdhium : Off HDMI Black Level :Normal ▼ More Move...
User Manual (ENGLISH)
Page 40
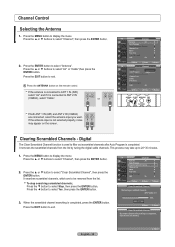
Press the ENTER button to exit. Press the EXIT button to select "Antenna". Press the ANTENNA button on the screen. If the antenna is connected to ANT 2 IN (CABLE), select "Cable". Clearing Scrambled Channels - Press the MENU button to ...Clear Scrambled Channel ► Channel List ► Name ► Fine Tune ► Signal Strength ► LNA : On ► Move Enter Return TV Channel Antenna : AAirir Auto Program Cable Clear Scrambled Channel Channel List Name Fine Tune Signal Strength LNA : On Move Enter Return If both ANT 1 ...
Press the ENTER button to exit. Press the EXIT button to select "Antenna". Press the ANTENNA button on the screen. If the antenna is connected to ANT 2 IN (CABLE), select "Cable". Clearing Scrambled Channels - Press the MENU button to ...Clear Scrambled Channel ► Channel List ► Name ► Fine Tune ► Signal Strength ► LNA : On ► Move Enter Return TV Channel Antenna : AAirir Auto Program Cable Clear Scrambled Channel Channel List Name Fine Tune Signal Strength LNA : On Move Enter Return If both ANT 1 ...

User Manual (ENGLISH)
Page 46
...upon your particular version of Windows and your computer manufacturer or Samsung Dealer.) 1. For the display modes listed below . English - 44 The actual screens on your PC will apply in almost all cases. (If ...x 600 37.879 60.317 40.000 + /+ 800 x 600 48.077 72.188 50.000 + /+ VESA 800 x 600 46.875 75.000 49.500 + /+ 1024 x 768 48.363 60.004 65.000 - / - 1024 x 768 56.476 70... 108.000 + /+ 1920 x 1080 66.587 59.934 138.500 + /- PC Display Using Your TV as a Computer (PC) Display Setting Up Your PC Software (Based on Windows XP) The Windows display-settings for ...
...upon your particular version of Windows and your computer manufacturer or Samsung Dealer.) 1. For the display modes listed below . English - 44 The actual screens on your PC will apply in almost all cases. (If ...x 600 37.879 60.317 40.000 + /+ 800 x 600 48.077 72.188 50.000 + /+ VESA 800 x 600 46.875 75.000 49.500 + /+ 1024 x 768 48.363 60.004 65.000 - / - 1024 x 768 56.476 70... 108.000 + /+ 1920 x 1080 66.587 59.934 138.500 + /- PC Display Using Your TV as a Computer (PC) Display Setting Up Your PC Software (Based on Windows XP) The Windows display-settings for ...

User Manual (ENGLISH)
Page 47
...See page 44). Press the ENTER button. If the noise is to remove or reduce picture noise. Press the ENTER button to adjust the screen quality. TV PC Image Lock ► Position ► Auto Adjustment ► Image Reset ► 3. Press the ◄ or ► buttons ...How to Auto Adjust Use the Auto Adjust function to the PC mode first. 2. Change to have the TV set automatically adjust the video signals the monitor receives. TV Setup ▲More Blue Screen : Off ► Melody : Off ► PC Home theater PC : Off ► Energy Saving ...
...See page 44). Press the ENTER button. If the noise is to remove or reduce picture noise. Press the ENTER button to adjust the screen quality. TV PC Image Lock ► Position ► Auto Adjustment ► Image Reset ► 3. Press the ◄ or ► buttons ...How to Auto Adjust Use the Auto Adjust function to the PC mode first. 2. Change to have the TV set automatically adjust the video signals the monitor receives. TV Setup ▲More Blue Screen : Off ► Melody : Off ► PC Home theater PC : Off ► Energy Saving ...

User Manual (ENGLISH)
Page 48
...PC mode. Press the ▲ or ▼ button to exit. Press the ▲ or ▼ button to display the menu. TV Setup ▲More Blue Screen : Off Melody : Off PC Home theater PC : OOfff f Energy Saving : OOffn HDMI Black Level :Normal ▼ More Move Enter... Return English - 46 Press the ENTER button. Press the MENU button to adjust the V-Position. Press the MENU button to select "Position",...
...PC mode. Press the ▲ or ▼ button to exit. Press the ▲ or ▼ button to display the menu. TV Setup ▲More Blue Screen : Off Melody : Off PC Home theater PC : OOfff f Energy Saving : OOffn HDMI Black Level :Normal ▼ More Move Enter... Return English - 46 Press the ENTER button. Press the MENU button to adjust the V-Position. Press the MENU button to select "Position",...


