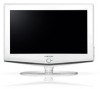
Quick Guide (easy Manual) (ver.1.0) (English)
Page 3
...Control Panel 3 Viewing the Connection Panel 4 Viewing the Remote Control 5 Installing Batteries in the Remote Control 6 CONNECTIONS Connecting VHF and UHF Antennas 6 Connecting Cable TV 7 Connecting a VCR 8 Connecting an S-VHS VCR 8 Connecting a DVD Player 9 Connecting a DVD Player/Set-Top Box via DVI 9 Connecting a DVD ...Player/Set-Top Box via HDMI 10 Connecting a PC 10 OPERATION Turning the TV On and Off 11 Plug and Play Feature 11 Changing Channels 12 Adjusting the Volume 12 Viewing the Display 12 Selecting the Video Signal-...
...Control Panel 3 Viewing the Connection Panel 4 Viewing the Remote Control 5 Installing Batteries in the Remote Control 6 CONNECTIONS Connecting VHF and UHF Antennas 6 Connecting Cable TV 7 Connecting a VCR 8 Connecting an S-VHS VCR 8 Connecting a DVD Player 9 Connecting a DVD Player/Set-Top Box via DVI 9 Connecting a DVD ...Player/Set-Top Box via HDMI 10 Connecting a PC 10 OPERATION Turning the TV On and Off 11 Plug and Play Feature 11 Changing Channels 12 Adjusting the Volume 12 Viewing the Display 12 Selecting the Video Signal-...
Quick Guide (easy Manual) (ver.1.0) (English)
Page 4
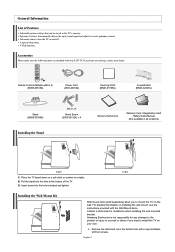
... a technician for any items are included with two screws. General Information List of the TV. 3. If any damage to the product or injury to yourself or others if you to turn the TV on the wall. V-Chip function. Samsung Electronics is not responsible for assistance when installing the wall mounted bracket. English-2 Accessories...
... a technician for any items are included with two screws. General Information List of the TV. 3. If any damage to the product or injury to yourself or others if you to turn the TV on the wall. V-Chip function. Samsung Electronics is not responsible for assistance when installing the wall mounted bracket. English-2 Accessories...
Quick Guide (easy Manual) (ver.1.0) (English)
Page 5
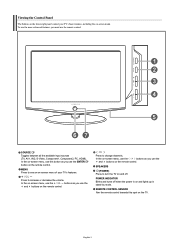
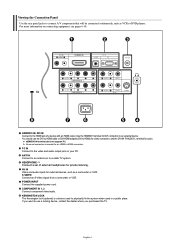
... features, including the on the remote control. In the on-screen menu, use the buttons as you use the ENTER button on the TV. MENU Press to change channels. SPEAKERS (POWER) Press to increase or decrease the volume. Viewing the Control Panel The buttons on the lower-right panel ...control your TV's features. In the on-screen menu, use this spot on the remote control. In the on-screen menu, use the buttons as you must use...
... features, including the on the remote control. In the on-screen menu, use the buttons as you use the ENTER button on the TV. MENU Press to change channels. SPEAKERS (POWER) Press to increase or decrease the volume. Viewing the Control Panel The buttons on the lower-right panel ...control your TV's features. In the on-screen menu, use this spot on the remote control. In the on-screen menu, use the buttons as you must use...
Quick Guide (easy Manual) (ver.1.0) (English)
Page 6
... A/V components that will be connected continuously, such as a camcorder or VCR. Use the HDMI/DVI terminal for audio. PC IN Connect to a cable TV system. POWER INPUT Connect the supplied power cord. HEADPHONE Connect a set of a device with an HDMI output. If you want to use the DVI... listening. HDMI/DVI IN, DVI IN Connect to an external device. You should use a locking device, contact the dealer where you purchased the TV. HDMI/DVI IN terminal does not support PC. No sound connection is a device used to HDMI connection. For more information on your PC. English...
... A/V components that will be connected continuously, such as a camcorder or VCR. Use the HDMI/DVI terminal for audio. PC IN Connect to a cable TV system. POWER INPUT Connect the supplied power cord. HEADPHONE Connect a set of a device with an HDMI output. If you want to use the DVI... listening. HDMI/DVI IN, DVI IN Connect to an external device. You should use a locking device, contact the dealer where you purchased the TV. HDMI/DVI IN terminal does not support PC. No sound connection is a device used to HDMI connection. For more information on your PC. English...
Quick Guide (easy Manual) (ver.1.0) (English)
Page 7
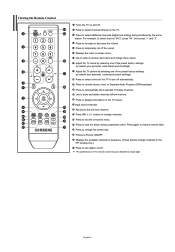
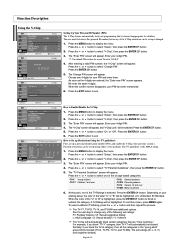
... by selecting one of the preset factory settings. (or selects your personal, customized picture settings) Press to select a time for the TV to change the screen size. Input source selection Returns to select channel "54-3", press "54", then press "-" and "3". Picture-in sequence. ...Displays the available channels in -Picture ON/OFF. Press to increase or decrease the volume. Press to select on -screen menu. Adjust the TV sound by the same station. Use to store and delete channels to choose stereo, mono or Separate Audio Program (SAPbroadcast). Press to select ...
... by selecting one of the preset factory settings. (or selects your personal, customized picture settings) Press to select a time for the TV to change the screen size. Input source selection Returns to select channel "54-3", press "54", then press "-" and "3". Picture-in sequence. ...Displays the available channels in -Picture ON/OFF. Press to increase or decrease the volume. Press to select on -screen menu. Adjust the TV sound by the same station. Use to store and delete channels to choose stereo, mono or Separate Audio Program (SAPbroadcast). Press to select ...
Quick Guide (easy Manual) (ver.1.0) (English)
Page 8
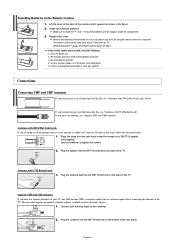
...ANT IN Antennas with the diagram inside the compartment. 3. Connect both antenna leads to tighten the screws. 2. Are the plus and minus ends of the TV. Connections Connecting VHF and UHF Antennas If your antenna has one lead that looks like this , see "Antennas with 75 Ω Round Leads". Is... the TV power on a 300-75 Ω adapter (not supplied). Is there a power outage, or is the power cord unplugged? 5. If you have two separate ...
...ANT IN Antennas with the diagram inside the compartment. 3. Connect both antenna leads to tighten the screws. 2. Are the plus and minus ends of the TV. Connections Connecting VHF and UHF Antennas If your antenna has one lead that looks like this , see "Antennas with 75 Ω Round Leads". Is... the TV power on a 300-75 Ω adapter (not supplied). Is there a power outage, or is the power cord unplugged? 5. If you have two separate ...
Quick Guide (easy Manual) (ver.1.0) (English)
Page 9
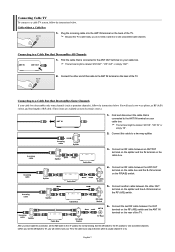
...box's output channel, which is cable-ready, you will need a two-way splitter, an RF (A/B) switch, and four lengths of the TV. Find and disconnect the cable that Descrambles Some Channels If your cable box. Connect an RF cable between an OUTPUT terminal on the splitter ... to view unscrambled cable channels. Incoming cable Splitter Incoming cable Splitter Cable Box 3. RF (A/B) Switch Incoming cable Splitter Cable Box RF (A/B) Switch ANT IN TV Rear 6. Set the A/B switch to the "B" position to view scrambled channels. (When you set the A/B switch to the ANT IN terminal on your...
...box's output channel, which is cable-ready, you will need a two-way splitter, an RF (A/B) switch, and four lengths of the TV. Find and disconnect the cable that Descrambles Some Channels If your cable box. Connect an RF cable between an OUTPUT terminal on the splitter ... to view unscrambled cable channels. Incoming cable Splitter Incoming cable Splitter Cable Box 3. RF (A/B) Switch Incoming cable Splitter Cable Box RF (A/B) Switch ANT IN TV Rear 6. Set the A/B switch to the "B" position to view scrambled channels. (When you set the A/B switch to the ANT IN terminal on your...
Quick Guide (easy Manual) (ver.1.0) (English)
Page 10
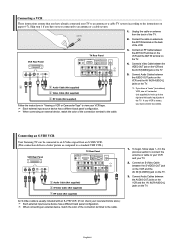
...has a different back panel configuration. Unplug the cable or antenna from an S-VHS VCR. (This connection delivers a better picture as compared to a standard VHS VCR.) TV Rear Panel VCR Rear Panel 3 Audio Cable (Not supplied) 2 S-Video Cable (Not supplied) 1 RF Cable (Not supplied) An S-Video cable is stereo, you... an RF Cable between the S-VIDEO OUT jack on the VCR and the AV IN [S-VIDEO] jack on the TV. 4. Connecting an S-VHS VCR Your Samsung TV can be connected to an S-Video signal from the back of the connection terminal to the cable. 1. English-8 Connect a Video Cable ...
...has a different back panel configuration. Unplug the cable or antenna from an S-VHS VCR. (This connection delivers a better picture as compared to a standard VHS VCR.) TV Rear Panel VCR Rear Panel 3 Audio Cable (Not supplied) 2 S-Video Cable (Not supplied) 1 RF Cable (Not supplied) An S-Video cable is stereo, you... an RF Cable between the S-VIDEO OUT jack on the VCR and the AV IN [S-VIDEO] jack on the TV. 4. Connecting an S-VHS VCR Your Samsung TV can be connected to an S-Video signal from the back of the connection terminal to the cable. 1. English-8 Connect a Video Cable ...
Quick Guide (easy Manual) (ver.1.0) (English)
Page 11
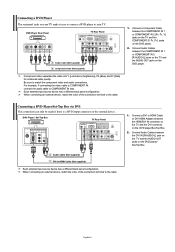
.../Set-Top Box via DVI This connection can only be made if there is a DVI Output connector on your TV make it easy to connect a DVD player to your TV. When connecting an external device, match the color of the connection terminal to the cable. 1. Each external input..., match the color of the connection terminal to the cable. 1. Connecting a DVD Player The rear panel jacks on the external device. DVD Player Rear Panel TV Rear Panel 2 Audio Cable (Not supplied) 1 Component Cable (Not supplied) Component video separates the video into Y (Luminance (brightness)), Pb (Blue) and ...
.../Set-Top Box via DVI This connection can only be made if there is a DVI Output connector on your TV make it easy to connect a DVD player to your TV. When connecting an external device, match the color of the connection terminal to the cable. 1. Each external input..., match the color of the connection terminal to the cable. 1. Connecting a DVD Player The rear panel jacks on the external device. DVD Player Rear Panel TV Rear Panel 2 Audio Cable (Not supplied) 1 Component Cable (Not supplied) Component video separates the video into Y (Luminance (brightness)), Pb (Blue) and ...

Quick Guide (easy Manual) (ver.1.0) (English)
Page 12
...is smaller in size, has the HDCP (High Bandwidth Digital Copy Protection) coding feature installed, and supports multi-channel digital audio. Connecting a PC PC TV Rear Panel 2 PC Audio Cable (Not supplied) 1 D-Sub Cable (Not supplied) Each external input source device has a different back panel configuration. ... to the cable. When connecting an external device, match the color of the connection terminal to the cable. DVD Player Rear Panel TV Rear Panel 1. The HDMI/DVI jacks do not support PC connection. 1. English-10 Connect an HDMI Cable between PC IN [PC] ...
...is smaller in size, has the HDCP (High Bandwidth Digital Copy Protection) coding feature installed, and supports multi-channel digital audio. Connecting a PC PC TV Rear Panel 2 PC Audio Cable (Not supplied) 1 D-Sub Cable (Not supplied) Each external input source device has a different back panel configuration. ... to the cable. When connecting an external device, match the color of the connection terminal to the cable. DVD Player Rear Panel TV Rear Panel 1. The HDMI/DVI jacks do not support PC connection. 1. English-10 Connect an HDMI Cable between PC IN [PC] ...

Quick Guide (easy Manual) (ver.1.0) (English)
Page 13
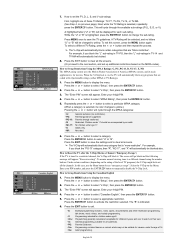
...reset the settings. Press the ENTER button. Set the "Hour", "Minute" or "am /pm". The message "Enjoy your local cable company TV system. Press the or button to select "Start". This will start and end automatically. You can also set the hour and minute by pressing...select "Setup", then press the ENTER 2. is displayed. • Language: Select your language. • Air/Cable: Select your local cable company TV system. • Auto Program: Selects between terrestrial antenna connection or your watching." The message "Check antenna input." Please check that the antenna cable is...
...reset the settings. Press the ENTER button. Set the "Hour", "Minute" or "am /pm". The message "Enjoy your local cable company TV system. Press the or button to select "Start". This will start and end automatically. You can also set the hour and minute by pressing...select "Setup", then press the ENTER 2. is displayed. • Language: Select your language. • Air/Cable: Select your local cable company TV system. • Auto Program: Selects between terrestrial antenna connection or your watching." The message "Check antenna input." Please check that the antenna cable is...

Quick Guide (easy Manual) (ver.1.0) (English)
Page 14
..., then use the number button to select the Previous Channel: 1. Using MUTE button: At any time, you press the CH or CH button, the TV changes channels in the lower-left corner of certain audio-video settings. Press the button once more or wait approximately 10 seconds and it disappears... the PRE-CH button to quickly alternate between two channels that were either erased or not memorized. To quickly switch between them. English-12 The TV will appear in sequence. Using the PRE-CH Button to select the second channel. To turn mute off . When you can temporarily cut off ...
..., then use the number button to select the Previous Channel: 1. Using MUTE button: At any time, you press the CH or CH button, the TV changes channels in the lower-left corner of certain audio-video settings. Press the button once more or wait approximately 10 seconds and it disappears... the PRE-CH button to quickly alternate between two channels that were either erased or not memorized. To quickly switch between them. English-12 The TV will appear in sequence. Using the PRE-CH Button to select the second channel. To turn mute off . When you can temporarily cut off ...

Quick Guide (easy Manual) (ver.1.0) (English)
Page 15
..." menu. 4. Press the ADD/DEL button on the remote control. STD, HRC and IRC identify various types of cable TV systems. Contact your local cable company to the TV (i.e. Storing Channels Automatically The TV automatically cycles through all the available channels are stored, the "Channel" menu reappears. 5. Press the ENTER button at any...
..." menu. 4. Press the ADD/DEL button on the remote control. STD, HRC and IRC identify various types of cable TV systems. Contact your local cable company to the TV (i.e. Storing Channels Automatically The TV automatically cycles through all the available channels are stored, the "Channel" menu reappears. 5. Press the ENTER button at any...

Quick Guide (easy Manual) (ver.1.0) (English)
Page 16
... to select "Color Tone", then press the ENTER button. 3. Each Picture mode can return to control picture quality. 1. Picture Control Using Automatic Picture Settings Your TV has four automatic picture settings ("Dynamic", "Standard", "Movie", "Custom") that are stored according to your preference. 1. The Picture mode must be set has several settings...
... to select "Color Tone", then press the ENTER button. 3. Each Picture mode can return to control picture quality. 1. Picture Control Using Automatic Picture Settings Your TV has four automatic picture settings ("Dynamic", "Standard", "Movie", "Custom") that are stored according to your preference. 1. The Picture mode must be set has several settings...

Quick Guide (easy Manual) (ver.1.0) (English)
Page 17
... "On" or "Off". This function don't work in PC mode. Changing the Picture Size You can select the picture size which best corresponds to your TV is weak, you can activate the Digital Noise Reduction feature to help reduce any static and ghosting that may appear on page 14. 2. Select by...
... "On" or "Off". This function don't work in PC mode. Changing the Picture Size You can select the picture size which best corresponds to your TV is weak, you can activate the Digital Noise Reduction feature to help reduce any static and ghosting that may appear on page 14. 2. Select by...
Quick Guide (easy Manual) (ver.1.0) (English)
Page 18
... button to select "Source", then press the ENTER button. 6. Press the PIP button on what the main picture is PC, the sub picture only supports TV, AV and S-VIDEO. Press the or button to activate or deactivate the "PIP". Select the source of the PIP window. • Channel: Changing the ... PIP mode and turn it on the remote control to select "PIP", then press the ENTER button. 3. Press the or button to simultaneously watch one TV channel in the main screen, and a different one in operation, the PIP function cannot be unavailable for PIP. Press the EXIT button to exit. &#...
... button to select "Source", then press the ENTER button. 6. Press the PIP button on what the main picture is PC, the sub picture only supports TV, AV and S-VIDEO. Press the or button to activate or deactivate the "PIP". Select the source of the PIP window. • Channel: Changing the ... PIP mode and turn it on the remote control to select "PIP", then press the ENTER button. 3. Press the or button to simultaneously watch one TV channel in the main screen, and a different one in operation, the PIP function cannot be unavailable for PIP. Press the EXIT button to exit. &#...
Quick Guide (easy Manual) (ver.1.0) (English)
Page 20
... wish to use the automatic On/Off timers. 1. Setting the Sleep Timer Set the timer for the TV to turn off at the preset time automatically. 1. Press the or button repeatedly until the desired time ... "Setup", then press the ENTER button. 2. Time Setting Setting the Clock You can set the TV's clock so that the set will be set the hour and minute by pressing the number buttons...When finished, press the ENTER button to select "On Timer", then press the ENTER button. 4. The TV automatically turn off when the timer reaches 0. Press the or button to return. You can also set to...
... wish to use the automatic On/Off timers. 1. Setting the Sleep Timer Set the timer for the TV to turn off at the preset time automatically. 1. Press the or button repeatedly until the desired time ... "Setup", then press the ENTER button. 2. Time Setting Setting the Clock You can set the TV's clock so that the set will be set the hour and minute by pressing the number buttons...When finished, press the ENTER button to select "On Timer", then press the ENTER button. 4. The TV automatically turn off when the timer reaches 0. Press the or button to return. You can also set to...
Quick Guide (easy Manual) (ver.1.0) (English)
Page 21
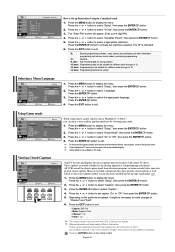
... and "V-Chip Lock" will be selected. Press the EXIT button to select "V-Chip", then press the ENTER button. 3. Enter your 4-digit PIN. A TV-Rating will be highlighted. The sub-ratings (D, L, S, V) work together similarly. English-19 Press the or button to exit. Enter your PIN has been... "V-Chip", then press the ENTER 3. Press the ENTER button. 5. The "Enter PIN" screen will appear. Similarly, if you block "TV-Y" category, then TV-Y7 will be blocked. As soon as the 4 digits are "more restrictive." When the confirm screen disappears, your 4-digit PIN. Press ...
... and "V-Chip Lock" will be selected. Press the EXIT button to select "V-Chip", then press the ENTER button. 3. Enter your 4-digit PIN. A TV-Rating will be highlighted. The sub-ratings (D, L, S, V) work together similarly. English-19 Press the or button to exit. Enter your PIN has been... "V-Chip", then press the ENTER 3. Press the ENTER button. 5. The "Enter PIN" screen will appear. Similarly, if you block "TV-Y" category, then TV-Y7 will be blocked. As soon as the 4 digits are "more restrictive." When the confirm screen disappears, your 4-digit PIN. Press ...
Quick Guide (easy Manual) (ver.1.0) (English)
Page 22
...set up additional restrictions based on previous page). General programming, suitable for movies. How to select "V-Chip", then press the ENTER button. 3. Next, while the TV-Rating is indicated. 6. A highlighted letter ("U" or "B") will cycle through the MPAA categories: • G: • PG: • PG-13: •..., and its main application is "more restrictive". Under certain conditions (depending on the rating of these TV-Ratings: TV-Y7, TV-PG, TV-14, or TV-MA (See Step 4, on the MPAA codes). Programming intended for each sub-rating. First, highlight one of ...
...set up additional restrictions based on previous page). General programming, suitable for movies. How to select "V-Chip", then press the ENTER button. 3. Next, while the TV-Rating is indicated. 6. A highlighted letter ("U" or "B") will cycle through the MPAA categories: • G: • PG: • PG-13: •..., and its main application is "more restrictive". Under certain conditions (depending on the rating of these TV-Ratings: TV-Y7, TV-PG, TV-14, or TV-MA (See Step 4, on the MPAA codes). Programming intended for each sub-rating. First, highlight one of ...
Quick Guide (easy Manual) (ver.1.0) (English)
Page 23
...top box signals. All VCRs record the closed caption signal from television programs, so home-recorded video tapes also provide closed caption symbol in TV mode. English-21 The "B" is not suitable for children under the age of 16. • 18 ans+: Programming restricted to adults...; Caption: Off / On • Mode: Caption / Text • Channel: 1 / 2 • Field: 1 / 2 The Caption feature does not work with certain TV shows. Check for the hearing impaired or foreign-language translations. Press the MENU button to select "Setup", then press the ENTER button. 2. Press the or...
...top box signals. All VCRs record the closed caption signal from television programs, so home-recorded video tapes also provide closed caption symbol in TV mode. English-21 The "B" is not suitable for children under the age of 16. • 18 ans+: Programming restricted to adults...; Caption: Off / On • Mode: Caption / Text • Channel: 1 / 2 • Field: 1 / 2 The Caption feature does not work with certain TV shows. Check for the hearing impaired or foreign-language translations. Press the MENU button to select "Setup", then press the ENTER button. 2. Press the or...


