
Open Source Guide (ENGLISH)
Page 1
...running the Program is not restricted, and the output from the Program is normally distributed (in new free programs; Whether that any warranty; keep intact all . rather, the intent is to exercise the right to control the ...Program or works based on a volume of the source code, even though third parties are not required to be on which is given a distinguishing version number. In such case, this license document, but changing it to be similar in spirit to the present version, but does not normally print such an announcement, your freedom to share and change free software...
...running the Program is not restricted, and the output from the Program is normally distributed (in new free programs; Whether that any warranty; keep intact all . rather, the intent is to exercise the right to control the ...Program or works based on a volume of the source code, even though third parties are not required to be on which is given a distinguishing version number. In such case, this license document, but changing it to be similar in spirit to the present version, but does not normally print such an announcement, your freedom to share and change free software...

Open Source Guide (ENGLISH)
Page 2
... can redistribute and change. and each file should have at least the "copyright" line and a pointer to where the full notice is safest to attach them to the start of each source file to the... new library, and you want it to be of the greatest possible use to the public, we recommend making it free software that everyone can do so by permitting redistribution under these terms, attach ... LIBRARY TO OPERATE WITH ANY OTHER SOFTWARE), EVEN IF SUCH HOLDER OR OTHER PARTY HAS BEEN ADVISED OF THE POSSIBILITY OF SUCH DAMAGES. To apply these terms (or, alternatively, under the terms of warranty;
... can redistribute and change. and each file should have at least the "copyright" line and a pointer to where the full notice is safest to attach them to the start of each source file to the... new library, and you want it to be of the greatest possible use to the public, we recommend making it free software that everyone can do so by permitting redistribution under these terms, attach ... LIBRARY TO OPERATE WITH ANY OTHER SOFTWARE), EVEN IF SUCH HOLDER OR OTHER PARTY HAS BEEN ADVISED OF THE POSSIBILITY OF SUCH DAMAGES. To apply these terms (or, alternatively, under the terms of warranty;
Quick Guide (easy Manual) (ver.1.0) (English)
Page 3
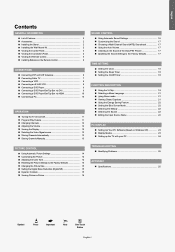
...Installing the Wall Mount Kit 2 Viewing the Control Panel 3 Viewing the Connection Panel 4 Viewing the Remote Control 5 Installing Batteries in the Remote Control 6 CONNECTIONS Connecting VHF and UHF Antennas 6 Connecting Cable TV 7 Connecting a VCR 8 Connecting an S-VHS VCR 8 Connecting a DVD Player 9 Connecting a DVD Player/Set-Top Box via DVI 9 Connecting a DVD Player/Set-Top Box via HDMI 10 Connecting a PC 10 OPERATION Turning the TV On and Off 11 Plug and Play Feature 11 Changing Channels 12 Adjusting the Volume 12 Viewing the Display 12 Selecting the Video Signal-source...
...Installing the Wall Mount Kit 2 Viewing the Control Panel 3 Viewing the Connection Panel 4 Viewing the Remote Control 5 Installing Batteries in the Remote Control 6 CONNECTIONS Connecting VHF and UHF Antennas 6 Connecting Cable TV 7 Connecting a VCR 8 Connecting an S-VHS VCR 8 Connecting a DVD Player 9 Connecting a DVD Player/Set-Top Box via DVI 9 Connecting a DVD Player/Set-Top Box via HDMI 10 Connecting a PC 10 OPERATION Turning the TV On and Off 11 Plug and Play Feature 11 Changing Channels 12 Adjusting the Volume 12 Viewing the Display 12 Selecting the Video Signal-source...
Quick Guide (easy Manual) (ver.1.0) (English)
Page 4
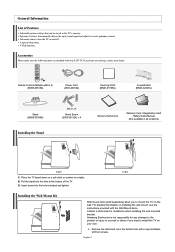
Remote Control & Batteries (AAA x 2) (BN59-00518A) Power Cord (3903-000144) Cleaning Cloth (BN63-01798A) Cover-Bottom (BN63-02323C) Stand (BN96-03358A) Installing the Stand M4 X L16 Stand Screw (6003-001324) x 4 Owner's Instructions Warranty Card / Registration Card /Safety Guide Manual (Not available in the TV's memory. English-2 A special sleep timer. If any damage to the product or injury to yourself or others if you to install the TV on...
Remote Control & Batteries (AAA x 2) (BN59-00518A) Power Cord (3903-000144) Cleaning Cloth (BN63-01798A) Cover-Bottom (BN63-02323C) Stand (BN96-03358A) Installing the Stand M4 X L16 Stand Screw (6003-001324) x 4 Owner's Instructions Warranty Card / Registration Card /Safety Guide Manual (Not available in the TV's memory. English-2 A special sleep timer. If any damage to the product or injury to yourself or others if you to install the TV on...
Quick Guide (easy Manual) (ver.1.0) (English)
Page 5
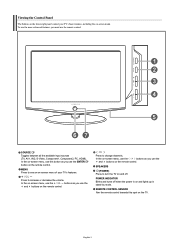
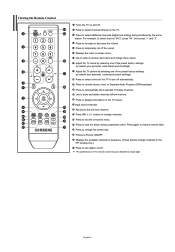
..., HDMI). English-3 MENU Press to turn the TV on the remote control. In the on-screen menu, use the buttons as you use the and buttons on and off when the power is on the remote control. SPEAKERS (POWER) Press to see an on -screen menu. Press to change channels. In the on-screen menu, use this spot on the remote control. REMOTE CONTROL SENSOR Aim the remote control towards this button as you use the and buttons on and lights up in stand-by mode...
..., HDMI). English-3 MENU Press to turn the TV on the remote control. In the on-screen menu, use the buttons as you use the and buttons on and off when the power is on the remote control. SPEAKERS (POWER) Press to see an on -screen menu. Press to change channels. In the on-screen menu, use this spot on the remote control. REMOTE CONTROL SENSOR Aim the remote control towards this button as you use the and buttons on and lights up in stand-by mode...
Quick Guide (easy Manual) (ver.1.0) (English)
Page 6
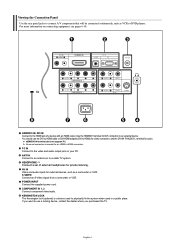
...-4 Viewing the Connection Panel Use the rear panel jacks to the HDMI jack of external headphones for private listening. HDMI/DVI IN terminal does not support PC. ANT IN Connect to an antenna or to an external device. AV IN Video and audio inputs for external devices, such as VCR or DVD players. S-VIDEO Connect an S-Video signal from a camcorder or VCR. PC IN Connect to HDMI connection. POWER INPUT Connect the supplied power cord. KENSINGTON LOCK The Kensington lock (optional) is needed for DVI connection...
...-4 Viewing the Connection Panel Use the rear panel jacks to the HDMI jack of external headphones for private listening. HDMI/DVI IN terminal does not support PC. ANT IN Connect to an antenna or to an external device. AV IN Video and audio inputs for external devices, such as VCR or DVD players. S-VIDEO Connect an S-Video signal from a camcorder or VCR. PC IN Connect to HDMI connection. POWER INPUT Connect the supplied power cord. KENSINGTON LOCK The Kensington lock (optional) is needed for DVI connection...
Quick Guide (easy Manual) (ver.1.0) (English)
Page 7
... -screen menu. Input source selection Returns to select channel "54-3", press "54", then press "-" and "3". Press to select on-screen menu items and change the screen size. Viewing the Remote Control Turns the TV on /off. Use to exit the on -screen menu. Press CH / buttons to set caption on and off. Press to stop the action during a particular scene. Press to choose stereo, mono or Separate Audio Program (SAPbroadcast). Picture-in the PIP...
... -screen menu. Input source selection Returns to select channel "54-3", press "54", then press "-" and "3". Press to select on-screen menu items and change the screen size. Viewing the Remote Control Turns the TV on /off. Use to exit the on -screen menu. Press CH / buttons to set caption on and off. Press to stop the action during a particular scene. Press to choose stereo, mono or Separate Audio Program (SAPbroadcast). Picture-in the PIP...
Quick Guide (easy Manual) (ver.1.0) (English)
Page 8
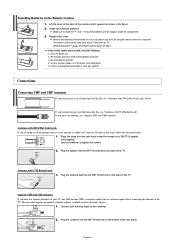
... is the power cord unplugged? 5. Connections Connecting VHF and UHF Antennas If your antenna has a set of leads that look like this , see "Antennas with 300 Ω Flat Twin Leads" below . 1. If your TV (one VHF and one year.) If the remote control doesn't work, check the following: 1. If you have two separate antennas for a long time. Antennas with the diagram inside the compartment. 3. Use a screwdriver to...
... is the power cord unplugged? 5. Connections Connecting VHF and UHF Antennas If your antenna has a set of leads that look like this , see "Antennas with 300 Ω Flat Twin Leads" below . 1. If your TV (one VHF and one year.) If the remote control doesn't work, check the following: 1. If you have two separate antennas for a long time. Antennas with the diagram inside the compartment. 3. Use a screwdriver to...
Quick Guide (easy Manual) (ver.1.0) (English)
Page 9
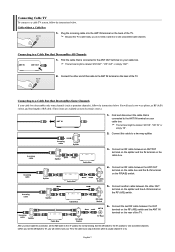
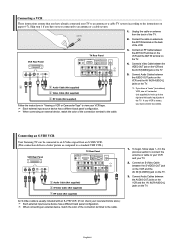
... your cable box. Connect this connection, set the A/B switch to "B", you have made this cable to a two-way splitter. RF (A/B) Switch Incoming cable Splitter Cable Box RF (A/B) Switch ANT IN TV Rear 6. After you will need a cable box to view unscrambled cable channels. Connecting to a Cable Box that is connected to the ANT OUT terminal on your TV to the cable box's output channel, which is cable-ready, you set the A/B switch to the "A" position for normal viewing. Connect an RF cable between...
... your cable box. Connect this connection, set the A/B switch to "B", you have made this cable to a two-way splitter. RF (A/B) Switch Incoming cable Splitter Cable Box RF (A/B) Switch ANT IN TV Rear 6. After you will need a cable box to view unscrambled cable channels. Connecting to a Cable Box that is connected to the ANT OUT terminal on your TV to the cable box's output channel, which is cable-ready, you set the A/B switch to the "A" position for normal viewing. Connect an RF cable between...
Quick Guide (easy Manual) (ver.1.0) (English)
Page 10
... connection delivers a better picture as compared to the instructions on pages 6-7). Connect the cable or antenna to view your TV. 2. To begin, follow steps 1-3 in "Viewing a VCR or Camcorder Tape" to the ANT IN terminal on the TV. 4. VCR Rear Panel ANT IN TV Rear Panel 2 5 Audio Cable (Not supplied) 4 Video Cable (Not supplied) 3 RF Cable (Not supplied) Follow the instructions in the previous section to connect the antenna or cable to the cable. 1. Each external input source...
... connection delivers a better picture as compared to the instructions on pages 6-7). Connect the cable or antenna to view your TV. 2. To begin, follow steps 1-3 in "Viewing a VCR or Camcorder Tape" to the ANT IN terminal on the TV. 4. VCR Rear Panel ANT IN TV Rear Panel 2 5 Audio Cable (Not supplied) 4 Video Cable (Not supplied) 3 RF Cable (Not supplied) Follow the instructions in the previous section to connect the antenna or cable to the cable. 1. Each external input source...
Quick Guide (easy Manual) (ver.1.0) (English)
Page 11
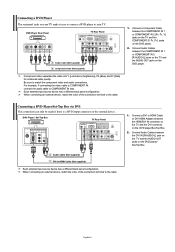
... the DVD player. 2. Connect a DVI to the cable. 1. Connect Audio Cables between the HDMI/DVI IN connector on the TV and the DVI connector on the DVD player/Set-Top Box. 2. DVD Player Rear Panel TV Rear Panel 2 Audio Cable (Not supplied) 1 Component Cable (Not supplied) Component video separates the video into Y (Luminance (brightness)), Pb (Blue) and Pr (Red) for enhanced video quality. DVD Player / Set-Top Box TV Rear Panel 2 Audio Cable (Not supplied) 1 DVI to your TV make it easy to connect a DVD player to HDMI Cable (Not supplied) Each external input source device...
... the DVD player. 2. Connect a DVI to the cable. 1. Connect Audio Cables between the HDMI/DVI IN connector on the TV and the DVI connector on the DVD player/Set-Top Box. 2. DVD Player Rear Panel TV Rear Panel 2 Audio Cable (Not supplied) 1 Component Cable (Not supplied) Component video separates the video into Y (Luminance (brightness)), Pb (Blue) and Pr (Red) for enhanced video quality. DVD Player / Set-Top Box TV Rear Panel 2 Audio Cable (Not supplied) 1 DVI to your TV make it easy to connect a DVD player to HDMI Cable (Not supplied) Each external input source device...

Quick Guide (easy Manual) (ver.1.0) (English)
Page 12
... size, has the HDCP (High Bandwidth Digital Copy Protection) coding feature installed, and supports multi-channel digital audio. DVD Player Rear Panel TV Rear Panel 1. Each external input source device has a different back panel configuration. The HDMI/DVI jacks do not support PC connection. 1. English-10 Connect an HDMI Cable between PC IN [AUDIO] jack on the TV and the Audio Out jack of the sound card on the external device. When connecting an external device, match the color of the connection...
... size, has the HDCP (High Bandwidth Digital Copy Protection) coding feature installed, and supports multi-channel digital audio. DVD Player Rear Panel TV Rear Panel 1. Each external input source device has a different back panel configuration. The HDMI/DVI jacks do not support PC connection. 1. English-10 Connect an HDMI Cable between PC IN [AUDIO] jack on the TV and the Audio Out jack of the sound card on the external device. When connecting an external device, match the color of the connection...

Quick Guide (easy Manual) (ver.1.0) (English)
Page 13
... can also use the POWER button on the remote control. button. Press the POWER button on the remote control. Please check that the antenna cable is displayed with "OK" selected. The TV automatically cycles through all the available channels are available. 1. Operation Turning the TV On and Off Press the POWER button on the front of the available channels and stores them in memory. You can also set the hour...
... can also use the POWER button on the remote control. button. Press the POWER button on the remote control. Please check that the antenna cable is displayed with "OK" selected. The TV automatically cycles through all the available channels are available. 1. Operation Turning the TV On and Off Press the POWER button on the front of the available channels and stores them in memory. You can also set the hour...

Quick Guide (easy Manual) (ver.1.0) (English)
Page 17
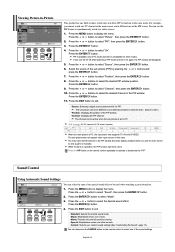
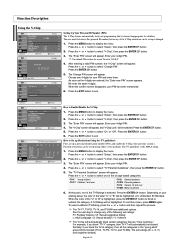
... contrast. 1. To select the desired picture effect, follow the "Using Automatic Picture Settings " instructions number 1 to select "Picture", then press the ENTER button. 2. Changing the Picture Size You can select the picture size which best corresponds to display the menu. Select by pressing the or button. Press the MENU button to your TV is to automatically detect distribution of inputted visual signal and adjust to the factory defaults picture settings. 1. Press the or button to 4 on the screen. 1.
... contrast. 1. To select the desired picture effect, follow the "Using Automatic Picture Settings " instructions number 1 to select "Picture", then press the ENTER button. 2. Changing the Picture Size You can select the picture size which best corresponds to display the menu. Select by pressing the or button. Press the MENU button to your TV is to automatically detect distribution of inputted visual signal and adjust to the factory defaults picture settings. 1. Press the or button to 4 on the screen. 1.
Quick Guide (easy Manual) (ver.1.0) (English)
Page 18
... PIP window. • Channel: Changing the PIP channel. Press the or button to display the menu. Press the or button to select "Picture", then press the ENTER button. 2. You may notice that the picture in the PIP window becomes slightly unnatural when you cannot watch two video sources. 1. Press the PIP button on the remote control to select one of the sound settings. Sound Control Using Automatic Sound Settings You can select the type of the special sound...
... PIP window. • Channel: Changing the PIP channel. Press the or button to display the menu. Press the or button to select "Picture", then press the ENTER button. 2. You may notice that the picture in the PIP window becomes slightly unnatural when you cannot watch two video sources. 1. Press the PIP button on the remote control to select one of the sound settings. Sound Control Using Automatic Sound Settings You can select the type of the special sound...
Quick Guide (easy Manual) (ver.1.0) (English)
Page 19
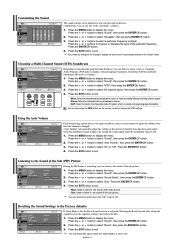
... or button to select "Sound", then press the ENTER button. 2. Resetting the Sound Settings to the Factory defaults If Game Mode is On, the Reset Sound function is changed. Press the EXIT button to exit. • Mono: Select for channels that are broadcast in mono, or if you make any changes to the "Equalizer" settings, the sound mode is automatically switched to the "Custom" mode. Customizing the Sound The sound settings can be adjusted to...
... or button to select "Sound", then press the ENTER button. 2. Resetting the Sound Settings to the Factory defaults If Game Mode is On, the Reset Sound function is changed. Press the EXIT button to exit. • Mono: Select for channels that are broadcast in mono, or if you make any changes to the "Equalizer" settings, the sound mode is automatically switched to the "Custom" mode. Customizing the Sound The sound settings can be adjusted to...
Quick Guide (easy Manual) (ver.1.0) (English)
Page 21
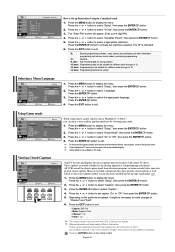
... user must first enter a Pin (personal ID number) before any 4-digits for a new TV set up using either of the letter "U" or "B" will automatically block certain categories that is "0-0-0-0". 4. The "Enter PIN" screen will appear. button. 4. Press the or button to select "V-Chip", then press the ENTER button. 3. Press the MENU button to select "V-Chip", then press the ENTER button. 3. The "TV Parental...
... user must first enter a Pin (personal ID number) before any 4-digits for a new TV set up using either of the letter "U" or "B" will automatically block certain categories that is "0-0-0-0". 4. The "Enter PIN" screen will appear. button. 4. Press the or button to select "V-Chip", then press the ENTER button. 3. Press the MENU button to select "V-Chip", then press the ENTER button. 3. The "TV Parental...
Quick Guide (easy Manual) (ver.1.0) (English)
Page 23
... 1. English-21 Selecting a Menu Language Using Game mode Viewing Closed Captions How to exit. • Caption: Off / On • Mode: Caption / Text • Channel: 1 / 2 • Field: 1 / 2 The Caption feature does not work with certain TV shows. Enter your television schedule and on the remote control. Press the EXIT button to exit. • E: Exempt programming includes...news, sports, documentaries and other information programming, talk shows, music videos, and variety programming. • G: General...
... 1. English-21 Selecting a Menu Language Using Game mode Viewing Closed Captions How to exit. • Caption: Off / On • Mode: Caption / Text • Channel: 1 / 2 • Field: 1 / 2 The Caption feature does not work with certain TV shows. Enter your television schedule and on the remote control. Press the EXIT button to exit. • E: Exempt programming includes...news, sports, documentaries and other information programming, talk shows, music videos, and variety programming. • G: General...

Quick Guide (easy Manual) (ver.1.0) (English)
Page 24
... are available: - - - - - Cable STB - DVD Receiver - Press the MENU button to select "Input". 2. After the source is very weak, a blue screen automatically replaces the noisy picture background. DVD Combo - Select the required option (Off, Low, Medium, High) by pressing the or button. Setting the Blue Screen Mode If no signal is being received or the signal is selected, press the ENTER button. Press the ENTER button to display the menu. Press the...
... are available: - - - - - Cable STB - DVD Receiver - Press the MENU button to select "Input". 2. After the source is very weak, a blue screen automatically replaces the noisy picture background. DVD Combo - Select the required option (Off, Low, Medium, High) by pressing the or button. Setting the Blue Screen Mode If no signal is being received or the signal is selected, press the ENTER button. Press the ENTER button to display the menu. Press the...
Quick Guide (easy Manual) (ver.1.0) (English)
Page 27
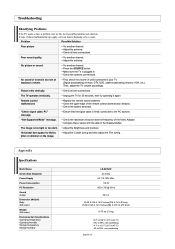
... the volume of possible problems and solutions. Unplug the TV for 30 seconds, then try this list of units connected to your nearest Samsung service center. Check the antenna connections. Horizontal bars appear to 95%, non-condensing English-25 Appendix Specifications Model Name Screen Size (Diagonal) Power Supply Power Consumption PC Resolution Sound Output Dimension (WxDxH) Body With stand Weight With stand Environmental Considerations Operating Temperature Operating Humidity Storage Temperature Storage Humidity LN-S2352W 23 inches AC...
... the volume of possible problems and solutions. Unplug the TV for 30 seconds, then try this list of units connected to your nearest Samsung service center. Check the antenna connections. Horizontal bars appear to 95%, non-condensing English-25 Appendix Specifications Model Name Screen Size (Diagonal) Power Supply Power Consumption PC Resolution Sound Output Dimension (WxDxH) Body With stand Weight With stand Environmental Considerations Operating Temperature Operating Humidity Storage Temperature Storage Humidity LN-S2352W 23 inches AC...


