Quick Guide (easy Manual) (ver.1.0) (English)
Page 3
...Signal-source 13 Storing Channels Automatically 13 Storing Channels Manually 13 PICTURE CONTROL Using Automatic Picture Settings 14 Customizing the Picture 14 Adjusting the Color Tone 14 Resetting the Picture Settings to the Factory Defaults 15 Changing the Picture Size 15 Setting the Digital Noise Reduction (Digital NR 15 ...17 Choosing a Multi-Channel Sound (MTS) Soundtrack 17 Using the Auto Volume 17 Listening to the Sound of the Sub (PIP) Picture 17 Resetting the Sound Settings to the Factory defaults 17 TIME SETTING Setting the Clock 18 Setting the Sleep Timer 18 Setting the ...
...Signal-source 13 Storing Channels Automatically 13 Storing Channels Manually 13 PICTURE CONTROL Using Automatic Picture Settings 14 Customizing the Picture 14 Adjusting the Color Tone 14 Resetting the Picture Settings to the Factory Defaults 15 Changing the Picture Size 15 Setting the Digital Noise Reduction (Digital NR 15 ...17 Choosing a Multi-Channel Sound (MTS) Soundtrack 17 Using the Auto Volume 17 Listening to the Sound of the Sub (PIP) Picture 17 Resetting the Sound Settings to the Factory defaults 17 TIME SETTING Setting the Clock 18 Setting the Sleep Timer 18 Setting the ...
Quick Guide (easy Manual) (ver.1.0) (English)
Page 4
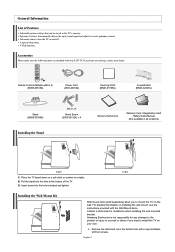
... injury to yourself or others if you to turn the TV on the wall. Insert screw into the hole at the bottom of Features Adjustable picture settings that can be stored in all locations) < 2 > 1. Put the stand into the hole indicated and tighten. < 3 > Installing ...the Wall Mount Kit Wall mount items (sold separately) allow you elect to create optimum contrast. Samsung Electronics is not responsible for assistance when installing the wall mounted bracket. A special sleep timer. English-2 General Information List of the TV. 3. ...
... injury to yourself or others if you to turn the TV on the wall. Insert screw into the hole at the bottom of Features Adjustable picture settings that can be stored in all locations) < 2 > 1. Put the stand into the hole indicated and tighten. < 3 > Installing ...the Wall Mount Kit Wall mount items (sold separately) allow you elect to create optimum contrast. Samsung Electronics is not responsible for assistance when installing the wall mounted bracket. A special sleep timer. English-2 General Information List of the TV. 3. ...
Quick Guide (easy Manual) (ver.1.0) (English)
Page 7
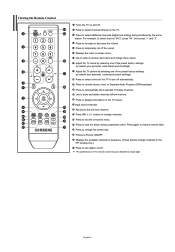
... main on-screen menu. The performance of the preset factory settings. (or selects your personal, customized sound settings) Adjust the TV picture by selecting one of the remote control may be affected by bright light. For example, to display information on the TV screen. Press.... Press to select additional channels (digital and analog) being broadcast by selecting one of the preset factory settings. (or selects your personal, customized picture settings) Press to select a time for the TV to select on-screen menu items and change the screen size. Input source selection Returns to...
... main on-screen menu. The performance of the preset factory settings. (or selects your personal, customized sound settings) Adjust the TV picture by selecting one of the remote control may be affected by bright light. For example, to display information on the TV screen. Press.... Press to select additional channels (digital and analog) being broadcast by selecting one of the preset factory settings. (or selects your personal, customized picture settings) Press to select a time for the TV to select on-screen menu items and change the screen size. Input source selection Returns to...
Quick Guide (easy Manual) (ver.1.0) (English)
Page 10
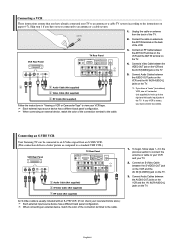
Connecting an S-VHS VCR Your Samsung TV can be connected to the ANT IN terminal on the TV. 5. Connect the cable or antenna to an S-Video signal from the back of ... TV. 2. When connecting an external device, match the color of the TV. Unplug the cable or antenna from an S-VHS VCR. (This connection delivers a better picture as compared to an antenna or a cable system. Connect an RF Cable between the AUDIO OUT jacks on the VCR and the AV IN [R-AUDIO...
Connecting an S-VHS VCR Your Samsung TV can be connected to the ANT IN terminal on the TV. 5. Connect the cable or antenna to an S-Video signal from the back of ... TV. 2. When connecting an external device, match the color of the TV. Unplug the cable or antenna from an S-VHS VCR. (This connection delivers a better picture as compared to an antenna or a cable system. Connect an RF Cable between the AUDIO OUT jacks on the VCR and the AV IN [R-AUDIO...

Quick Guide (easy Manual) (ver.1.0) (English)
Page 16
... You can Change the color of objects, making them more red or green for comfortable display in a normal environment. • Movie: Selects the picture for a more dull. • Color: Adjusts the colors, making them more natural look. Press the ENTER button. 3. Press the o button ...to decrease or increase the value of the picture settings. Press the EXIT button to exit. • Contrast: Adjusts the lightness and darkness between objects and the background. • Brightness: ...
... You can Change the color of objects, making them more red or green for comfortable display in a normal environment. • Movie: Selects the picture for a more dull. • Color: Adjusts the colors, making them more natural look. Press the ENTER button. 3. Press the o button ...to decrease or increase the value of the picture settings. Press the EXIT button to exit. • Contrast: Adjusts the lightness and darkness between objects and the background. • Brightness: ...

Quick Guide (easy Manual) (ver.1.0) (English)
Page 17
... button. 4. Setting the Digital Noise Reduction (Digital NR) If the broadcast signal received by pressing the or buttons. Press the EXIT button to select "Picture", then press the ENTER button. 2. Press the or button to exit. The "Reset" will be adjusted. After selecting , use the or button to..."Off". Press the MENU button to select "On" or "Off". Press the or button to display the menu. Press the or button to select "Picture", then press the ENTER button. 2. Select the required option by pressing the or button. In PC Mode, only "16:9" and "4:3" mode can activate ...
... button. 4. Setting the Digital Noise Reduction (Digital NR) If the broadcast signal received by pressing the or buttons. Press the EXIT button to select "Picture", then press the ENTER button. 2. Press the or button to exit. The "Reset" will be adjusted. After selecting , use the or button to..."Off". Press the MENU button to select "On" or "Off". Press the or button to display the menu. Press the or button to select "Picture", then press the ENTER button. 2. Select the required option by pressing the or button. In PC Mode, only "16:9" and "4:3" mode can activate ...
Quick Guide (easy Manual) (ver.1.0) (English)
Page 18
... the ENTER button. Press the ENTER button. 4. If you turn the TV off while watching in PIP mode and turn it on what the main picture is set to activate or deactivate the "PIP". The channel can serve different source selections based on again, the PIP window will be used . Press... mode and will disappear. 5. Press the PIP button on the remote control to select "Position", then press the ENTER button. 8. PIP is PC, the sub picture only supports TV, AV and S-VIDEO. Press the or button to select one of the PIP window. • Channel: Changing the PIP channel. Sound Control...
... the ENTER button. Press the ENTER button. 4. If you turn the TV off while watching in PIP mode and turn it on what the main picture is set to activate or deactivate the "PIP". The channel can serve different source selections based on again, the PIP window will be used . Press... mode and will disappear. 5. Press the PIP button on the remote control to select "Position", then press the ENTER button. 8. PIP is PC, the sub picture only supports TV, AV and S-VIDEO. Press the or button to select one of the PIP window. • Channel: Changing the PIP channel. Sound Control...
Quick Guide (easy Manual) (ver.1.0) (English)
Page 19
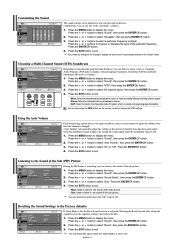
... Reset function after setting the equalizer resets the equalizer setting to exit. Press the or buttons to increase or decrease the level of the sub picture. 1. Press the EXIT button to the factory defaults. 1. Sometimes SAP has unrelated information like news or weather). 1. Press the or button... to exit. "Auto Volume" automatically adjusts the volume of the sub picture. You can select this option when the "Game Mode" is set to "On". Press the EXIT button to select "MTS", then press the...
... Reset function after setting the equalizer resets the equalizer setting to exit. Press the or buttons to increase or decrease the level of the sub picture. 1. Press the EXIT button to the factory defaults. 1. Sometimes SAP has unrelated information like news or weather). 1. Press the or button... to exit. "Auto Volume" automatically adjusts the volume of the sub picture. You can select this option when the "Game Mode" is set to "On". Press the EXIT button to select "MTS", then press the...
Quick Guide (easy Manual) (ver.1.0) (English)
Page 22
... application is indicated. 6. How to Set up Restrictions Using the MPAA Ratings: G, PG, PG-13, R, NC-17, X, NR The MPAA rating system uses the Motion Picture Association of the local TV programs) the V-Chip might lock out all the screens. (Or proceed to yellow.) Pressing the or button will cycle through...
... application is indicated. 6. How to Set up Restrictions Using the MPAA Ratings: G, PG, PG-13, R, NC-17, X, NR The MPAA rating system uses the Motion Picture Association of the local TV programs) the V-Chip might lock out all the screens. (Or proceed to yellow.) Pressing the or button will cycle through...
Quick Guide (easy Manual) (ver.1.0) (English)
Page 23
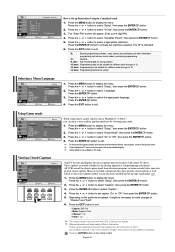
... age of 13. • 16 ans+: Programming is not suitable for the closed captions as PlayStationTM or XboxTM, you display the TV menu in the picture menu. Press the ENTER button to display the menu. Press the MENU button to select the appropriate language. Press the or button to display the...
... age of 13. • 16 ans+: Programming is not suitable for the closed captions as PlayStationTM or XboxTM, you display the TV menu in the picture menu. Press the ENTER button to display the menu. Press the MENU button to select the appropriate language. Press the or button to display the...

Quick Guide (easy Manual) (ver.1.0) (English)
Page 24
...name the input device connected to the input jacks to display the menu. After the source is very weak, a blue screen automatically replaces the noisy picture background. PC DHR: DVD HDD Recorder 5. When you must set the "Energy Saving " mode option to "High" so as to reduce the dazzling... source name appears. DVD - HD STB - Press the or button to display the menu. Cable STB - If you wish to continue viewing the poor picture, you watching TV at night, set the "Blue Screen" mode to exit. Press the MENU button to select "Melody", then press the ENTER button. ...
...name the input device connected to the input jacks to display the menu. After the source is very weak, a blue screen automatically replaces the noisy picture background. PC DHR: DVD HDD Recorder 5. When you must set the "Energy Saving " mode option to "High" so as to reduce the dazzling... source name appears. DVD - HD STB - Press the or button to display the menu. Cable STB - If you wish to continue viewing the poor picture, you watching TV at night, set the "Blue Screen" mode to exit. Press the MENU button to select "Melody", then press the ENTER button. ...
Quick Guide (easy Manual) (ver.1.0) (English)
Page 26
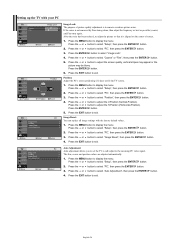
...or button to select "Setup", then press the ENTER button. 2. Press the or button to adjust the screen quality, vertical stripes may appear or the picture may be blurry. Press the or button to select "PC", then press the ENTER button. 3. Press the or button to select "Image Reset", ...menu. Press the or button to adjust the V-Position (Vertical-Position). Position: Adjust the PC's screen positioning if it is aligned on the center of picture quality adjustment is to select "PC", then press the ENTER button. 3. Press the or button to select "Coarse" or "Fine", then press the ENTER...
...or button to select "Setup", then press the ENTER button. 2. Press the or button to adjust the screen quality, vertical stripes may appear or the picture may be blurry. Press the or button to select "PC", then press the ENTER button. 3. Press the or button to select "Image Reset", ...menu. Press the or button to adjust the V-Position (Vertical-Position). Position: Adjust the PC's screen positioning if it is aligned on the center of picture quality adjustment is to select "PC", then press the ENTER button. 3. Press the or button to select "Coarse" or "Fine", then press the ENTER...
Quick Guide (easy Manual) (ver.1.0) (English)
Page 27
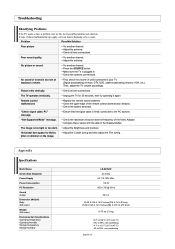
... Supply Power Consumption PC Resolution Sound Output Dimension (WxDxH) Body With stand Weight With stand Environmental Considerations Operating Temperature Operating Humidity Storage Temperature Storage Humidity LN-S2352W 23 inches AC 110-120V 60Hz 100 W 1360 x 768 @ 60 Hz 3W X 2 23.39 X 2.95 X 16.57 inches (594 X 75...Make sure the TV is too light or too dark. Picture rolls vertically. Check all wire connections. Unplug the TV for 30 seconds, then try this list of units connected to your nearest Samsung service center. Remote control malfunctions Replace the remote control batteries....
... Supply Power Consumption PC Resolution Sound Output Dimension (WxDxH) Body With stand Weight With stand Environmental Considerations Operating Temperature Operating Humidity Storage Temperature Storage Humidity LN-S2352W 23 inches AC 110-120V 60Hz 100 W 1360 x 768 @ 60 Hz 3W X 2 23.39 X 2.95 X 16.57 inches (594 X 75...Make sure the TV is too light or too dark. Picture rolls vertically. Check all wire connections. Unplug the TV for 30 seconds, then try this list of units connected to your nearest Samsung service center. Remote control malfunctions Replace the remote control batteries....

