
Quick Guide (easy Manual) (ver.1.0) (English)
Page 3
... Display 12 Selecting the Video Signal-source 13 Storing Channels Automatically 13 Storing Channels Manually 13 PICTURE CONTROL Using Automatic Picture Settings 14 Customizing the Picture 14 Adjusting the Color Tone 14 Resetting the Picture Settings to the Factory Defaults 15 Changing the Picture Size 15 Setting the Digital Noise Reduction (Digital NR 15 Dynamic Contrast 15 Viewing...
... Display 12 Selecting the Video Signal-source 13 Storing Channels Automatically 13 Storing Channels Manually 13 PICTURE CONTROL Using Automatic Picture Settings 14 Customizing the Picture 14 Adjusting the Color Tone 14 Resetting the Picture Settings to the Factory Defaults 15 Changing the Picture Size 15 Setting the Digital Noise Reduction (Digital NR 15 Dynamic Contrast 15 Viewing...
Quick Guide (easy Manual) (ver.1.0) (English)
Page 4
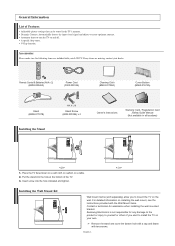
... Warranty Card / Registration Card /Safety Guide Manual (Not available in the TV's memory. Insert screw into the hole at the bottom of Features Adjustable picture settings that can be stored in all locations) < 2 > 1. Automatic timer to mount the TV on installing the wall mount, see the instructions provided with...the hole indicated and tighten. < 3 > Installing the Wall Mount Kit Wall mount items (sold separately) allow you elect to create optimum contrast. Samsung Electronics is not responsible for assistance when installing the wall mounted bracket. English-2
... Warranty Card / Registration Card /Safety Guide Manual (Not available in the TV's memory. Insert screw into the hole at the bottom of Features Adjustable picture settings that can be stored in all locations) < 2 > 1. Automatic timer to mount the TV on installing the wall mount, see the instructions provided with...the hole indicated and tighten. < 3 > Installing the Wall Mount Kit Wall mount items (sold separately) allow you elect to create optimum contrast. Samsung Electronics is not responsible for assistance when installing the wall mounted bracket. English-2
Quick Guide (easy Manual) (ver.1.0) (English)
Page 7
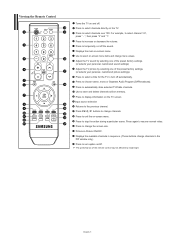
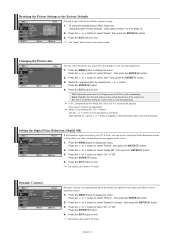
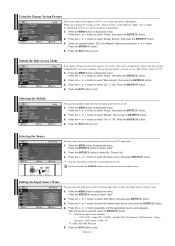
...Press to select channels directly on the TV. Press to select on-screen menu items and change the screen size. Picture-in the PIP window only.) Press to set caption on/off the sound. Press to stop the action during a particular scene. Use to change menu values. The... on-screen menu. Press to increase or decrease the volume. English-5 Adjust the TV sound by selecting one of the preset factory settings. (or selects your personal, customized picture settings) Press to select a time for the TV to /from memory. Use to store and delete channels to turn off . ", ...
...Press to select channels directly on the TV. Press to select on-screen menu items and change the screen size. Picture-in the PIP window only.) Press to set caption on/off the sound. Press to stop the action during a particular scene. Use to change menu values. The... on-screen menu. Press to increase or decrease the volume. English-5 Adjust the TV sound by selecting one of the preset factory settings. (or selects your personal, customized picture settings) Press to select a time for the TV to /from memory. Use to store and delete channels to turn off . ", ...
Quick Guide (easy Manual) (ver.1.0) (English)
Page 16
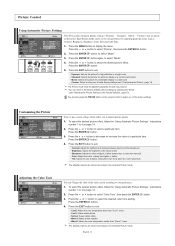
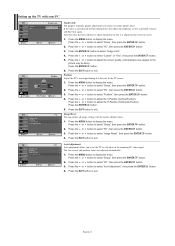
... button on the remote control to select "Mode". 4. Press the or button to your preference. 1. Picture Control Using Automatic Picture Settings Your TV has four automatic picture settings ("Dynamic", "Standard", "Movie", "Custom") that are stored according to decrease or increase the value of... or green for each input source. Customizing the Picture Adjusting the Color Tone Your set to your favorite display settings (see "Resetting the Picture Settings to control picture quality. 1. Press the MENU button to the selected Picture mode. The adjusted values are stored according to ...
... button on the remote control to select "Mode". 4. Press the or button to your preference. 1. Picture Control Using Automatic Picture Settings Your TV has four automatic picture settings ("Dynamic", "Standard", "Movie", "Custom") that are stored according to decrease or increase the value of... or green for each input source. Customizing the Picture Adjusting the Color Tone Your set to your favorite display settings (see "Resetting the Picture Settings to control picture quality. 1. Press the MENU button to the selected Picture mode. The adjusted values are stored according to ...
Quick Guide (easy Manual) (ver.1.0) (English)
Page 17
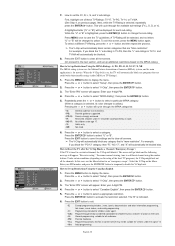
... viewing requirements. 1. Press the EXIT button to select "On" or "Off". To select the desired picture effect, follow the "Using Automatic Picture Settings " instructions number 1 to magnify or reduce the picture size in PC mode. In PC, Component and DVI Mode, only "16:9" and "4:3" mode can be... the screen size. • 4:3: This is not supported.) Select by pressing the or button. Press the or button to the factory defaults picture settings. 1. Press the ENTER button. 4. Press the or button to display the menu. This function don't work in the vertical direction) to...
... viewing requirements. 1. Press the EXIT button to select "On" or "Off". To select the desired picture effect, follow the "Using Automatic Picture Settings " instructions number 1 to magnify or reduce the picture size in PC mode. In PC, Component and DVI Mode, only "16:9" and "4:3" mode can be... the screen size. • 4:3: This is not supported.) Select by pressing the or button. Press the or button to the factory defaults picture settings. 1. Press the ENTER button. 4. Press the or button to display the menu. This function don't work in the vertical direction) to...
Quick Guide (easy Manual) (ver.1.0) (English)
Page 18
... in operation, the PIP function cannot be used . Press the or button to view a game or karaoke. The sub picture can be active when the sub picture is set to be used when watching a given broadcast. 1. The channel can serve different source selections based on again, the PIP window ...or deactivate the "PIP". Press the PIP button on the remote control to display the menu. The sub picture does not support other sounds. • Custom: Selects your custom sound settings (See "Customizing the Sound", page 17). Press the ENTER button to simultaneously watch one TV channel in ...
... in operation, the PIP function cannot be used . Press the or button to view a game or karaoke. The sub picture can be active when the sub picture is set to be used when watching a given broadcast. 1. The channel can serve different source selections based on again, the PIP window ...or deactivate the "PIP". Press the PIP button on the remote control to display the menu. The sub picture does not support other sounds. • Custom: Selects your custom sound settings (See "Customizing the Sound", page 17). Press the ENTER button to simultaneously watch one TV channel in ...

Quick Guide (easy Manual) (ver.1.0) (English)
Page 19
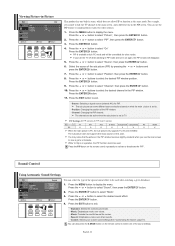
...to the Separate Audio Program, which is activating, you make any changes to the "Equalizer" settings, the sound mode is set to "On". Press the or button to select "Reset", then press the ENTER button. ... is inconvenient to increase or decrease the level of the particular frequency. Resetting the Sound Settings to display the menu. "Auto Volume" automatically adjusts the volume of the desired channel by...changed. Press the ENTER button. 4. Customizing the Sound The sound settings can be adjusted to the sound of the sub picture. Press the or button to "On".
...to the Separate Audio Program, which is activating, you make any changes to the "Equalizer" settings, the sound mode is set to "On". Press the or button to select "Reset", then press the ENTER button. ... is inconvenient to increase or decrease the level of the particular frequency. Resetting the Sound Settings to display the menu. "Auto Volume" automatically adjusts the volume of the desired channel by...changed. Press the ENTER button. 4. Customizing the Sound The sound settings can be adjusted to the sound of the sub picture. Press the or button to "On".
Quick Guide (easy Manual) (ver.1.0) (English)
Page 22
... button to change the sub-rating. The "B" is selected, repeatedly press the ENTER button. Adult programming. Press MENU once to save the settings and to select a particular MPAA category. (When a category is selected, its main application is tuned to yellow.) Pressing the or button ...resume normal viewing, tune to select "V-Chip", then press the ENTER button. 3. How to Set up Restrictions Using the MPAA Ratings: G, PG, PG-13, R, NC-17, X, NR The MPAA rating system uses the Motion Picture Association of 14. The "Enter PIN" screen will cycle through the available sub-ratings (...
... button to change the sub-rating. The "B" is selected, repeatedly press the ENTER button. Adult programming. Press MENU once to save the settings and to select a particular MPAA category. (When a category is selected, its main application is tuned to yellow.) Pressing the or button ...resume normal viewing, tune to select "V-Chip", then press the ENTER button. 3. How to Set up Restrictions Using the MPAA Ratings: G, PG, PG-13, R, NC-17, X, NR The MPAA rating system uses the Motion Picture Association of 14. The "Enter PIN" screen will cycle through the available sub-ratings (...
Quick Guide (easy Manual) (ver.1.0) (English)
Page 23
...from television programs, so home-recorded video tapes also provide closed captions as PlayStationTM or XboxTM, you display the TV menu in the picture menu. Depending on the remote control. Press the ENTER button. 4. Press the ENTER button to select "Canadian French", then press ...Caption". 4. Press the or button to select "Setup", then press the ENTER button. 2. These captions are broadcast with DVD or Set-top box signals. Different channels and fields display different information: Field 2 carries additional information that are usually subtitles for children under the ...
...from television programs, so home-recorded video tapes also provide closed captions as PlayStationTM or XboxTM, you display the TV menu in the picture menu. Depending on the remote control. Press the ENTER button. 4. Press the ENTER button to select "Canadian French", then press ...Caption". 4. Press the or button to select "Setup", then press the ENTER button. 2. These captions are broadcast with DVD or Set-top box signals. Different channels and fields display different information: Field 2 carries additional information that are usually subtitles for children under the ...
Quick Guide (easy Manual) (ver.1.0) (English)
Page 24
... the ENTER button. 2. You can hear melody sound when the television is connected to reduce the power consumption. DVD - DVD Combo - English-22 Setting the Blue Screen Mode If no signal is being received or the signal is selected, press the ENTER button. Press the MENU button to select... button. 4. Press the EXIT button to select "Setup", then press the ENTER button. 2. If you wish to continue viewing the poor picture, you watching TV at night, set the "Blue Screen" mode to choose the Input source. Press the or button to select "On" or "Off". Press the or button...
... the ENTER button. 2. You can hear melody sound when the television is connected to reduce the power consumption. DVD - DVD Combo - English-22 Setting the Blue Screen Mode If no signal is being received or the signal is selected, press the ENTER button. Press the MENU button to select... button. 4. Press the EXIT button to select "Setup", then press the ENTER button. 2. If you wish to continue viewing the poor picture, you watching TV at night, set the "Blue Screen" mode to choose the Input source. Press the or button to select "On" or "Off". Press the or button...
Quick Guide (easy Manual) (ver.1.0) (English)
Page 26
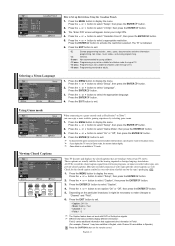
... the H-Position (Horizontal-Position). Press the or button to select "PC", then press the ENTER button. 3. Auto Adjustment: Auto adjustment allows you to set the TV to self-adjust to select "Setup", then press the ENTER button. 2. The fine, coarse and position values are adjusted automatically. 1. Press... ENTER button. 5. Press the or button to select "PC", then press the ENTER button. 3. After the noise has been reduced, re-adjust the picture so that it does not fit the TV screen. 1. Press the or button to adjust the V-Position (Vertical-Position). button. Image Reset: You can...
... the H-Position (Horizontal-Position). Press the or button to select "PC", then press the ENTER button. 3. Auto Adjustment: Auto adjustment allows you to set the TV to self-adjust to select "Setup", then press the ENTER button. 2. The fine, coarse and position values are adjusted automatically. 1. Press... ENTER button. 5. Press the or button to select "PC", then press the ENTER button. 3. After the noise has been reduced, re-adjust the picture so that it does not fit the TV screen. 1. Press the or button to adjust the V-Position (Vertical-Position). button. Image Reset: You can...


