
Quick Guide (easy Manual) (ver.1.0) (English)
Page 3
...S-VHS VCR 8 Connecting a DVD Player 9 Connecting a DVD Player/Set-Top Box via DVI 9 Connecting a DVD Player/Set-Top Box via HDMI 10 Connecting a PC 10 OPERATION Turning the TV On and Off 11 Plug and Play Feature 11 Changing Channels 12 Adjusting the Volume 12 Viewing the Display 12...Selecting the Melody 22 Selecting the Source 22 Editing the Input Source Name 22 PC DISPLAY Setting Up Your PC Software (Based on Windows XP 23 Display Modes 23 Setting up the TV with your PC 24 TROUBLESHOOTING Identifying Problems 25 APPENDIX Specifications 25 Symbol Press Important Note One-...
...S-VHS VCR 8 Connecting a DVD Player 9 Connecting a DVD Player/Set-Top Box via DVI 9 Connecting a DVD Player/Set-Top Box via HDMI 10 Connecting a PC 10 OPERATION Turning the TV On and Off 11 Plug and Play Feature 11 Changing Channels 12 Adjusting the Volume 12 Viewing the Display 12...Selecting the Melody 22 Selecting the Source 22 Editing the Input Source Name 22 PC DISPLAY Setting Up Your PC Software (Based on Windows XP 23 Display Modes 23 Setting up the TV with your PC 24 TROUBLESHOOTING Identifying Problems 25 APPENDIX Specifications 25 Symbol Press Important Note One-...
Quick Guide (easy Manual) (ver.1.0) (English)
Page 5
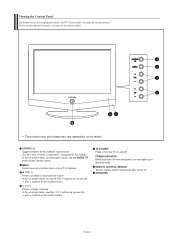
... control. (POWER) Press to see an on the model. SPEAKERS English-3 SOURCE Toggles between all the available input sources (TV, AV1, AV2, S-Video, Component1, Component2, PC, HDMI). In the on-screen menu, use the remote control. Viewing the Control Panel The buttons on the lower-right panel control your TV's features.
... control. (POWER) Press to see an on the model. SPEAKERS English-3 SOURCE Toggles between all the available input sources (TV, AV1, AV2, S-Video, Component1, Component2, PC, HDMI). In the on-screen menu, use the remote control. Viewing the Control Panel The buttons on the lower-right panel control your TV's features.
Quick Guide (easy Manual) (ver.1.0) (English)
Page 6
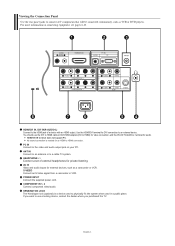
... the rear panel jacks to the video and audio output jack on connecting equipment, see pages 6-10. For more information on your PC. HDMI/DVI IN terminal does not support PC. PC IN Connect to connect A/V components that will be connected continuously, such as a camcorder or VCR. ANT IN Connect to an antenna...
... the rear panel jacks to the video and audio output jack on connecting equipment, see pages 6-10. For more information on your PC. HDMI/DVI IN terminal does not support PC. PC IN Connect to connect A/V components that will be connected continuously, such as a camcorder or VCR. ANT IN Connect to an antenna...
Quick Guide (easy Manual) (ver.1.0) (English)
Page 12
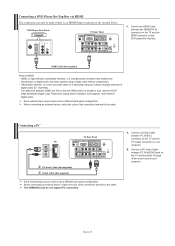
... for it especially because it allows multiple channels of the connection terminal to the cable. The difference between PC IN [PC] connector on the TV and the PC output connector on the external device. DVD Player Rear Panel TV Rear Panel 1. The HDMI/DVI jacks ... coding feature installed, and supports multi-channel digital audio. Each external input source device has a different back panel configuration. Connecting a PC PC TV Rear Panel 2 PC Audio Cable (Not supplied) 1 D-Sub Cable (Not supplied) Each external input source device has a different back panel configuration. When...
... for it especially because it allows multiple channels of the connection terminal to the cable. The difference between PC IN [PC] connector on the TV and the PC output connector on the external device. DVD Player Rear Panel TV Rear Panel 1. The HDMI/DVI jacks ... coding feature installed, and supports multi-channel digital audio. Each external input source device has a different back panel configuration. Connecting a PC PC TV Rear Panel 2 PC Audio Cable (Not supplied) 1 D-Sub Cable (Not supplied) Each external input source device has a different back panel configuration. When...
Quick Guide (easy Manual) (ver.1.0) (English)
Page 17
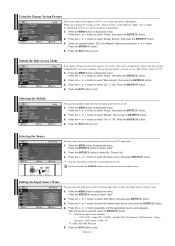
... to create optimum contrast. 1. Press the or button to display the menu. Press the or button to magnify or reduce the picture size in PC mode. Select the required option by pressing the or buttons. Press the EXIT button to exit. • 16:9: Adjusts the picture size to 16...:9 appropriate for DVDs or wide broadcasting. • Zoom: Magnifies the 16:9 wide picture (in PC mode. In PC, Component and DVI Mode, only "16:9" and "4:3" mode can activate the Digital Noise Reduction feature to select "Picture", then press the ENTER button. 2....
... to create optimum contrast. 1. Press the or button to display the menu. Press the or button to magnify or reduce the picture size in PC mode. Select the required option by pressing the or buttons. Press the EXIT button to exit. • 16:9: Adjusts the picture size to 16...:9 appropriate for DVDs or wide broadcasting. • Zoom: Magnifies the 16:9 wide picture (in PC mode. In PC, Component and DVI Mode, only "16:9" and "4:3" mode can activate the Digital Noise Reduction feature to select "Picture", then press the ENTER button. 2....
Quick Guide (easy Manual) (ver.1.0) (English)
Page 18
... and will disappear. 5. Press the ENTER button. 11. PIP Settings (O: PIP operates, X: PIP doesn't operate) Main Sub TV PC O AV1 AV2 S-Video Component1 Component2 PC O O O X X X HDMI X When the main picture is set to select the desired sound effect. You may notice that the picture in the PIP window ...(PIP) by pressing the or buttons and press the ENTER button. 7. You can also press the S.MODE button on what the main picture is PC, the sub picture only supports TV, AV and S-VIDEO. You can use the main screen to display the menu. Press the or button to ...
... and will disappear. 5. Press the ENTER button. 11. PIP Settings (O: PIP operates, X: PIP doesn't operate) Main Sub TV PC O AV1 AV2 S-Video Component1 Component2 PC O O O X X X HDMI X When the main picture is set to select the desired sound effect. You may notice that the picture in the PIP window ...(PIP) by pressing the or buttons and press the ENTER button. 7. You can also press the S.MODE button on what the main picture is PC, the sub picture only supports TV, AV and S-VIDEO. You can use the main screen to display the menu. Press the or button to ...
Quick Guide (easy Manual) (ver.1.0) (English)
Page 24
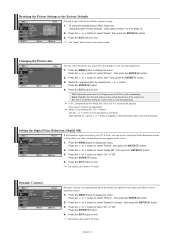
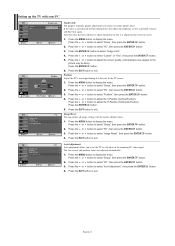
... the Input source. You can select among external sources connected to exit. Press the or button repeatedly until the appropriate source name appears. VCR - DHR - PC DHR: DVD HDD Recorder 5. When you must set the "Energy Saving " mode option to "High" so as to exit. Press the EXIT button to reduce...
... the Input source. You can select among external sources connected to exit. Press the or button repeatedly until the appropriate source name appears. VCR - DHR - PC DHR: DVD HDD Recorder 5. When you must set the "Energy Saving " mode option to "High" so as to exit. Press the EXIT button to reduce...
Quick Guide (easy Manual) (ver.1.0) (English)
Page 25
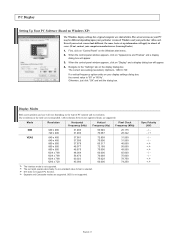
...appear. 3. DVI does not support PC function. SOG is "60" or "60 Hz". PC Display Setting Up Your PC Software (Based on the type of Windows and your computer manufacturer or Samsung Dealer.) 1. When the control panel window appears, click on your PC may be different depending upon your ...particular version of PC monitor and its resolution. The actual screens on "Appearance and Themes" and a display ...
...appear. 3. DVI does not support PC function. SOG is "60" or "60 Hz". PC Display Setting Up Your PC Software (Based on the type of Windows and your computer manufacturer or Samsung Dealer.) 1. When the control panel window appears, click on your PC may be different depending upon your ...particular version of PC monitor and its resolution. The actual screens on "Appearance and Themes" and a display ...
Quick Guide (easy Manual) (ver.1.0) (English)
Page 26
..."Setup", then press the ENTER button. 2. Press the or button to adjust the H-Position (Horizontal-Position). Press the or button to select "PC", then press the ENTER button. 3. Press the ENTER button to adjust the V-Position (Vertical-Position). Press the or button to select "Image ...Lock". 4. Press the MENU button to the incoming PC video signal. The fine, coarse and position values are adjusted automatically. 1. If the noise is to exit. After the noise has been reduced...
..."Setup", then press the ENTER button. 2. Press the or button to adjust the H-Position (Horizontal-Position). Press the or button to select "PC", then press the ENTER button. 3. Press the ENTER button to adjust the V-Position (Vertical-Position). Press the or button to select "Image ...Lock". 4. Press the MENU button to the incoming PC video signal. The fine, coarse and position values are adjusted automatically. 1. If the noise is to exit. After the noise has been reduced...
Quick Guide (easy Manual) (ver.1.0) (English)
Page 27
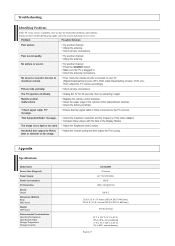
...Contrast. Appendix Specifications Model Name Screen Size (Diagonal) Power Supply Power Consumption PC Resolution Sound Output Dimension (WxDxH) Body With stand Weight With stand Environmental Considerations Operating Temperature Operating Humidity Storage Temperature Storage Humidity LN-S2338W 23 inches AC 110-120V 60Hz 100 W 1280 x 720 @ 60 Hz..." message. Adjust the Coarse tuning and then adjust the Fine tuning. If none of units connected to your nearest Samsung service center. Poor sound quality. No picture or sound. Check the antenna connections. The TV operates erratically. Check...
...Contrast. Appendix Specifications Model Name Screen Size (Diagonal) Power Supply Power Consumption PC Resolution Sound Output Dimension (WxDxH) Body With stand Weight With stand Environmental Considerations Operating Temperature Operating Humidity Storage Temperature Storage Humidity LN-S2338W 23 inches AC 110-120V 60Hz 100 W 1280 x 720 @ 60 Hz..." message. Adjust the Coarse tuning and then adjust the Fine tuning. If none of units connected to your nearest Samsung service center. Poor sound quality. No picture or sound. Check the antenna connections. The TV operates erratically. Check...


