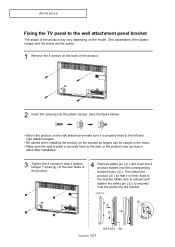
Quick Guide (easy Manual) (ver.1.0) (English)
Page 7
... your dealer. The Anynet system enables you to easily control Samsung audio-video (AV) devices from this TV supports HD broadcasts with no Set-Top... Box needed, and provides simple access with your LCD TV. Chapter 1 G E N E R A L I N F O R M AT I O N List of ... Cloth (BN63-001798A) Anynet Cable (BN39-00518B) Cover-Bottom LN-R269D/LN-R329D: BN63-01947A LN-R409D: BN63-01938A LN-R469D: BN63-01810A Stand LN-R269D: BN96-02203A LN-R329D: BN96-02202A Anynet AV Owner's Instructions Owner's Instructions English...
Quick Guide (easy Manual) (ver.1.0) (English)
Page 35
.... Setting Up the Remote to Operate Your VCR 1 Turn off your VCR. 2 Press the MODE button and make sure that the VCR appears on the LCD screen. 3 Press the SET button on your TV's remote control. 4 Using the number buttons on your remote control, enter three digits of the VCR code...
Quick Guide (easy Manual) (ver.1.0) (English)
Page 36
... the Remote to Operate Your Cable Box 1 Turn off your cable box. 2 Press the MODE button and make sure that the CATV appears on the LCD screen. 3 Press the SET button on your TV's remote control. 4 Using the number buttons on your remote control, enter three digits of the cable box...
Quick Guide (easy Manual) (ver.1.0) (English)
Page 37
... I O N Setting Up the Remote to Operate Your .DVD 1Turn off your DVD. 2 Press the MODE button and make sure that the DVD appears on the LCD screen. 3 Press the SET button on your TV's remote control. 4Using the number buttons on your remote control, enter three digits of the DVD code...
Quick Guide (easy Manual) (ver.1.0) (English)
Page 39
... button. Press the UP/DOWN buttons to select signal source, then press the ENTER button. Press the EXIT button to exit. (LN-R329D/LN-R409D/LN-R469D) • When you connect equipment to the LCD, you can choose between the following sets of jacks: TV, AV, S-Video, Component 1, Component 2, PC, or HDMI on the TV... the external device is turned on and connected via HDMI. • For 32", 40" and 46", AV2/S-Video2 is turned on and connected via HDMI. 2-2 (LN-R329D / LN-R409D / LN-R469D) Press the ENTER button to display the on the side of the TV.
Quick Guide (easy Manual) (ver.1.0) (English)
Page 121
... black and power On your computer utility appear to vibrate program to change the display settings. when you need to the PC input. The TFT LCD panel uses a panel consisting of the product. English-115 dark. Move the computer's mouse or press any key on the output source (i.e. If a still image...
Quick Guide (easy Manual) (ver.1.0) (English)
Page 123
... on the wall. Fix anchors on each hole on the marked location using drill. APPENDIX Installing the Wall Mount Kit (LN-R269D) Note: This installation is not firmly fixed to the wall, LCD TV can fall off. 2 Turn the power off and unplug the power cord from the outlet. Note: If the...
Quick Guide (easy Manual) (ver.1.0) (English)
Page 124
... Wood Screw: 7EA Anchor: 7EA M4 X L8 Screw: 3EA Installation Guide How to the wall with the two screws removed in step 3 above. (Only Model LN-R409D Applied) 3 Insert three Hangers of the set-bracket into the wall-bracket . English-118 Loosen two screws on the wall where the hole will... be used when attaching the wall mount to a wall. APPENDIX Installing the Wall Mount Kit (LN-R329D, LN-R409D) Note: This installation is not firmly fixed to the wall, LCD TV can fall off. 2 Turn the power off and unplug the power cord from the outlet. Connect wall-bracket...
Quick Guide (easy Manual) (ver.1.0) (English)
Page 127
.... 2 Insert the screw into the corresponding bracket holes ( ). Make sure to reinsert and tighten the safety pin ( ) to securely hold the product to the bracket. LCD TV English-121 Wall Bracket Wall Then place the product ( ) so that it is properly fixed to the left and right plastic hangers. • Be...
Quick Guide (easy Manual) (ver.1.0) (English)
Page 130
... in Another Country If you plan to take your TV with the Kensington lock for one system may differ from the illustration depending on the LCD TV (Figure 1), and turn it in use . APPENDIX Using the Anti-Theft Kensington Lock The Kensington lock is a device used to physically fix the system...