

Quick Guide (easy Manual) (ver.1.0) (English)
Page 3
... Feature 17 Setting the Blue Screen Mode 17 Selecting the Melody 17 Selecting the Source 17 Editing the Input Source Name 17 OPERATION Turning the TV On and Off 6 Changing Channels 6 Adjusting the Volume 7 Viewing the Display 7 Plug and Play Feature 7 Selecting the Video Signal-source 8 Storing Channels Automatically 8 Storing Channels...
... Feature 17 Setting the Blue Screen Mode 17 Selecting the Melody 17 Selecting the Source 17 Editing the Input Source Name 17 OPERATION Turning the TV On and Off 6 Changing Channels 6 Adjusting the Volume 7 Viewing the Display 7 Plug and Play Feature 7 Selecting the Video Signal-source 8 Storing Channels Automatically 8 Storing Channels...

Quick Guide (easy Manual) (ver.1.0) (English)
Page 4
... Mount Kit Wall mount items (sold separately) allow you elect to create optimum contrast. English-2 A special sleep timer. Automatic timer to mount the TV on your dealer. Place the TV faced down on a soft cloth or cushion on and off. Insert screw into the hole at the bottom of the... the wall. If any damage to the product or injury to yourself or others if you to turn the TV on a table. 2. Samsung Electronics is not responsible for assistance when installing the wall mounted bracket. List of Features Adjustable picture settings that can be stored in all locations) < 2 ...
... Mount Kit Wall mount items (sold separately) allow you elect to create optimum contrast. English-2 A special sleep timer. Automatic timer to mount the TV on your dealer. Place the TV faced down on a soft cloth or cushion on and off. Insert screw into the hole at the bottom of the... the wall. If any damage to the product or injury to yourself or others if you to turn the TV on a table. 2. Samsung Electronics is not responsible for assistance when installing the wall mounted bracket. List of Features Adjustable picture settings that can be stored in all locations) < 2 ...

Quick Guide (easy Manual) (ver.1.0) (English)
Page 5
...SENSOR Aim the remote control towards this button as you must use this spot on the remote control. (HEADPHONE JACK) Connect a set of your TV's basic features, including the on and lights up in stand-by mode. In the on -screen menu of external headphones to this jack for ...private listening. (POWER) Press to decrease or increase the volume. Viewing the Control Panel The buttons on the lower-right panel control your TV's features. POWER INDICATOR Blinks and turns off . Press to see an on -screen menu, use the remote control. English-3 The product color and...
...SENSOR Aim the remote control towards this button as you must use this spot on the remote control. (HEADPHONE JACK) Connect a set of your TV's basic features, including the on and lights up in stand-by mode. In the on -screen menu of external headphones to this jack for ...private listening. (POWER) Press to decrease or increase the volume. Viewing the Control Panel The buttons on the lower-right panel control your TV's features. POWER INDICATOR Blinks and turns off . Press to see an on -screen menu, use the remote control. English-3 The product color and...

Quick Guide (easy Manual) (ver.1.0) (English)
Page 6
Viewing the Connection Panel DVD Player/Set-Top Box PC Red White Red White Red Blue Green Red White Yellow DVD Player Rear VCR Rear Whenever you connect an external device to the cable. English-4 When connecting an external device, match the color of the connection terminal to your TV, make sure that power on the unit is turned off.
Viewing the Connection Panel DVD Player/Set-Top Box PC Red White Red White Red Blue Green Red White Yellow DVD Player Rear VCR Rear Whenever you connect an external device to the cable. English-4 When connecting an external device, match the color of the connection terminal to your TV, make sure that power on the unit is turned off.

Quick Guide (easy Manual) (ver.1.0) (English)
Page 7
...VCR. Returns to choose stereo, mono or Separate Audio Program (SAP broadcast). Press to exit the on and off . Press to a cable TV system. Connect to the audio output jack on -screen menu items and change menu values. ANT IN Connect to an antenna or to automatically...press "+100", then press "2" and "1". Press again to use a locking device, contact the dealer where you purchased the TV. Displays the main on the TV. Adjust the TV sound by selecting one of the preset factory settings. (or selects your personal, customized sound settings) The performance of the ...
...VCR. Returns to choose stereo, mono or Separate Audio Program (SAP broadcast). Press to exit the on and off . Press to a cable TV system. Connect to the audio output jack on -screen menu items and change menu values. ANT IN Connect to an antenna or to automatically...press "+100", then press "2" and "1". Press again to use a locking device, contact the dealer where you purchased the TV. Displays the main on the TV. Adjust the TV sound by selecting one of the preset factory settings. (or selects your personal, customized sound settings) The performance of the ...

Quick Guide (easy Manual) (ver.1.0) (English)
Page 8
.... The remote control can be using the remote control for about one channel, then use the number button to about 23 feet from the TV. (Assuming typical TV usage, the batteries last for a long time. Press the CH or CH button to change the channel faster, press the channel buttons, then ENTER... will switch to select the Previous Channel: 1. To quickly switch between them in a cool, dry place if you press the CH or CH button, the TV changes channels in the Remote Control 1. You will not see all the channels that were either erased or not memorized. Slide the cover out completely...
.... The remote control can be using the remote control for about one channel, then use the number button to about 23 feet from the TV. (Assuming typical TV usage, the batteries last for a long time. Press the CH or CH button to change the channel faster, press the channel buttons, then ENTER... will switch to select the Previous Channel: 1. To quickly switch between them in a cool, dry place if you press the CH or CH button, the TV changes channels in the Remote Control 1. You will not see all the channels that were either erased or not memorized. Slide the cover out completely...

Quick Guide (easy Manual) (ver.1.0) (English)
Page 9
...the screen. 2. Set the "Hour", "Minute" or "am /pm". This will start and end automatically. Plug and Play Feature When the TV is initially powered on -screen displays disappear after about one to select "Plug & Play". 3. Press the ENTER button to confirm your choice.... 3. Press the ENTER button to select "Start". The message "Enjoy your local cable company TV system. Auto Program: Selects between terrestrial antenna connection or your watching." Press the ENTER button to two minutes. The on , several ...
...the screen. 2. Set the "Hour", "Minute" or "am /pm". This will start and end automatically. Plug and Play Feature When the TV is initially powered on -screen displays disappear after about one to select "Plug & Play". 3. Press the ENTER button to confirm your choice.... 3. Press the ENTER button to select "Start". The message "Enjoy your local cable company TV system. Auto Program: Selects between terrestrial antenna connection or your watching." Press the ENTER button to two minutes. The on , several ...

Quick Guide (easy Manual) (ver.1.0) (English)
Page 10
...Cable". 3. an antenna or a cable system). 1. Press the ENTER button to exit. STD, HRC and IRC identify various types of cable TV systems. Contact your particular area. This takes about one to select "Auto Program". Press the or button to two minutes. 1. Storing Channels Manually...the appropriate channel, then repeat above. 6. Press the CH or CH button to switch to 3 on the remote control. Storing Channels Automatically The TV automatically cycles through all the available channels are stored, the "Channel" menu reappears. 5. English-8 Press the or button to select "Add/Delete"....
...Cable". 3. an antenna or a cable system). 1. Press the ENTER button to exit. STD, HRC and IRC identify various types of cable TV systems. Contact your particular area. This takes about one to select "Auto Program". Press the or button to two minutes. 1. Storing Channels Manually...the appropriate channel, then repeat above. 6. Press the CH or CH button to switch to 3 on the remote control. Storing Channels Automatically The TV automatically cycles through all the available channels are stored, the "Channel" menu reappears. 5. English-8 Press the or button to select "Add/Delete"....

Quick Guide (easy Manual) (ver.1.0) (English)
Page 11
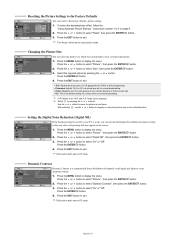
... Picture", page 9). Press the or button to control picture quality. 1. Tint: Adjusts the color of the picture settings. Picture Control Using Automatic Picture Settings Your TV has four automatic picture settings ("Dynamic", "Standard", "Movie", "Custom") that are stored according to the selected Picture mode. Press the ENTER button again, to exit...
... Picture", page 9). Press the or button to control picture quality. 1. Tint: Adjusts the color of the picture settings. Picture Control Using Automatic Picture Settings Your TV has four automatic picture settings ("Dynamic", "Standard", "Movie", "Custom") that are stored according to the selected Picture mode. Press the ENTER button again, to exit...
Quick Guide (easy Manual) (ver.1.0) (English)
Page 12
... "On" or "Off". Changing the Picture Size You can activate the Digital Noise Reduction feature to create optimum contrast. 1. Press the EXIT button to your TV is to automatically detect distribution of inputted visual signal and adjust to help reduce any static and ghosting that may appear on page 9. 2. Press the...
... "On" or "Off". Changing the Picture Size You can activate the Digital Noise Reduction feature to create optimum contrast. 1. Press the EXIT button to your TV is to automatically detect distribution of inputted visual signal and adjust to help reduce any static and ghosting that may appear on page 9. 2. Press the...

Quick Guide (easy Manual) (ver.1.0) (English)
Page 13
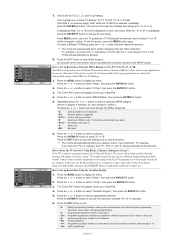
...or button to function in PC mode and will disappear. 5. Press the ENTER button. 4. PIP is PC, the sub picture only supports TV, AV and S-VIDEO. Press the or button to select the desired PIP window position. Press the or buttons to select "Position", then ...button to select the desired sound effect. Source: Selecting a signal source (external A/V) for movies. PIP Settings (O: PIP operates, X: PIP doesn't operate) Main Sub TV AV1 AV2 S-Video Component1 Component2 PC DVI PC O O O O X X X X When the main picture is available only in the same mode. The sub ...
...or button to function in PC mode and will disappear. 5. Press the ENTER button. 4. PIP is PC, the sub picture only supports TV, AV and S-VIDEO. Press the or button to select the desired PIP window position. Press the or buttons to select "Position", then ...button to select the desired sound effect. Source: Selecting a signal source (external A/V) for movies. PIP Settings (O: PIP operates, X: PIP doesn't operate) Main Sub TV AV1 AV2 S-Video Component1 Component2 PC DVI PC O O O O X X X X When the main picture is available only in the same mode. The sub ...

Quick Guide (easy Manual) (ver.1.0) (English)
Page 15
... button to select "Time", then press the ENTER button. 3. Switch off at the time you do not operate any controls for 3 hours after the TV has been turned on , your choice at the time you press the INFO button. Press the or button to select "Setup", then press the ENTER...time if you have to select "Off Timer", then press the ENTER button. 6. Press the EXIT button to use the automatic On/Off timers. 1. The TV automatically turn off automatically at the preset time automatically. 1. Press the or button to select "On Timer", then press the ENTER button. 4. Press the ...
... button to select "Time", then press the ENTER button. 3. Switch off at the time you do not operate any controls for 3 hours after the TV has been turned on , your choice at the time you press the INFO button. Press the or button to select "Setup", then press the ENTER...time if you have to select "Off Timer", then press the ENTER button. 6. Press the EXIT button to use the automatic On/Off timers. 1. The TV automatically turn off automatically at the preset time automatically. 1. Press the or button to select "On Timer", then press the ENTER button. 4. Press the ...

Quick Guide (easy Manual) (ver.1.0) (English)
Page 16
..."B" is deemed inappropriate for your existing setup, the color of the letter "U" or "B" will automatically be blocked (TV-G, TV-PG, TV-14, and TV-MA). See the next step to change any of the TV-Ratings is "0-0-0-0". 4. The sub-ratings (D, L, S, V) work together similarly. English-14 Press the or button ... appear. At this screen, press MENU again. Press the ENTER button. 5. Press the EXIT button to display the menu. The TV-Y7, TV-PG, TV-14, and TV-MA have additional options. Press the ENTER button: Depending on your PIN and enter them. The default PIN number for a new...
..."B" is deemed inappropriate for your existing setup, the color of the letter "U" or "B" will automatically be blocked (TV-G, TV-PG, TV-14, and TV-MA). See the next step to change any of the TV-Ratings is "0-0-0-0". 4. The sub-ratings (D, L, S, V) work together similarly. English-14 Press the or button ... appear. At this screen, press MENU again. Press the ENTER button. 5. Press the EXIT button to display the menu. The TV-Y7, TV-PG, TV-14, and TV-MA have additional options. Press the ENTER button: Depending on your PIN and enter them. The default PIN number for a new...
Quick Guide (easy Manual) (ver.1.0) (English)
Page 17
...to select a category. Parents strongly cautioned. To resume normal viewing, tune to display the menu. Parental Guidance. Next, while the TV-Rating is indicated. 6. Repeatedly press the or button to temporarily disable the V-Chip Lock. Under certain conditions (depending on previous page... No children under age 8. The V-Chip will appear. Programming contains themes or content which may not be blocked. 8. 7. To select a different TV-Rating, press the or button and then repeat the process. For example, if you block the "PG-13" category, then "R", "NC-17",...
...to select a category. Parents strongly cautioned. To resume normal viewing, tune to display the menu. Parental Guidance. Next, while the TV-Rating is indicated. 6. Repeatedly press the or button to temporarily disable the V-Chip Lock. Under certain conditions (depending on previous page... No children under age 8. The V-Chip will appear. Programming contains themes or content which may not be blocked. 8. 7. To select a different TV-Rating, press the or button and then repeat the process. For example, if you block the "PG-13" category, then "R", "NC-17",...
Quick Guide (easy Manual) (ver.1.0) (English)
Page 18
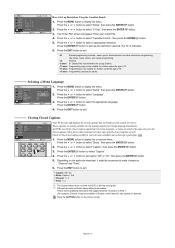
... display the menu. Press the MENU button to activate the restriction selected. Press the ENTER button. 3. Viewing Closed Captions Your TV decodes and displays the closed caption symbol in Spanish). Check for the hearing impaired or foreign-language translations. Press the or button...ENTER button. 2. Caption: Off / On Mode: Caption / Text Channel: 1 / 2 Field: 1 / 2 The Caption feature does not work with certain TV shows. How to select a appropriate restriction. Press the or button to Set up Restrictions Using the Canadian French 1. Press the ENTER button. 4. Press the ...
... display the menu. Press the MENU button to activate the restriction selected. Press the ENTER button. 3. Viewing Closed Captions Your TV decodes and displays the closed caption symbol in Spanish). Check for the hearing impaired or foreign-language translations. Press the or button...ENTER button. 2. Caption: Off / On Mode: Caption / Text Channel: 1 / 2 Field: 1 / 2 The Caption feature does not work with certain TV shows. How to select a appropriate restriction. Press the or button to Set up Restrictions Using the Canadian French 1. Press the ENTER button. 4. Press the ...

Quick Guide (easy Manual) (ver.1.0) (English)
Page 19
... the ENTER button. 2. HD STB - DVD Combo - When you must set the "Energy Saving " mode option to "High" so as to reduce the dazzling of TV so as to exit. Selecting the Source You can only select a source if it is powered on -screen menu. button. Press the or button repeatedly... press the ENTER button. 4. Press the or button to select the Input source, then press ENTER You can select among external sources connected to your TV's input jacks. 1. Cable STB - Press the or button to display the on or off. 1. Game Camcorder - Press the MENU button to select "Edit Name" then...
... the ENTER button. 2. HD STB - DVD Combo - When you must set the "Energy Saving " mode option to "High" so as to reduce the dazzling of TV so as to exit. Selecting the Source You can only select a source if it is powered on -screen menu. button. Press the or button repeatedly... press the ENTER button. 4. Press the or button to select the Input source, then press ENTER You can select among external sources connected to your TV's input jacks. 1. Cable STB - Press the or button to display the on or off. 1. Game Camcorder - Press the MENU button to select "Edit Name" then...

Quick Guide (easy Manual) (ver.1.0) (English)
Page 20
... the or button to select "Position", then press the ENTER button. 5. Image Reset: You can replace all cases. (If not, contact your computer manufacturer or Samsung Dealer.) 1. Press the MENU button to select "Setup", then press the ENTER button. 3. Press the or button to display the menu. The actual screens on... window appears, click on the display dialog-box. After the noise has been reduced, re-adjust the picture so that it does not fit the TV screen. 1. Preset: Press the PC button to exit. Press the or button to exit. Press the or button to exit. Press the EXIT button to...
... the or button to select "Position", then press the ENTER button. 5. Image Reset: You can replace all cases. (If not, contact your computer manufacturer or Samsung Dealer.) 1. Press the MENU button to select "Setup", then press the ENTER button. 3. Press the or button to display the menu. The actual screens on... window appears, click on the display dialog-box. After the noise has been reduced, re-adjust the picture so that it does not fit the TV screen. 1. Preset: Press the PC button to exit. Press the or button to exit. Press the or button to exit. Press the EXIT button to...

Quick Guide (easy Manual) (ver.1.0) (English)
Page 21
...connections. No picture or sound. Check all wire connections. The TV operates erratically. "Check signal cable. Check the maximum resolution and ...Contrast. Adjust the antenna. Poor sound quality. Make sure the TV is firmly connected to display the menu. Picture rolls vertically. The...signal. Troubleshooting Identifying Problems If the TV seems to have a problem, first try operating it again. Unplug the TV for 30 seconds, then try this...you to set the TV to self-adjust to select "Auto Adjustment", then press the ENTER 5. Then, adjust the TV volume accordingly. English-19...
...connections. No picture or sound. Check all wire connections. The TV operates erratically. "Check signal cable. Check the maximum resolution and ...Contrast. Adjust the antenna. Poor sound quality. Make sure the TV is firmly connected to display the menu. Picture rolls vertically. The...signal. Troubleshooting Identifying Problems If the TV seems to have a problem, first try operating it again. Unplug the TV for 30 seconds, then try this...you to set the TV to self-adjust to select "Auto Adjustment", then press the ENTER 5. Then, adjust the TV volume accordingly. English-19...


