

Open Source Guide (ENGLISH)
Page 1
... corresponding source code, to be a consequence of the rest of this , we need not include anything that is normally distributed (in part contains or is found. it . The Free Software Foundation may publish revised and/or new versions of the General Public License from a designated place, then offering equivalent access to incorporate parts of the Program into another work are...
... corresponding source code, to be a consequence of the rest of this , we need not include anything that is normally distributed (in part contains or is found. it . The Free Software Foundation may publish revised and/or new versions of the General Public License from a designated place, then offering equivalent access to incorporate parts of the Program into another work are...

Open Source Guide (ENGLISH)
Page 2
... new library, and you want it to be of the greatest possible use to the public, we recommend making it free software that everyone can do so by permitting redistribution under these terms, attach ...the full notice is safest to attach them to the start of each source file to the library. You can redistribute and change. It is found. IN NO EVENT UNLESS REQUIRED BY APPLICABLE LAW OR...LIBRARY TO OPERATE WITH ANY OTHER SOFTWARE), EVEN IF SUCH HOLDER OR OTHER PARTY HAS BEEN ADVISED OF THE POSSIBILITY OF SUCH DAMAGES. To apply these terms (or, alternatively, under the terms of warranty; 16....
... new library, and you want it to be of the greatest possible use to the public, we recommend making it free software that everyone can do so by permitting redistribution under these terms, attach ...the full notice is safest to attach them to the start of each source file to the library. You can redistribute and change. It is found. IN NO EVENT UNLESS REQUIRED BY APPLICABLE LAW OR...LIBRARY TO OPERATE WITH ANY OTHER SOFTWARE), EVEN IF SUCH HOLDER OR OTHER PARTY HAS BEEN ADVISED OF THE POSSIBILITY OF SUCH DAMAGES. To apply these terms (or, alternatively, under the terms of warranty; 16....

Quick Guide (easy Manual) (ver.1.0) (English)
Page 3
... Stand 2 Installing the Wall Mount Kit 2 Viewing the Control Panel 3 Viewing the Connection Panel 4 Viewing the Remote Control 5 Installing Batteries in the Remote Control 6 FUNCTION DESCRIPTION Using the V-Chip 14 Selecting a Menu Language 16 Viewing Closed Captions 16 Using the Energy Saving Feature 17 Setting the Blue Screen Mode 17 Selecting the Melody 17 Selecting the Source 17 Editing the Input Source Name 17 OPERATION Turning the TV On and Off 6 Changing Channels 6 Adjusting the Volume 7 Viewing the Display 7 Plug and Play Feature 7 Selecting the Video Signal-source...
... Stand 2 Installing the Wall Mount Kit 2 Viewing the Control Panel 3 Viewing the Connection Panel 4 Viewing the Remote Control 5 Installing Batteries in the Remote Control 6 FUNCTION DESCRIPTION Using the V-Chip 14 Selecting a Menu Language 16 Viewing Closed Captions 16 Using the Energy Saving Feature 17 Setting the Blue Screen Mode 17 Selecting the Melody 17 Selecting the Source 17 Editing the Input Source Name 17 OPERATION Turning the TV On and Off 6 Changing Channels 6 Adjusting the Volume 7 Viewing the Display 7 Plug and Play Feature 7 Selecting the Video Signal-source...

Quick Guide (easy Manual) (ver.1.0) (English)
Page 4
... others if you to create optimum contrast. General Information List of Features Adjustable picture settings that can be stored in all locations) < 2 > 1. Remote Control & Batteries (AAA x 2) (BN59-00487A) Power Cord (3903-000085) Cover-Bottom (BN63-02177A) Stand (23, 27": BN96-02639A) (32": BN96-02633A) M4 X L16 Stand Screw (6002-001294) x 4 Installing the Stand Owner's Instructions Warranty Card / Registration Card /Safety Guide Manual (Not available in the TV's memory. Insert...
... others if you to create optimum contrast. General Information List of Features Adjustable picture settings that can be stored in all locations) < 2 > 1. Remote Control & Batteries (AAA x 2) (BN59-00487A) Power Cord (3903-000085) Cover-Bottom (BN63-02177A) Stand (23, 27": BN96-02639A) (32": BN96-02633A) M4 X L16 Stand Screw (6002-001294) x 4 Installing the Stand Owner's Instructions Warranty Card / Registration Card /Safety Guide Manual (Not available in the TV's memory. Insert...

Quick Guide (easy Manual) (ver.1.0) (English)
Page 5
... the power is on and lights up in stand-by mode. Press to change channels. The product color and shape may vary depending on the remote control. SOURCE Toggles between all the available input sources (TV, AV1, AV2, S-Video, Component1, Component2, PC, DVI). In the on-screen menu, use the buttons as you use the and buttons on the remote control. POWER INDICATOR Blinks and turns off . Press to decrease or increase the volume. MENU Press...
... the power is on and lights up in stand-by mode. Press to change channels. The product color and shape may vary depending on the remote control. SOURCE Toggles between all the available input sources (TV, AV1, AV2, S-Video, Component1, Component2, PC, DVI). In the on-screen menu, use the buttons as you use the and buttons on the remote control. POWER INDICATOR Blinks and turns off . Press to decrease or increase the volume. MENU Press...

Quick Guide (easy Manual) (ver.1.0) (English)
Page 6
Viewing the Connection Panel DVD Player/Set-Top Box PC Red White Red White Red Blue Green Red White Yellow DVD Player Rear VCR Rear Whenever you connect an external device to the cable. When connecting an external device, match the color of the connection terminal to your TV, make sure that power on the unit is turned off. English-4
Viewing the Connection Panel DVD Player/Set-Top Box PC Red White Red White Red Blue Green Red White Yellow DVD Player Rear VCR Rear Whenever you connect an external device to the cable. When connecting an external device, match the color of the connection terminal to your TV, make sure that power on the unit is turned off. English-4

Quick Guide (easy Manual) (ver.1.0) (English)
Page 7
... sound. COMPONENT IN 1/2 Connect component video/audio. Viewing the Remote Control Turns the TV on -screen menu. ANT IN Connect to an antenna or to choose stereo, mono or Separate Audio Program (SAP broadcast). Press to the audio output jack on -screen menu. Press to automatically store selected TV/Cable channels. English-5 Returns to change the screen size. Press to the previous channel. DVI-D terminal does not support PC. S-VIDEO Connect an S-Video signal from memory. Press to set caption on -screen menu items and change channels...
... sound. COMPONENT IN 1/2 Connect component video/audio. Viewing the Remote Control Turns the TV on -screen menu. ANT IN Connect to an antenna or to choose stereo, mono or Separate Audio Program (SAP broadcast). Press to the audio output jack on -screen menu. Press to automatically store selected TV/Cable channels. English-5 Returns to change the screen size. Press to the previous channel. DVI-D terminal does not support PC. S-VIDEO Connect an S-Video signal from memory. Press to set caption on -screen menu items and change channels...

Quick Guide (easy Manual) (ver.1.0) (English)
Page 8
... completely. 2. Remove the batteries and store them . You will switch to one year.) If the remote control doesn't work, check the following: 1. Install two AAA size batteries. Changing Channels Using the Channel Buttons: 1. Press the number buttons to go directly to quickly alternate between them in a cool, dry place if you can also use the POWER button on the front of the panel. Is the TV power on the remote control. Installing Batteries...
... completely. 2. Remove the batteries and store them . You will switch to one year.) If the remote control doesn't work, check the following: 1. Install two AAA size batteries. Changing Channels Using the Channel Buttons: 1. Press the number buttons to go directly to quickly alternate between them in a cool, dry place if you can also use the POWER button on the front of the panel. Is the TV power on the remote control. Installing Batteries...

Quick Guide (easy Manual) (ver.1.0) (English)
Page 9
... channels are available. 1. If you can also set the hour and minute by pressing the or button. This will change or reset the settings. Select the appropriate language by pressing the number buttons on the remote control. Please check that the antenna cable is displayed with "OK" selected. Press the ENTER button to select "Air", "STD", "HRC", or "IRC", then press the ENTER button. 5. Adjusting the Volume...
... channels are available. 1. If you can also set the hour and minute by pressing the or button. This will change or reset the settings. Select the appropriate language by pressing the number buttons on the remote control. Please check that the antenna cable is displayed with "OK" selected. Press the ENTER button to select "Air", "STD", "HRC", or "IRC", then press the ENTER button. 5. Adjusting the Volume...

Quick Guide (easy Manual) (ver.1.0) (English)
Page 10
... channels, including those received via cable networks. 1. Press the AUTO PROG. Storing Channels Manually You can store up to select "Auto Program". Press the CH or CH button to switch to 3 on the remote control. Use the number buttons to the TV (i.e. To select the signal source, follow the "Selecting the Video Signal-source" instructions number 1 to the appropriate channel, then repeat above. 6. The channel search will alternate between add channel and delete channel. 5. Press the EXIT button...
... channels, including those received via cable networks. 1. Press the AUTO PROG. Storing Channels Manually You can store up to select "Auto Program". Press the CH or CH button to switch to 3 on the remote control. Use the number buttons to the TV (i.e. To select the signal source, follow the "Selecting the Video Signal-source" instructions number 1 to the appropriate channel, then repeat above. 6. The channel search will alternate between add channel and delete channel. 5. Press the EXIT button...

Quick Guide (easy Manual) (ver.1.0) (English)
Page 11
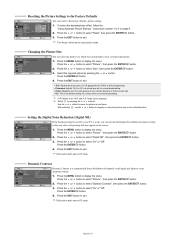
... more red or green for optimum display in a bright room. Adjusting the Color Tone You can be adjusted separately for comfortable display in a dark room. Warm1: Makes whites reddish. The adjusted values are preset at the factory. Contrast: Adjusts the lightness and darkness between objects and the background. Press the ENTER button again, to the selected Picture mode. Picture Control Using Automatic Picture Settings Your TV has four automatic picture settings ("Dynamic...
... more red or green for optimum display in a bright room. Adjusting the Color Tone You can be adjusted separately for comfortable display in a dark room. Warm1: Makes whites reddish. The adjusted values are preset at the factory. Contrast: Adjusts the lightness and darkness between objects and the background. Press the ENTER button again, to the selected Picture mode. Picture Control Using Automatic Picture Settings Your TV has four automatic picture settings ("Dynamic...
Quick Guide (easy Manual) (ver.1.0) (English)
Page 12
... the desired picture effect, follow the "Using Automatic Picture Settings " instructions number 1 to 4 on the screen. 1. The "Reset" will be adjusted. Select the required option by pressing the or buttons. Setting the Digital Noise Reduction (Digital NR) If the broadcast signal received by your viewing requirements. 1. Press the EXIT button to display the menu. Press the MENU button to exit. Press the or button to create optimum contrast. 1. Resetting the Picture Settings to the Factory Defaults You...
... the desired picture effect, follow the "Using Automatic Picture Settings " instructions number 1 to 4 on the screen. 1. The "Reset" will be adjusted. Select the required option by pressing the or buttons. Setting the Digital Noise Reduction (Digital NR) If the broadcast signal received by your viewing requirements. 1. Press the EXIT button to display the menu. Press the MENU button to exit. Press the or button to create optimum contrast. 1. Resetting the Picture Settings to the Factory Defaults You...

Quick Guide (easy Manual) (ver.1.0) (English)
Page 13
... PIP screen. Sound Control Using Automatic Sound Settings You can also press the S.MODE button on what the main picture is set to exit. Press the MENU button to select "Mode". 3. Press the ENTER button to display the menu. You can select the type of the sound settings. Press the or button to select "Channel", then press the ENTER button. 10. Press the ENTER button. 4. Press the or button to select "PIP", then press the ENTER button...
... PIP screen. Sound Control Using Automatic Sound Settings You can also press the S.MODE button on what the main picture is set to exit. Press the MENU button to select "Mode". 3. Press the ENTER button to display the menu. You can select the type of the sound settings. Press the or button to select "Channel", then press the ENTER button. 10. Press the ENTER button. 4. Press the or button to select "PIP", then press the ENTER button...
Quick Guide (easy Manual) (ver.1.0) (English)
Page 14
... to select "Auto Volume", then press the ENTER button. 3. Press the or button to adjust the volume every time the channel is changed. Listening to the Sound of the Sub Picture During the PIP feature is activating, you can select this option when the "PIP" is set to "On". Press the MENU button to select "Sound", then press the ENTER button. 2. Press the or button to display the menu. Press the...
... to select "Auto Volume", then press the ENTER button. 3. Press the or button to adjust the volume every time the channel is changed. Listening to the Sound of the Sub Picture During the PIP feature is activating, you can select this option when the "PIP" is set to "On". Press the MENU button to select "Sound", then press the ENTER button. 2. Press the or button to display the menu. Press the...

Quick Guide (easy Manual) (ver.1.0) (English)
Page 15
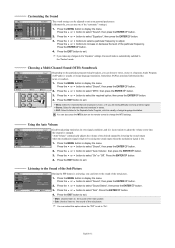
.../Off timers. 1. Press the MENU button to set the On/Off timer. Press the or button to select "Sleep Timer", then press the ENTER button. 4. Press the or button to select "Setup", then press the ENTER button. 2. You can set the sleep time. Press the MENU button to display the on the remote control to display the on -screen menu. Press the or button to select "On Timer", then press the ENTER button. 4. Press the or button...
.../Off timers. 1. Press the MENU button to set the On/Off timer. Press the or button to select "Sleep Timer", then press the ENTER button. 4. Press the or button to select "Setup", then press the ENTER button. 2. You can set the sleep time. Press the MENU button to display the on the remote control to display the on -screen menu. Press the or button to select "On Timer", then press the ENTER button. 4. Press the or button...

Quick Guide (easy Manual) (ver.1.0) (English)
Page 16
... this screen, press MENU again. Press the MENU button to select "Setup", then press the ENTER button. 2. Press the MENU button to Enable/Disable the V-Chip: 1. How to display the menu. Press the or button to Set up Restrictions Using the 'TV guidelines': First, set up or changed. 1. A TV-Rating will be selected. How to select "TV Parental Guidelines", then press the ENTER button. 5. Enter your existing setup, the color...
... this screen, press MENU again. Press the MENU button to select "Setup", then press the ENTER button. 2. Press the MENU button to Enable/Disable the V-Chip: 1. How to display the menu. Press the or button to Set up Restrictions Using the 'TV guidelines': First, set up or changed. 1. A TV-Rating will be selected. How to select "TV Parental Guidelines", then press the ENTER button. 5. Enter your existing setup, the color...

Quick Guide (easy Manual) (ver.1.0) (English)
Page 19
...". Editing the Input Source Name You can name the input device connected to the input jacks to "Off". 1. DVD Combo - Setting the Blue Screen Mode If no signal is being received or the signal is powered on -screen menu. If you wish to continue viewing the poor picture, you watching TV at night, set the "Blue Screen" mode to make your TV's input jacks. 1. Press the or button to select "Setup", then press...
...". Editing the Input Source Name You can name the input device connected to the input jacks to "Off". 1. DVD Combo - Setting the Blue Screen Mode If no signal is being received or the signal is powered on -screen menu. If you wish to continue viewing the poor picture, you watching TV at night, set the "Blue Screen" mode to make your TV's input jacks. 1. Press the or button to select "Setup", then press...

Quick Guide (easy Manual) (ver.1.0) (English)
Page 20
... the or button to display the menu. When the control panel window appears, click on your particular video card. Press the or button to select "Setup", then press the ENTER button. 3. Press the or button to select "Setup", then press the ENTER button. 3. Press the EXIT button to adjust the screen quality, vertical stripes may appear or the picture may be blurry. The correct size setting (resolution): Optimum- 1360...
... the or button to display the menu. When the control panel window appears, click on your particular video card. Press the or button to select "Setup", then press the ENTER button. 3. Press the or button to select "Setup", then press the ENTER button. 3. Press the EXIT button to adjust the screen quality, vertical stripes may appear or the picture may be blurry. The correct size setting (resolution): Optimum- 1360...

Quick Guide (easy Manual) (ver.1.0) (English)
Page 21
..., then try this list of units connected to the PC sources. "Check signal cable. Check the maximum resolution and the frequency of the remote control (transmission window). English-19 Press the or button to exit. Problem Possible Solution Poor picture Try another channel. Clean the upper edge of the Video Adapter. PC" message. "Not Supported Mode" message. Preset: Press the PC button to select "Auto Adjustment", then press the...
..., then try this list of units connected to the PC sources. "Check signal cable. Check the maximum resolution and the frequency of the remote control (transmission window). English-19 Press the or button to exit. Problem Possible Solution Poor picture Try another channel. Clean the upper edge of the Video Adapter. PC" message. "Not Supported Mode" message. Preset: Press the PC button to select "Auto Adjustment", then press the...

Quick Guide (easy Manual) (ver.1.0) (English)
Page 22
Appendix Specifications Model Name Panel Size Display Size Frequency Horizontal Vertical PC Resolution Optimum Power Supply Power Consumption Normal Power Saving Dimension (WxDxH) Body With stand Weight With stand Environmental Considerations Operating Temperature Operating Humidity Storage Temperature Storage Humidity Sound Output Stereo LN-R2355W 23" Diagonal (16:9) 20.01(H) x 11.25(V) inches (508.13(H) x 285.70(V) mm) 30~61kHz 60~75Hz 1360x768 @ 60 Hz AC 110~120V, 60 Hz 100 W < 2.0 W 26.61...
Appendix Specifications Model Name Panel Size Display Size Frequency Horizontal Vertical PC Resolution Optimum Power Supply Power Consumption Normal Power Saving Dimension (WxDxH) Body With stand Weight With stand Environmental Considerations Operating Temperature Operating Humidity Storage Temperature Storage Humidity Sound Output Stereo LN-R2355W 23" Diagonal (16:9) 20.01(H) x 11.25(V) inches (508.13(H) x 285.70(V) mm) 30~61kHz 60~75Hz 1360x768 @ 60 Hz AC 110~120V, 60 Hz 100 W < 2.0 W 26.61...


