

Quick Guide (easy Manual) (ver.1.0) (English)
Page 11
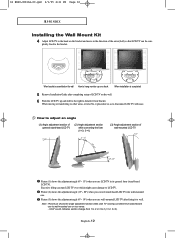
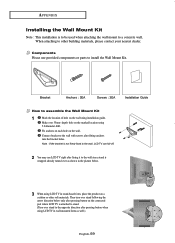
... the bracket holes. Connect bracket to the wall since stand is wrapped already turned over stand in the opposite direction after pressing button when using LCD TV in wall-mounted form as shown in stand-based form, place the product on a cushion or other building materials, please contact your nearest dealer. ...Note : If the bracket is not firmly fixed to the wall, LCD TV can fall off. 2 You may use provided components or parts to stand. (Turn over as well.) English-11 Components Please use...
... the bracket holes. Connect bracket to the wall since stand is wrapped already turned over stand in the opposite direction after pressing button when using LCD TV in wall-mounted form as shown in stand-based form, place the product on a cushion or other building materials, please contact your nearest dealer. ...Note : If the bracket is not firmly fixed to the wall, LCD TV can fall off. 2 You may use provided components or parts to stand. (Turn over as well.) English-11 Components Please use...
Quick Guide (easy Manual) (ver.1.0) (English)
Page 12
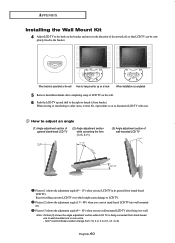
...adjustment angle (0°~ 13°) when you use wall-mounted LCD TV after completing setup of the arrow(Left) so that LCD TV can turn LCD TV over which might cause damage to LCD TV. Click" sound indicates section change from 1 to 2 or 3 to disconnect LCD TV with ease. When moving or transferring to other areas, reverse... completely fixed to the bracket. Picture (2) shows the adjustment angle (13°~ 80°) when you use LCD TV in the direction of LCD TV on the wall. 6 Push the LCD TV up on the wall How to hang monitor up and shift to the right to detach it to wall. Note...
...adjustment angle (0°~ 13°) when you use wall-mounted LCD TV after completing setup of the arrow(Left) so that LCD TV can turn LCD TV over which might cause damage to LCD TV. Click" sound indicates section change from 1 to 2 or 3 to disconnect LCD TV with ease. When moving or transferring to other areas, reverse... completely fixed to the bracket. Picture (2) shows the adjustment angle (13°~ 80°) when you use LCD TV in the direction of LCD TV on the wall. 6 Push the LCD TV up on the wall How to hang monitor up and shift to the right to detach it to wall. Note...
Quick Guide (easy Manual) (ver.1.0) (English)
Page 6
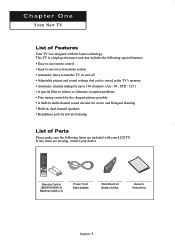
...TV is a high-performance unit that includes the following special features: • Easy-to-use remote control • Easy-to-use on-screen menu system • Automatic timer to turn the TV... on and off • Adjustable picture and sound settings that can be stored in the TV's memory • Automatic channel tuning for up to 194 ...; Built-in, dual channel speakers • Headphone jack for private listening List of Features Your TV was designed with your dealer. Remote Control (BN59-00429A) & Batteries (AAA x 2) Power Cord...
...TV is a high-performance unit that includes the following special features: • Easy-to-use remote control • Easy-to-use on-screen menu system • Automatic timer to turn the TV... on and off • Adjustable picture and sound settings that can be stored in the TV's memory • Automatic channel tuning for up to 194 ...; Built-in, dual channel speakers • Headphone jack for private listening List of Features Your TV was designed with your dealer. Remote Control (BN59-00429A) & Batteries (AAA x 2) Power Cord...
Quick Guide (easy Manual) (ver.1.0) (English)
Page 9
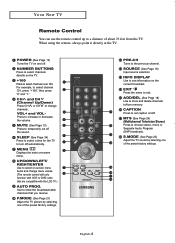
...automatically. P.MODE (See Page 21) Adjust the TV picture by selecting one of about 23 feet from memory. CAPTION Press to store the broadcast/cable channels that are compatible with the LCD TV.) AUTO PROG. S.MODE (See Page 23) Adjust the TV sound by selecting one of the preset factory settings.... POWER (See Page 13) Turns the TV on /off the sound. For example, to choose stereo, mono or...
...automatically. P.MODE (See Page 21) Adjust the TV picture by selecting one of about 23 feet from memory. CAPTION Press to store the broadcast/cable channels that are compatible with the LCD TV.) AUTO PROG. S.MODE (See Page 23) Adjust the TV sound by selecting one of the preset factory settings.... POWER (See Page 13) Turns the TV on /off the sound. For example, to choose stereo, mono or...
Quick Guide (easy Manual) (ver.1.0) (English)
Page 60
...this set only supports 480i/480p resolution. NOTE:Your TV supports multiscan display functions within the following frequency domain: Horizontal frequency(kHz) Vertical frequency(Hz) Maximum refresh rate (at 75Hz) 15"(LN-R1550) 30~69 50~75 1024x768 20"(LN-R2050) 28~47 50~75 800x600 Image is ...and may be few bright or dark pixels on the screen. Adjust the horizontal and vertical position. The TFT LCD panel uses a panel consisting of sub pixels (LN-R1550 - 2,359,296/LN-R2050- 1,440,000) which require sophisticated technology to change the display settings. Move the computer's mouse or...
...this set only supports 480i/480p resolution. NOTE:Your TV supports multiscan display functions within the following frequency domain: Horizontal frequency(kHz) Vertical frequency(Hz) Maximum refresh rate (at 75Hz) 15"(LN-R1550) 30~69 50~75 1024x768 20"(LN-R2050) 28~47 50~75 800x600 Image is ...and may be few bright or dark pixels on the screen. Adjust the horizontal and vertical position. The TFT LCD panel uses a panel consisting of sub pixels (LN-R1550 - 2,359,296/LN-R2050- 1,440,000) which require sophisticated technology to change the display settings. Move the computer's mouse or...
Quick Guide (easy Manual) (ver.1.0) (English)
Page 61
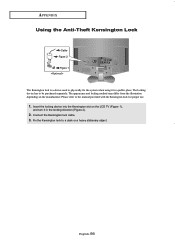
... the manufacturer. Fix the Kensington lock to a desk or a heavy stationary object. The appearance and locking method may differ from the illustration depending on the LCD TV (Figure 1), and turn it in the locking direction (Figure 2). 2. English-56 Connect the Kensington lock cable. 3.
... the manufacturer. Fix the Kensington lock to a desk or a heavy stationary object. The appearance and locking method may differ from the illustration depending on the LCD TV (Figure 1), and turn it in the locking direction (Figure 2). 2. English-56 Connect the Kensington lock cable. 3.
Quick Guide (easy Manual) (ver.1.0) (English)
Page 64
... : 3EA Screws : 3EA Installation Guide How to assemble the Wall Mount Kit 1 Mark the location of hole on the connected part where LCD TV is to be used when attaching the wall mount to the wall with screws after pressing button on the wall using 5.0-diameter drill. Then turn... over 35mm- Make over stand following the arrow direction below . 3 When using LCD TV in stand-based form, place the product on the wall. When attaching to install the Wall Mount Kit. hole on the marked location using ...
... : 3EA Screws : 3EA Installation Guide How to assemble the Wall Mount Kit 1 Mark the location of hole on the connected part where LCD TV is to be used when attaching the wall mount to the wall with screws after pressing button on the wall using 5.0-diameter drill. Then turn... over 35mm- Make over stand following the arrow direction below . 3 When using LCD TV in stand-based form, place the product on the wall. When attaching to install the Wall Mount Kit. hole on the marked location using ...
Quick Guide (easy Manual) (ver.1.0) (English)
Page 65
... 3->1) (3) Angle adjustment section of wall-mounted LCD TV Picture (1) shows the adjustment angle (0°~ 13°) when you use wall-mounted LCD TV after completing setup of the arrow(Left) so that LCD TV can turn LCD TV over which might cause damage to LCD TV. Picture (2) shows the adjustment angle (13&#...176;~ 80°) when you use LCD TV in the direction of LCD TV on the wall. 6 Push the LCD TV up and...
... 3->1) (3) Angle adjustment section of wall-mounted LCD TV Picture (1) shows the adjustment angle (0°~ 13°) when you use wall-mounted LCD TV after completing setup of the arrow(Left) so that LCD TV can turn LCD TV over which might cause damage to LCD TV. Picture (2) shows the adjustment angle (13&#...176;~ 80°) when you use LCD TV in the direction of LCD TV on the wall. 6 Push the LCD TV up and...


