
Quick Guide (easy Manual) (ver.1.0) (English)
Page 1
... IN Video and audio inputs for external devices, such as a VCR or a DVD player. 01 BN68-00816A-00.qxd 2/1/05 4:14 PM Page 3 YOUR NEW TV Rear Panel Jacks Use the rear panel jacks to a cable...
... IN Video and audio inputs for external devices, such as a VCR or a DVD player. 01 BN68-00816A-00.qxd 2/1/05 4:14 PM Page 3 YOUR NEW TV Rear Panel Jacks Use the rear panel jacks to a cable...
Quick Guide (easy Manual) (ver.1.0) (English)
Page 2
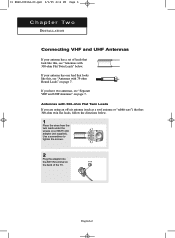
...-ohm Flat Twin Leads If you have two antennas, see "Antennas with 300-ohm Flat Twin Leads" below. If your antenna has a set of the TV. Antennas with 75-ohm Round Leads" on page 7. 01 BN68-00816A-00.qxd 2/1/05 4:14 PM Page 6 Chapter Two I N S TA L L AT I O N Connecting VHF and UHF...
...-ohm Flat Twin Leads If you have two antennas, see "Antennas with 300-ohm Flat Twin Leads" below. If your antenna has a set of the TV. Antennas with 75-ohm Round Leads" on page 7. 01 BN68-00816A-00.qxd 2/1/05 4:14 PM Page 6 Chapter Two I N S TA L L AT I O N Connecting VHF and UHF...

Quick Guide (easy Manual) (ver.1.0) (English)
Page 3
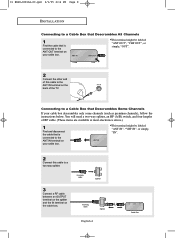
... VHF 2 Plug the combiner into the ANT IN terminal on the back of the TV. English-3 UHF VHF ANT IN Connecting Cable TV To connect to the combiner. Because this TV is cable-ready, you must combine the two antenna signals before connecting the antennas to view unscrambled cable channels. Cable without a ...Cable Box 1 Plug the incoming cable into the ANT IN terminal on the back of the TV. This procedure requires an optional combiner-adaptor (available at most electronics shops). 1 Connect both antenna leads to a cable...
... VHF 2 Plug the combiner into the ANT IN terminal on the back of the TV. English-3 UHF VHF ANT IN Connecting Cable TV To connect to the combiner. Because this TV is cable-ready, you must combine the two antenna signals before connecting the antennas to view unscrambled cable channels. Cable without a ...Cable Box 1 Plug the incoming cable into the ANT IN terminal on the back of the TV. This procedure requires an optional combiner-adaptor (available at most electronics shops). 1 Connect both antenna leads to a cable...
Quick Guide (easy Manual) (ver.1.0) (English)
Page 4
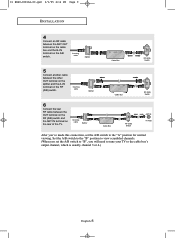
You will need a two-way splitter, an RF (A/B) switch, and four lengths of the TV. Incoming cable Splitter English-4 Cable Box ANT IN This terminal might be labeled "ANT IN", "VHF IN", or simply, "IN". 2 Connect this cable to the ...
You will need a two-way splitter, an RF (A/B) switch, and four lengths of the TV. Incoming cable Splitter English-4 Cable Box ANT IN This terminal might be labeled "ANT IN", "VHF IN", or simply, "IN". 2 Connect this cable to the ...
Quick Guide (easy Manual) (ver.1.0) (English)
Page 5
...the ANT OUT terminal on the cable box and the B-IN terminal on the RF (A/B) switch. Incoming cable Splitter Cable Box RF (A/B) Switch ANT IN TV Rear After you've made this connection, set the A/B switch to "B", you set the A/B switch to the cable box's output channel, which is usually...the OUT terminal on the RF (A/B) switch and the ANT IN terminal on the rear of the TV. Set the A/B switch to the "B" position to view scrambled channels. (When you will need to tune your TV to the "A" position for normal viewing. Incoming cable Splitter Cable Box RF (A/B) Switch 6 Connect ...
...the ANT OUT terminal on the cable box and the B-IN terminal on the RF (A/B) switch. Incoming cable Splitter Cable Box RF (A/B) Switch ANT IN TV Rear After you've made this connection, set the A/B switch to "B", you set the A/B switch to the cable box's output channel, which is usually...the OUT terminal on the RF (A/B) switch and the ANT IN terminal on the rear of the TV. Set the A/B switch to the "B" position to view scrambled channels. (When you will need to tune your TV to the "A" position for normal viewing. Incoming cable Splitter Cable Box RF (A/B) Switch 6 Connect ...

Quick Guide (easy Manual) (ver.1.0) (English)
Page 6
... or Antenna VCR Rear Panel 3 Connect an RF cable between the AUDIO OUT jacks on the VCR and the AV IN [L-AUDIO-R] jacks on the TV. Skip step 1 if you have a "mono" (non-stereo) VCR, use the Y-connector (not supplied) to hook up to the instructions on the back of the... TV. 01 BN68-00816A-00.qxd 2/1/05 4:14 PM Page 10 I N S TA L L AT I O N Connecting a VCR These instructions assume that you have already connected your local electronics ...
... or Antenna VCR Rear Panel 3 Connect an RF cable between the AUDIO OUT jacks on the VCR and the AV IN [L-AUDIO-R] jacks on the TV. Skip step 1 if you have a "mono" (non-stereo) VCR, use the Y-connector (not supplied) to hook up to the instructions on the back of the... TV. 01 BN68-00816A-00.qxd 2/1/05 4:14 PM Page 10 I N S TA L L AT I O N Connecting a VCR These instructions assume that you have already connected your local electronics ...
Quick Guide (easy Manual) (ver.1.0) (English)
Page 7
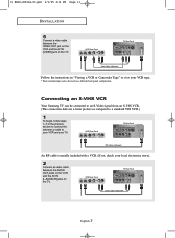
... I N S TA L L AT I O N 5 Connect a video cable between the AUDIO OUT jacks on the VCR and the AV IN [L-AUDIO-R] jacks on the TV. Connecting an S-VHS VCR Your Samsung TV can be connected to an S-Video signal from an S-VHS VCR. (This connection delivers a better picture as compared to a standard VHS VCR.) 1 To...local electronics store). 2 Connect an audio cable between the VIDEO OUT jack on the VCR and the AV IN [VIDEO] jack on the TV. VCR Rear Panel TV Rear Panel Video Cable Follow the instructions in the previous section to connect the antenna or cable to view your VCR tape. * Each ...
... I N S TA L L AT I O N 5 Connect a video cable between the AUDIO OUT jacks on the VCR and the AV IN [L-AUDIO-R] jacks on the TV. Connecting an S-VHS VCR Your Samsung TV can be connected to an S-Video signal from an S-VHS VCR. (This connection delivers a better picture as compared to a standard VHS VCR.) 1 To...local electronics store). 2 Connect an audio cable between the VIDEO OUT jack on the VCR and the AV IN [VIDEO] jack on the TV. VCR Rear Panel TV Rear Panel Video Cable Follow the instructions in the previous section to connect the antenna or cable to view your VCR tape. * Each ...

Quick Guide (easy Manual) (ver.1.0) (English)
Page 8
... The component terminal of Component video, see your DVD player owner's manual. DVD Player Rear Panel TV Rear Panel Audio Cable 2 Connect a component cable between the COMPONENT IN [L-AUDIO-R] jacks on the TV and the AUDIO OUT jacks on the DVD player. Connecting a DVD Player The rear panel jacks ... Cable An S-video cable is usually included with an S-VHS VCR. (If not, check your TV. 1 Connect an audio cable between the COMPONENT IN [Y, PB, PR] jacks on the TV and the COMPONENT [Y, PB, PR] jacks on the TV. 01 BN68-00816A-00.qxd 2/1/05 4:14 PM Page 12 I N S TA L L AT I O ...
... The component terminal of Component video, see your DVD player owner's manual. DVD Player Rear Panel TV Rear Panel Audio Cable 2 Connect a component cable between the COMPONENT IN [L-AUDIO-R] jacks on the TV and the AUDIO OUT jacks on the DVD player. Connecting a DVD Player The rear panel jacks ... Cable An S-video cable is usually included with an S-VHS VCR. (If not, check your TV. 1 Connect an audio cable between the COMPONENT IN [Y, PB, PR] jacks on the TV and the COMPONENT [Y, PB, PR] jacks on the TV. 01 BN68-00816A-00.qxd 2/1/05 4:14 PM Page 12 I N S TA L L AT I O ...
Quick Guide (easy Manual) (ver.1.0) (English)
Page 9
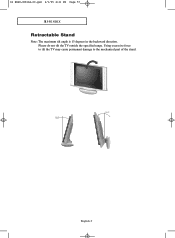
Using excessive force to tilt the TV may cause permanent damage to the mechanical part of the stand. English-9 04 BN68-00816A-00.qxd 2/1/05 4:21 PM Page 57 APPENDIX Retractable Stand Note: The maximum tilt angle is 13 degrees in the backward direction. Please do not tilt the TV outside the specified range.
Using excessive force to tilt the TV may cause permanent damage to the mechanical part of the stand. English-9 04 BN68-00816A-00.qxd 2/1/05 4:21 PM Page 57 APPENDIX Retractable Stand Note: The maximum tilt angle is 13 degrees in the backward direction. Please do not tilt the TV outside the specified range.
Quick Guide (easy Manual) (ver.1.0) (English)
Page 10
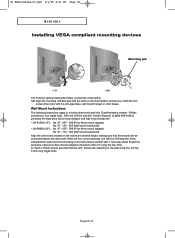
... the back of the stand. Assemble the wall mount kit according to purchase the triple pivot direct mount adapter and wall mount bracket kit. • LN-R1550 (15") : No. 47 - 007 - 099 (Pivot direct mount adapter) No. 97 - 101 - 003 (Wall mount bracket kit) •...; LN-R2050 (20") : No. 47 - 007 - 099 (Pivot direct mount adapter) No. 97 - 101 - 003 (Wall mount bracket kit) Align the wall mount bracket on the back of the TV using four 3/16 by 3-inch long toggle bolts. Contact Ergotron at...
... the back of the stand. Assemble the wall mount kit according to purchase the triple pivot direct mount adapter and wall mount bracket kit. • LN-R1550 (15") : No. 47 - 007 - 099 (Pivot direct mount adapter) No. 97 - 101 - 003 (Wall mount bracket kit) •...; LN-R2050 (20") : No. 47 - 007 - 099 (Pivot direct mount adapter) No. 97 - 101 - 003 (Wall mount bracket kit) Align the wall mount bracket on the back of the TV using four 3/16 by 3-inch long toggle bolts. Contact Ergotron at...

Quick Guide (easy Manual) (ver.1.0) (English)
Page 11
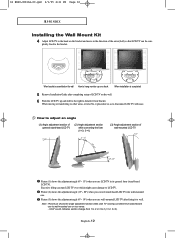
...based form, place the product on the marked location using 5.0-diameter drill. Then turn over stand following the arrow direction below . 3 When using LCD TV in wall-mounted form as well.) English-11 Connect bracket to stand. (Turn over stand in the opposite direction after fixing it to a concrete ... the wall since stand is wrapped already turned over as shown in the picture below only after pressing button on the connected part where LCD TV is attached to the wall with screws after fitting anchors into the bracket holes. Make over 35mm- Bracket Anchors : 3EA Screws : 3EA ...
...based form, place the product on the marked location using 5.0-diameter drill. Then turn over stand following the arrow direction below . 3 When using LCD TV in wall-mounted form as well.) English-11 Connect bracket to stand. (Turn over stand in the opposite direction after fixing it to a concrete ... the wall since stand is wrapped already turned over as shown in the picture below only after pressing button on the connected part where LCD TV is attached to the wall with screws after fitting anchors into the bracket holes. Make over 35mm- Bracket Anchors : 3EA Screws : 3EA ...
Quick Guide (easy Manual) (ver.1.0) (English)
Page 12
... detach it to wall. Click" sound indicates section change from bracket. Picture (3) shows the adjustment angle (0°~ 10°) when you convert stand-based LCD TV into wall-mounted one or vice versa. - Picture (2) shows the adjustment angle (13°~ 80°) when you use LCD... TV in the direction of LCD TV on the wall. 6 Push the LCD TV up on a hook When installation is being converted from stand-based one to wall-mounted one . How to adjust an...
... detach it to wall. Click" sound indicates section change from bracket. Picture (3) shows the adjustment angle (0°~ 10°) when you convert stand-based LCD TV into wall-mounted one or vice versa. - Picture (2) shows the adjustment angle (13°~ 80°) when you use LCD... TV in the direction of LCD TV on the wall. 6 Push the LCD TV up on a hook When installation is being converted from stand-based one to wall-mounted one . How to adjust an...
Quick Guide (easy Manual) (ver.1.0) (English)
Page 2
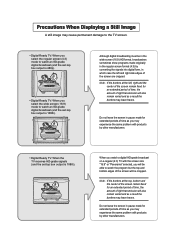
... products by converting the signals into digital form, in the regular screen format (4:3) by other manufacturers. • Digital Ready TV: When the TV receives HD-grade signals (and the set-top box output is 1080i). Although digital broadcasting must be in the wide screen (16:9) HD ... and right side edges of the screen are cropped. Precautions When Displaying a Still Image A still image may cause permanent damage to the TV screen. • Digital Ready TV: When you select the regular screen (4:3) mode to watch an SD-grade digital broadcast (and the set-top box output is 480p). ...
... products by converting the signals into digital form, in the regular screen format (4:3) by other manufacturers. • Digital Ready TV: When the TV receives HD-grade signals (and the set-top box output is 1080i). Although digital broadcasting must be in the wide screen (16:9) HD ... and right side edges of the screen are cropped. Precautions When Displaying a Still Image A still image may cause permanent damage to the TV screen. • Digital Ready TV: When you select the regular screen (4:3) mode to watch an SD-grade digital broadcast (and the set-top box output is 480p). ...

Quick Guide (easy Manual) (ver.1.0) (English)
Page 3
... by other manufacturers. If you connect a DVD player, computer or a game console to the wide-screen TV and watch a DVD, CD or a video in wide screen (21:9) format on a wide-screen TV (with the 4:3 screen mode selected). • When you watch a movie or play a game in ... and as a result the borders may leave traces. • Integrated Digital TV (Wide-screen): When the TV receives SD-grade (regular) broadcasting signals (receives 480p regular signals). • Digital Ready TV (wide-screen): digital TV: When the TV receives SD-grade (regular) broadcasting signals (with a set-top box). &#...
... by other manufacturers. If you connect a DVD player, computer or a game console to the wide-screen TV and watch a DVD, CD or a video in wide screen (21:9) format on a wide-screen TV (with the 4:3 screen mode selected). • When you watch a movie or play a game in ... and as a result the borders may leave traces. • Integrated Digital TV (Wide-screen): When the TV receives SD-grade (regular) broadcasting signals (receives 480p regular signals). • Digital Ready TV (wide-screen): digital TV: When the TV receives SD-grade (regular) broadcasting signals (with a set-top box). &#...
Quick Guide (easy Manual) (ver.1.0) (English)
Page 4
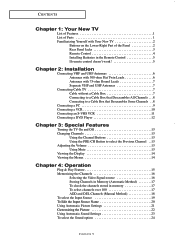
... Connecting VHF and UHF Antennas 6 Antennas with 300-ohm Flat Twin Leads 6 Antennas with 75-ohm Round Leads 7 Separate VHF and UHF Antennas 7 Connecting Cable TV 7 Cable without a Cable Box 7 Connecting to a Cable Box that Descrambles All Channels . . .8 Connecting to a Cable Box that Descrambles Some Channels . ....8 Connecting a PC 9 Connecting a VCR 10 Connecting an S-VHS VCR 11 Connecting a DVD Player 12 Chapter 3: Special Features Turning the TV On and Off 13 Changing Channels 13 Using the Channel Buttons 13 Using the PRE-CH Button to select the Previous Channel . .13 Adjusting...
... Connecting VHF and UHF Antennas 6 Antennas with 300-ohm Flat Twin Leads 6 Antennas with 75-ohm Round Leads 7 Separate VHF and UHF Antennas 7 Connecting Cable TV 7 Cable without a Cable Box 7 Connecting to a Cable Box that Descrambles All Channels . . .8 Connecting to a Cable Box that Descrambles Some Channels . ....8 Connecting a PC 9 Connecting a VCR 10 Connecting an S-VHS VCR 11 Connecting a DVD Player 12 Chapter 3: Special Features Turning the TV On and Off 13 Changing Channels 13 Using the Channel Buttons 13 Using the PRE-CH Button to select the Previous Channel . .13 Adjusting...
Quick Guide (easy Manual) (ver.1.0) (English)
Page 5
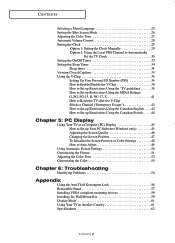
... Volume Control 28 Setting the Clock 29 Option 1: Setting the Clock Manually 29 Option 2: Using the Local PBS Channel to Automatically Set the TV Clock 30 Setting the On/Off Timer 32 Setting the Sleep Timer 34 Sleep timer 34 Viewing Closed Captions 35 Using the V-Chip 36 Setting...to Set up Restrictions Using the Canadian English . . . .43 How to Set up Restrictions Using the Canadian French . . . . .44 Chapter 5: PC Display Using Your TV as a Computer (PC) Display 45 How to Set up Your PC Software (Windows only 45 Adjusting the Screen Quality 46 Changing the Screen Position 47...
... Volume Control 28 Setting the Clock 29 Option 1: Setting the Clock Manually 29 Option 2: Using the Local PBS Channel to Automatically Set the TV Clock 30 Setting the On/Off Timer 32 Setting the Sleep Timer 34 Sleep timer 34 Viewing Closed Captions 35 Using the V-Chip 36 Setting...to Set up Restrictions Using the Canadian English . . . .43 How to Set up Restrictions Using the Canadian French . . . . .44 Chapter 5: PC Display Using Your TV as a Computer (PC) Display 45 How to Set up Your PC Software (Windows only 45 Adjusting the Screen Quality 46 Changing the Screen Position 47...
Quick Guide (easy Manual) (ver.1.0) (English)
Page 6
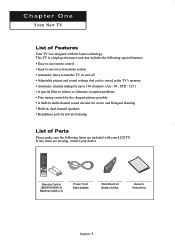
...AAA x 2) Power Cord 3903-000085 Wall Mount kit BN96-01270A Owner's Instructions English-1 This TV is a high-performance unit that includes the following items are missing, contact your LCD TV. Chapter One YOUR NEW TV List of Parts Please make sure the following special features: • Easy-to-use remote ...control • Easy-to-use on-screen menu system • Automatic timer to turn the TV on and off • Adjustable picture and sound settings that can be stored in the TV's memory • Automatic channel tuning for up to 194 channels. (Air : 69 , STD : 125 )...
...AAA x 2) Power Cord 3903-000085 Wall Mount kit BN96-01270A Owner's Instructions English-1 This TV is a high-performance unit that includes the following items are missing, contact your LCD TV. Chapter One YOUR NEW TV List of Parts Please make sure the following special features: • Easy-to-use remote ...control • Easy-to-use on-screen menu system • Automatic timer to turn the TV on and off • Adjustable picture and sound settings that can be stored in the TV's memory • Automatic channel tuning for up to 194 channels. (Air : 69 , STD : 125 )...
Quick Guide (easy Manual) (ver.1.0) (English)
Page 7
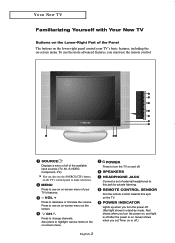
..., S-VIDEO, Component, PC). Green shows when you must use the SOURCE( ) button on the TV's control panel to this spot on the TV. YOUR NEW TV Familiarizing Yourself with Your New TV Buttons on the Lower-Right Part of your TV's basic features, including the on-screen menu. SPEAKERS HEADPHONE JACK Connect a set Timer on... change channels. POWER INDICATOR Lights up when you turn the power off. (Red light shows in stand-by mode, Red shows when you turn the TV on and off after the power is on or off.) Also press to see an on-screen menu of the Panel The buttons on -screen...
..., S-VIDEO, Component, PC). Green shows when you must use the SOURCE( ) button on the TV's control panel to this spot on the TV. YOUR NEW TV Familiarizing Yourself with Your New TV Buttons on the Lower-Right Part of your TV's basic features, including the on-screen menu. SPEAKERS HEADPHONE JACK Connect a set Timer on... change channels. POWER INDICATOR Lights up when you turn the power off. (Red light shows in stand-by mode, Red shows when you turn the TV on and off after the power is on or off.) Also press to see an on-screen menu of the Panel The buttons on -screen...

Quick Guide (easy Manual) (ver.1.0) (English)
Page 8
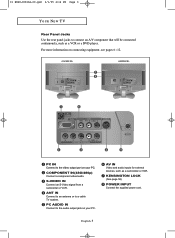
... video output port on connecting equipment, see pages 6~12. COMPONENT IN (480i/480p) Connect a component video/audio. For more information on your PC. YOUR NEW TV Rear Panel Jacks Use the rear panel jacks to connect an A/V component that will be connected continuously, such as a camcorder or VCR. ANT IN Connect... external devices, such as a VCR or a DVD player. English-3 S-VIDEO IN Connect an S-Video signal from a camcorder or VCR. PC AUDIO IN Connect to a cable TV system.
... video output port on connecting equipment, see pages 6~12. COMPONENT IN (480i/480p) Connect a component video/audio. For more information on your PC. YOUR NEW TV Rear Panel Jacks Use the rear panel jacks to connect an A/V component that will be connected continuously, such as a camcorder or VCR. ANT IN Connect... external devices, such as a VCR or a DVD player. English-3 S-VIDEO IN Connect an S-Video signal from a camcorder or VCR. PC AUDIO IN Connect to a cable TV system.
Quick Guide (easy Manual) (ver.1.0) (English)
Page 9
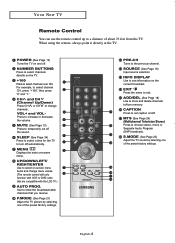
... settings. EXIT Press the menu to select channel 121, press "+100," then press "2" and "1." NUMBER BUTTONS Press to select channels directly on the TV. +100 Press to select on-screen menu items and change channels. UP/DOWN/LEFT/ RIGHT/ENTER Use to select channels over 100. PRE-CH Turns... DISPLAY Use to choose stereo, mono or Separate Audio Program (SAP broadcast). MUTE (See Page 13) Press to temporarily cut off . YOUR NEW TV Remote Control You can use the remote control up to a distance of about 23 feet from memory. When using the remote, always point it directly...
... settings. EXIT Press the menu to select channel 121, press "+100," then press "2" and "1." NUMBER BUTTONS Press to select channels directly on the TV. +100 Press to select on-screen menu items and change channels. UP/DOWN/LEFT/ RIGHT/ENTER Use to select channels over 100. PRE-CH Turns... DISPLAY Use to choose stereo, mono or Separate Audio Program (SAP broadcast). MUTE (See Page 13) Press to temporarily cut off . YOUR NEW TV Remote Control You can use the remote control up to a distance of about 23 feet from memory. When using the remote, always point it directly...


