
Quick Guide (easy Manual) (ver.1.0) (English)
Page 2
...system of the building, as close to the point of fire or electric shock, do not expose this product contain chemicals that the AC power supply in the general household trash. 2 WARNING: To reduce the risk of cable entry as a CLASS 1 LASER product. Switching off the Home Theater...ENG PREPARATION Ensure that are not covered. vases) , and excess heat (e.g.fireplace) or equipment creating strong magnetic or electric fields (i.e.speakers...). If transporting the player during the winter, wait approximately 2 hours until the unit has reached room temperature before using. This ...
...system of the building, as close to the point of fire or electric shock, do not expose this product contain chemicals that the AC power supply in the general household trash. 2 WARNING: To reduce the risk of cable entry as a CLASS 1 LASER product. Switching off the Home Theater...ENG PREPARATION Ensure that are not covered. vases) , and excess heat (e.g.fireplace) or equipment creating strong magnetic or electric fields (i.e.speakers...). If transporting the player during the winter, wait approximately 2 hours until the unit has reached room temperature before using. This ...

Quick Guide (easy Manual) (ver.1.0) (English)
Page 4
...as pictures, movies and tunes saved in the Disc changer 26 MP3/WMA-CD Playback 27 Displaying Disc Information...the Password 50 Setting the Wallpaper 51 DVD Playback Mode 53 Setting the Speaker Mode 54 Setting the Delay Time ...XM radio Samsung 's XM Ready Home Theater Systems give you the opportunity to sync up with the Remote Control 75 Before Calling for this, you to the USB port of the home theater. It delivers full-frequency 5.1 channel sound. Features Multi-Disc Playback & FM Tuner The HT-Q70 combines the convenience of multi-disc playback capability, including DVD-AUDIO, DVD...
...as pictures, movies and tunes saved in the Disc changer 26 MP3/WMA-CD Playback 27 Displaying Disc Information...the Password 50 Setting the Wallpaper 51 DVD Playback Mode 53 Setting the Speaker Mode 54 Setting the Delay Time ...XM radio Samsung 's XM Ready Home Theater Systems give you the opportunity to sync up with the Remote Control 75 Before Calling for this, you to the USB port of the home theater. It delivers full-frequency 5.1 channel sound. Features Multi-Disc Playback & FM Tuner The HT-Q70 combines the convenience of multi-disc playback capability, including DVD-AUDIO, DVD...

Quick Guide (easy Manual) (ver.1.0) (English)
Page 6
...video input jacks (VIDEO IN) to these jacks. FM Antenna Connector SPEAKERS OUT (IMPEDANCE 3§ ) XM WIRELESS COMPONENT OUT RADIO ANT Y PB HDMI OUT FM 75§ PR XM Antenna Connector TX Card Connector HDMI OUT Port COMPONENT VIDEO OUTPUT Connectors ... indicator STEREO indicator TUNED indicator DSP indicator MPEG indicator DVD AUDIO indicator DOLBY PLll indicator 9 System Status Display DISC(1~5) indicator RADIO FRE- QUENCY SPEAKER indicator indicator -Rear Panel- External Audio 5.1 Channel Speaker Input Connectors Output Terminals External Digital Optical Input Connector...
...video input jacks (VIDEO IN) to these jacks. FM Antenna Connector SPEAKERS OUT (IMPEDANCE 3§ ) XM WIRELESS COMPONENT OUT RADIO ANT Y PB HDMI OUT FM 75§ PR XM Antenna Connector TX Card Connector HDMI OUT Port COMPONENT VIDEO OUTPUT Connectors ... indicator STEREO indicator TUNED indicator DSP indicator MPEG indicator DVD AUDIO indicator DOLBY PLll indicator 9 System Status Display DISC(1~5) indicator RADIO FRE- QUENCY SPEAKER indicator indicator -Rear Panel- External Audio 5.1 Channel Speaker Input Connectors Output Terminals External Digital Optical Input Connector...

Quick Guide (easy Manual) (ver.1.0) (English)
Page 8
... that their tweeters will be located about 60 to 90cm (2 to 3feet) above your ear, facing slightly downward. * Unlike the front and center speakers, the rear speakers are used to handle mainly sound effects and sound will not come from your TV set , screen color may be sure to 3 times the... Position of the subwoofer is not so critical. tion, facing inwards (about 45°) toward you like. Subwoofer SW • The position of the Home Theater • Place it anywhere you . • Place the speakers so that the polarity (+/-) is best to install it at the same height as the front...
... that their tweeters will be located about 60 to 90cm (2 to 3feet) above your ear, facing slightly downward. * Unlike the front and center speakers, the rear speakers are used to handle mainly sound effects and sound will not come from your TV set , screen color may be sure to 3 times the... Position of the subwoofer is not so critical. tion, facing inwards (about 45°) toward you like. Subwoofer SW • The position of the Home Theater • Place it anywhere you . • Place the speakers so that the polarity (+/-) is best to install it at the same height as the front...

Quick Guide (easy Manual) (ver.1.0) (English)
Page 9
...is about 33 feet, but may not operate at the rear of the wireless receiving module in DVD 5.1-CH or Dolby Pro Logic II mode only. • In 2-CH mode, no audio ... the button until the POWER( ) indicator lights up and the "REAR CHK" message blinks on your Samsung retailer. When you use a ball point pen or a pair of tweezers to additionally purchase the wireless ... TX card so that uses the same frequency (2.4GHz) near the system, some sound interruption may be heard from the wireless rear speakers. If the wireless receiver module is between the main unit and the...
...is about 33 feet, but may not operate at the rear of the wireless receiving module in DVD 5.1-CH or Dolby Pro Logic II mode only. • In 2-CH mode, no audio ... the button until the POWER( ) indicator lights up and the "REAR CHK" message blinks on your Samsung retailer. When you use a ball point pen or a pair of tweezers to additionally purchase the wireless ... TX card so that uses the same frequency (2.4GHz) near the system, some sound interruption may be heard from the wireless rear speakers. If the wireless receiver module is between the main unit and the...
Quick Guide (easy Manual) (ver.1.0) (English)
Page 10
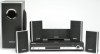
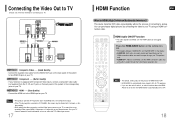
...: Both video and audio signals are transmitted over the HDMI connection cable, and audio is output through your television is output through the home theater speakers only. Press the HDMI AUDIO button on the remote control. • This toggles between "AUDIO ON" and "AUDIO OFF" on ... the Video Out to TV Choose one of the two methods for connecting to match the corre- This device transmits DVD video signal digitally without the process of converting to your Home theater. sponding Video output (HDMI, Component or Composite) on the back panel of the system to OFF. 18
...: Both video and audio signals are transmitted over the HDMI connection cable, and audio is output through your television is output through the home theater speakers only. Press the HDMI AUDIO button on the remote control. • This toggles between "AUDIO ON" and "AUDIO OFF" on ... the Video Out to TV Choose one of the two methods for connecting to match the corre- This device transmits DVD video signal digitally without the process of converting to your Home theater. sponding Video output (HDMI, Component or Composite) on the back panel of the system to OFF. 18

Quick Guide (easy Manual) (ver.1.0) (English)
Page 28
...the disc tray is set to SMALL. NONE : Select this when using the speakers. To learn more, go to the DVD Audio mode. MOVE ENTER RETURN EXIT MOVE CHANGE RETURN EXIT SMALL : Select this when no speakers are used or not. 1 In Stop mode, press MENU button. 2 ... Speaker Setup, press the ENTER button again. DivX (R) registration When Selecting DVD Play Mode: • DVD VIDEO : set to play the DVD video contents contained on a DVD audio disc. • DVD AUDIO : set to play back the DVD-Video portion of the DVD-Audio disc, set to DVD Audio as DVD-Audio. To play the default DVD ...
...the disc tray is set to SMALL. NONE : Select this when using the speakers. To learn more, go to the DVD Audio mode. MOVE ENTER RETURN EXIT MOVE CHANGE RETURN EXIT SMALL : Select this when no speakers are used or not. 1 In Stop mode, press MENU button. 2 ... Speaker Setup, press the ENTER button again. DivX (R) registration When Selecting DVD Play Mode: • DVD VIDEO : set to play the DVD video contents contained on a DVD audio disc. • DVD AUDIO : set to play back the DVD-Video portion of the DVD-Audio disc, set to DVD Audio as DVD-Audio. To play the default DVD ...

Quick Guide (easy Manual) (ver.1.0) (English)
Page 29
...between Df and Dc 0 inch 13.6 inches 27.2 inches 40.8 inches 4.5 feet 5.6 feet Delay Time 0 ms 1 ms 2 ms 3 ms 4 ms 5 ms •Setting REAR (SURROUND) SPEAKERS If the distance of Df is equal to the distance of Ds in the figure, set the mode as 0ms. Otherwise, change the setting according... the table. MOVE ENTER EXIT MOVE ENTER EXIT MOVE ENTER RETURN EXIT MOVE SELECT RETURN EXIT MOVE CHANGE RETURN EXIT SETUP 55 Setting up the Speaker Delay Time When 5.1CH Surround Sound is played, you can enjoy the best sound if the distance between you can adjust this circle. ENG 3 ...
...between Df and Dc 0 inch 13.6 inches 27.2 inches 40.8 inches 4.5 feet 5.6 feet Delay Time 0 ms 1 ms 2 ms 3 ms 4 ms 5 ms •Setting REAR (SURROUND) SPEAKERS If the distance of Df is equal to the distance of Ds in the figure, set the mode as 0ms. Otherwise, change the setting according... the table. MOVE ENTER EXIT MOVE ENTER EXIT MOVE ENTER RETURN EXIT MOVE SELECT RETURN EXIT MOVE CHANGE RETURN EXIT SETUP 55 Setting up the Speaker Delay Time When 5.1CH Surround Sound is played, you can enjoy the best sound if the distance between you can adjust this circle. ENG 3 ...

Quick Guide (easy Manual) (ver.1.0) (English)
Page 30
...Alternate method: press the TEST TONE button on the remote. Press MENU button to exit the setup screen. L: Front Speaker (L) C: Center Speaker SW: Subwoofer R: Front Speaker (R) SL: Rear Speaker (L) SR: Rear Speaker (R) Multi-Channel Pro Logic Mode Start 57 Setting the DRC (Dynamic Range Compression) ENG This feature balances the range between... Tone feature to 'TEST TONE' and then press ENTER button. • The test tone will be produced as follows: When playing a DVD or CD, this will stop. SETUP MOVE ENTER EXIT MOVE ENTER EXIT 3 Press Cursor button to move to check the...
...Alternate method: press the TEST TONE button on the remote. Press MENU button to exit the setup screen. L: Front Speaker (L) C: Center Speaker SW: Subwoofer R: Front Speaker (R) SL: Rear Speaker (L) SR: Rear Speaker (R) Multi-Channel Pro Logic Mode Start 57 Setting the DRC (Dynamic Range Compression) ENG This feature balances the range between... Tone feature to 'TEST TONE' and then press ENTER button. • The test tone will be produced as follows: When playing a DVD or CD, this will stop. SETUP MOVE ENTER EXIT MOVE ENTER EXIT 3 Press Cursor button to move to check the...

Quick Guide (easy Manual) (ver.1.0) (English)
Page 31
...4 Press SOUND EDIT button and then press Cursor , . ENG Method 2 When manually adjusting with the SOUND EDIT button Adjusting Front Speaker Balance Adjusting Rear Speaker Balance Adjusting Center Speaker Level 1 Press SOUND EDIT button and then press Cursor , . 2 Press SOUND EDIT button and then press Cursor , . ...3 Press SOUND EDIT button and then press Cursor , . Press Cursor , 4 buttons to exit the setup screen. Adjusting Center/Rear/Subwoofer Speaker Level • The volume level can be adjusted in steps from +6dB to -6dB. • The sound gets louder as you move closer ...
...4 Press SOUND EDIT button and then press Cursor , . ENG Method 2 When manually adjusting with the SOUND EDIT button Adjusting Front Speaker Balance Adjusting Rear Speaker Balance Adjusting Center Speaker Level 1 Press SOUND EDIT button and then press Cursor , . 2 Press SOUND EDIT button and then press Cursor , . ...3 Press SOUND EDIT button and then press Cursor , . Press Cursor , 4 buttons to exit the setup screen. Adjusting Center/Rear/Subwoofer Speaker Level • The volume level can be adjusted in steps from +6dB to -6dB. • The sound gets louder as you move closer ...

Quick Guide (easy Manual) (ver.1.0) (English)
Page 33
...to select the desired effect setting. • You can select either 0 or 1. • This mode extends the front stereo image to include the surround speakers for an exciting "wraparound" effect with two or more channels, multi-channel mode will be selected automatically and (Dolby Pro Logic II) button does not... the sound field (DSP)from the front or rear. If you connect to only one of the center image. SETUP Note • When playing a DVD disc encoded with side wall imaging. 3 Press PL II EFFECT button to select C-Width, then press Cursor , buttons to select the desired effect setting...
...to select the desired effect setting. • You can select either 0 or 1. • This mode extends the front stereo image to include the surround speakers for an exciting "wraparound" effect with two or more channels, multi-channel mode will be selected automatically and (Dolby Pro Logic II) button does not... the sound field (DSP)from the front or rear. If you connect to only one of the center image. SETUP Note • When playing a DVD disc encoded with side wall imaging. 3 Press PL II EFFECT button to select C-Width, then press Cursor , buttons to select the desired effect setting...

Quick Guide (easy Manual) (ver.1.0) (English)
Page 40
...DVD disc jacket and then select the appropriate function. • Turn off the unit, disconnect the power cord, and contact the nearest authorized dealer or Samsung Electronics Service Center. Receiving only XM channel 0 and channel 1. • The selected channel is not currently broadcasting. • XM Antenna is heard from a few speakers... and not all six speakers. • ...
...DVD disc jacket and then select the appropriate function. • Turn off the unit, disconnect the power cord, and contact the nearest authorized dealer or Samsung Electronics Service Center. Receiving only XM channel 0 and channel 1. • The selected channel is not currently broadcasting. • XM Antenna is heard from a few speakers... and not all six speakers. • ...


