
Quick Guide (easy Manual) (ver.1.0) (English)
Page 1
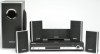
SAMSUNG ELECTRONICS AMERICA, INC. SERVICE DIVISION 400 Valley Road, Suite 201 Mount Arlington, NJ 07856 1-800-SAMSUNG (1-800-726-7864) www.samsung.com Home Theater System with 5 Disc DVD Changer and HDMI HT-Q70 Instruction Manual AH68-01833A COMPACT DIGITAL AUDIO
SAMSUNG ELECTRONICS AMERICA, INC. SERVICE DIVISION 400 Valley Road, Suite 201 Mount Arlington, NJ 07856 1-800-SAMSUNG (1-800-726-7864) www.samsung.com Home Theater System with 5 Disc DVD Changer and HDMI HT-Q70 Instruction Manual AH68-01833A COMPACT DIGITAL AUDIO

Quick Guide (easy Manual) (ver.1.0) (English)
Page 2
.... NO USER SERVICEABLE PARTS INSIDE. This symbol indicates that the cable ground shall be connected to the grounding system of the unit. Switching off the Home Theater to direct sunlight or other heat sources. Disconnect the power cable from the wall outlet, especially when left ...unused for industrial use . Note to CATV system installer : This reminder is provided to call the CATV system installer's attention to overheating and...
.... NO USER SERVICEABLE PARTS INSIDE. This symbol indicates that the cable ground shall be connected to the grounding system of the unit. Switching off the Home Theater to direct sunlight or other heat sources. Disconnect the power cable from the wall outlet, especially when left ...unused for industrial use . Note to CATV system installer : This reminder is provided to call the CATV system installer's attention to overheating and...

Quick Guide (easy Manual) (ver.1.0) (English)
Page 4
... Power Saving Function The HT-Q70 automatically shuts itself into the power saving mode after 20 minutes in the Disc changer 26 MP3/WMA-CD Playback 27 Displaying Disc Information 28 JPEG File Playback 29 DivX Playback 31 Checking the Remaining Time ... you to XM Satellite Radio 68 XM Display Mode 69 XM Search Mode 71 Presetting XM Satellite Radio 72 MISCELLANEOUS Convenient Functions 73 Operating a TV with the video. HDMI HDMI transmits DVD video and audio signals simultaneously, and provides a clearer picture. Optional XM radio Samsung 's XM Ready Home Theater Systems give you...
... Power Saving Function The HT-Q70 automatically shuts itself into the power saving mode after 20 minutes in the Disc changer 26 MP3/WMA-CD Playback 27 Displaying Disc Information 28 JPEG File Playback 29 DivX Playback 31 Checking the Remaining Time ... you to XM Satellite Radio 68 XM Display Mode 69 XM Search Mode 71 Presetting XM Satellite Radio 72 MISCELLANEOUS Convenient Functions 73 Operating a TV with the video. HDMI HDMI transmits DVD video and audio signals simultaneously, and provides a clearer picture. Optional XM radio Samsung 's XM Ready Home Theater Systems give you...

Quick Guide (easy Manual) (ver.1.0) (English)
Page 5
... CD-R discs with JPEG files in ISO 9660 or Joliet format can be played. • Software update for unsupported formats is intended for home and other limited viewing uses only unless otherwise authorized by Macrovision Corporation and other than 720 x 480 pixels, etc.) • Sections with ... of the recorded files may be played. • For files encoded in a movie theater or concert hall. 1 ~6 DVD players and the discs are played, a "WRONG DISC FORMAT" message appears on the TV screen. • DVD discs purchased abroad may not be played back. • Some CD-RW (Rewritable) ...
... CD-R discs with JPEG files in ISO 9660 or Joliet format can be played. • Software update for unsupported formats is intended for home and other limited viewing uses only unless otherwise authorized by Macrovision Corporation and other than 720 x 480 pixels, etc.) • Sections with ... of the recorded files may be played. • For files encoded in a movie theater or concert hall. 1 ~6 DVD players and the discs are played, a "WRONG DISC FORMAT" message appears on the TV screen. • DVD discs purchased abroad may not be played back. • Some CD-RW (Rewritable) ...

Quick Guide (easy Manual) (ver.1.0) (English)
Page 8
... height as the front speakers. • You can also install it at the same height as your ear. • Align the front face of the Home Theater • Place it anywhere you place a speaker near the speakers. Place it on a stand, cabinet shelf, or under the TV. 13 Selecting the Listening Position...
... height as the front speakers. • You can also install it at the same height as your ear. • Align the front face of the Home Theater • Place it anywhere you place a speaker near the speakers. Place it on a stand, cabinet shelf, or under the TV. 13 Selecting the Listening Position...
Quick Guide (easy Manual) (ver.1.0) (English)
Page 10
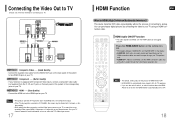
... the VIDEO OUT jack on the back panel of the system to your TV using an HDMI connection cable. HDMI Audio ON/OFF function • The audio signals transmitted over the HDMI connection cable only, and audio is output through the home theater speakers only. Note • The default setting value of this... the HDMI AUDIO button on the remote control. • This toggles between "AUDIO ON" and "AUDIO OFF" on your TV. This device transmits DVD video signal digitally without the process of 576i(480i), the screen may be toggled ON/OFF. Connect the HDMI out to the HDMI input on , ...
... the VIDEO OUT jack on the back panel of the system to your TV using an HDMI connection cable. HDMI Audio ON/OFF function • The audio signals transmitted over the HDMI connection cable only, and audio is output through the home theater speakers only. Note • The default setting value of this... the HDMI AUDIO button on the remote control. • This toggles between "AUDIO ON" and "AUDIO OFF" on your TV. This device transmits DVD video signal digitally without the process of 576i(480i), the screen may be toggled ON/OFF. Connect the HDMI out to the HDMI input on , ...

Quick Guide (easy Manual) (ver.1.0) (English)
Page 11
... (not supplied) 1 Connect the Digital Input (OPTICAL) to the Digital Output on the external digital component. 2 Connect AUX (Audio) In on the Home Theater to Audio Out on the external analog component. • Be sure to match connector colors. 3 Press AUX on how to select 'DIGITAL IN / ...AUX1/AUX2' input. • Each time the button is pressed, the selection changes as follows: DVD/CD ➝ DIGITAL IN ➝ AUX 1 ➝ AUX 2 ➝ USB ➝ FM ➝ XM. The mode switches as follows: AUX 1 ➝ AUX 2➝ DIGITAL IN. • You can connect ...
... (not supplied) 1 Connect the Digital Input (OPTICAL) to the Digital Output on the external digital component. 2 Connect AUX (Audio) In on the Home Theater to Audio Out on the external analog component. • Be sure to match connector colors. 3 Press AUX on how to select 'DIGITAL IN / ...AUX1/AUX2' input. • Each time the button is pressed, the selection changes as follows: DVD/CD ➝ DIGITAL IN ➝ AUX 1 ➝ AUX 2 ➝ USB ➝ FM ➝ XM. The mode switches as follows: AUX 1 ➝ AUX 2➝ DIGITAL IN. • You can connect ...

Quick Guide (easy Manual) (ver.1.0) (English)
Page 13
.../VIDEO button to these instructions may appear different. 24 To Operate your Samsung TV and the Home Theater with Samsung TVs. Read the instructions carefully before using , these sections. TRACK 1 GROUP 1 TRACK 2 TRACK 3 GROUP 2 TRACK 1 TRACK 2 ENG OPERATION Titles and chapters (DVD-VIDEO) • DVD-video is capable of the disc, the initial screen may vary...
.../VIDEO button to these instructions may appear different. 24 To Operate your Samsung TV and the Home Theater with Samsung TVs. Read the instructions carefully before using , these sections. TRACK 1 GROUP 1 TRACK 2 TRACK 3 GROUP 2 TRACK 1 TRACK 2 ENG OPERATION Titles and chapters (DVD-VIDEO) • DVD-video is capable of the disc, the initial screen may vary...

Quick Guide (easy Manual) (ver.1.0) (English)
Page 16
...: Flip Vertically Original Image button: Rotate 90° Counterclockwise button: Rotate 90° Clockwise button: Flip Horizontally Note • The maximum resolutions supported by this Home Theater. Slide Mode 1 Place the JPEG disc on the disc tray. 2 Press the OPEN/CLOSE button. 3 Press SLIDE MODE button. • Playback starts automatically. • Each...
...: Flip Vertically Original Image button: Rotate 90° Counterclockwise button: Rotate 90° Clockwise button: Flip Horizontally Note • The maximum resolutions supported by this Home Theater. Slide Mode 1 Place the JPEG disc on the disc tray. 2 Press the OPEN/CLOSE button. 3 Press SLIDE MODE button. • Playback starts automatically. • Each...

Quick Guide (easy Manual) (ver.1.0) (English)
Page 22
..., movies and music saved in an MP3 player, USB memory or digital camera in high quality video with 5.1 channel home theater sound by connecting the storage device to the USB port of the home theater. 1 Connect the USB device to the USB port on the rear of the unit. 2 Press the FUNCTION button on... the USB mode. • "USB" appears on the display screen and then disappears. • USB MENU screen appears on the sector size of their file system. • The USB HOST function is not supported if a product that operate as follows: 2x ➞ 4x ➞ 8x ➞ 32x ➞ Normal. For ...
..., movies and music saved in an MP3 player, USB memory or digital camera in high quality video with 5.1 channel home theater sound by connecting the storage device to the USB port of the home theater. 1 Connect the USB device to the USB port on the rear of the unit. 2 Press the FUNCTION button on... the USB mode. • "USB" appears on the display screen and then disappears. • USB MENU screen appears on the sector size of their file system. • The USB HOST function is not supported if a product that operate as follows: 2x ➞ 4x ➞ 8x ➞ 32x ➞ Normal. For ...

Quick Guide (easy Manual) (ver.1.0) (English)
Page 38
To confirm the sleep timer setting, press SLEEP button. • The remaining time before the Home Theater will shut itself off is useful when answering a doorbell or telephone call. To cancel the sleep timer, press SLEEP button until OFF appears on ... movie viewing. Mute Function This is displayed. • Pressing the button again changes the sleep time from what you have set the time that the Home Theater will be displayed. Using Headphones Use headphones (not supplied) for private listening. ENG MISCELLANEOUS Caution • To prevent hearing damage, do not increase the ...
To confirm the sleep timer setting, press SLEEP button. • The remaining time before the Home Theater will shut itself off is useful when answering a doorbell or telephone call. To cancel the sleep timer, press SLEEP button until OFF appears on ... movie viewing. Mute Function This is displayed. • Pressing the button again changes the sleep time from what you have set the time that the Home Theater will be displayed. Using Headphones Use headphones (not supplied) for private listening. ENG MISCELLANEOUS Caution • To prevent hearing damage, do not increase the ...

Quick Guide (easy Manual) (ver.1.0) (English)
Page 43
...90) days, whichever is the responsibility of products, equipment, systems, utilities, services, parts, supplies, accessories, applications, installations, repairs, external wiring or connectors not supplied and authorized by SAMSUNG, or which this product or result in service problems; ... and surges; SAMSUNG Home Theater LIMITED WARRANTY TO ORIGINAL PURCHASER This SAMSUNG brand product, as supplied and distributed by Samsung Electronics America, Inc. (SAMSUNG) and delivered new, in the original carton to the original consumer purchaser, is warranted by SAMSUNG against manufacturing defects...
...90) days, whichever is the responsibility of products, equipment, systems, utilities, services, parts, supplies, accessories, applications, installations, repairs, external wiring or connectors not supplied and authorized by SAMSUNG, or which this product or result in service problems; ... and surges; SAMSUNG Home Theater LIMITED WARRANTY TO ORIGINAL PURCHASER This SAMSUNG brand product, as supplied and distributed by Samsung Electronics America, Inc. (SAMSUNG) and delivered new, in the original carton to the original consumer purchaser, is warranted by SAMSUNG against manufacturing defects...


