Quick Guide (easy Manual) (ver.1.0) (English)
Page 3
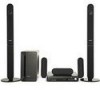
...Audio Language Selection Function 41 Subtitle Language Selection Function 41 Moving Directly to the USB port of the Home Theater. Customized TV Screen Display The HT-X70/HT-TX72/HT-TX75 allows you can adjust the audio delay time to Radio 59 XM Satellite Radio 61 Convenient ... Samsung logo appears on the TV screen. The HT-X70/HT-TX72/HT-TX75 will automatically shut off after 20 minutes in terms of DVD-Audio. The on an MP3 player, digital camera or USB memory stick by Digital Theater Systems Inc. It delivers full-frequency 5.1 channel sound. HDMI HDMI transmits DVD ...
...Audio Language Selection Function 41 Subtitle Language Selection Function 41 Moving Directly to the USB port of the Home Theater. Customized TV Screen Display The HT-X70/HT-TX72/HT-TX75 allows you can adjust the audio delay time to Radio 59 XM Satellite Radio 61 Convenient ... Samsung logo appears on the TV screen. The HT-X70/HT-TX72/HT-TX75 will automatically shut off after 20 minutes in terms of DVD-Audio. The on an MP3 player, digital camera or USB memory stick by Digital Theater Systems Inc. It delivers full-frequency 5.1 channel sound. HDMI HDMI transmits DVD ...
Quick Guide (easy Manual) (ver.1.0) (English)
Page 5
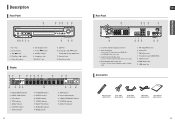
DOLBY DIGITAL indicator 2. Cooling Fan 7. HDMI Output Jack 11. Disc Tray 2. Power ( ) button 8. Volume Control 14. PROGRAM indicator 9. Component Video Output Jacks Connect a TV with Component video inputs to connect...) 9. AUX IN 2 Jacks 10. USB Port 12. DTS indicator 4. TRACK indicator 16 8. TUNED indicator 11. DVD AUDIO indicator 14. MPEG indicator 8 17 18 19 15. System Status Display 17. FM 75Ω COAXIAL Jack 6. HDMI Input Jack Accessories Remote Control (AH59-01778J) Video Cable (AH39-40001V) Audio Cable (AH39-00954A) FM Antenna...
DOLBY DIGITAL indicator 2. Cooling Fan 7. HDMI Output Jack 11. Disc Tray 2. Power ( ) button 8. Volume Control 14. PROGRAM indicator 9. Component Video Output Jacks Connect a TV with Component video inputs to connect...) 9. AUX IN 2 Jacks 10. USB Port 12. DTS indicator 4. TRACK indicator 16 8. TUNED indicator 11. DVD AUDIO indicator 14. MPEG indicator 8 17 18 19 15. System Status Display 17. FM 75Ω COAXIAL Jack 6. HDMI Input Jack Accessories Remote Control (AH59-01778J) Video Cable (AH39-40001V) Audio Cable (AH39-00954A) FM Antenna...
Quick Guide (easy Manual) (ver.1.0) (English)
Page 10
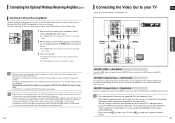
... Video Out to the DVD Player, you can operate the Home Theater using the TV's remote control. If your TV owner's manual for connecting to press the RESET button on the back of the wireless receiver module blinks 2 Times. 3 Turn on your Home theater. Reset the system while the main unit ... After making the video connection, set the Video input source on your TV to the HDMI IN jack on the main unit. If a steel-concrete wall or metallic wall is equipped with SAMSUNG TVs that support Anynet+(HDMI-CEC). • Please check the logo. METHOD 3 : Composite Video ....... (Good Quality...
... Video Out to the DVD Player, you can operate the Home Theater using the TV's remote control. If your TV owner's manual for connecting to press the RESET button on the back of the wireless receiver module blinks 2 Times. 3 Turn on your Home theater. Reset the system while the main unit ... After making the video connection, set the Video input source on your TV to the HDMI IN jack on the main unit. If a steel-concrete wall or metallic wall is equipped with SAMSUNG TVs that support Anynet+(HDMI-CEC). • Please check the logo. METHOD 3 : Composite Video ....... (Good Quality...
Quick Guide (easy Manual) (ver.1.0) (English)
Page 11
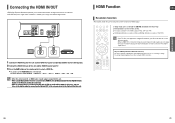
... the user to this unit. Connecting the HDMI IN/OUT HDMI (High-Definition Multimedia Interface) is an interface that enables the digital transmission of converting to select . The mode switches as follows: DVD/CD ➝ DIGITAL IN ➝ AUX 1 ➝ AUX 2 ➝ HDMI IN ➝ USB ➝ FM &#... AUX button on the remote control to analog. In addition, it enables you will not be output. s Resolutions available for HDMI output. This device transmits a DVD video signal digitally without the process of video and audio data with just a single cable. s You can listen to the ...
... the user to this unit. Connecting the HDMI IN/OUT HDMI (High-Definition Multimedia Interface) is an interface that enables the digital transmission of converting to select . The mode switches as follows: DVD/CD ➝ DIGITAL IN ➝ AUX 1 ➝ AUX 2 ➝ HDMI IN ➝ USB ➝ FM &#... AUX button on the remote control to analog. In addition, it enables you will not be output. s Resolutions available for HDMI output. This device transmits a DVD video signal digitally without the process of video and audio data with just a single cable. s You can listen to the ...
Quick Guide (easy Manual) (ver.1.0) (English)
Page 12
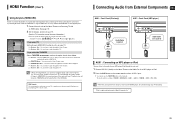
... TV, you must have a digital optical cable connected from an MP3 player/iPod through the Home Theater. The mode switches as follows : DVD/CD ➝ DIGITAL IN ➝ AUX 1 ➝ AUX 2 ➝ HDMI IN ➝ USB ➝ FM ➝ XM. • When the unit is ...pressing the Play button on your Samsung TV's remote control. s : If Anynet+(HDMI-CEC) set the option of the Home Theater to a Samsung TV with your Samsung TV's remote control, Anynet + can be displayed. s You can listen to audio through the TV. HDMI Function (Con't) Using Anynet+(HDMI-CEC) Anynet+ is a function ...
... TV, you must have a digital optical cable connected from an MP3 player/iPod through the Home Theater. The mode switches as follows : DVD/CD ➝ DIGITAL IN ➝ AUX 1 ➝ AUX 2 ➝ HDMI IN ➝ USB ➝ FM ➝ XM. • When the unit is ...pressing the Play button on your Samsung TV's remote control. s : If Anynet+(HDMI-CEC) set the option of the Home Theater to a Samsung TV with your Samsung TV's remote control, Anynet + can be displayed. s You can listen to audio through the TV. HDMI Function (Con't) Using Anynet+(HDMI-CEC) Anynet+ is a function ...
Quick Guide (easy Manual) (ver.1.0) (English)
Page 13
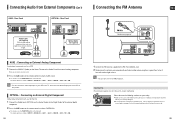
s You can also use the FUNCTION button on the Home Theater to the Audio Out of the VCR to select . The mode switches as follows : DVD/CD ➝ DIGITAL IN ➝ AUX 1 ➝ AUX 2 ➝ HDMI IN ➝ USB ➝ FM ➝ XM. 24 1 Connect the FM antenna supplied to the... (Audio) on the main unit. The mode switches as follows : DVD/CD ➝ DIGITAL IN ➝ AUX 1 ➝ AUX 2 ➝ HDMI IN ➝ USB ➝ FM ➝ XM. • You can also use the FUNCTION button on the Home Theater to a wall or other rigid surface. • This unit does ...
s You can also use the FUNCTION button on the Home Theater to the Audio Out of the VCR to select . The mode switches as follows : DVD/CD ➝ DIGITAL IN ➝ AUX 1 ➝ AUX 2 ➝ HDMI IN ➝ USB ➝ FM ➝ XM. 24 1 Connect the FM antenna supplied to the... (Audio) on the main unit. The mode switches as follows : DVD/CD ➝ DIGITAL IN ➝ AUX 1 ➝ AUX 2 ➝ HDMI IN ➝ USB ➝ FM ➝ XM. • You can also use the FUNCTION button on the Home Theater to a wall or other rigid surface. • This unit does ...

Quick Guide (easy Manual) (ver.1.0) (English)
Page 16
...) button to the next slide. s The selected image is played for progressive image files. • If a JPEG file is played when the HDMI output resolution is 720p/1080i, the mode is pressed, the slide moves backward or forward. To view the previous or next 9 images, press the...Vertically Original Image button: Rotate 90° Counterclockwise button: Rotate 90° Clockwise button: Flip Horizontally • The maximum resolutions supported by this Home Theater. s The appearance of the menu. Each image is displayed for 5 seconds and then the next image is in Stop mode and select a...
...) button to the next slide. s The selected image is played for progressive image files. • If a JPEG file is played when the HDMI output resolution is 720p/1080i, the mode is pressed, the slide moves backward or forward. To view the previous or next 9 images, press the...Vertically Original Image button: Rotate 90° Counterclockwise button: Rotate 90° Clockwise button: Flip Horizontally • The maximum resolutions supported by this Home Theater. s The appearance of the menu. Each image is displayed for 5 seconds and then the next image is in Stop mode and select a...
Quick Guide (easy Manual) (ver.1.0) (English)
Page 24
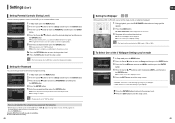
... button to exit the setup screen. Press the EXIT button to exit the setup screen. When playing DVDs recorded in different screen sizes, you have a widescreen TV. 4:3PS (4:3 Pan&Scan) Select this to... language codes) AUDIO, SUBTITLE and DISC MENU language can enjoy the widescreen aspect. • If a DVD is in the 4:3 ratio, you can see the central portion of the screen only (with the sides...Setting the Language OSD (On-Screen Display) language is set it in widescreen. • Since DVD discs are recorded in various image formats, they will look different depending on the software, the ...
... button to exit the setup screen. Press the EXIT button to exit the setup screen. When playing DVDs recorded in different screen sizes, you have a widescreen TV. 4:3PS (4:3 Pan&Scan) Select this to... language codes) AUDIO, SUBTITLE and DISC MENU language can enjoy the widescreen aspect. • If a DVD is in the 4:3 ratio, you can see the central portion of the screen only (with the sides...Setting the Language OSD (On-Screen Display) language is set it in widescreen. • Since DVD discs are recorded in various image formats, they will look different depending on the software, the ...
Quick Guide (easy Manual) (ver.1.0) (English)
Page 25
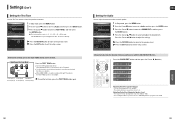
...the ENTER button. 4 Press the Cursor , button to 3 wallpaper settings. • This function will erase all settings will be taken to set the Samsung Logo image as background wallpaper. Do not use this unless necessary. ) button for the Parental (rating level) setting. To Select One of the 3 ...password, a new password, and confirm new password. Using the RESET function will not work when the HDMI output is 720p or 1080i. appears on 48 ENG Setting the Wallpaper DVD JPEG While watching a DVD or JPEG CD, you can set to "7890" by default. Press the RETURN button to return...
...the ENTER button. 4 Press the Cursor , button to 3 wallpaper settings. • This function will erase all settings will be taken to set the Samsung Logo image as background wallpaper. Do not use this unless necessary. ) button for the Parental (rating level) setting. To Select One of the 3 ...password, a new password, and confirm new password. Using the RESET function will not work when the HDMI output is 720p or 1080i. appears on 48 ENG Setting the Wallpaper DVD JPEG While watching a DVD or JPEG CD, you can set to "7890" by default. Press the RETURN button to return...
Quick Guide (easy Manual) (ver.1.0) (English)
Page 27
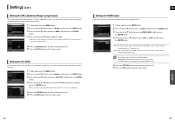
s When HDMI AUDIO is on the remote. Press the Cursor , button to check the speaker connections. Manually Adjusting the Speaker Volume and Balance with the SOUND EDIT ... Audio You can select between 00, -06, and OFF. • The volume decreases as you move closer to +6dB and quieter as follows: When playing a DVD or CD, this will be adjusted in steps from +6dB to -6dB. • The sound gets louder as you move closer to -6. Press the EXIT...
s When HDMI AUDIO is on the remote. Press the Cursor , button to check the speaker connections. Manually Adjusting the Speaker Volume and Balance with the SOUND EDIT ... Audio You can select between 00, -06, and OFF. • The volume decreases as you move closer to +6dB and quieter as follows: When playing a DVD or CD, this will be adjusted in steps from +6dB to -6dB. • The sound gets louder as you move closer to -6. Press the EXIT...
Quick Guide (easy Manual) (ver.1.0) (English)
Page 28
... press the ENTER button. MOVE SELECT RETURN EXIT • ON : Both video and audio signals are transmitted over the HDMI connection cable, and audio is output through the home theater speakers only. • The default setting of this occurs, adjust the audio delay time to to enjoy Dolby Digital sound...When the Cursor button is pressed, the effect is greater, and when the Cursor button is pressed, the effect is not available when using the HDMI IN function. Settings (Con't) Setting the DRC (Dynamic Range Compression) This feature balances the range between 0 ms and 300 ms. Set it is...
... press the ENTER button. MOVE SELECT RETURN EXIT • ON : Both video and audio signals are transmitted over the HDMI connection cable, and audio is output through the home theater speakers only. • The default setting of this occurs, adjust the audio delay time to to enjoy Dolby Digital sound...When the Cursor button is pressed, the effect is greater, and when the Cursor button is pressed, the effect is not available when using the HDMI IN function. Settings (Con't) Setting the DRC (Dynamic Range Compression) This feature balances the range between 0 ms and 300 ms. Set it is...


