
Safety Guide (ENGLISH)
Page 5
... between the equipment and receiver. -- Consult the dealer or an experienced radio/TV technician for Interference (VCCI) - User Information Changes or modifications not expressly approved by turning the equipment off and on a circuit different from the U.S. If necessary, consult... limits are designed to radio communications. This device may not cause harmful interference, and 2. Regulatory Compliance Statements Your Samsung product compliance class is a detachable power supply cord with IEC320 style terminations. Voluntary Control Council for help. This equipment...
... between the equipment and receiver. -- Consult the dealer or an experienced radio/TV technician for Interference (VCCI) - User Information Changes or modifications not expressly approved by turning the equipment off and on a circuit different from the U.S. If necessary, consult... limits are designed to radio communications. This device may not cause harmful interference, and 2. Regulatory Compliance Statements Your Samsung product compliance class is a detachable power supply cord with IEC320 style terminations. Voluntary Control Council for help. This equipment...
User Manual (ENGLISH)
Page 4
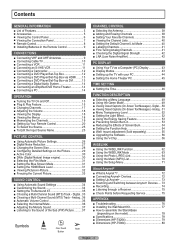
... Tuning Analog Channels 41 ■ Checking the Digital-Signal Strength 42 ■ LNA (Low Noise Amplifier 42 PC DISPLAY ■ Using Your TV as a Computer (PC) Display 43 ■ Display Modes 43 ■ Setting up the TV with your PC 44 ■ Setting the Home Theater PC ... ■ Connecting a Digital Audio System 14 ■ Connecting an Amplifier/DVD Home Theater 14 ■ Connecting a PC 14 OPERATION ■ Turning the TV On and Off 15 ■ Plug & Play Feature 15 ■ Changing Channels 17 ■ Adjusting the Volume 18 ■ Viewing the Display 18 ...
... Tuning Analog Channels 41 ■ Checking the Digital-Signal Strength 42 ■ LNA (Low Noise Amplifier 42 PC DISPLAY ■ Using Your TV as a Computer (PC) Display 43 ■ Display Modes 43 ■ Setting up the TV with your PC 44 ■ Setting the Home Theater PC ... ■ Connecting a Digital Audio System 14 ■ Connecting an Amplifier/DVD Home Theater 14 ■ Connecting a PC 14 OPERATION ■ Turning the TV On and Off 15 ■ Plug & Play Feature 15 ■ Changing Channels 17 ■ Adjusting the Volume 18 ■ Viewing the Display 18 ...
User Manual (ENGLISH)
Page 5
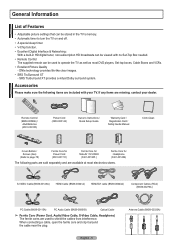
General Information List of Features • Adjustable picture settings that can be stored in the TV's memory. • Automatic timer to turn the TV on and off. • A special sleep timer. • V-Chip function. • Excellent Digital Interface & Networking : With a built-in HD ...digital tuner, non-subscription HD broadcasts can be used to operate the TV as well as most electronics stores. Accessories ...
General Information List of Features • Adjustable picture settings that can be stored in the TV's memory. • Automatic timer to turn the TV on and off. • A special sleep timer. • V-Chip function. • Excellent Digital Interface & Networking : With a built-in HD ...digital tuner, non-subscription HD broadcasts can be used to operate the TV as well as most electronics stores. Accessories ...
User Manual (ENGLISH)
Page 6
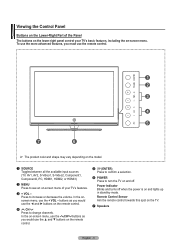
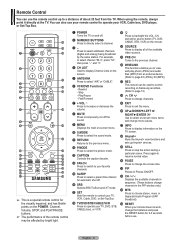
... would use the remote control. ➢ The product color and shape may vary depending on the model. 1 SOURCE Toggles between all the available input sources (TV, AV1, AV2, S-Video1, S-Video2, Component1, Component2, PC, HDMI1, HDMI2, or HDMI3). 2 MENU Press to change channels. In the onscreen menu, use ...3 + VOL - buttons as you would use the + VOL - Power Indicator Blinks and turns off . Remote Control Sensor Aim the remote control towards this spot on the TV. 7 Speakers English - 6 Press to turn the TV on and off when the power is on and lights up in stand-by mode. In...
... would use the remote control. ➢ The product color and shape may vary depending on the model. 1 SOURCE Toggles between all the available input sources (TV, AV1, AV2, S-Video1, S-Video2, Component1, Component2, PC, HDMI1, HDMI2, or HDMI3). 2 MENU Press to change channels. In the onscreen menu, use ...3 + VOL - buttons as you would use the + VOL - Power Indicator Blinks and turns off . Remote Control Sensor Aim the remote control towards this spot on the TV. 7 Speakers English - 6 Press to turn the TV on and off when the power is on and lights up in stand-by mode. In...
User Manual (ENGLISH)
Page 8
... select on-screen menu items and change the screen size. Press to select additional channels (digital and analog) being broadcast by bright light. 1 POWER Turns the TV on the remote. ) SOURCE Press to directly select a channel. 3 - Press to increase or decrease the volume. 8 MUTE Press to temporarily cut... remote control to operate your favorite channels. % SLEEP Press to select a preset time interval for the visually impaired, and has Braille points on Samsung recorders. (Refer to page 74) d CH Press to change channels in the PIP window only.) m MTS Press to your VCR, Cable box...
... select on-screen menu items and change the screen size. Press to select additional channels (digital and analog) being broadcast by bright light. 1 POWER Turns the TV on the remote. ) SOURCE Press to directly select a channel. 3 - Press to increase or decrease the volume. 8 MUTE Press to temporarily cut... remote control to operate your favorite channels. % SLEEP Press to select a preset time interval for the visually impaired, and has Braille points on Samsung recorders. (Refer to page 74) d CH Press to change channels in the PIP window only.) m MTS Press to your VCR, Cable box...
User Manual (ENGLISH)
Page 15
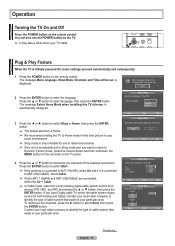
...then press the ENTER button. ➢ The default selection is Home. ➢ We recommend setting the TV to memorize the channels of cable system that exists in your particular area. Plug & Play Select the ... button. Start 2 Press the ENTER button to memorize. The message Select Home Mode when installing this TV at home. Contact your local cable company to select Start, then press the ENTER button. Analog STD..., Shop Mode, Channels and Time will be set . Operation Turning the TV On and Off Press the POWER button on the TV. ➢ It may take a while when your...
...then press the ENTER button. ➢ The default selection is Home. ➢ We recommend setting the TV to memorize the channels of cable system that exists in your particular area. Plug & Play Select the ... button. Start 2 Press the ENTER button to memorize. The message Select Home Mode when installing this TV at home. Contact your local cable company to select Start, then press the ENTER button. Analog STD..., Shop Mode, Channels and Time will be set . Operation Turning the TV On and Off Press the POWER button on the TV. ➢ It may take a while when your...

User Manual (ENGLISH)
Page 18
... of the five icons. The main menu appears on the remote control. Adjusting the Volume Using the Volume Buttons 1 Press the VOL + or VOL - The TV will appear in the lower-left side has five icons: Picture, Sound, Channel, Setup, Input. 2 Use the ▲ or ▼ button to select one minute... ▼ More Move Enter Exit English - 18 The word "Mute" will display the channel, the type of sound, and the status of the screen. 2 To turn mute off . Air 28 Mono Picture Mode : Dynamic Sound Mode : Custom MTS : Stereo 12 : 00 am Viewing the Menus 1 With the power on -screen menu...
... of the five icons. The main menu appears on the remote control. Adjusting the Volume Using the Volume Buttons 1 Press the VOL + or VOL - The TV will appear in the lower-left side has five icons: Picture, Sound, Channel, Setup, Input. 2 Use the ▲ or ▼ button to select one minute... ▼ More Move Enter Exit English - 18 The word "Mute" will display the channel, the type of sound, and the status of the screen. 2 To turn mute off . Air 28 Mono Picture Mode : Dynamic Sound Mode : Custom MTS : Stereo 12 : 00 am Viewing the Menus 1 With the power on -screen menu...
User Manual (ENGLISH)
Page 20
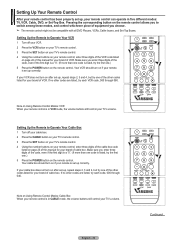
...modes, and control whichever piece of VCR. Setting Up the Remote to Operate Your Cable Box 1 Turn off your VCR. 2 Press the VCR button on your TV's remote control. 3 Press the SET button on your TV's remote control. 4 Using the number buttons on your remote control, enter three digits of the ...VCR mode, the volume buttons still control your brand of equipment you to Operate Your VCR 1 Turn off your cable box. 2 Press the CABLE button on your TV's remote control. 3 Press the SET button on your TV's remote control. 4 Using the number buttons on your remote control, enter three digits of the...
...modes, and control whichever piece of VCR. Setting Up the Remote to Operate Your Cable Box 1 Turn off your VCR. 2 Press the VCR button on your TV's remote control. 3 Press the SET button on your TV's remote control. 4 Using the number buttons on your remote control, enter three digits of the ...VCR mode, the volume buttons still control your brand of equipment you to Operate Your VCR 1 Turn off your cable box. 2 Press the CABLE button on your TV's remote control. 3 Press the SET button on your TV's remote control. 4 Using the number buttons on your remote control, enter three digits of the...
User Manual (ENGLISH)
Page 21
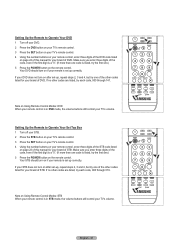
.... English - 21 If no other codes are listed, try the first one code is in DVD mode, the volume buttons still control your TV's volume. Your STB should turn on if your remote is listed, try each code, 000 through 074. Make sure you enter three digits of the code, even if... the POWER button on the remote control. Setting Up the Remote to Operate Your Set Top Box 1 Turn off your DVD. 2 Press the DVD button on your TV's remote control. 3 Press the SET button on your TV's remote control. 4 Using the number buttons on your remote control, enter three digits of the DVD...
.... English - 21 If no other codes are listed, try the first one code is in DVD mode, the volume buttons still control your TV's volume. Your STB should turn on if your remote is listed, try each code, 000 through 074. Make sure you enter three digits of the code, even if... the POWER button on the remote control. Setting Up the Remote to Operate Your Set Top Box 1 Turn off your DVD. 2 Press the DVD button on your TV's remote control. 3 Press the SET button on your TV's remote control. 4 Using the number buttons on your remote control, enter three digits of the DVD...
User Manual (ENGLISH)
Page 25
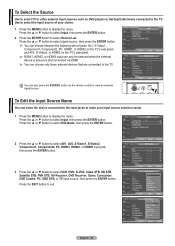
..., S-Video1, Component1, Component2, PC, HDMI1, or HDMI2 on the TV's rear panel and AV2, S-Video2, or HDMI3 on the TV's side panel. ➢ HDMI1, HDMI2, or HDMI3 input can only be selected when the external device is turned on the remote control to display the menu. Press the ▲ ...or ▼ button to the TV. T V Input Source List : TV ► Edit Name ► WISELINK Anynet+ (HDMI-CEC) 2 Press the ▲ or ...
..., S-Video1, Component1, Component2, PC, HDMI1, or HDMI2 on the TV's rear panel and AV2, S-Video2, or HDMI3 on the TV's side panel. ➢ HDMI1, HDMI2, or HDMI3 input can only be selected when the external device is turned on the remote control to display the menu. Press the ▲ ...or ▼ button to the TV. T V Input Source List : TV ► Edit Name ► WISELINK Anynet+ (HDMI-CEC) 2 Press the ▲ or ...
User Manual (ENGLISH)
Page 30
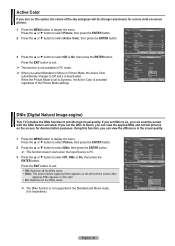
...: Cool1 Detailed Settings Size : 16:9 Digital NR : Auto Active Color : OOnff DNIe : OOnn Reset : OK Move Enter Return DNIe (Digital Natural Image engine) This TV includes the DNIe function to exit. • Off: Switches off the DNIe mode. • DNIe: The screen before applying DNIe appears on the left and... a more vivid on-screen picture. 1 Press the MENU button to display the menu. When the Picture Mode is set the DNIe to Demo, you turn on this function, you can view the difference in the Standard and Movie mode. (It is activated regardless of the sky and grass will be...
...: Cool1 Detailed Settings Size : 16:9 Digital NR : Auto Active Color : OOnff DNIe : OOnn Reset : OK Move Enter Return DNIe (Digital Natural Image engine) This TV includes the DNIe function to exit. • Off: Switches off the DNIe mode. • DNIe: The screen before applying DNIe appears on the left and... a more vivid on-screen picture. 1 Press the MENU button to display the menu. When the Picture Mode is set the DNIe to Demo, you turn on this function, you can view the difference in the Standard and Movie mode. (It is activated regardless of the sky and grass will be...
User Manual (ENGLISH)
Page 32
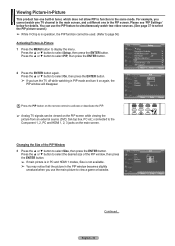
...You may notice that the picture in the PIP window becomes slightly unnatural when you turn the TV off while watching in PIP mode and turn it on the main screen. Press the ▲ or ▼ button to... select On, then press the ENTER button. ➢ If you use the PIP feature to simultaneously watch one TV channel... PIP function cannot be viewed on the remote control to activate or deactivate the PIP. ➢ Analog TV signals can use the main picture to select Size, then press the ENTER button. Please see 'PIP ...
...You may notice that the picture in the PIP window becomes slightly unnatural when you turn the TV off while watching in PIP mode and turn it on the main screen. Press the ▲ or ▼ button to... select On, then press the ENTER button. ➢ If you use the PIP feature to simultaneously watch one TV channel... PIP function cannot be viewed on the remote control to activate or deactivate the PIP. ➢ Analog TV signals can use the main picture to select Size, then press the ENTER button. Please see 'PIP ...
User Manual (ENGLISH)
Page 43
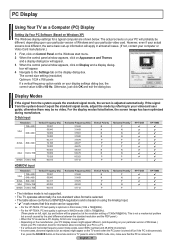
...as a PC display, 32-bit color is supported. • Depending on the manufacturer, your PC display screen might appear on the TV screen when the PC power is turned off (or if the PC is disconnected). Otherwise, just click OK and exit the dialog box. For the display modes listed below... no video. If the signal from the system equals the standard signal mode, the screen is adjusted automatically. English - 43 PC Display Using Your TV as a Computer (PC) Display Setting Up Your PC Software (Based on Windows XP) The Windows display-settings for information about connecting your PC to...
...as a PC display, 32-bit color is supported. • Depending on the manufacturer, your PC display screen might appear on the TV screen when the PC power is turned off (or if the PC is disconnected). Otherwise, just click OK and exit the dialog box. For the display modes listed below... no video. If the signal from the system equals the standard signal mode, the screen is adjusted automatically. English - 43 PC Display Using Your TV as a Computer (PC) Display Setting Up Your PC Software (Based on Windows XP) The Windows display-settings for information about connecting your PC to...
User Manual (ENGLISH)
Page 48
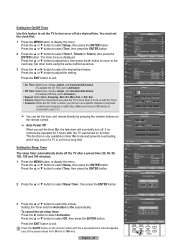
... by pressing the number buttons on the remote control. ➢ Auto Power Off When you set the timer On, the television will eventually turn on or off the TV after a preset time (30, 60, 90, 120, 150 and 180 minutes). 1 Press the MENU button to select Timer1, Timer2,or Timer3, then press... select the desired item below. Setting the Sleep Timer The sleep timer automatically shuts off at when it turns on with the Timer. • Contents: When the On Timer is connected to your TV.) ➢ You can set the hour, and minute directly by timer. Press the ▲ or ▼ button to...
... by pressing the number buttons on the remote control. ➢ Auto Power Off When you set the timer On, the television will eventually turn on or off the TV after a preset time (30, 60, 90, 120, 150 and 180 minutes). 1 Press the MENU button to select Timer1, Timer2,or Timer3, then press... select the desired item below. Setting the Sleep Timer The sleep timer automatically shuts off at when it turns on with the Timer. • Contents: When the On Timer is connected to your TV.) ➢ You can set the hour, and minute directly by timer. Press the ▲ or ▼ button to...
User Manual (ENGLISH)
Page 52
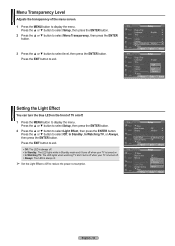
... EXIT button to exit. • Off: The LED is always off. • In Standby: The LED lights while in Standby mode and it turns off when your TV is always lit. ➢ Set the Light Effect to Off to display the menu. Press the ▲ or ▼ button to select level... the ENTER button. 2 Press the ▲ or ▼ button to exit. Menu Transparency Level Adjusts the transparency of TV on . • In Watching TV: The LED lights when watching TV and it turns off when your TV is turned on /off . • Always: The LED is turned off . 1 Press the MENU button to display the menu.
... EXIT button to exit. • Off: The LED is always off. • In Standby: The LED lights while in Standby mode and it turns off when your TV is always lit. ➢ Set the Light Effect to Off to display the menu. Press the ▲ or ▼ button to select level... the ENTER button. 2 Press the ▲ or ▼ button to exit. Menu Transparency Level Adjusts the transparency of TV on . • In Watching TV: The LED lights when watching TV and it turns off when your TV is turned on /off . • Always: The LED is turned off . 1 Press the MENU button to display the menu.
User Manual (ENGLISH)
Page 55
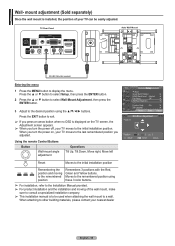
... the installation and moving to display the menu. Wall- Press the EXIT button to exit. ➢ If you adjusted. When you turn the power on, your nearest dealer English - 55 Using the remote Control Buttons Button Wall-mount angle adjustment Operations Tilt Up, Tilt... installation company. ➢ This installation manual is displayed on the TV screen, the Adjustment screen appears. ➢ When you turn the power off, your TV moves to other building materials, please contact your TV moves to a wall. TV Rear Panel Auto Wall-Mount EX-LINK Cable (Not supplied) Entering...
... the installation and moving to display the menu. Wall- Press the EXIT button to exit. ➢ If you adjusted. When you turn the power on, your nearest dealer English - 55 Using the remote Control Buttons Button Wall-mount angle adjustment Operations Tilt Up, Tilt... installation company. ➢ This installation manual is displayed on the TV screen, the Adjustment screen appears. ➢ When you turn the power off, your TV moves to other building materials, please contact your TV moves to a wall. TV Rear Panel Auto Wall-Mount EX-LINK Cable (Not supplied) Entering...

User Manual (ENGLISH)
Page 56
...More Move Enter Return 2 Press the ▲ or ▼ button to version XXXX ? Upgrading the Software Samsung may offer upgrades for your 4 digit PIN number. ➢ The default PIN number of a new TV set up or changed. ➢ When the V-Chip feature is activated, the PIP features do not function... center at 1-800-SAMSUNG to select Setup, then press the ENTER button. The user must enter a PIN (personal ID number) before any of the TV. 2 Press the MENU button to 30 seconds. The message Enter PIN will shut off and turn on the side of the V-Chip restrictions are ...
...More Move Enter Return 2 Press the ▲ or ▼ button to version XXXX ? Upgrading the Software Samsung may offer upgrades for your 4 digit PIN number. ➢ The default PIN number of a new TV set up or changed. ➢ When the V-Chip feature is activated, the PIP features do not function... center at 1-800-SAMSUNG to select Setup, then press the ENTER button. The user must enter a PIN (personal ID number) before any of the TV. 2 Press the MENU button to 30 seconds. The message Enter PIN will shut off and turn on the side of the V-Chip restrictions are ...
User Manual (ENGLISH)
Page 62
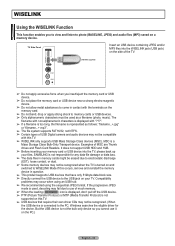
...WISELINK Using the WISELINK Function This function enables you cannot use of USB Digital camera and audio devices may not be recognized when the TV is turned on and switched to WISELINK Mode If this occurs, remove and reinstall the memory device in contact with the terminals on the memory ... characters must be used , decoding may fail due to photo (BASELINE, JPEG) and audio files (MP3) saved on a memory device. Examples of the TV. SAMSUNG is not responsible for the device. But the USB device is connected to the PC, Windows searches the eligible driver for any data file damage...
...WISELINK Using the WISELINK Function This function enables you cannot use of USB Digital camera and audio devices may not be recognized when the TV is turned on and switched to WISELINK Mode If this occurs, remove and reinstall the memory device in contact with the terminals on the memory ... characters must be used , decoding may fail due to photo (BASELINE, JPEG) and audio files (MP3) saved on a memory device. Examples of the TV. SAMSUNG is not responsible for the device. But the USB device is connected to the PC, Windows searches the eligible driver for any data file damage...

User Manual (ENGLISH)
Page 63
...a selected memory device will be displayed. ➢ The WISELINK menu differs depending on the USB Memory Device connected to TV. 3 Press the ◄ or ► button to turn on the WISELINK mode. Press the WISELINK button on the remote control, and enter the WISELINK screen again. Stop the...select an icon (Photo, Music or Setup), then press the ENTER button. Play or pause the Slide Show or MP3 file. T V Input Source List : TV ► Edit Name ► WISELINK Anynet+ (HDMI-CEC) 2 Press the ▲ or ▼ button to the previous menu. Return to select a corresponding...
...a selected memory device will be displayed. ➢ The WISELINK menu differs depending on the USB Memory Device connected to TV. 3 Press the ◄ or ► button to turn on the WISELINK mode. Press the WISELINK button on the remote control, and enter the WISELINK screen again. Stop the...select an icon (Photo, Music or Setup), then press the ENTER button. Play or pause the Slide Show or MP3 file. T V Input Source List : TV ► Edit Name ► WISELINK Anynet+ (HDMI-CEC) 2 Press the ▲ or ▼ button to the previous menu. Return to select a corresponding...
User Manual (ENGLISH)
Page 64
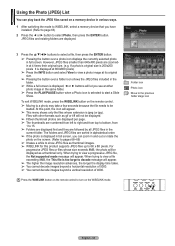
... stage icon Press the WISELINK button on the remote control to view a progressive JPEG file, the Not supported mode message will appear. When trying to turn on the WISELINK mode. Photo CELLDISK2.0 315MB/495MB Free 3 Press the buttons to 8K x 8K pixels. At this product supports JPEG files up to select...
... stage icon Press the WISELINK button on the remote control to view a progressive JPEG file, the Not supported mode message will appear. When trying to turn on the WISELINK mode. Photo CELLDISK2.0 315MB/495MB Free 3 Press the buttons to 8K x 8K pixels. At this product supports JPEG files up to select...


