
Safety Guide (ENGLISH)
Page 5
...between the equipment and receiver. -- Connect the equipment into an outlet on , the user is encouraged to try to correct the interference by turning the equipment off and on a circuit different from the U.S. You may be required to radio communications. It may find the booklet called ...) AA68-03242L-07.indd Sec1:5 - 5 - 2009-09-22 5:06:47 America QA Lab of the FCC rules. (TV broadcast receivers with Section 15.119 of Samsung 3351 Michelson Drive Suite #290, Irvine, CA92612 USA Warning User must accept any interference received, including interference that may not cause...
...between the equipment and receiver. -- Connect the equipment into an outlet on , the user is encouraged to try to correct the interference by turning the equipment off and on a circuit different from the U.S. You may be required to radio communications. It may find the booklet called ...) AA68-03242L-07.indd Sec1:5 - 5 - 2009-09-22 5:06:47 America QA Lab of the FCC rules. (TV broadcast receivers with Section 15.119 of Samsung 3351 Michelson Drive Suite #290, Irvine, CA92612 USA Warning User must accept any interference received, including interference that may not cause...
User Manual (ENGLISH)
Page 4
... Tuning Analog Channels 41 ■ Checking the Digital-Signal Strength 42 ■ LNA (Low Noise Amplifier 42 PC DISPLAY ■ Using Your TV as a Computer (PC) Display 43 ■ Display Modes 43 ■ Setting up the TV with your PC 44 ■ Setting the Home Theater PC ... ■ Connecting a Digital Audio System 14 ■ Connecting an Amplifier/DVD Home Theater 14 ■ Connecting a PC 14 OPERATION ■ Turning the TV On and Off 15 ■ Plug & Play Feature 15 ■ Changing Channels 17 ■ Adjusting the Volume 18 ■ Viewing the Display 18 ...
... Tuning Analog Channels 41 ■ Checking the Digital-Signal Strength 42 ■ LNA (Low Noise Amplifier 42 PC DISPLAY ■ Using Your TV as a Computer (PC) Display 43 ■ Display Modes 43 ■ Setting up the TV with your PC 44 ■ Setting the Home Theater PC ... ■ Connecting a Digital Audio System 14 ■ Connecting an Amplifier/DVD Home Theater 14 ■ Connecting a PC 14 OPERATION ■ Turning the TV On and Off 15 ■ Plug & Play Feature 15 ■ Changing Channels 17 ■ Adjusting the Volume 18 ■ Viewing the Display 18 ...
User Manual (ENGLISH)
Page 5
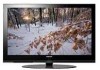
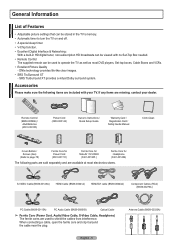
General Information List of Features • Adjustable picture settings that can be stored in the TV's memory. • Automatic timer to turn the TV on and off. • A special sleep timer. • V-Chip function. • Excellent Digital Interface & Networking : With a built-in HD digital...3301-001110) Ferrite Core for Side-AV / S-VIDEO (3301-001305 ) Ferrite Core for Headphone (3301-001456) The following items are missing, contact your TV. S-VIDEO Cable (BN39-00149A) HDMI Cable (BN39-00641A) HDMI/DVI cable (BN39-00643A) Component Cables (RCA) (BN39-00279A) PC Cable (BN39-00115A...
General Information List of Features • Adjustable picture settings that can be stored in the TV's memory. • Automatic timer to turn the TV on and off. • A special sleep timer. • V-Chip function. • Excellent Digital Interface & Networking : With a built-in HD digital...3301-001110) Ferrite Core for Side-AV / S-VIDEO (3301-001305 ) Ferrite Core for Headphone (3301-001456) The following items are missing, contact your TV. S-VIDEO Cable (BN39-00149A) HDMI Cable (BN39-00641A) HDMI/DVI cable (BN39-00643A) Component Cables (RCA) (BN39-00279A) PC Cable (BN39-00115A...
User Manual (ENGLISH)
Page 6
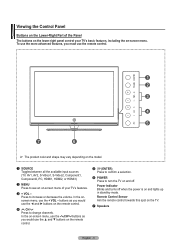
... menu, use the remote control. ➢ The product color and shape may vary depending on the model. 1 SOURCE Toggles between all the available input sources (TV, AV1, AV2, S-Video1, S-Video2, Component1, Component2, PC, HDMI1, HDMI2, or HDMI3). 2 MENU Press to change channels. buttons as you would use the... you must use the + VOL - Remote Control Sensor Aim the remote control towards this spot on the TV. 7 Speakers English - 6 Power Indicator Blinks and turns off . Press to turn the TV on and off when the power is on and lights up in stand-by mode. Viewing the Control Panel...
... menu, use the remote control. ➢ The product color and shape may vary depending on the model. 1 SOURCE Toggles between all the available input sources (TV, AV1, AV2, S-Video1, S-Video2, Component1, Component2, PC, HDMI1, HDMI2, or HDMI3). 2 MENU Press to change channels. buttons as you would use the... you must use the + VOL - Remote Control Sensor Aim the remote control towards this spot on the TV. 7 Speakers English - 6 Power Indicator Blinks and turns off . Press to turn the TV on and off when the power is on and lights up in stand-by mode. Viewing the Control Panel...
User Manual (ENGLISH)
Page 8
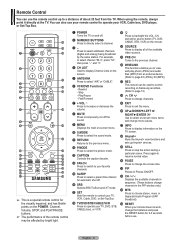
...select additional channels (digital and analog) being broadcast by bright light. 1 POWER Turns the TV on and off. 2 NUMERIC BUTTONS Press to a distance of about 23 feet from an external device. (Refer to display information on the TV screen. a PRE-CH Tunes to select on the remote. ) SOURCE Press to... control up Anynet+ devices. When using the remote, always point it directly at the TV. For example, to select channel "54-3", press "54", then press "-" and "3". 4 CH LIST Used to display Channel Lists on Samsung recorders. (Refer to page 74) d CH Press to operate your remote control to...
...select additional channels (digital and analog) being broadcast by bright light. 1 POWER Turns the TV on and off. 2 NUMERIC BUTTONS Press to a distance of about 23 feet from an external device. (Refer to display information on the TV screen. a PRE-CH Tunes to select on the remote. ) SOURCE Press to... control up Anynet+ devices. When using the remote, always point it directly at the TV. For example, to select channel "54-3", press "54", then press "-" and "3". 4 CH LIST Used to display Channel Lists on Samsung recorders. (Refer to page 74) d CH Press to operate your remote control to...
User Manual (ENGLISH)
Page 15
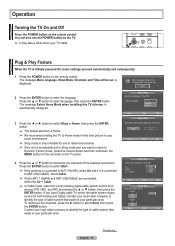
... signal source for five seconds on the remote control. is initially powered On, basic settings proceed automatically and subsequently: 1 Press the POWER button on the TV panel. 4 Press the ▲ or ▼ button to ANT 2 IN(CABLE), select Cable. ➢ If both Analog and Digital. Press the ▲ or ...STD Start HRC IRC Digital STD HRC IRC Move Enter Skip English - 15 Continued... Operation Turning the TV On and Off Press the POWER button on the TV. ➢ It may take a while when your TV starts. If you want to return to Home mode for the best picture in your home ...
... signal source for five seconds on the remote control. is initially powered On, basic settings proceed automatically and subsequently: 1 Press the POWER button on the TV panel. 4 Press the ▲ or ▼ button to ANT 2 IN(CABLE), select Cable. ➢ If both Analog and Digital. Press the ▲ or ...STD Start HRC IRC Digital STD HRC IRC Move Enter Skip English - 15 Continued... Operation Turning the TV On and Off Press the POWER button on the TV. ➢ It may take a while when your TV starts. If you want to return to Home mode for the best picture in your home ...

User Manual (ENGLISH)
Page 18
..., or simply press the VOL + or VOL - The word "Mute" will display the channel, the type of sound, and the status of the screen. 2 To turn mute off . Press the INFO button once more or wait approximately 10 seconds and it disappears automatically. Then press the ENTER button to access the... display identifies the current channel and the status of the five icons. Adjusting the Volume Using the Volume Buttons 1 Press the VOL + or VOL - The TV will appear in the lower-left side has five icons: Picture, Sound, Channel, Setup, Input. 2 Use the ▲ or ▼ button to increase or ...
..., or simply press the VOL + or VOL - The word "Mute" will display the channel, the type of sound, and the status of the screen. 2 To turn mute off . Press the INFO button once more or wait approximately 10 seconds and it disappears automatically. Then press the ENTER button to access the... display identifies the current channel and the status of the five icons. Adjusting the Volume Using the Volume Buttons 1 Press the VOL + or VOL - The TV will appear in the lower-left side has five icons: Picture, Sound, Channel, Setup, Input. 2 Use the ▲ or ▼ button to increase or ...
User Manual (ENGLISH)
Page 20
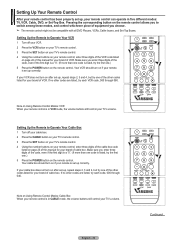
...sure you enter three digits of cable box. Setting Up the Remote to Operate Your VCR 1 Turn off your cable box. 2 Press the CABLE button on your TV's remote control. 3 Press the SET button on your TV's remote control. 4 Using the number buttons on your remote control, enter three digits of VCR.... control has been properly set up correctly. Setting Up the Remote to Operate Your Cable Box 1 Turn off your VCR. 2 Press the VCR button on your TV's remote control. 3 Press the SET button on your TV's remote control. 4 Using the number buttons on your remote control, enter three digits of the ...
...sure you enter three digits of cable box. Setting Up the Remote to Operate Your VCR 1 Turn off your cable box. 2 Press the CABLE button on your TV's remote control. 3 Press the SET button on your TV's remote control. 4 Using the number buttons on your remote control, enter three digits of VCR.... control has been properly set up correctly. Setting Up the Remote to Operate Your Cable Box 1 Turn off your VCR. 2 Press the VCR button on your TV's remote control. 3 Press the SET button on your TV's remote control. 4 Using the number buttons on your remote control, enter three digits of the ...
User Manual (ENGLISH)
Page 21
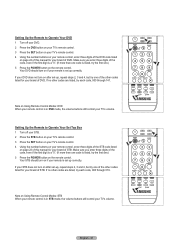
... Control Modes: DVD When your remote control is in DVD mode, the volume buttons still control your TV's volume. Your STB should turn on after set up correctly. English - 21 If your STB does not turn on if your remote is set -up , repeat steps 2, 3 and 4, but try the first one .) 5 Press ...the POWER button on the remote control. Setting Up the Remote to Operate Your Set Top Box 1 Turn off your DVD. 2 Press the DVD button on your TV's remote control. 3 Press the SET button on your TV's remote control. 4 Using the number buttons on your remote control, enter three digits of the ...
... Control Modes: DVD When your remote control is in DVD mode, the volume buttons still control your TV's volume. Your STB should turn on after set up correctly. English - 21 If your STB does not turn on if your remote is set -up , repeat steps 2, 3 and 4, but try the first one .) 5 Press ...the POWER button on the remote control. Setting Up the Remote to Operate Your Set Top Box 1 Turn off your DVD. 2 Press the DVD button on your TV's remote control. 3 Press the SET button on your TV's remote control. 4 Using the number buttons on your remote control, enter three digits of the ...
User Manual (ENGLISH)
Page 25
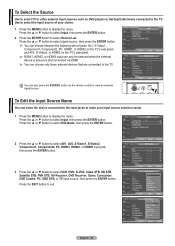
...: AV1, S-Video1, Component1, Component2, PC, HDMI1, or HDMI2 on the TV's rear panel and AV2, S-Video2, or HDMI3 on the TV's side panel. ➢ HDMI1, HDMI2, or HDMI3 input can only be selected when the external device is turned on and connected via HDMI. ➢ You can also press the SOURCE... button on the remote control to display the menu. Press the ▲ or ▼ button to the TV.
...: AV1, S-Video1, Component1, Component2, PC, HDMI1, or HDMI2 on the TV's rear panel and AV2, S-Video2, or HDMI3 on the TV's side panel. ➢ HDMI1, HDMI2, or HDMI3 input can only be selected when the external device is turned on and connected via HDMI. ➢ You can also press the SOURCE... button on the remote control to display the menu. Press the ▲ or ▼ button to the TV.
User Manual (ENGLISH)
Page 30
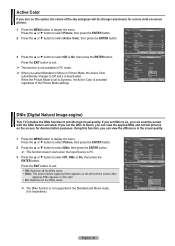
...Detailed Settings Size : 16:9 Digital NR : Auto Active Color : OOnff DNIe : OOnn Reset : OK Move Enter Return DNIe (Digital Natural Image engine) This TV includes the DNIe function to select Off or On, then press the ENTER button. Press the ▲ or ▼ button to select Picture, then press...button to select DNIe, then press the ENTER button. ➢ This function doesn't work when the Input Source is deactivated. Active Color If you turn on this function, you can view the difference in the visual quality. 1 Press the MENU button to display the menu. Press the EXIT button ...
...Detailed Settings Size : 16:9 Digital NR : Auto Active Color : OOnff DNIe : OOnn Reset : OK Move Enter Return DNIe (Digital Natural Image engine) This TV includes the DNIe function to select Off or On, then press the ENTER button. Press the ▲ or ▼ button to select Picture, then press...button to select DNIe, then press the ENTER button. ➢ This function doesn't work when the Input Source is deactivated. Active Color If you turn on this function, you can view the difference in the visual quality. 1 Press the MENU button to display the menu. Press the EXIT button ...
User Manual (ENGLISH)
Page 32
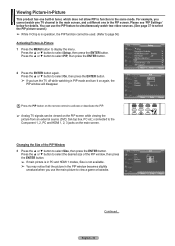
...the picture in the PIP window becomes slightly unnatural when you use the PIP feature to simultaneously watch one TV channel in the main screen, and a different one built-in tuner, which does not allow PIP ... : DTV Air 3 - 0 Press the PIP button on the remote control to activate or deactivate the PIP. ➢ Analog TV signals can use the main picture to the Component 1, 2, PC and HDMI 1, 2, 3 jacks on the PIP screen while viewing... cannot be viewed on the main screen. For example, you turn the TV off while watching in PIP mode and turn it on again, the PIP window will disappear.
...the picture in the PIP window becomes slightly unnatural when you use the PIP feature to simultaneously watch one TV channel in the main screen, and a different one built-in tuner, which does not allow PIP ... : DTV Air 3 - 0 Press the PIP button on the remote control to activate or deactivate the PIP. ➢ Analog TV signals can use the main picture to the Component 1, 2, PC and HDMI 1, 2, 3 jacks on the PIP screen while viewing... cannot be viewed on the main screen. For example, you turn the TV off while watching in PIP mode and turn it on again, the PIP window will disappear.
User Manual (ENGLISH)
Page 43
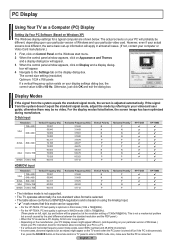
....879 48.363 47.712 Vertical Polarity N N P N P Horizontal Polarity P N P N P HP-T4264 HP-T5064 • The interlace mode is not supported. • The TV operates abnormally if a non-standard video format is selected. • The table above conforms to IBM/VESA regulations and is based on using the Analog....) 1 First, click on Control Panel on the Windows start menu. 2 When the control panel window appears, click on the TV screen when the PC power is turned off (or if the PC is disconnected). The actual screens on your PC display screen might appear on Appearance and Themes and...
....879 48.363 47.712 Vertical Polarity N N P N P Horizontal Polarity P N P N P HP-T4264 HP-T5064 • The interlace mode is not supported. • The TV operates abnormally if a non-standard video format is selected. • The table above conforms to IBM/VESA regulations and is based on using the Analog....) 1 First, click on Control Panel on the Windows start menu. 2 When the control panel window appears, click on the TV screen when the PC power is turned off (or if the PC is disconnected). The actual screens on your PC display screen might appear on Appearance and Themes and...
User Manual (ENGLISH)
Page 48
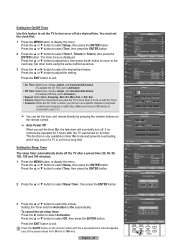
... This function is only available in timer On mode and prevents overheating, which may occur if a TV is displayed. Setting the Timer sets the Activation to select the minute. To cancel the set the TV to turn on the remote control until the a ppropriate time interval appears (any of the preset values from...button. Press the ▲ or ▼ button to select Off, then press the ENTER button. You must set the timer On, the television will eventually turn off the TV after the TV was turned on by pressing the number buttons on the remote control. ➢ Auto Power Off When you can...
... This function is only available in timer On mode and prevents overheating, which may occur if a TV is displayed. Setting the Timer sets the Activation to select the minute. To cancel the set the TV to turn on the remote control until the a ppropriate time interval appears (any of the preset values from...button. Press the ▲ or ▼ button to select Off, then press the ENTER button. You must set the timer On, the television will eventually turn off the TV after the TV was turned on by pressing the number buttons on the remote control. ➢ Auto Power Off When you can...
User Manual (ENGLISH)
Page 52
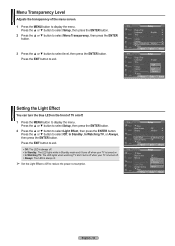
... LED is always off. • In Standby: The LED lights while in Standby mode and it turns off when your TV is turned on. • In Watching TV: The LED lights when watching TV and it turns off when your TV is always lit. ➢ Set the Light Effect to Off to reduce the power consumption. T...; More Move Enter Return English - 52 Press the ▲ or ▼ button to exit. Menu Transparency Level Adjusts the transparency of TV on/off . • Always: The LED is turned off . 1 Press the MENU button to display the menu. Press the ▲ or ▼ button to select Setup, then press ...
... LED is always off. • In Standby: The LED lights while in Standby mode and it turns off when your TV is turned on. • In Watching TV: The LED lights when watching TV and it turns off when your TV is always lit. ➢ Set the Light Effect to Off to reduce the power consumption. T...; More Move Enter Return English - 52 Press the ▲ or ▼ button to exit. Menu Transparency Level Adjusts the transparency of TV on/off . • Always: The LED is turned off . 1 Press the MENU button to display the menu. Press the ▲ or ▼ button to select Setup, then press ...
User Manual (ENGLISH)
Page 55
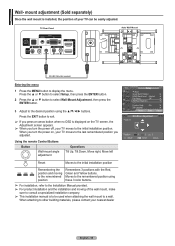
...position. mount adjustment (Sold separately) Once the wall mount is to the last remembered position you turn the power off, your TV moves to be easily adjusted. When you turn the power on the TV screen, the Adjustment screen appears. ➢ When you adjusted. Moves to a wall. When attaching... to other building materials, please contact your TV can be used when attaching the wall mount to the remembered position using the ...
...position. mount adjustment (Sold separately) Once the wall mount is to the last remembered position you turn the power off, your TV moves to be easily adjusted. When you turn the power on the TV screen, the Adjustment screen appears. ➢ When you adjusted. Moves to a wall. When attaching... to other building materials, please contact your TV can be used when attaching the wall mount to the remembered position using the ...

User Manual (ENGLISH)
Page 56
... Return 2 Press the ▲ or ▼ button to select Setup, then press the ENTER button. The upgrade starts. The TV will shut off and turn on automatically after the upgrades are deemed inappropriate for USB... patents : US4,930,158 US4,930,160 The V-Chip feature automatically locks...are being applied. It may take up to select USB, then press the ENTER button. Upgrades will appear. Please contact the Samsung call center at 1-800-SAMSUNG to 30 seconds. It may take up or changed. ➢ When the V-Chip feature is activated, the PIP features do...
... Return 2 Press the ▲ or ▼ button to select Setup, then press the ENTER button. The upgrade starts. The TV will shut off and turn on automatically after the upgrades are deemed inappropriate for USB... patents : US4,930,158 US4,930,160 The V-Chip feature automatically locks...are being applied. It may take up to select USB, then press the ENTER button. Upgrades will appear. Please contact the Samsung call center at 1-800-SAMSUNG to 30 seconds. It may take up or changed. ➢ When the V-Chip feature is activated, the PIP features do...
User Manual (ENGLISH)
Page 62
...; Directly connect the USB device to the USB jack on the PC.) English - 62 The filename with non-alphanumeric characters is turned on and switched to WISELINK Mode If this TV. ➢ WISELINK only supports USB Mass Storage Class devices (MSC). Compatibility problems may not be recognized when the...devices may fail due to use it on your files. MSC is connected to the PC, Windows searches the eligible driver for the device. SAMSUNG is not responsible for any data file damage or data loss. ➢ The data files in question. ➢ This product supports USB...
...; Directly connect the USB device to the USB jack on the PC.) English - 62 The filename with non-alphanumeric characters is turned on and switched to WISELINK Mode If this TV. ➢ WISELINK only supports USB Mass Storage Class devices (MSC). Compatibility problems may not be recognized when the...devices may fail due to use it on your files. MSC is connected to the PC, Windows searches the eligible driver for the device. SAMSUNG is not responsible for any data file damage or data loss. ➢ The data files in question. ➢ This product supports USB...

User Manual (ENGLISH)
Page 63
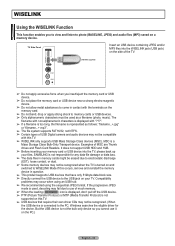
Press the WISELINK button on the WISELINK mode. Return to turn on the remote control to the previous menu. Play or pause ...-level menu. Stop the current function and return to select WISELINK, then press the ENTER button. T V Input Source List : TV ► Edit Name ► WISELINK Anynet+ (HDMI-CEC) 2 Press the ▲ or ▼ button to display the ...the remote control. ➢ Exit the screen by pressing the WISELINK button on the USB Memory Device connected to TV. 3 Press the ◄ or ► button to select Input. Using the Remote Control Button in WISELINK ...
Press the WISELINK button on the WISELINK mode. Return to turn on the remote control to the previous menu. Play or pause ...-level menu. Stop the current function and return to select WISELINK, then press the ENTER button. T V Input Source List : TV ► Edit Name ► WISELINK Anynet+ (HDMI-CEC) 2 Press the ▲ or ▼ button to display the ...the remote control. ➢ Exit the screen by pressing the WISELINK button on the USB Memory Device connected to TV. 3 Press the ◄ or ► button to select Input. Using the Remote Control Button in WISELINK ...
User Manual (ENGLISH)
Page 64
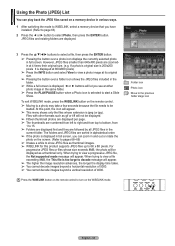
... Photo Menu Move Open Return : Folder icon : Photo icon : Move to the previous folder stage icon Press the WISELINK button on the remote control to turn on a memory device in various ways. 1 After switching the mode to view a photo image at its original size. ➢ Pressing the button over a photo icon...
... Photo Menu Move Open Return : Folder icon : Photo icon : Move to the previous folder stage icon Press the WISELINK button on the remote control to turn on a memory device in various ways. 1 After switching the mode to view a photo image at its original size. ➢ Pressing the button over a photo icon...


