User Manual (ENGLISH)
Page 4
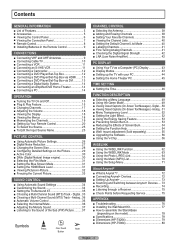
... 41 ■ Checking the Digital-Signal Strength 42 ■ LNA (Low Noise Amplifier 42 PC DISPLAY ■ Using Your TV as a Computer (PC) Display 43 ■ Display Modes 43 ■ Setting up the TV with your PC 44 ■ Setting the ...; Accessories 5 ■ Viewing the Control Panel 6 ■ Viewing the Connection Panel 7 ■ Remote Control 8 ■ Installing Batteries in the Remote Control 9 CONNECTIONS ■ Connecting VHF and UHF Antennas 9 ■ Connecting Cable TV 10 ■ Connecting a VCR 11 ■ Connecting an S-VHS VCR 11 ■ Connecting a...
... 41 ■ Checking the Digital-Signal Strength 42 ■ LNA (Low Noise Amplifier 42 PC DISPLAY ■ Using Your TV as a Computer (PC) Display 43 ■ Display Modes 43 ■ Setting up the TV with your PC 44 ■ Setting the ...; Accessories 5 ■ Viewing the Control Panel 6 ■ Viewing the Connection Panel 7 ■ Remote Control 8 ■ Installing Batteries in the Remote Control 9 CONNECTIONS ■ Connecting VHF and UHF Antennas 9 ■ Connecting Cable TV 10 ■ Connecting a VCR 11 ■ Connecting an S-VHS VCR 11 ■ Connecting a...
User Manual (ENGLISH)
Page 5
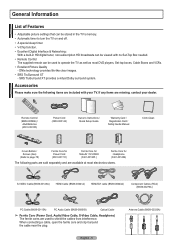
... Guide Manual Cloth-Clean Cover-Bottom / Screws (2ea) (Refer to shield the cables from interference. If any items are missing, contact your TV. English - 5 Antenna Cable (BN39-00333A) Accessories Please make sure the following parts are sold separately and are included with no Set-Top ...Box needed. • Remote Control The supplied remote can be used to page 78) Ferrite Core for Power Cord (3301-001110) Ferrite Core for Side-AV / S-VIDEO (3301-001305...
... Guide Manual Cloth-Clean Cover-Bottom / Screws (2ea) (Refer to shield the cables from interference. If any items are missing, contact your TV. English - 5 Antenna Cable (BN39-00333A) Accessories Please make sure the following parts are sold separately and are included with no Set-Top ...Box needed. • Remote Control The supplied remote can be used to page 78) Ferrite Core for Power Cord (3301-001110) Ferrite Core for Side-AV / S-VIDEO (3301-001305...
User Manual (ENGLISH)
Page 6
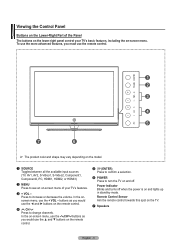
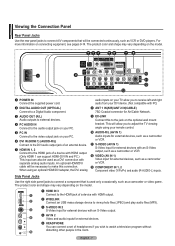
... see an on-screen menu of the Panel The buttons on the lower-right panel control your TV's features. 3 + VOL - In the on-screen menu, use the CH buttons as you would use the remote control. ➢ The product color and shape may vary depending on the model. 1 SOURCE Toggles... between all the available input sources (TV, AV1, AV2, S-Video1, S-Video2, Component1, Component2, PC, HDMI1, HDMI2, or HDMI3). 2 MENU...
... see an on-screen menu of the Panel The buttons on the lower-right panel control your TV's features. 3 + VOL - In the on-screen menu, use the CH buttons as you would use the remote control. ➢ The product color and shape may vary depending on the model. 1 SOURCE Toggles... between all the available input sources (TV, AV1, AV2, S-Video1, S-Video2, Component1, Component2, PC, HDMI1, HDMI2, or HDMI3). 2 MENU...
User Manual (ENGLISH)
Page 7
...8 ANT 1 IN(AIR)/ANT 2 IN(CABLE) 75Ω Coaxial connector for Air/Cable Network. 9 EX-LINK Connect this to the jack on your TV allow you to make this connection. Side Panel Jacks Use the right side panel jacks to connect a component that will be necessary to adjust the... TV viewing angle using your remote control. 0 AUDIO-R/L (AV IN 1) Audio inputs for external devices, such as a camcorder or VCR. # COMPONENT IN 1, 2 Component video (Y/PB/PR) ...
...8 ANT 1 IN(AIR)/ANT 2 IN(CABLE) 75Ω Coaxial connector for Air/Cable Network. 9 EX-LINK Connect this to the jack on your TV allow you to make this connection. Side Panel Jacks Use the right side panel jacks to connect a component that will be necessary to adjust the... TV viewing angle using your remote control. 0 AUDIO-R/L (AV IN 1) Audio inputs for external devices, such as a camcorder or VCR. # COMPONENT IN 1, 2 Component video (Y/PB/PR) ...
User Manual (ENGLISH)
Page 8
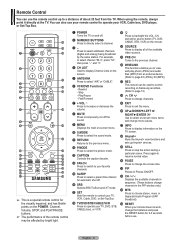
...for the visually impaired, and has Braille points on the POWER, Channel, Volume, STOP, and PLAY/PAUSE buttons. ➢ The performance of the remote control may be used to control recording on Samsung recorders. (Refer to page 74) d CH Press to display all of the available video sources. When using the... remote, always point it directly at the TV. h Anynet+ Runs the Anynet+ view functions and sets up to a distance of about 23 feet from an ...
...for the visually impaired, and has Braille points on the POWER, Channel, Volume, STOP, and PLAY/PAUSE buttons. ➢ The performance of the remote control may be used to control recording on Samsung recorders. (Refer to page 74) d CH Press to display all of the available video sources. When using the... remote, always point it directly at the TV. h Anynet+ Runs the Anynet+ view functions and sets up to a distance of about 23 feet from an ...
User Manual (ENGLISH)
Page 9
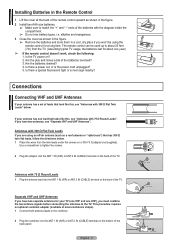
... the "+" and "-" ends of the batteries with 300 Ω Flat Twin Leads" below . 1 Place the wires from the TV. (Assuming typical TV usage, the batteries last for about one year.) ➢ If the remote control doesn't work, check the following: 1. Is there a power cut, or is the power cord unplugged? 5. Use a...screws. 2 Plug the adaptor into the ANT 1 IN (AIR) or ANT 2 IN (CABLE) terminal on the back of the TV. The remote control can be using the remote control for your TV (one VHF and one lead that has 300 Ω twin flat leads, follow the directions below . If your antenna has a set...
... the "+" and "-" ends of the batteries with 300 Ω Flat Twin Leads" below . 1 Place the wires from the TV. (Assuming typical TV usage, the batteries last for about one year.) ➢ If the remote control doesn't work, check the following: 1. Is there a power cut, or is the power cord unplugged? 5. Use a...screws. 2 Plug the adaptor into the ANT 1 IN (AIR) or ANT 2 IN (CABLE) terminal on the back of the TV. The remote control can be using the remote control for your TV (one VHF and one lead that has 300 Ω twin flat leads, follow the directions below . If your antenna has a set...
User Manual (ENGLISH)
Page 15
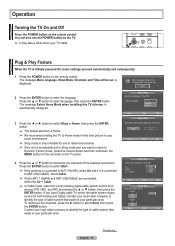
...and subsequently: 1 Press the POWER button on the TV. ➢ It may take a while when your home environment. ➢ Shop mode is only intended for use the POWER button on the remote control. You can also use in your TV starts. Menu Language :English Spanish French Move Enter ...Skip Plug & Play Select Home Mode when installing this TV at home. Operation Turning the TV On and Off Press the POWER button on ...
...and subsequently: 1 Press the POWER button on the TV. ➢ It may take a while when your home environment. ➢ Shop mode is only intended for use the POWER button on the remote control. You can also use in your TV starts. Menu Language :English Spanish French Move Enter ...Skip Plug & Play Select Home Mode when installing this TV at home. Operation Turning the TV On and Off Press the POWER button on ...
User Manual (ENGLISH)
Page 16
... on the map of the available channels. Plug & Play Auto Program in which you want to the appropriate time zone on the remote control. 8 The message Enjoy your watching. Move Enter Skip Plug & Play Select the time zone in progress. is automatically displayed....States). is complete. OK Enter Skip Plug & Play Select the clock mode. Select the time zone in which you live . 5 The TV will automatically disappear after several seconds. Press the ENTER button when channel memorization is displayed. Day Month Year -- -- ---- Move Adjust Enter ...
... on the map of the available channels. Plug & Play Auto Program in which you want to the appropriate time zone on the remote control. 8 The message Enjoy your watching. Move Enter Skip Plug & Play Select the time zone in progress. is automatically displayed....States). is complete. OK Enter Skip Plug & Play Select the clock mode. Select the time zone in which you live . 5 The TV will automatically disappear after several seconds. Press the ENTER button when channel memorization is displayed. Day Month Year -- -- ---- Move Adjust Enter ...

User Manual (ENGLISH)
Page 18
... icons. Then press the ENTER button to access the icon's sub-menu. 3 Press the EXIT button to select one minute until the on the remote control. The TV will appear in the lower-left side has five icons: Picture, Sound, Channel, Setup, Input. 2 Use the ▲ or ▼ button to exit. ➢...
... icons. Then press the ENTER button to access the icon's sub-menu. 3 Press the EXIT button to select one minute until the on the remote control. The TV will appear in the lower-left side has five icons: Picture, Sound, Channel, Setup, Input. 2 Use the ▲ or ▼ button to exit. ➢...
User Manual (ENGLISH)
Page 19
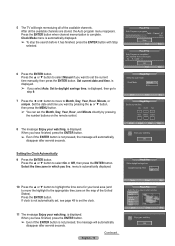
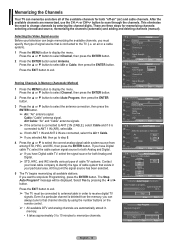
... tune to that exists in memory. • It takes approximately 3 to 10 minutes to scan through the channels. If you have Digital cable TV, select the signal source for memorizing channels: selecting a broadcast source, memorizing the channels (automatic) and adding and deleting channels (manual). If you... Analog and Digital. ➢ If you want to identify the type of cable system that channel directly by using the number buttons on the remote control. ➢ • All available DTV and analog channels are three steps for both "off-air" (air) and cable channels. Analog...
... tune to that exists in memory. • It takes approximately 3 to 10 minutes to scan through the channels. If you have Digital cable TV, select the signal source for memorizing channels: selecting a broadcast source, memorizing the channels (automatic) and adding and deleting channels (manual). If you... Analog and Digital. ➢ If you want to identify the type of cable system that channel directly by using the number buttons on the remote control. ➢ • All available DTV and analog channels are three steps for both "off-air" (air) and cable channels. Analog...
User Manual (ENGLISH)
Page 20
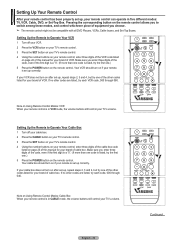
... Operate Your VCR 1 Turn off your cable box. 2 Press the CABLE button on your TV's remote control. 3 Press the SET button on your TV's remote control. 4 Using the number buttons on your remote control, enter three digits of the cable box code listed on if your brand of VCR. If no other codes ...one code is listed, try one .) 5 Press the POWER button on page 22 of this manual for your TV's volume. Your cable box should turn on Using Remote Control Modes: Cable Box When your remote control is set up correctly. Note on after set-up, repeat steps 2, 3 and 4, but try the ...
... Operate Your VCR 1 Turn off your cable box. 2 Press the CABLE button on your TV's remote control. 3 Press the SET button on your TV's remote control. 4 Using the number buttons on your remote control, enter three digits of the cable box code listed on if your brand of VCR. If no other codes ...one code is listed, try one .) 5 Press the POWER button on page 22 of this manual for your TV's volume. Your cable box should turn on Using Remote Control Modes: Cable Box When your remote control is set up correctly. Note on after set-up, repeat steps 2, 3 and 4, but try the ...
User Manual (ENGLISH)
Page 21
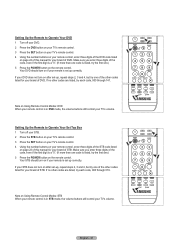
... Operate Your DVD 1 Turn off your STB. 2 Press the STB button on your TV's remote control. 3 Press the SET button on your TV's remote control. 4 Using the number buttons on your remote control, enter three digits of the STB code listed on page 23 of this manual for your brand of DVD. Your STB ... Operate Your Set Top Box 1 Turn off your DVD. 2 Press the DVD button on your TV's remote control. 3 Press the SET button on your TV's remote control. 4 Using the number buttons on your remote control, enter three digits of the DVD code listed on page 24 of this manual for your brand of STB. If...
... Operate Your DVD 1 Turn off your STB. 2 Press the STB button on your TV's remote control. 3 Press the SET button on your TV's remote control. 4 Using the number buttons on your remote control, enter three digits of the STB code listed on page 23 of this manual for your brand of DVD. Your STB ... Operate Your Set Top Box 1 Turn off your DVD. 2 Press the DVD button on your TV's remote control. 3 Press the SET button on your TV's remote control. 4 Using the number buttons on your remote control, enter three digits of the DVD code listed on page 24 of this manual for your brand of STB. If...
User Manual (ENGLISH)
Page 25
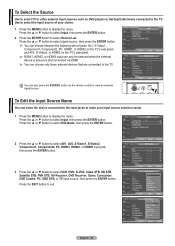
... can choose between the following sets of your input source selection easier. 1 Press the MENU button to view an external signal source. T V Input Source List : TV ► Edit Name ► WISELINK Anynet+ (HDMI-CEC) 2 Press the ▲ or ▼ button to select AV1, AV2, S-Video1, S-Video2, Component1, Component2... panel and AV2, S-Video2, or HDMI3 on the TV's side panel. ➢ HDMI1, HDMI2, or HDMI3 input can only be selected when the external device is turned on the remote control to display the menu. To Edit the Input Source Name You can choose only those external ...
... can choose between the following sets of your input source selection easier. 1 Press the MENU button to view an external signal source. T V Input Source List : TV ► Edit Name ► WISELINK Anynet+ (HDMI-CEC) 2 Press the ▲ or ▼ button to select AV1, AV2, S-Video1, S-Video2, Component1, Component2... panel and AV2, S-Video2, or HDMI3 on the TV's side panel. ➢ HDMI1, HDMI2, or HDMI3 input can only be selected when the external device is turned on the remote control to display the menu. To Edit the Input Source Name You can choose only those external ...
User Manual (ENGLISH)
Page 26
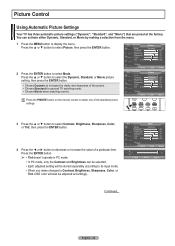
Picture Control Using Automatic Picture Settings Your TV has three automatic picture settings ("Dynamic", "Standard", and "Movie") that are preset at the factory. Press the ENTER button. ➢ • Tint doesn't operate in ... button. • Choose Dynamic to decrease or increase the value of the picture. • Choose Standard for general TV watching mode. • Choose Movie when watching movies. Press the P.MODE button on the remote control to select Mode. English - 26 OSD color will be adjusted accordingly. T V Mode Mode : Dynamic Contrast 100 Brightness...
Picture Control Using Automatic Picture Settings Your TV has three automatic picture settings ("Dynamic", "Standard", and "Movie") that are preset at the factory. Press the ENTER button. ➢ • Tint doesn't operate in ... button. • Choose Dynamic to decrease or increase the value of the picture. • Choose Standard for general TV watching mode. • Choose Movie when watching movies. Press the P.MODE button on the remote control to select Mode. English - 26 OSD color will be adjusted accordingly. T V Mode Mode : Dynamic Contrast 100 Brightness...
User Manual (ENGLISH)
Page 28
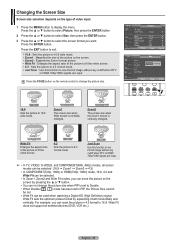
... input. 1 Press the MENU button to see the full image without any cutoff when DTV or HDMI 720p/1080i signals are input. ➢ • In TV, VIDEO, S-VIDEO, and COMPONENT(480i, 480p) modes, all external devices (DVD, VCR etc.). Press the EXIT button to exit. • 16:9 : Sets the picture ...to 16:9 wide mode. • Zoom1 : Magnifies the size of the picture on the remote control to select the screen format you can not change the picture size. Wide Fit Enlarges the aspect ratio of the picture to fit the...
... input. 1 Press the MENU button to see the full image without any cutoff when DTV or HDMI 720p/1080i signals are input. ➢ • In TV, VIDEO, S-VIDEO, and COMPONENT(480i, 480p) modes, all external devices (DVD, VCR etc.). Press the EXIT button to exit. • 16:9 : Sets the picture ...to 16:9 wide mode. • Zoom1 : Magnifies the size of the picture on the remote control to select the screen format you can not change the picture size. Wide Fit Enlarges the aspect ratio of the picture to fit the...
User Manual (ENGLISH)
Page 32
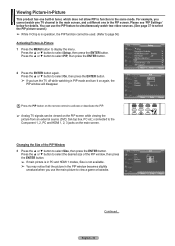
...Move Enter Return T V PIP Size Position Channel PIP : OOfff : On : : DTV Air 3 - 0 Press the PIP button on the remote control to activate or deactivate the PIP. ➢ Analog TV signals can use the main picture to view a game or karaoke. English - 32 Press the ▲ or ▼ button to select...; While V-Chip is not available. ➢ You may notice that the picture in the PIP window becomes slightly unnatural when you cannot watch one TV channel in the main screen, and a different one built-in tuner, which does not allow PIP to select Size, then press the ENTER button....
...Move Enter Return T V PIP Size Position Channel PIP : OOfff : On : : DTV Air 3 - 0 Press the PIP button on the remote control to activate or deactivate the PIP. ➢ Analog TV signals can use the main picture to view a game or karaoke. English - 32 Press the ▲ or ▼ button to select...; While V-Chip is not available. ➢ You may notice that the picture in the PIP window becomes slightly unnatural when you cannot watch one TV channel in the main screen, and a different one built-in tuner, which does not allow PIP to select Size, then press the ENTER button....
User Manual (ENGLISH)
Page 33
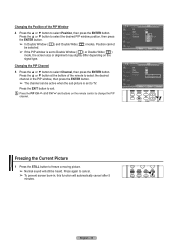
Changing the Position of the remote to select the desired channel in , this function will still be heard. Changing the PIP Channel 5 Press the ▲ or ▼ button to exit. Press ...; If the PIP window is set to Double Window ( ) or Double Wide ( ) mode, the screen size or alignment may slightly differ depending on the remote control to TV. Press the ▲ or ▼ button to select the desired PIP window position, then press the ENTER button. ➢ In Double Window ( be active...
Changing the Position of the remote to select the desired channel in , this function will still be heard. Changing the PIP Channel 5 Press the ▲ or ▼ button to exit. Press ...; If the PIP window is set to Double Window ( ) or Double Wide ( ) mode, the screen size or alignment may slightly differ depending on the remote control to TV. Press the ▲ or ▼ button to select the desired PIP window position, then press the ENTER button. ➢ In Double Window ( be active...

User Manual (ENGLISH)
Page 34
...-Track Options Auto Volume : Off Internal Mute : Off Sound Select : Main Reset Move Enter Return English - 34 Press the S.MODE button on the remote control to exit. ➢ • R/L Sound Balance Adjustment: To adjust the sound balance of the R/L speakers. • Frequency Adjustment (100Hz, ... be set to On. (Refer to page 49) 1 Press the MENU button to the Custom mode. Sound Control Using Automatic Sound Settings Your TV has automatic sound settings ("Standard", "Music", "Movie", "Speech", and "Custom") that is automatically switched to display the menu. T V Sound...
...-Track Options Auto Volume : Off Internal Mute : Off Sound Select : Main Reset Move Enter Return English - 34 Press the S.MODE button on the remote control to exit. ➢ • R/L Sound Balance Adjustment: To adjust the sound balance of the R/L speakers. • Frequency Adjustment (100Hz, ... be set to On. (Refer to page 49) 1 Press the MENU button to the Custom mode. Sound Control Using Automatic Sound Settings Your TV has automatic sound settings ("Standard", "Music", "Movie", "Speech", and "Custom") that is automatically switched to display the menu. T V Sound...

User Manual (ENGLISH)
Page 35
... TruSurround XT TruSurround XT is a patented SRS technology that solves the problem of the program into foreign languages). Digital The digital-TV broadcast system is incorporated under license from among the actual languages being broadcast. The availability of SRS Labs, Inc. T V Sound...compelling, virtual surround sound experience through any two-speaker playback system, including internal television speakers. Press the SRS button on the remote control to select Off or On, then press the ENTER button. TruSurround XT technology is capable of simultaneous transmission of many ...
... TruSurround XT TruSurround XT is a patented SRS technology that solves the problem of the program into foreign languages). Digital The digital-TV broadcast system is incorporated under license from among the actual languages being broadcast. The availability of SRS Labs, Inc. T V Sound...compelling, virtual surround sound experience through any two-speaker playback system, including internal television speakers. Press the SRS button on the remote control to select Off or On, then press the ENTER button. TruSurround XT technology is capable of simultaneous transmission of many ...

User Manual (ENGLISH)
Page 36
... Off Multi-Track Options Auto Volume : OOfff Internal Mute : OOffn Sound Select : Main Reset Move Enter Return Selecting the Internal Mute Sound output from the TV speakers is useful when you are having difficulty receiving a stereo signal. • Choose Stereo for channels that are broadcasting in volume level among broadcasters. 1 ...XT : Off Multi-Track Options Auto Volume : Off Internal Mute : Off Sound Select : Main Reset Move Enter Return English - 36 Analog Depending on the remote control to Mono, Stereo or SAP. Choosing a Multi-Channel Sound (MTS) Track -
... Off Multi-Track Options Auto Volume : OOfff Internal Mute : OOffn Sound Select : Main Reset Move Enter Return Selecting the Internal Mute Sound output from the TV speakers is useful when you are having difficulty receiving a stereo signal. • Choose Stereo for channels that are broadcasting in volume level among broadcasters. 1 ...XT : Off Multi-Track Options Auto Volume : Off Internal Mute : Off Sound Select : Main Reset Move Enter Return English - 36 Analog Depending on the remote control to Mono, Stereo or SAP. Choosing a Multi-Channel Sound (MTS) Track -


