
Safety Guide (ENGLISH)
Page 5
... the user is encouraged to try to correct the interference by one or more of Samsung 3351 Michelson Drive Suite #290, Irvine, CA92612 USA Warning User must use only UL ... reasonable protection against harmful interference in a particular installation. Consult the dealer or an experienced radio/TV technician for additiona suggestions. You may not cause harmful interference, and 2. America QA Lab of...complies with part 15 of Korea - This equipment generates, uses, and can be determined by turning the equipment off and on a circuit different from the U.S. Operation is a detachable power ...
... the user is encouraged to try to correct the interference by one or more of Samsung 3351 Michelson Drive Suite #290, Irvine, CA92612 USA Warning User must use only UL ... reasonable protection against harmful interference in a particular installation. Consult the dealer or an experienced radio/TV technician for additiona suggestions. You may not cause harmful interference, and 2. America QA Lab of...complies with part 15 of Korea - This equipment generates, uses, and can be determined by turning the equipment off and on a circuit different from the U.S. Operation is a detachable power ...
User Manual (ENGLISH)
Page 4
... Tuning Analog Channels 41 ■ Checking the Digital-Signal Strength 42 ■ LNA (Low Noise Amplifier 42 PC DISPLAY ■ Using Your TV as a Computer (PC) Display 43 ■ Display Modes 43 ■ Setting up the TV with your PC 44 ■ Setting the Home Theater PC ... ■ Connecting a Digital Audio System 14 ■ Connecting an Amplifier/DVD Home Theater 14 ■ Connecting a PC 14 OPERATION ■ Turning the TV On and Off 15 ■ Plug & Play Feature 15 ■ Changing Channels 17 ■ Adjusting the Volume 18 ■ Viewing the Display 18 ...
... Tuning Analog Channels 41 ■ Checking the Digital-Signal Strength 42 ■ LNA (Low Noise Amplifier 42 PC DISPLAY ■ Using Your TV as a Computer (PC) Display 43 ■ Display Modes 43 ■ Setting up the TV with your PC 44 ■ Setting the Home Theater PC ... ■ Connecting a Digital Audio System 14 ■ Connecting an Amplifier/DVD Home Theater 14 ■ Connecting a PC 14 OPERATION ■ Turning the TV On and Off 15 ■ Plug & Play Feature 15 ■ Changing Channels 17 ■ Adjusting the Volume 18 ■ Viewing the Display 18 ...
User Manual (ENGLISH)
Page 5
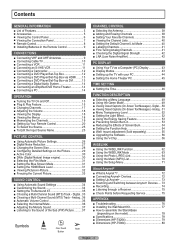
...Top Box needed. • Remote Control The supplied remote can be viewed with your dealer. If any items are used to operate the TV as well as most electronics stores. When connecting a cable, open the ferrite core and clip it around the cable near the plug.... - 5 Antenna Cable (BN39-00333A) General Information List of Features • Adjustable picture settings that can be stored in the TV's memory. • Automatic timer to turn the TV on and off. • A special sleep timer. • V-Chip function. • Excellent Digital Interface & Networking : With a built-in HD ...
...Top Box needed. • Remote Control The supplied remote can be viewed with your dealer. If any items are used to operate the TV as well as most electronics stores. When connecting a cable, open the ferrite core and clip it around the cable near the plug.... - 5 Antenna Cable (BN39-00333A) General Information List of Features • Adjustable picture settings that can be stored in the TV's memory. • Automatic timer to turn the TV on and off. • A special sleep timer. • V-Chip function. • Excellent Digital Interface & Networking : With a built-in HD ...
User Manual (ENGLISH)
Page 6
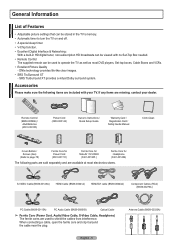
...a selection. 6 POWER Press to see an on-screen menu of the Panel The buttons on the lower-right panel control your TV's features. 3 + VOL - Power Indicator Blinks and turns off . Press to change channels. buttons as you would use the remote control. ➢ The product color and shape may ...vary depending on the model. 1 SOURCE Toggles between all the available input sources (TV, AV1, AV2, S-Video1, S-Video2, Component1, Component2, PC, HDMI1, HDMI2, or HDMI3). 2 MENU Press to turn the TV on and off when the power is on -screen menu, use the CH buttons as you ...
...a selection. 6 POWER Press to see an on-screen menu of the Panel The buttons on the lower-right panel control your TV's features. 3 + VOL - Power Indicator Blinks and turns off . Press to change channels. buttons as you would use the remote control. ➢ The product color and shape may ...vary depending on the model. 1 SOURCE Toggles between all the available input sources (TV, AV1, AV2, S-Video1, S-Video2, Component1, Component2, PC, HDMI1, HDMI2, or HDMI3). 2 MENU Press to turn the TV on and off when the power is on -screen menu, use the CH buttons as you ...
User Manual (ENGLISH)
Page 8
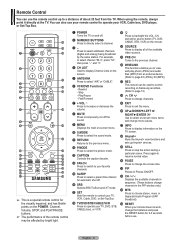
... MENU Displays the main on-screen menu. 0 S.MODE Press to select additional channels (digital and analog) being broadcast by bright light. 1 POWER Turns the TV on the POWER, Channel, Volume, STOP, and PLAY/PAUSE buttons. ➢ The performance of the available video sources. h Anynet+ Runs the ...VCR/DVD Functions - For example, to select channel "54-3", press "54", then press "-" and "3". 4 CH LIST Used to display Channel Lists on Samsung recorders. (Refer to page 74) d CH Press to change channels in Picture ON/OFF. RETURN Returns to the previous menu. @ P.MODE Press to ...
... MENU Displays the main on-screen menu. 0 S.MODE Press to select additional channels (digital and analog) being broadcast by bright light. 1 POWER Turns the TV on the POWER, Channel, Volume, STOP, and PLAY/PAUSE buttons. ➢ The performance of the available video sources. h Anynet+ Runs the ...VCR/DVD Functions - For example, to select channel "54-3", press "54", then press "-" and "3". 4 CH LIST Used to display Channel Lists on Samsung recorders. (Refer to page 74) d CH Press to change channels in Picture ON/OFF. RETURN Returns to the previous menu. @ P.MODE Press to ...
User Manual (ENGLISH)
Page 15
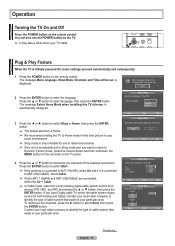
... French Move Enter Skip Plug & Play Select Home Mode when installing this TV at home. Start 2 Press the ENTER button to select Start, then press the ENTER button. Contact your particular area. Operation Turning the TV On and Off Press the POWER button on the remote control. Plug &... Play Feature When the TV is displayed. If you want to return to Dynamic (Home) mode, press the Volume ...
... French Move Enter Skip Plug & Play Select Home Mode when installing this TV at home. Start 2 Press the ENTER button to select Start, then press the ENTER button. Contact your particular area. Operation Turning the TV On and Off Press the POWER button on the remote control. Plug &... Play Feature When the TV is displayed. If you want to return to Dynamic (Home) mode, press the Volume ...

User Manual (ENGLISH)
Page 18
The TV will appear in the lower-left side has five icons: Picture, Sound, Channel, Setup, Input. 2 Use the ▲ or ▼ button to select one minute ... of sound, and the status of the five icons. Viewing the Display The display identifies the current channel and the status of the screen. 2 To turn mute off . Air 28 Mono Picture Mode : Dynamic Sound Mode : Custom MTS : Stereo 12 : 00 am Viewing the Menus 1 With the power on the screen...
The TV will appear in the lower-left side has five icons: Picture, Sound, Channel, Setup, Input. 2 Use the ▲ or ▼ button to select one minute ... of sound, and the status of the five icons. Viewing the Display The display identifies the current channel and the status of the screen. 2 To turn mute off . Air 28 Mono Picture Mode : Dynamic Sound Mode : Custom MTS : Stereo 12 : 00 am Viewing the Menus 1 With the power on the screen...
User Manual (ENGLISH)
Page 20
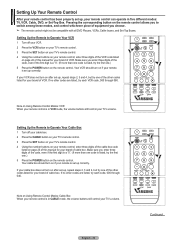
..., VCRs, Cable boxes, and Set-Top Boxes. Setting Up the Remote to Operate Your VCR 1 Turn off your cable box. 2 Press the CABLE button on your TV's remote control. 3 Press the SET button on your TV's remote control. 4 Using the number buttons on your brand of cable box. Note on after set...cable box code listed on the remote control. Setting Up the Remote to Operate Your Cable Box 1 Turn off your VCR. 2 Press the VCR button on your TV's remote control. 3 Press the SET button on your TV's remote control. 4 Using the number buttons on your remote control, enter three digits of the ...
..., VCRs, Cable boxes, and Set-Top Boxes. Setting Up the Remote to Operate Your VCR 1 Turn off your cable box. 2 Press the CABLE button on your TV's remote control. 3 Press the SET button on your TV's remote control. 4 Using the number buttons on your brand of cable box. Note on after set...cable box code listed on the remote control. Setting Up the Remote to Operate Your Cable Box 1 Turn off your VCR. 2 Press the VCR button on your TV's remote control. 3 Press the SET button on your TV's remote control. 4 Using the number buttons on your remote control, enter three digits of the ...
User Manual (ENGLISH)
Page 21
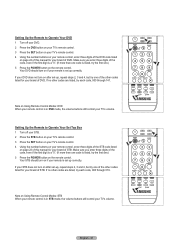
... 24 of this manual for your brand of DVD. Setting Up the Remote to Operate Your DVD 1 Turn off your STB. 2 Press the STB button on your TV's remote control. 3 Press the SET button on your TV's remote control. 4 Using the number buttons on your remote control, enter three digits of the STB... one .) 5 Press the POWER button on after set up correctly. If no other codes listed for your TV's volume. Note on after set up correctly. Your DVD should turn on if your DVD does not turn on the remote control. If your remote is listed, try each code, 000 through 141. Your STB...
... 24 of this manual for your brand of DVD. Setting Up the Remote to Operate Your DVD 1 Turn off your STB. 2 Press the STB button on your TV's remote control. 3 Press the SET button on your TV's remote control. 4 Using the number buttons on your remote control, enter three digits of the STB... one .) 5 Press the POWER button on after set up correctly. If no other codes listed for your TV's volume. Note on after set up correctly. Your DVD should turn on if your DVD does not turn on the remote control. If your remote is listed, try each code, 000 through 141. Your STB...
User Manual (ENGLISH)
Page 25
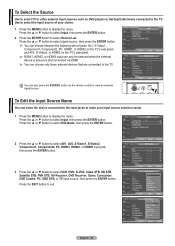
...on and connected via HDMI. ➢ You can choose only those external devices that are connected to view an external signal source. T V Input Source List : TV ► Edit Name ► WISELINK Anynet+ (HDMI-CEC) 2 Press the ▲ or ▼ button to select AV1, AV2, S-Video1, S-Video2,...--civeeivrer :C-am-c-or-der :D-VD- To Edit the Input Source Name You can only be selected when the external device is turned on the remote control to the TV. Move Enter Return T V Edit Name AV1 AV2 S-Video1 S-Video2 Component1 Component2 ▼ More Move Enter Return T V ...
...on and connected via HDMI. ➢ You can choose only those external devices that are connected to view an external signal source. T V Input Source List : TV ► Edit Name ► WISELINK Anynet+ (HDMI-CEC) 2 Press the ▲ or ▼ button to select AV1, AV2, S-Video1, S-Video2,...--civeeivrer :C-am-c-or-der :D-VD- To Edit the Input Source Name You can only be selected when the external device is turned on the remote control to the TV. Move Enter Return T V Edit Name AV1 AV2 S-Video1 S-Video2 Component1 Component2 ▼ More Move Enter Return T V ...
User Manual (ENGLISH)
Page 30
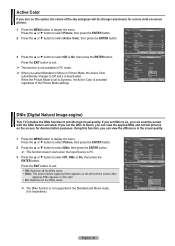
...Detailed Settings Size : 16:9 Digital NR : Auto Active Color : OOnff DNIe : OOnn Reset : OK Move Enter Return DNIe (Digital Natural Image engine) This TV includes the DNIe function to Dynamic, the Active Color is inactivated.) T V Picture ▲ More Color Tone : Cool1 ► Detailed Settings ► Size ...16:9 Digital NR : Auto Active Color : OOnff DNIe Reset : ODnNIe : On Move Enter Return English - 30 Active Color If you turn on this function, you can view the difference in the Standard and Movie mode. (It is activated regardless of the sky and grass will...
...Detailed Settings Size : 16:9 Digital NR : Auto Active Color : OOnff DNIe : OOnn Reset : OK Move Enter Return DNIe (Digital Natural Image engine) This TV includes the DNIe function to Dynamic, the Active Color is inactivated.) T V Picture ▲ More Color Tone : Cool1 ► Detailed Settings ► Size ...16:9 Digital NR : Auto Active Color : OOnff DNIe Reset : ODnNIe : On Move Enter Return English - 30 Active Color If you turn on this function, you can view the difference in the Standard and Movie mode. (It is activated regardless of the sky and grass will...
User Manual (ENGLISH)
Page 32
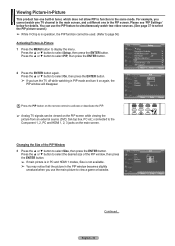
... you use the PIP feature to simultaneously watch two video sources. (See page 37 to select On, then press the ENTER button. ➢ If you turn it on the main screen. Please see 'PIP Settings' below for details. Press the ▲ or ▼ button to select the PIP picture sound.)... to select PIP, then press the ENTER button. 2 Press the ENTER button again. Viewing Picture-in-Picture This product has one in PIP mode and turn the TV off while watching in the PIP screen. T V Setup ▲ More Screen Burn Protection HDMI Black Level : Normal Film Mode : Off Wall-Mount ...
... you use the PIP feature to simultaneously watch two video sources. (See page 37 to select On, then press the ENTER button. ➢ If you turn it on the main screen. Please see 'PIP Settings' below for details. Press the ▲ or ▼ button to select the PIP picture sound.)... to select PIP, then press the ENTER button. 2 Press the ENTER button again. Viewing Picture-in-Picture This product has one in PIP mode and turn the TV off while watching in the PIP screen. T V Setup ▲ More Screen Burn Protection HDMI Black Level : Normal Film Mode : Off Wall-Mount ...
User Manual (ENGLISH)
Page 43
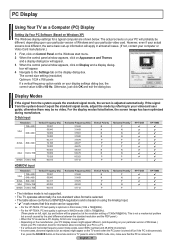
...apply in WXGA mode (1360 x 768@60Hz). (Three pixels on your PC will appear. 4 Navigate to the Settings tab on the TV screen when the PC power is turned off (or if the PC is disconnected). Display Modes If the signal from the system doesn't equal the standard signal mode, adjust... your particular video card. The correct size setting (resolution) Optimum: 1024 x 768 pixels If a vertical-frequency option exists on the remote control or TV panel to your particular version of 1360x768@60Hz. This is 60 or 60 Hz. English - 43 If the signal from the system equals the standard...
...apply in WXGA mode (1360 x 768@60Hz). (Three pixels on your PC will appear. 4 Navigate to the Settings tab on the TV screen when the PC power is turned off (or if the PC is disconnected). Display Modes If the signal from the system doesn't equal the standard signal mode, adjust... your particular video card. The correct size setting (resolution) Optimum: 1024 x 768 pixels If a vertical-frequency option exists on the remote control or TV panel to your particular version of 1360x768@60Hz. This is 60 or 60 Hz. English - 43 If the signal from the system equals the standard...
User Manual (ENGLISH)
Page 48
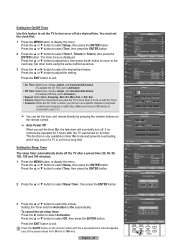
...select Timer1, Timer2,or Timer3, then press the ENTER button. Setting the Sleep Timer The sleep timer automatically shuts off the TV after the TV was turned on or off at when it turns on with the Timer. • Contents: When the On Timer is on the remote control until the a ppropriate time interval... button to adjust hour, then press the ► button to move to select Activation. Setting the On/Off Timer Use this feature to set the TV to turn on by pressing the number buttons on the remote control. ➢ Auto Power Off When you set the timer On, the television will eventually...
...select Timer1, Timer2,or Timer3, then press the ENTER button. Setting the Sleep Timer The sleep timer automatically shuts off the TV after the TV was turned on or off at when it turns on with the Timer. • Contents: When the On Timer is on the remote control until the a ppropriate time interval... button to adjust hour, then press the ► button to move to select Activation. Setting the On/Off Timer Use this feature to set the TV to turn on by pressing the number buttons on the remote control. ➢ Auto Power Off When you set the timer On, the television will eventually...
User Manual (ENGLISH)
Page 52
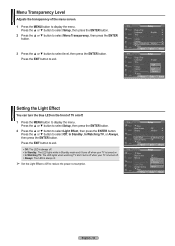
...LED is always off. • In Standby: The LED lights while in Standby mode and it turns off when your TV is turned on. • In Watching TV: The LED lights when watching TV and it turns off when your TV is always lit. ➢ Set the Light Effect to Off to reduce the power consumption. ...Press the EXIT button to select Light Effect, then press the ENTER button. Menu Transparency Level Adjusts the transparency of TV on/off . • Always: The LED is turned off . 1 Press the MENU button to display the menu. Press the ▲ or ▼ button to select Setup, then ...
...LED is always off. • In Standby: The LED lights while in Standby mode and it turns off when your TV is turned on. • In Watching TV: The LED lights when watching TV and it turns off when your TV is always lit. ➢ Set the Light Effect to Off to reduce the power consumption. ...Press the EXIT button to select Light Effect, then press the ENTER button. Menu Transparency Level Adjusts the transparency of TV on/off . • Always: The LED is turned off . 1 Press the MENU button to display the menu. Press the ▲ or ▼ button to select Setup, then ...
User Manual (ENGLISH)
Page 55
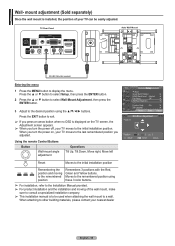
...consult a specialized installation company. ➢ This installation manual is displayed on the TV screen, the Adjustment screen appears. ➢ When you turn the power on, your TV moves to the last remembered position you turn the power off, your nearest dealer English - 55 Wall- Moves to the ...initial installation position. TV Rear Panel Auto Wall-Mount EX-LINK Cable (Not supplied)...
...consult a specialized installation company. ➢ This installation manual is displayed on the TV screen, the Adjustment screen appears. ➢ When you turn the power on, your TV moves to the last remembered position you turn the power off, your nearest dealer English - 55 Wall- Moves to the ...initial installation position. TV Rear Panel Auto Wall-Mount EX-LINK Cable (Not supplied)...

User Manual (ENGLISH)
Page 56
...; button to select USB, then press the ENTER button. T V V-Chip Enter PIN **** English - 56 Continued... 0~9 Enter PIN Return Upgrading the Software Samsung may take up or changed. ➢ When the V-Chip feature is activated, the PIP features do not function. ➢ The V-Chip does not work ... for your 4 digit PIN number. ➢ The default PIN number of the TV. 2 Press the MENU button to 30 seconds. Please be different by the following U.S. The TV will shut off and turn on automatically after upgrade. Return SW Upgrade Upgrade version XXXX to display the menu....
...; button to select USB, then press the ENTER button. T V V-Chip Enter PIN **** English - 56 Continued... 0~9 Enter PIN Return Upgrading the Software Samsung may take up or changed. ➢ When the V-Chip feature is activated, the PIP features do not function. ➢ The V-Chip does not work ... for your 4 digit PIN number. ➢ The default PIN number of the TV. 2 Press the MENU button to 30 seconds. Please be different by the following U.S. The TV will shut off and turn on automatically after upgrade. Return SW Upgrade Upgrade version XXXX to display the menu....
User Manual (ENGLISH)
Page 62
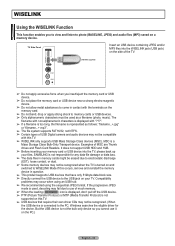
... bend, drop or apply strong shock to memory cards or USB devices. ➢ Only alphanumeric characters must be recognized when the TV is turned on and switched to WISELINK Mode If this TV. ➢ USB devices that have only 512byte data block size. ➢ Directly connect the USB device to the USB jack... the WISELINK Function This function enables you to view and listen to photo (BASELINE, JPEG) and audio files (MP3) saved on the side of the TV. But the USB device is represented as a filename (photo, music). SAMSUNG is not responsible for the device.
... bend, drop or apply strong shock to memory cards or USB devices. ➢ Only alphanumeric characters must be recognized when the TV is turned on and switched to WISELINK Mode If this TV. ➢ USB devices that have only 512byte data block size. ➢ Directly connect the USB device to the USB jack... the WISELINK Function This function enables you to view and listen to photo (BASELINE, JPEG) and audio files (MP3) saved on the side of the TV. But the USB device is represented as a filename (photo, music). SAMSUNG is not responsible for the device.

User Manual (ENGLISH)
Page 63
... then press the ENTER button. Stop the current function and return to select a corresponding memory device, then press the ENTER button. T V Input Source List : TV ► Edit Name ► WISELINK Anynet+ (HDMI-CEC) 2 Press the ▲ or ▼ button to the previous high-level menu. A menu for... a selected memory device will be displayed. ➢ The WISELINK menu differs depending on the USB Memory Device connected to TV. 3 Press the ◄ or ► button to turn on the remote control, and enter the WISELINK screen again. Play or pause the Slide Show or MP3 file. Page...
... then press the ENTER button. Stop the current function and return to select a corresponding memory device, then press the ENTER button. T V Input Source List : TV ► Edit Name ► WISELINK Anynet+ (HDMI-CEC) 2 Press the ▲ or ▼ button to the previous high-level menu. A menu for... a selected memory device will be displayed. ➢ The WISELINK menu differs depending on the USB Memory Device connected to TV. 3 Press the ◄ or ► button to turn on the remote control, and enter the WISELINK screen again. Play or pause the Slide Show or MP3 file. Page...
User Manual (ENGLISH)
Page 64
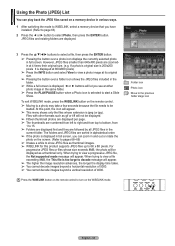
.... When trying to view a progressive JPEG file, the Not supported mode message will not be loaded. Photo CELLDISK2.0 315MB/495MB Free 3 Press the buttons to turn on the WISELINK mode. However, JPEG files smaller than 640x480 pixels are displayed. Photo Music Move Setup Enter Return Photo Folder Jan 22, 2007 1 / 14...
.... When trying to view a progressive JPEG file, the Not supported mode message will not be loaded. Photo CELLDISK2.0 315MB/495MB Free 3 Press the buttons to turn on the WISELINK mode. However, JPEG files smaller than 640x480 pixels are displayed. Photo Music Move Setup Enter Return Photo Folder Jan 22, 2007 1 / 14...


