
Open Source Guide (ENGLISH)
Page 2
16. You can redistribute and change. How to Apply These Terms to Your New Libraries If you develop a new library, and you want it free software that everyone can do so by permitting redistribution under the terms of the greatest possible use to the public, we recommend making it to the library. and each source file to where the full notice is safest to attach them to the start of each file should have at least the "copyright" line and a pointer to most effectively convey the exclusion of warranty; IN NO EVENT UNLESS REQUIRED BY APPLICABLE LAW OR AGREED TO IN WRITING WILL ANY ...
16. You can redistribute and change. How to Apply These Terms to Your New Libraries If you develop a new library, and you want it free software that everyone can do so by permitting redistribution under the terms of the greatest possible use to the public, we recommend making it to the library. and each source file to where the full notice is safest to attach them to the start of each file should have at least the "copyright" line and a pointer to most effectively convey the exclusion of warranty; IN NO EVENT UNLESS REQUIRED BY APPLICABLE LAW OR AGREED TO IN WRITING WILL ANY ...
Safety Guide (ENGLISH)
Page 1
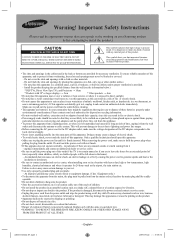
..., chemical substances and where it from the wall (see the information below.) * DLP TVs, Direct View Type TVs, and Projectors → 10cm * Products with a cloth or other similar surface. -...near a swimming pool etc.). An improper ground may cause serious damage to the marking on your set . • Use only a properly grounded plug and receptacle. - Important Safety Instructions (Please ...not operate normally - Failure to contact an authorized service center, when installing your Samsung product before cleaning. • This appratus use any unusual sounds or smells coming ...
..., chemical substances and where it from the wall (see the information below.) * DLP TVs, Direct View Type TVs, and Projectors → 10cm * Products with a cloth or other similar surface. -...near a swimming pool etc.). An improper ground may cause serious damage to the marking on your set . • Use only a properly grounded plug and receptacle. - Important Safety Instructions (Please ...not operate normally - Failure to contact an authorized service center, when installing your Samsung product before cleaning. • This appratus use any unusual sounds or smells coming ...
Safety Guide (ENGLISH)
Page 7
...) 1) Read these instructions. 2) Keep these instructions. 3) Heed all warnings. 4) Follow all servicing to qualified service personnel. Your Samsung TV is adequate ventilation and that you've followed that there is ENERGYSTAR qualified in accordance with SWEDAC(MPR II) recommendations for mounting and ...installation. A polarized plug has two blades with the apparatus. Change to certain features, settings and functionality in a rack or bookcase. A grounding type plug has two blades and a third grounding prong. Ensure that manufacturer...
...) 1) Read these instructions. 2) Keep these instructions. 3) Heed all warnings. 4) Follow all servicing to qualified service personnel. Your Samsung TV is adequate ventilation and that you've followed that there is ENERGYSTAR qualified in accordance with SWEDAC(MPR II) recommendations for mounting and ...installation. A polarized plug has two blades with the apparatus. Change to certain features, settings and functionality in a rack or bookcase. A grounding type plug has two blades and a third grounding prong. Ensure that manufacturer...
User Manual (ENGLISH)
Page 4
... the Channel Lists 40 ■ Setting the Default Channel List Mode 40 ■ Labeling Channels 41 ■ Fine Tuning Analog Channels 41 ■ Checking the Digital-Signal Strength 42 ■ LNA (Low Noise Amplifier 42 PC DISPLAY ■ Using Your TV as a Computer (PC) Display ...43 ■ Display Modes 43 ■ Setting up the TV with your PC 44 ■ Setting the Home Theater PC 45 TIME SETTING ■ Setting the Time 46 FUNCTION...
... the Channel Lists 40 ■ Setting the Default Channel List Mode 40 ■ Labeling Channels 41 ■ Fine Tuning Analog Channels 41 ■ Checking the Digital-Signal Strength 42 ■ LNA (Low Noise Amplifier 42 PC DISPLAY ■ Using Your TV as a Computer (PC) Display ...43 ■ Display Modes 43 ■ Setting up the TV with your PC 44 ■ Setting the Home Theater PC 45 TIME SETTING ■ Setting the Time 46 FUNCTION...
User Manual (ENGLISH)
Page 5
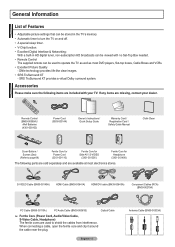
...; Ferrite Core (Power Cord, Audio/Video Cable, S-Video Cable, Headphone) The ferrite cores are available at most DVD players, Set-top boxes, Cable Boxes and VCRs. • Excellent Picture Quality - Accessories Please make sure the following parts are sold separately ... TruSurround XT - English - 5 Antenna Cable (BN39-00333A) General Information List of Features • Adjustable picture settings that can be stored in the TV's memory. • Automatic timer to turn the TV on and off. • A special sleep timer. • V-Chip function. • Excellent Digital Interface ...
...; Ferrite Core (Power Cord, Audio/Video Cable, S-Video Cable, Headphone) The ferrite cores are available at most DVD players, Set-top boxes, Cable Boxes and VCRs. • Excellent Picture Quality - Accessories Please make sure the following parts are sold separately ... TruSurround XT - English - 5 Antenna Cable (BN39-00333A) General Information List of Features • Adjustable picture settings that can be stored in the TV's memory. • Automatic timer to turn the TV on and off. • A special sleep timer. • V-Chip function. • Excellent Digital Interface ...
User Manual (ENGLISH)
Page 7
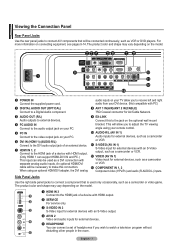
... Connect to the DVI audio output jack of an external device. 7 HDMI IN 1, 2 Connect to the HDMI jack of headphones if you to adjust the TV viewing angle using your remote control. 0 AUDIO-R/L (AV IN 1) Audio inputs for external devices. 5 HEADPHONE You can also be used only occasionally, such ...for external devices, such as a DVI connection with HDMI output. (Only HDMI 1 can support HDMI-DVI IN and PC.) This input can connect a set of a device with separate analog audio inputs. For more information on the optional wall mount bracket. Side Panel Jacks Use the right side panel jacks...
... Connect to the DVI audio output jack of an external device. 7 HDMI IN 1, 2 Connect to the HDMI jack of headphones if you to adjust the TV viewing angle using your remote control. 0 AUDIO-R/L (AV IN 1) Audio inputs for external devices. 5 HEADPHONE You can also be used only occasionally, such ...for external devices, such as a DVI connection with HDMI output. (Only HDMI 1 can support HDMI-DVI IN and PC.) This input can connect a set of a device with separate analog audio inputs. For more information on the optional wall mount bracket. Side Panel Jacks Use the right side panel jacks...
User Manual (ENGLISH)
Page 8
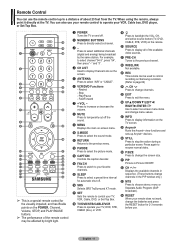
...; This is a special remote control for automatic shut off. ^ SRS Selects SRS TruSurround XT mode. & SET Sets the remote to control your TV, VCR, Cable, DVD, or Set-Top Box. * TV/DVD/STB/CABLE/VCR Press to select a preset time interval for the visually impaired, and has Braille points on... to resume normal video. c REC This remote can also use . h Anynet+ Runs the Anynet+ view functions and sets up to a distance of the remote control may be used to control recording on Samsung recorders. (Refer to page 64) d CH Press to change the screen size. English - 8 Fast/Forward 7 +...
...; This is a special remote control for automatic shut off. ^ SRS Selects SRS TruSurround XT mode. & SET Sets the remote to control your TV, VCR, Cable, DVD, or Set-Top Box. * TV/DVD/STB/CABLE/VCR Press to select a preset time interval for the visually impaired, and has Braille points on... to resume normal video. c REC This remote can also use . h Anynet+ Runs the Anynet+ view functions and sets up to a distance of the remote control may be used to control recording on Samsung recorders. (Refer to page 64) d CH Press to change the screen size. English - 8 Fast/Forward 7 +...
User Manual (ENGLISH)
Page 9
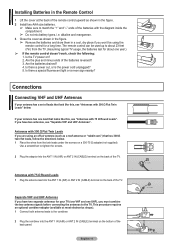
Are the batteries drained? 4. Antennas with 300 Ω Flat Twin Leads If you are using the remote control for your antenna has a set of the TV. This procedure requires an optional combiner-adaptor (available at the back of the remote control upward as a roof antenna or "rabbit ears") that ... UHF), you have two separate antennas for a long time. Antennas with 300 Ω Flat Twin Leads" below . 1 Place the wires from the TV. (Assuming typical TV usage, the batteries last for about 23 feet (7m) from the twin leads under the screws on a 300-75 Ω adapter (not supplied). ...
Are the batteries drained? 4. Antennas with 300 Ω Flat Twin Leads If you are using the remote control for your antenna has a set of the TV. This procedure requires an optional combiner-adaptor (available at the back of the remote control upward as a roof antenna or "rabbit ears") that ... UHF), you have two separate antennas for a long time. Antennas with 300 Ω Flat Twin Leads" below . 1 Place the wires from the TV. (Assuming typical TV usage, the batteries last for about 23 feet (7m) from the twin leads under the screws on a 300-75 Ω adapter (not supplied). ...

User Manual (ENGLISH)
Page 10
... IN ANT OUT 2 Connect the other OUT terminal on the splitter and the A-IN terminal on your TV to the cable box's output channel, which is cable-ready, you have made this connection, set the A/B switch to "B", you will need a two-way splitter, an RF (A/B) switch, and four...IN" or simply, "IN". 2 Connect this cable to the ANT 2 IN(CABLE) terminal on the rear of the TV. Set the A/B switch to the "B" position to view scrambled channels. (When you set the A/B switch to the "A" position for normal viewing. Incoming cable Incoming cable Incoming cable 6 Connect the last Antenna ...
... IN ANT OUT 2 Connect the other OUT terminal on the splitter and the A-IN terminal on your TV to the cable box's output channel, which is cable-ready, you have made this connection, set the A/B switch to "B", you will need a two-way splitter, an RF (A/B) switch, and four...IN" or simply, "IN". 2 Connect this cable to the ANT 2 IN(CABLE) terminal on the rear of the TV. Set the A/B switch to the "B" position to view scrambled channels. (When you set the A/B switch to the "A" position for normal viewing. Incoming cable Incoming cable Incoming cable 6 Connect the last Antenna ...

User Manual (ENGLISH)
Page 12
... Audio Cable (Not supplied) IN 1 [R-AUDIO-L](or COMPONENT IN 2 1 Component Cable (Not supplied) [R-AUDIO-L]) jacks on the TV and the AUDIO OUT jacks on the DVD Player/Set-Top Box. ➢ Component video separates the video into Y (Luminance (brightness)), PB (Blue) and PR (Red) for enhanced...the audio cable to COMPONENT IN also. ➢ Each DVD Player/Set-Top box has a different back panel configuration. ➢ When connecting a DVD Player/Set-Top box, match the color of the connection terminal to the cable. Camcorder TV Side Panel 1 S-Video Cable(Not supplied) or 1 Video Cable ...
... Audio Cable (Not supplied) IN 1 [R-AUDIO-L](or COMPONENT IN 2 1 Component Cable (Not supplied) [R-AUDIO-L]) jacks on the TV and the AUDIO OUT jacks on the DVD Player/Set-Top Box. ➢ Component video separates the video into Y (Luminance (brightness)), PB (Blue) and PR (Red) for enhanced...the audio cable to COMPONENT IN also. ➢ Each DVD Player/Set-Top box has a different back panel configuration. ➢ When connecting a DVD Player/Set-Top box, match the color of the connection terminal to the cable. Camcorder TV Side Panel 1 S-Video Cable(Not supplied) or 1 Video Cable ...

User Manual (ENGLISH)
Page 13
... cable. ➢ When using a single cable without compression. • The difference between the HDMI IN 2 on the TV and the HDMI OUT on the DVD Player/Set-Top Box. Connecting a DVD Player/Set-Top Box via HDMI This connection can only be made if there is a DVI Output jack on the external... Box. 2 Connect Audio Cables between the DVI IN (HDMI 1) [R-AUDIO-L] jack on the TV and the AUDIO OUT jacks on the DVD Player/Set-Top Box. DVD Player / Set-Top Box TV Rear Panel 1 HDMI Cable (Not supplied) What is HDMI? • HDMI, or high-definition multimedia interface, is an interface that ...
... cable. ➢ When using a single cable without compression. • The difference between the HDMI IN 2 on the TV and the HDMI OUT on the DVD Player/Set-Top Box. Connecting a DVD Player/Set-Top Box via HDMI This connection can only be made if there is a DVI Output jack on the external... Box. 2 Connect Audio Cables between the DVI IN (HDMI 1) [R-AUDIO-L] jack on the TV and the AUDIO OUT jacks on the DVD Player/Set-Top Box. DVD Player / Set-Top Box TV Rear Panel 1 HDMI Cable (Not supplied) What is HDMI? • HDMI, or high-definition multimedia interface, is an interface that ...
User Manual (ENGLISH)
Page 14
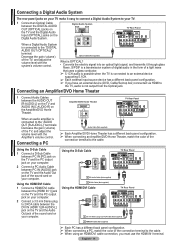
Cable/Set-top box) connected via HDMI to the TV, audio is connected to the cable. Connecting a PC Audio Cable (Not ... a different back panel configuration. ➢ If you must use the HDMI IN1 terminal. Amplifier/DVD Home Theater TV Rear Panel When an audio amplifier is connected to the "DIGITAL AUDIO OUT (OPTICAL)" terminal: Decrease the gain... ➢ Each PC has a different back panel configuration. ➢ When connecting a PC, match the color of the TV, and adjust the volume level with the Amplifier's volume control. English - 14 Optical Cable (Not supplied) What is a...
Cable/Set-top box) connected via HDMI to the TV, audio is connected to the cable. Connecting a PC Audio Cable (Not ... a different back panel configuration. ➢ If you must use the HDMI IN1 terminal. Amplifier/DVD Home Theater TV Rear Panel When an audio amplifier is connected to the "DIGITAL AUDIO OUT (OPTICAL)" terminal: Decrease the gain... ➢ Each PC has a different back panel configuration. ➢ When connecting a PC, match the color of the TV, and adjust the volume level with the Amplifier's volume control. English - 14 Optical Cable (Not supplied) What is a...
User Manual (ENGLISH)
Page 15
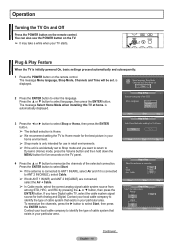
... or ► button to select Shop or Home, then press the ENTER button. ➢ The default selection is Home. ➢ We recommend setting the TV to Home mode for the best picture in retail environments. ➢ If the unit is connected to Dynamic (Home) mode, press the Volume button ...of the OSD. To memorize the channels, press the ► button to enter the language. Plug & Play Feature When the TV is displayed. i Menu language, Shop Mode, Channels and Time will be set . Menu Language :English Spanish French Move Enter Skip Plug & Play Select Home Mode when installing this...
... or ► button to select Shop or Home, then press the ENTER button. ➢ The default selection is Home. ➢ We recommend setting the TV to Home mode for the best picture in retail environments. ➢ If the unit is connected to Dynamic (Home) mode, press the Volume button ...of the OSD. To memorize the channels, press the ► button to enter the language. Plug & Play Feature When the TV is displayed. i Menu language, Shop Mode, Channels and Time will be set . Menu Language :English Spanish French Move Enter Skip Plug & Play Select Home Mode when installing this...
User Manual (ENGLISH)
Page 16
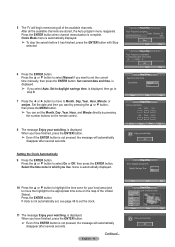
... completed. 14 Channels were memorized. When you live . OK Enter Skip Plug & Play Select the clock mode. is complete. 5 The TV will begin memorizing all the available channels are stored, the Auto program menu reappears. Hour Minute am /pm. Move Adjust Enter Skip i ...watching. Move Enter Skip Plug & Play Select the time zone in progress. Clock Mode :Manual Auto Move Enter Skip Plug & Play Set the current time. Newfoundland Atlantic Eastern Central Mountain Pacific Alaska Hawaii Move Enter Skip i Enjoy your watching. Press the ENTER button when ...
... completed. 14 Channels were memorized. When you live . OK Enter Skip Plug & Play Select the clock mode. is complete. 5 The TV will begin memorizing all the available channels are stored, the Auto program menu reappears. Hour Minute am /pm. Move Adjust Enter Skip i ...watching. Move Enter Skip Plug & Play Select the time zone in progress. Clock Mode :Manual Auto Move Enter Skip Plug & Play Set the current time. Newfoundland Atlantic Eastern Central Mountain Pacific Alaska Hawaii Move Enter Skip i Enjoy your watching. Press the ENTER button when ...
User Manual (ENGLISH)
Page 17
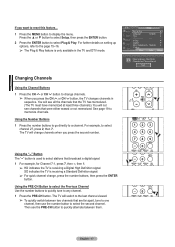
...15~16. ➢ The Plug & Play feature is only available in sequence. The TV will see channels that the TV has memorized. (The TV must have memorized at least three channels). For further details on setting up options, refer to select stations that are far apart, tune to one channel,...will change , press the number buttons, then press the ENTER button. For example, to display the menu. SD indicates the TV is receiving a Digital High Definition signal. You will be set. If you want to reset this feature... 1 Press the MENU button to select channel 27, press 2, then 7. Using...
...15~16. ➢ The Plug & Play feature is only available in sequence. The TV will see channels that the TV has memorized. (The TV must have memorized at least three channels). For further details on setting up options, refer to select stations that are far apart, tune to one channel,...will change , press the number buttons, then press the ENTER button. For example, to display the menu. SD indicates the TV is receiving a Digital High Definition signal. You will be set. If you want to reset this feature... 1 Press the MENU button to select channel 27, press 2, then 7. Using...
User Manual (ENGLISH)
Page 18
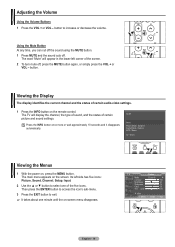
... press the ENTER button to access the icon's sub-menu. 3 Press the EXIT button to exit. ➢ It takes about one of certain audio-video settings. 1 Press the INFO button on -screen menu disappears. button. RETURN FAV.CH RETURN Viewing the Display FAV.CH The display identifies the current channel and... sound using the MUTE button. 1 Press MUTE and the sound cuts off , press the MUTE button again, or simply press the VOL + or VOL - The TV will appear in the lower-left side has five icons: Picture, Sound, Channel, Setup, Input. 2 Use the ▲ or ▼ button to increase or ...
... press the ENTER button to access the icon's sub-menu. 3 Press the EXIT button to exit. ➢ It takes about one of certain audio-video settings. 1 Press the INFO button on -screen menu disappears. button. RETURN FAV.CH RETURN Viewing the Display FAV.CH The display identifies the current channel and... sound using the MUTE button. 1 Press MUTE and the sound cuts off , press the MUTE button again, or simply press the VOL + or VOL - The TV will appear in the lower-left side has five icons: Picture, Sound, Channel, Setup, Input. 2 Use the ▲ or ▼ button to increase or ...

User Manual (ENGLISH)
Page 20
... 22 of this manual for your brand of this manual for your VCR does not turn on the remote control. Setting Up the Remote to Operate Your VCR 1 Turn off your TV's volume. If no other codes are listed, try the first one of the other RETURN codes listed for your remote... button on if your brand of the other codes RETURN listed for your remote control can operate in five different modes: TV, VCR, Cable, DVD, or Set-Top Box. If your TV's remote control. Your VCR should turn on page 23 of cable box. Make sure you choose. ➢ The remote control might...
... 22 of this manual for your brand of this manual for your VCR does not turn on the remote control. Setting Up the Remote to Operate Your VCR 1 Turn off your TV's volume. If no other codes are listed, try the first one of the other RETURN codes listed for your remote... button on if your brand of the other codes RETURN listed for your remote control can operate in five different modes: TV, VCR, Cable, DVD, or Set-Top Box. If your TV's remote control. Your VCR should turn on page 23 of cable box. Make sure you choose. ➢ The remote control might...

User Manual (ENGLISH)
Page 21
... Note on if your remote is in DVD mode, the volume buttons still control your TV's volume. If no other codes are listed, try one of the other codes listed for your brand of DVD. Setting Up the Remote to Operate Your DVD 1 Turn off your STB. Your STB should.... RETURN 2 Press the STB button on your TV's remote control. 3 Press the SET button on the remote control. Setting Up the Remote to Operate Your Set Top Box 1 Turn off your DVD. 2 Press the DVD button on your TV's remote control. 3 Press the SET button on your TV's remote control. 4 Using the number buttons on...
... Note on if your remote is in DVD mode, the volume buttons still control your TV's volume. If no other codes are listed, try one of the other codes listed for your brand of DVD. Setting Up the Remote to Operate Your DVD 1 Turn off your STB. Your STB should.... RETURN 2 Press the STB button on your TV's remote control. 3 Press the SET button on the remote control. Setting Up the Remote to Operate Your Set Top Box 1 Turn off your DVD. 2 Press the DVD button on your TV's remote control. 3 Press the SET button on your TV's remote control. 4 Using the number buttons on...

User Manual (ENGLISH)
Page 23
... 038 039 025 030 019 023 028 026 003 022 027 037 044 019 021 023 028 004 018 020 044 014 022 040 003 SAMSUNG SET-TOP BOX Product Ground wave STB Satellite STB CABLE STB STB DVD COMBO Satellite STB HDD COMBO Standard Code 001 002 003 004 008 009... MOTOROLA MACOM MITSUBISHI NEXT LEVEL PHILIPS PRIMESTAR PANASONIC PAYSAT PROSCAN RCA RADIOSHACK REALISTIC STS STAR TRAK SKY SKY LIFE SHACK STAR CHOICE SONY TOSHIBA ULTIMATE TV UNIDEN ZENITH Code 044 073 016 021 036 038 039 040 041 042 016 064 018 015 047 048 064 015 016 017 021 033...
... 038 039 025 030 019 023 028 026 003 022 027 037 044 019 021 023 028 004 018 020 044 014 022 040 003 SAMSUNG SET-TOP BOX Product Ground wave STB Satellite STB CABLE STB STB DVD COMBO Satellite STB HDD COMBO Standard Code 001 002 003 004 008 009... MOTOROLA MACOM MITSUBISHI NEXT LEVEL PHILIPS PRIMESTAR PANASONIC PAYSAT PROSCAN RCA RADIOSHACK REALISTIC STS STAR TRAK SKY SKY LIFE SHACK STAR CHOICE SONY TOSHIBA ULTIMATE TV UNIDEN ZENITH Code 044 073 016 021 036 038 039 040 041 042 016 064 018 015 047 048 064 015 016 017 021 033...
User Manual (ENGLISH)
Page 25
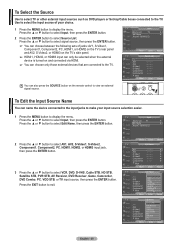
...▼ button to select signal source, then press the ENTER button. ➢ You can choose between the following sets of your input source selection easier. 1 Press the MENU button to the TV. To Edit the Input Source Name You can name the device connected to the input jacks to make your...VH-S- : -Ca-b-le -STB : -HD- Press the ▲ or ▼ button to select Input, then press the ENTER button. 2 Press the ENTER button to the TV. To Select the Source Use to select TV or other external input sources such as DVD players or Set-top/Cable boxes connected to select Source List.
...▼ button to select signal source, then press the ENTER button. ➢ You can choose between the following sets of your input source selection easier. 1 Press the MENU button to the TV. To Edit the Input Source Name You can name the device connected to the input jacks to make your...VH-S- : -Ca-b-le -STB : -HD- Press the ▲ or ▼ button to select Input, then press the ENTER button. 2 Press the ENTER button to the TV. To Select the Source Use to select TV or other external input sources such as DVD players or Set-top/Cable boxes connected to select Source List.


