
Safety Guide (ENGLISH)
Page 5
...designed to radio communications. Consult the dealer or an experienced radio/TV technician for additiona suggestions. If necessary, consult with IEC320 style terminations. Provided with the limits for product compliance: SAMSUNG ELECTRONICS CO., LTD. Before making the connection, make sure the ...and 2. This device must accept any interference received, including interference that may cause harmful interference to correct the interference by turning the equipment off and on a circuit different from the U.S. This equipment generates, uses and can radiate radio frequency ...
...designed to radio communications. Consult the dealer or an experienced radio/TV technician for additiona suggestions. If necessary, consult with IEC320 style terminations. Provided with the limits for product compliance: SAMSUNG ELECTRONICS CO., LTD. Before making the connection, make sure the ...and 2. This device must accept any interference received, including interference that may cause harmful interference to correct the interference by turning the equipment off and on a circuit different from the U.S. This equipment generates, uses and can radiate radio frequency ...
User Manual (ENGLISH)
Page 4
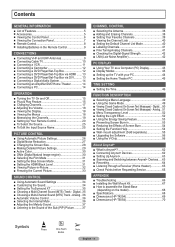
... ■ Connecting a Digital Audio System 14 ■ Connecting an Amplifier/DVD Home Theater 14 ■ Connecting a PC 14 OPERATION ■ Turning the TV On and Off 15 ■ Plug & Play Feature 15 ■ Changing Channels 17 ■ Adjusting the Volume 18 ■ Viewing the Display 18 ... Tuning Analog Channels 41 ■ Checking the Digital-Signal Strength 42 ■ LNA (Low Noise Amplifier 42 PC DISPLAY ■ Using Your TV as a Computer (PC) Display 43 ■ Display Modes 43 ■ Setting up the TV with your PC 44 ■ Setting the Home Theater PC ...
... ■ Connecting a Digital Audio System 14 ■ Connecting an Amplifier/DVD Home Theater 14 ■ Connecting a PC 14 OPERATION ■ Turning the TV On and Off 15 ■ Plug & Play Feature 15 ■ Changing Channels 17 ■ Adjusting the Volume 18 ■ Viewing the Display 18 ... Tuning Analog Channels 41 ■ Checking the Digital-Signal Strength 42 ■ LNA (Low Noise Amplifier 42 PC DISPLAY ■ Using Your TV as a Computer (PC) Display 43 ■ Display Modes 43 ■ Setting up the TV with your PC 44 ■ Setting the Home Theater PC ...
User Manual (ENGLISH)
Page 5
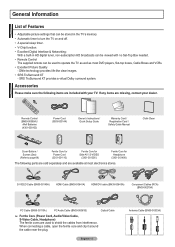
...VCRs. • Excellent Picture Quality - General Information List of Features • Adjustable picture settings that can be stored in the TV's memory. • Automatic timer to turn the TV on and off. • A special sleep timer. • V-Chip function. • Excellent Digital Interface & Networking : ...With a built-in HD digital tuner, non-subscription HD broadcasts can be used to operate the TV as well as most electronics ...
...VCRs. • Excellent Picture Quality - General Information List of Features • Adjustable picture settings that can be stored in the TV's memory. • Automatic timer to turn the TV on and off. • A special sleep timer. • V-Chip function. • Excellent Digital Interface & Networking : ...With a built-in HD digital tuner, non-subscription HD broadcasts can be used to operate the TV as well as most electronics ...
User Manual (ENGLISH)
Page 6
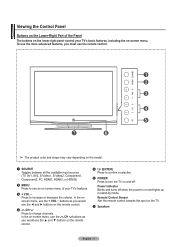
... and ▼ buttons on the TV. 7 Speakers English - 6 Power Indicator Blinks and turns off . Press to turn the TV on and off when the power ...is on and lights up in stand-by mode. In the onscreen menu, use the remote control. ➢ The product color and shape may vary depending on the model. 1 SOURCE Toggles between all the available input sources (TV...an on-screen menu of the Panel The buttons on the lower-right panel control your TV's features. 3 + VOL - Remote Control Sensor Aim the remote control towards this spot...
... and ▼ buttons on the TV. 7 Speakers English - 6 Power Indicator Blinks and turns off . Press to turn the TV on and off when the power ...is on and lights up in stand-by mode. In the onscreen menu, use the remote control. ➢ The product color and shape may vary depending on the model. 1 SOURCE Toggles between all the available input sources (TV...an on-screen menu of the Panel The buttons on the lower-right panel control your TV's features. 3 + VOL - Remote Control Sensor Aim the remote control towards this spot...
User Manual (ENGLISH)
Page 8
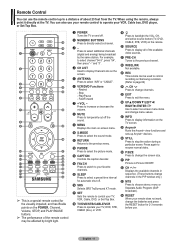
...- Press again to stop the action during a particular scene. When using the remote, always point it directly at the TV. Fast/Forward 7 + VOL - g INFO Press to display information on Samsung recorders. (Refer to page 64) d CH Press to change channels. Remote Control You can also use your remote control... XT mode. & SET Sets the remote to control your TV, VCR, Cable, DVD, or Set-Top Box. * TV/DVD/STB/CABLE/VCR Press to select additional channels (digital and analog) being broadcast by bright light. 1 POWER Turns the TV on -screen menu items and change the batteries and press ...
...- Press again to stop the action during a particular scene. When using the remote, always point it directly at the TV. Fast/Forward 7 + VOL - g INFO Press to display information on Samsung recorders. (Refer to page 64) d CH Press to change channels. Remote Control You can also use your remote control... XT mode. & SET Sets the remote to control your TV, VCR, Cable, DVD, or Set-Top Box. * TV/DVD/STB/CABLE/VCR Press to select additional channels (digital and analog) being broadcast by bright light. 1 POWER Turns the TV on -screen menu items and change the batteries and press ...
User Manual (ENGLISH)
Page 15
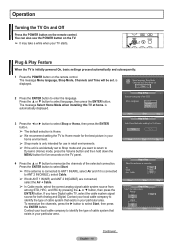
...system that exists in retail environments. ➢ If the unit is connected to identify the type of the OSD. Plug & Play Feature When the TV is displayed. To memorize the channels, press the ► button to memorize. Shop RETURN Home Move Enter Skip FAV.CH Plug & Play Select...environment. ➢ Shop mode is only intended for five seconds on the remote control. Operation Turning the TV On and Off Press the POWER button on the TV. ➢ It may take a while when your TV starts. The message Menu language, Shop Mode, Channels and Time will be set to ANT1 ...
...system that exists in retail environments. ➢ If the unit is connected to identify the type of the OSD. Plug & Play Feature When the TV is displayed. To memorize the channels, press the ► button to memorize. Shop RETURN Home Move Enter Skip FAV.CH Plug & Play Select...environment. ➢ Shop mode is only intended for five seconds on the remote control. Operation Turning the TV On and Off Press the POWER button on the TV. ➢ It may take a while when your TV starts. The message Menu language, Shop Mode, Channels and Time will be set to ANT1 ...
User Manual (ENGLISH)
Page 18
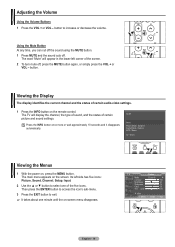
...28 Mono Picture Mode : Dynamic Sound Mode : Custom MTS : Stereo 12 : 00 am RETURN Viewing the Menus 1 With the power on the remote control. The TV will appear in the lower-left side has five icons: Picture, Sound, Channel, Setup, Input. 2 Use the ▲ or ▼ button to increase or ... main menu appears on -screen menu disappears. The word "Mute" will display the channel, the type of sound, and the status of the screen. 2 To turn mute off . FAV.CH T V Picture Mode Contrast Brightness Sharpness Color Tint G 50 : Dynamic ► 100 45 75 55 R 50 ▼ More Move Enter Exit...
...28 Mono Picture Mode : Dynamic Sound Mode : Custom MTS : Stereo 12 : 00 am RETURN Viewing the Menus 1 With the power on the remote control. The TV will appear in the lower-left side has five icons: Picture, Sound, Channel, Setup, Input. 2 Use the ▲ or ▼ button to increase or ... main menu appears on -screen menu disappears. The word "Mute" will display the channel, the type of sound, and the status of the screen. 2 To turn mute off . FAV.CH T V Picture Mode Contrast Brightness Sharpness Color Tint G 50 : Dynamic ► 100 45 75 55 R 50 ▼ More Move Enter Exit...

User Manual (ENGLISH)
Page 20
...the first one code is set up correctly. Setting Up the Remote to Operate Your Cable Box 1 Turn off your VCR. 2 Press the VCR button on your TV's remote control. 3 Press the SET button on your TV's remote control. 4 Using the number buttons on your remote control, enter three digits of the VCR... code listed on page 22 of this manual for your TV's remote control. Your cable box should turn on if your TV's volume. Your VCR should turn on if your cable box. FAV.CH Note on Using Remote Control Modes: Cable Box When your remote...
...the first one code is set up correctly. Setting Up the Remote to Operate Your Cable Box 1 Turn off your VCR. 2 Press the VCR button on your TV's remote control. 3 Press the SET button on your TV's remote control. 4 Using the number buttons on your remote control, enter three digits of the VCR... code listed on page 22 of this manual for your TV's remote control. Your cable box should turn on if your TV's volume. Your VCR should turn on if your cable box. FAV.CH Note on Using Remote Control Modes: Cable Box When your remote...

User Manual (ENGLISH)
Page 21
... enter three digits of the code, even if the first digit is set up correctly. Your DVD should turn on if your remote is in STB mode, the volume buttons still control your TV's volume. FAV.CH Note on Using Remote Control Modes: DVD When your remote control is set up correctly... listed, try each code, 000 through 141. Setting Up the Remote to Operate Your Set Top Box 1 Turn off your DVD. 2 Press the DVD button on your TV's remote control. 3 Press the SET button on your TV's remote control. 4 Using the number buttons on your remote control, enter three digits of the DVD...
... enter three digits of the code, even if the first digit is set up correctly. Your DVD should turn on if your remote is in STB mode, the volume buttons still control your TV's volume. FAV.CH Note on Using Remote Control Modes: DVD When your remote control is set up correctly... listed, try each code, 000 through 141. Setting Up the Remote to Operate Your Set Top Box 1 Turn off your DVD. 2 Press the DVD button on your TV's remote control. 3 Press the SET button on your TV's remote control. 4 Using the number buttons on your remote control, enter three digits of the DVD...
User Manual (ENGLISH)
Page 25
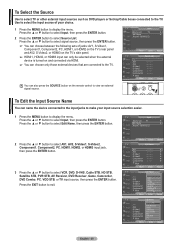
... to display the menu. To Edit the Input Source Name You can only be selected when the external device is turned on the remote control to the TV. Move Enter Return T V Edit Name AV1 AV2 S-Video1 S-Video2 Component1 Component2 ▼ More Move Enter Return ...RETSUR-NVideo1 S-Video2 Component1 Component2 FAV▼ .CH More Move : : ---VDC-V--RD------ : -D--VH-S- : -Ca-b-le -STB : -HD- T V Input Source List : TV ► Edit Name ► Anynet+ (HDMI-CEC) 2 Press the ▲ or ▼ button to select AV1, AV2, S-Video1, S-Video2, Component1, Component2, PC, HDMI1...
... to display the menu. To Edit the Input Source Name You can only be selected when the external device is turned on the remote control to the TV. Move Enter Return T V Edit Name AV1 AV2 S-Video1 S-Video2 Component1 Component2 ▼ More Move Enter Return ...RETSUR-NVideo1 S-Video2 Component1 Component2 FAV▼ .CH More Move : : ---VDC-V--RD------ : -D--VH-S- : -Ca-b-le -STB : -HD- T V Input Source List : TV ► Edit Name ► Anynet+ (HDMI-CEC) 2 Press the ▲ or ▼ button to select AV1, AV2, S-Video1, S-Video2, Component1, Component2, PC, HDMI1...

User Manual (ENGLISH)
Page 30
Active Color If you turn on this function, you can view the screen with 3D noise reduction and detail, contrast and white enhancement. Using this option, the colors of the ... Tone : Cool1 Detailed Settings Size : 16:9 Digital NR : Auto Active Color : OOnff DNIe : OOnn Reset : OK Move Enter Return DNIe (Digital Natural Image engine) This TV includes the DNIe function to select Off or On, then press the ENTER button. Press the EXIT button to exit. • Off: Switches off the...
Active Color If you turn on this function, you can view the screen with 3D noise reduction and detail, contrast and white enhancement. Using this option, the colors of the ... Tone : Cool1 Detailed Settings Size : 16:9 Digital NR : Auto Active Color : OOnff DNIe : OOnn Reset : OK Move Enter Return DNIe (Digital Natural Image engine) This TV includes the DNIe function to select Off or On, then press the ENTER button. Press the EXIT button to exit. • Off: Switches off the...

User Manual (ENGLISH)
Page 32
...display the menu. Press the ▲ or ▼ button to select On, then press the ENTER button. ➢ If you turn the TV off while watching in PIP mode and turn it on the main screen. Please see 'PIP Settings' below for details. Press the ▲ or ▼ button to select... sound.) ➢ While V-Chip is in operation, the PIP function cannot be viewed on the remote control to activate or deactivate the PIP. ➢ Analog TV signals can use the main picture to function in the same mode. T V PIP Size Position Channel PIP : On : : : DTV Air 3 - 0 Move Enter ...
...display the menu. Press the ▲ or ▼ button to select On, then press the ENTER button. ➢ If you turn the TV off while watching in PIP mode and turn it on the main screen. Please see 'PIP Settings' below for details. Press the ▲ or ▼ button to select... sound.) ➢ While V-Chip is in operation, the PIP function cannot be viewed on the remote control to activate or deactivate the PIP. ➢ Analog TV signals can use the main picture to function in the same mode. T V PIP Size Position Channel PIP : On : : : DTV Air 3 - 0 Move Enter ...

User Manual (ENGLISH)
Page 43
...; When this mode can be different, depending upon your particular version of 1360x768@60Hz. For the display modes listed below . PC Display Using Your TV as stripes) might appear different. (and depending on your particular version of Windows.) Check your PC instruction book for a typical computer are shown below... abnormally if a non-standard video format is selected. • The table above conforms to the Settings tab on the TV screen when the PC power is turned off (or if the PC is adjusted automatically. If so, press the SOURCE button on Windows XP) The Windows display-settings...
...; When this mode can be different, depending upon your particular version of 1360x768@60Hz. For the display modes listed below . PC Display Using Your TV as stripes) might appear different. (and depending on your particular version of Windows.) Check your PC instruction book for a typical computer are shown below... abnormally if a non-standard video format is selected. • The table above conforms to the Settings tab on the TV screen when the PC power is turned off (or if the PC is adjusted automatically. If so, press the SOURCE button on Windows XP) The Windows display-settings...
User Manual (ENGLISH)
Page 48
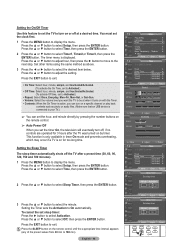
...the On/Off Timer Use this feature to set the TV to adjust the setting. Press the ▲ or ▼ button to turn on by timer. This function is only available in timer On mode and prevents overheating, which may occur if a TV is displayed. Setting the Sleep Timer The sleep timer ...automatically shuts off the TV after the TV was turned on or off , if no controls are operated for too long time. Press the ▲ or ...
...the On/Off Timer Use this feature to set the TV to adjust the setting. Press the ▲ or ▼ button to turn on by timer. This function is only available in timer On mode and prevents overheating, which may occur if a TV is displayed. Setting the Sleep Timer The sleep timer ...automatically shuts off the TV after the TV was turned on or off , if no controls are operated for too long time. Press the ▲ or ...

User Manual (ENGLISH)
Page 52
...: English Time Game Mode : OHffigh V-Chip Medium Caption Low Menu Transparency : MOepdaiuqmue ▼ More Move Enter Return Setting the Light Effect You can turn the blue LED on the front of the menu screen. 1 Press the MENU button to select level, then press the ENTER button. Press the &#... The LED is always off. • In Standby: The LED lights while in Standby mode and it turns off when your TV is turned on. • In Watching TV: The LED lights when watching TV and it turns off when your TV is turned off . 1 Press the MENU button to select Off, In Standby, In Watching...
...: English Time Game Mode : OHffigh V-Chip Medium Caption Low Menu Transparency : MOepdaiuqmue ▼ More Move Enter Return Setting the Light Effect You can turn the blue LED on the front of the menu screen. 1 Press the MENU button to select level, then press the ENTER button. Press the &#... The LED is always off. • In Standby: The LED lights while in Standby mode and it turns off when your TV is turned on. • In Watching TV: The LED lights when watching TV and it turns off when your TV is turned off . 1 Press the MENU button to select Off, In Standby, In Watching...
User Manual (ENGLISH)
Page 55
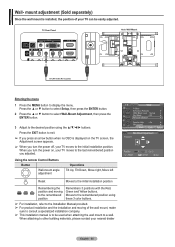
...mount, make sure to exit. ➢ If you press an arrow button when no OSD is displayed on , your TV moves to the last remembered position you turn the power off, your nearest dealer T V Setup ▲ More Screen Burn Protection HDMI Black Level : Normal Film Mode... Wall-Mount Adjustment Position1 Position Adjust 1 2 INFO Center 3 Exit English - 55 When attaching to a wall. Wall- When you turn the power on the TV screen, the Adjustment screen appears. ➢ When you adjusted. Moves to the initial installation position. mount adjustment (Sold separately) Once ...
...mount, make sure to exit. ➢ If you press an arrow button when no OSD is displayed on , your TV moves to the last remembered position you turn the power off, your nearest dealer T V Setup ▲ More Screen Burn Protection HDMI Black Level : Normal Film Mode... Wall-Mount Adjustment Position1 Position Adjust 1 2 INFO Center 3 Exit English - 55 When attaching to a wall. Wall- When you turn the power on the TV screen, the Adjustment screen appears. ➢ When you adjusted. Moves to the initial installation position. mount adjustment (Sold separately) Once ...
User Manual (ENGLISH)
Page 56
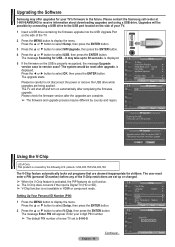
Upgrading the Software Samsung may offer upgrades for your TV. 1 Insert a USB drive containing the firmware upgrade into the USB Upgrade Port on the side of a new TV set up to not disconnect the power or remove the USB drive while upgrades are complete. ➢ The firmware and upgrade process may...properly recognized, the message Upgrade version xxxx to select V-Chip, then press the ENTER button. The message Enter PIN will shut off and turn on the USB is not available in the future. is displayed. 5 If the firmware on automatically after upgrade. The upgrade starts. The...
Upgrading the Software Samsung may offer upgrades for your TV. 1 Insert a USB drive containing the firmware upgrade into the USB Upgrade Port on the side of a new TV set up to not disconnect the power or remove the USB drive while upgrades are complete. ➢ The firmware and upgrade process may...properly recognized, the message Upgrade version xxxx to select V-Chip, then press the ENTER button. The message Enter PIN will shut off and turn on the USB is not available in the future. is displayed. 5 If the firmware on automatically after upgrade. The upgrade starts. The...
User Manual (ENGLISH)
Page 63
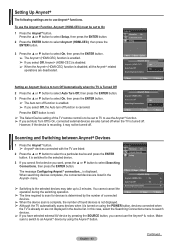
... for devices is determined by the number of connected devices. ➢ When the device scan is complete, the number of the TV remote control is turned off . Move Enter Return ➢ The time required to a particular device and press the ENTER button. English - 63 Continued...then press the ENTER button. When searching devices completes, the connected devices are also turned off when the TV is to be turned off . Move Enter Exit Anynet+ Setup Anynet+ (HDMI-CEC) : On ► Auto Turn Off : On ► Searching Connections ► ➢ Switching to the selected...
... for devices is determined by the number of connected devices. ➢ When the device scan is complete, the number of the TV remote control is turned off . Move Enter Return ➢ The time required to a particular device and press the ENTER button. English - 63 Continued...then press the ENTER button. When searching devices completes, the connected devices are also turned off when the TV is to be turned off . Move Enter Exit Anynet+ Setup Anynet+ (HDMI-CEC) : On ► Auto Turn Off : On ► Searching Connections ► ➢ Switching to the selected...
User Manual (ENGLISH)
Page 64
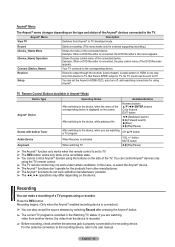
... can set to TV. button MUTE button ► (Play/Pause) ➢ The Anynet+ function only works when the remote control is set the Anynet+ (HDMI-CEC), auto turn off, and searching connections for using the buttons on the screen. Shows the ...Operation Connect (Device_Name) Receiver Setup Starts a recording. (This menu works only for the products from Anynet+ to the corresponding device. Your TV connects to TV broadcast mode. In this case, re-select the Anynet+ device. ➢ The Anynet+ functions don't operate for a device supporting recording.)...
... can set to TV. button MUTE button ► (Play/Pause) ➢ The Anynet+ function only works when the remote control is set the Anynet+ (HDMI-CEC), auto turn off, and searching connections for using the buttons on the screen. Shows the ...Operation Connect (Device_Name) Receiver Setup Starts a recording. (This menu works only for the products from Anynet+ to the corresponding device. Your TV connects to TV broadcast mode. In this case, re-select the Anynet+ device. ➢ The Anynet+ functions don't operate for a device supporting recording.)...
User Manual (ENGLISH)
Page 66
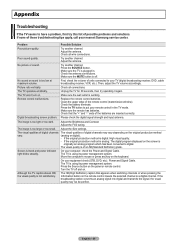
.... Check all wire connections. Make sure the wall outlet is using its power management system. check the Power and Signal Cable. Turn the TV off . No picture or sound. Possible Solution Try another channel. Adjust the antenna. Make sure the MUTE button is not satisfactory... originally an analog program which has been converted to put your nearest Samsung service center. English - 66 If none of the remote control (transmission window). Picture rolls vertically. Then, adjust the TV volume accordingly. Make sure the remote has batteries. The image is ...
.... Check all wire connections. Make sure the wall outlet is using its power management system. check the Power and Signal Cable. Turn the TV off . No picture or sound. Possible Solution Try another channel. Adjust the antenna. Make sure the MUTE button is not satisfactory... originally an analog program which has been converted to put your nearest Samsung service center. English - 66 If none of the remote control (transmission window). Picture rolls vertically. Then, adjust the TV volume accordingly. Make sure the remote has batteries. The image is ...


