Safety Guide (ENGLISH)
Page 1
...- THERE ARE NO USER SERVICEABLE PARTS INSIDE. Install the product keeping the specified distance from the wall (see the information below.) * DLP TVs, Direct View Type TVs, and Projectors → 10cm * Products with heavy dust, high or low temperatures, high humidity, chemical substances and where it operates for ...the inside . TO PREVENT THE SPREAD OF FIRE, KEEP CANDLES OR OTHER OPEN FLAMES AWAY FROM THIS PRODUCT AT ALL TIMES. In your Samsung product before cleaning. • This appratus use any kind of explosion if battery is to remain unused or if you to your set in...
...- THERE ARE NO USER SERVICEABLE PARTS INSIDE. Install the product keeping the specified distance from the wall (see the information below.) * DLP TVs, Direct View Type TVs, and Projectors → 10cm * Products with heavy dust, high or low temperatures, high humidity, chemical substances and where it operates for ...the inside . TO PREVENT THE SPREAD OF FIRE, KEEP CANDLES OR OTHER OPEN FLAMES AWAY FROM THIS PRODUCT AT ALL TIMES. In your Samsung product before cleaning. • This appratus use any kind of explosion if battery is to remain unused or if you to your set in...

Safety Guide (ENGLISH)
Page 5
... be determined by one or more of the FCC Rules. It is available from that to any UL Listed personal computer with part 15 of Samsung 3351 Michelson Drive Suite #290, Irvine, CA92612 USA Warning User must use only UL Listed detachable power supply cord with the limits for a...06:47 Reorient or relocate the receiving antenna. -- For 240 Volt applications use shielded signal interface cables to Part 15 of the FCC rules. (TV broadcast receivers with picture screens 13 inches or larger in accordance with the limits for a Class B digital device, pursuant to maintain FCC compliance for...
... be determined by one or more of the FCC Rules. It is available from that to any UL Listed personal computer with part 15 of Samsung 3351 Michelson Drive Suite #290, Irvine, CA92612 USA Warning User must use only UL Listed detachable power supply cord with the limits for a...06:47 Reorient or relocate the receiving antenna. -- For 240 Volt applications use shielded signal interface cables to Part 15 of the FCC rules. (TV broadcast receivers with picture screens 13 inches or larger in accordance with the limits for a Class B digital device, pursuant to maintain FCC compliance for...
Safety Guide (ENGLISH)
Page 7
... near water. 6) Clean only with dry cloth. 7) Do not block any ventilation openings, Install in accordance with the apparatus. Your Samsung TV is used, use caution when moving the cart/apparatus combination to avoid injury from the apparatus. 11) Only use this product or product... appliance to rain or moisture. • Ventilation Do not place the apparatus in its factory default settings. As an ENERGY STAR Partner, Samsung has determined that manufacturer's instructions for ENERGYSTAR qualification. - A polarized plug has two blades with SWEDAC(MPR II) recommendations for USA only)...
... near water. 6) Clean only with dry cloth. 7) Do not block any ventilation openings, Install in accordance with the apparatus. Your Samsung TV is used, use caution when moving the cart/apparatus combination to avoid injury from the apparatus. 11) Only use this product or product... appliance to rain or moisture. • Ventilation Do not place the apparatus in its factory default settings. As an ENERGY STAR Partner, Samsung has determined that manufacturer's instructions for ENERGYSTAR qualification. - A polarized plug has two blades with SWEDAC(MPR II) recommendations for USA only)...
User Manual (ENGLISH)
Page 3
...refer to a change of surrounding environment such as "screen burn". A 'cracking' noise may cause similar effect to the PDP Panel. Avoid operating the TV at heights under 6500ft. Playing a DVD or a game console may occur when the product contracts or expands due to page 26 of this effect, ...displayed on the left, right and center of the screen caused by image retention. Watching the PDP TV in 4:3 format for a long time. These pixels will have no impact on the plasma display panel for longer than several minutes as it can only operate normally at temperatures below 5°C ...
...refer to a change of surrounding environment such as "screen burn". A 'cracking' noise may cause similar effect to the PDP Panel. Avoid operating the TV at heights under 6500ft. Playing a DVD or a game console may occur when the product contracts or expands due to page 26 of this effect, ...displayed on the left, right and center of the screen caused by image retention. Watching the PDP TV in 4:3 format for a long time. These pixels will have no impact on the plasma display panel for longer than several minutes as it can only operate normally at temperatures below 5°C ...
User Manual (ENGLISH)
Page 4
...Analog Channels 41 ■ Checking the Digital-Signal Strength 42 ■ LNA (Low Noise Amplifier 42 PC DISPLAY ■ Using Your TV as a Computer (PC) Display 43 ■ Display Modes 43 ■ Setting up the TV with your PC 44 ■ Setting the Home ... Panel 7 ■ Remote Control 8 ■ Installing Batteries in the Remote Control 9 CONNECTIONS ■ Connecting VHF and UHF Antennas 9 ■ Connecting Cable TV 10 ■ Connecting a VCR 11 ■ Connecting a Camcorder 12 ■ Connecting a DVD Player/Set-Top Box 12 ■ Connecting a DVD Player/...
...Analog Channels 41 ■ Checking the Digital-Signal Strength 42 ■ LNA (Low Noise Amplifier 42 PC DISPLAY ■ Using Your TV as a Computer (PC) Display 43 ■ Display Modes 43 ■ Setting up the TV with your PC 44 ■ Setting the Home ... Panel 7 ■ Remote Control 8 ■ Installing Batteries in the Remote Control 9 CONNECTIONS ■ Connecting VHF and UHF Antennas 9 ■ Connecting Cable TV 10 ■ Connecting a VCR 11 ■ Connecting a Camcorder 12 ■ Connecting a DVD Player/Set-Top Box 12 ■ Connecting a DVD Player/...
User Manual (ENGLISH)
Page 5
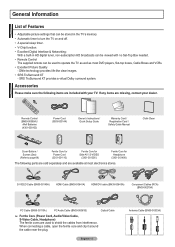
... and clip it around the cable near the plug. English - 5 Antenna Cable (BN39-00333A) If any items are used to operate the TV as well as most electronics stores. S-VIDEO Cable (BN39-00149A) HDMI Cable (BN39-00641A) HDMI/DVI cable (BN39-00643A) Component Cables (RCA...XT provides a virtual Dolby surround system. General Information List of Features • Adjustable picture settings that can be stored in the TV's memory. • Automatic timer to turn the TV on and off. • A special sleep timer. • V-Chip function. • Excellent Digital Interface & Networking : With...
... and clip it around the cable near the plug. English - 5 Antenna Cable (BN39-00333A) If any items are used to operate the TV as well as most electronics stores. S-VIDEO Cable (BN39-00149A) HDMI Cable (BN39-00641A) HDMI/DVI cable (BN39-00643A) Component Cables (RCA...XT provides a virtual Dolby surround system. General Information List of Features • Adjustable picture settings that can be stored in the TV's memory. • Automatic timer to turn the TV on and off. • A special sleep timer. • V-Chip function. • Excellent Digital Interface & Networking : With...
User Manual (ENGLISH)
Page 6
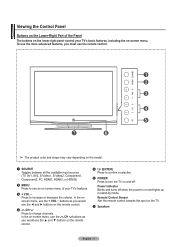
... Sensor Aim the remote control towards this spot on and off when the power is on the remote control. 4 CH Press to turn the TV on the TV. 7 Speakers English - 6 Viewing the Control Panel Buttons on the Lower-Right Part of the Panel The buttons on the lower-right panel control your... TV's basic features, including the on -screen menu of your TV's features. 3 + VOL - To use the more advanced features, you would use the ◄ and ► buttons on and lights up...
... Sensor Aim the remote control towards this spot on and off when the power is on the remote control. 4 CH Press to turn the TV on the TV. 7 Speakers English - 6 Viewing the Control Panel Buttons on the Lower-Right Part of the Panel The buttons on the lower-right panel control your... TV's basic features, including the on -screen menu of your TV's features. 3 + VOL - To use the more advanced features, you would use the ◄ and ► buttons on and lights up...
User Manual (ENGLISH)
Page 7
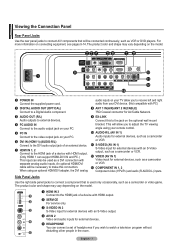
... if you wish to watch a television program without disturbing other people in the room. An optional HDMI/DVI cable will allow you to adjust the TV viewing angle using your PC. 5 PC IN Connect to the video output jack on connecting equipment, see pages 9-14. This will be necessary to ...; Coaxial connector for external devices, such as a camcorder or VCR. ! English - 7 When using an optional HDMI/DVI adapter, the DVI analog audio inputs on your TV allow you to receive left and right audio from your PC. 6 DVI IN (HDMI 1) (AUDIO-R/L) Connect to the DVI audio output jack of an external...
... if you wish to watch a television program without disturbing other people in the room. An optional HDMI/DVI cable will allow you to adjust the TV viewing angle using your PC. 5 PC IN Connect to the video output jack on connecting equipment, see pages 9-14. This will be necessary to ...; Coaxial connector for external devices, such as a camcorder or VCR. ! English - 7 When using an optional HDMI/DVI adapter, the DVI analog audio inputs on your TV allow you to receive left and right audio from your PC. 6 DVI IN (HDMI 1) (AUDIO-R/L) Connect to the DVI audio output jack of an external...
User Manual (ENGLISH)
Page 8
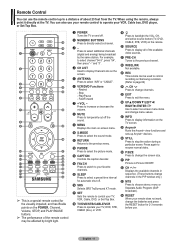
... impaired, and has Braille points on the POWER, Channel, Volume, STOP, and PLAY/PAUSE buttons. ➢ The performance of about 23 feet from the TV. b WISELINK Not available. Stop - Press to increase or decrease the volume. 8 MUTE Press to temporarily cut off . 2 NUMERIC BUTTONS Press to select... a channel. 3 - Press to select additional channels (digital and analog) being broadcast by bright light. 1 POWER Turns the TV on and off the sound. 9 MENU Displays the main on Samsung recorders. (Refer to page 64) d CH Press to change channels in Picture ON/OFF. c REC This remote can be ...
... impaired, and has Braille points on the POWER, Channel, Volume, STOP, and PLAY/PAUSE buttons. ➢ The performance of about 23 feet from the TV. b WISELINK Not available. Stop - Press to increase or decrease the volume. 8 MUTE Press to temporarily cut off . 2 NUMERIC BUTTONS Press to select... a channel. 3 - Press to select additional channels (digital and analog) being broadcast by bright light. 1 POWER Turns the TV on and off the sound. 9 MENU Displays the main on Samsung recorders. (Refer to page 64) d CH Press to change channels in Picture ON/OFF. c REC This remote can be ...
User Manual (ENGLISH)
Page 9
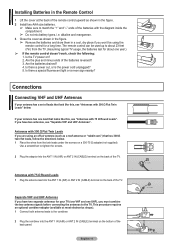
.... 3 Close the cover as shown in the figure. 2 Install two AAA size batteries. ➢ Make sure to match the "+" and "-" ends of the TV. Is the TV power on a 300-75 Ω adapter (not supplied). Is there a special fluorescent light or a neon sign nearby? If your antenna has a set of ... , see "Separate VHF and UHF Antennas". Separate VHF and UHF Antennas If you must combine the two antenna signals before connecting the antennas to the TV. Antennas with 75 Ω Round Leads". Use a screwdriver to the combiner. 2 Plug the combiner into the ANT 1 IN (AIR) or ANT 2 IN (CABLE) ...
.... 3 Close the cover as shown in the figure. 2 Install two AAA size batteries. ➢ Make sure to match the "+" and "-" ends of the TV. Is the TV power on a 300-75 Ω adapter (not supplied). Is there a special fluorescent light or a neon sign nearby? If your antenna has a set of ... , see "Separate VHF and UHF Antennas". Separate VHF and UHF Antennas If you must combine the two antenna signals before connecting the antennas to the TV. Antennas with 75 Ω Round Leads". Use a screwdriver to the combiner. 2 Plug the combiner into the ANT 1 IN (AIR) or ANT 2 IN (CABLE) ...

User Manual (ENGLISH)
Page 10
... below . Incoming cable Splitter Incoming cable Splitter Splitter Cable Box Splitter Cable Box RF (A/B) Switch Splitter Cable Box RF (A/B) Switch RF (A/B) Switch TV Rear ANT 2 IN (CABLE) After you do not need to tune your cable box. ➢ This terminal might be labeled "ANT OUT",...connection, set the A/B switch to "B", you will need a two-way splitter, an RF (A/B) switch, and four lengths of the TV. ➢ Because this TV is cable-ready, you have made this cable to view unscrambled cable channels. Set the A/B switch to the "B" position to view ...
... below . Incoming cable Splitter Incoming cable Splitter Splitter Cable Box Splitter Cable Box RF (A/B) Switch Splitter Cable Box RF (A/B) Switch RF (A/B) Switch TV Rear ANT 2 IN (CABLE) After you do not need to tune your cable box. ➢ This terminal might be labeled "ANT OUT",...connection, set the A/B switch to "B", you will need a two-way splitter, an RF (A/B) switch, and four lengths of the TV. ➢ Because this TV is cable-ready, you have made this cable to view unscrambled cable channels. Set the A/B switch to the "B" position to view ...

User Manual (ENGLISH)
Page 11
...These instructions assume that you have not yet connected to an antenna or a cable system. 1 Unplug the cable or antenna from the back of the TV. 2 Connect the cable or antenna to the ANT IN terminal on the back of the VCR. 3 Connect an Antenna Cable between the ANT OUT ...stereo, you have a "mono" (non-stereo) VCR, use a Yconnector (not supplied) to hook up to the cable. S-Video Connection Your Samsung TV can be included with your VCR. (If not, check your TV. An S-Video may be connected to the S-Video jack of a VCR. (This connection delivers a better picture when compared to the...
...These instructions assume that you have not yet connected to an antenna or a cable system. 1 Unplug the cable or antenna from the back of the TV. 2 Connect the cable or antenna to the ANT IN terminal on the back of the VCR. 3 Connect an Antenna Cable between the ANT OUT ...stereo, you have a "mono" (non-stereo) VCR, use a Yconnector (not supplied) to hook up to the cable. S-Video Connection Your Samsung TV can be included with your VCR. (If not, check your TV. An S-Video may be connected to the S-Video jack of a VCR. (This connection delivers a better picture when compared to the...

User Manual (ENGLISH)
Page 12
...back panel configuration. ➢ When connecting a Camcorder, match the color of the connection terminal to match the component video and audio connections. Camcorder TV Side Panel 1 S-Video Cable(Not supplied) or 1 Video Cable (Not supplied) 2 Connect Audio Cables 2 Audio Cable (Not supplied) between... the COMPONENT 2 Audio Cable (Not supplied) IN 1 [R-AUDIO-L](or COMPONENT IN 2 1 Component Cable (Not supplied) [R-AUDIO-L]) jacks on the TV and the AUDIO OUT jacks on the DVD Player/Set-Top Box. ➢ Component video separates the video into Y (Luminance (brightness)), PB (...
...back panel configuration. ➢ When connecting a Camcorder, match the color of the connection terminal to match the component video and audio connections. Camcorder TV Side Panel 1 S-Video Cable(Not supplied) or 1 Video Cable (Not supplied) 2 Connect Audio Cables 2 Audio Cable (Not supplied) between... the COMPONENT 2 Audio Cable (Not supplied) IN 1 [R-AUDIO-L](or COMPONENT IN 2 1 Component Cable (Not supplied) [R-AUDIO-L]) jacks on the TV and the AUDIO OUT jacks on the DVD Player/Set-Top Box. ➢ Component video separates the video into Y (Luminance (brightness)), PB (...

User Manual (ENGLISH)
Page 13
... the connection terminal to connect Audio Cables. This connection will provide the highest quality picture. 1 Connect an HDMI Cable between the HDMI IN 2 on the TV and the HDMI OUT on the external device. You only need to the cable. ➢ When using a single cable without compression. • The difference between... if there is a DVI Output jack on the external device. 1 Connect a HDMI/DVI Cable or DVI-HDMI Adapter between the [HDMI IN 1] jack on the TV and the DVI jack on the DVD Player/Set-Top Box. 2 Connect Audio Cables between the DVI IN (HDMI 1) [R-AUDIO-L] jack on the...
... the connection terminal to connect Audio Cables. This connection will provide the highest quality picture. 1 Connect an HDMI Cable between the HDMI IN 2 on the TV and the HDMI OUT on the external device. You only need to the cable. ➢ When using a single cable without compression. • The difference between... if there is a DVI Output jack on the external device. 1 Connect a HDMI/DVI Cable or DVI-HDMI Adapter between the [HDMI IN 1] jack on the TV and the DVI jack on the DVD Player/Set-Top Box. 2 Connect Audio Cables between the DVI IN (HDMI 1) [R-AUDIO-L] jack on the...
User Manual (ENGLISH)
Page 14
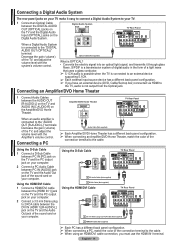
...back panel configuration. ➢ When connecting a PC, match the color of the connection terminal to 2 RCA cable between the [HDMI IN 1] jack on the TV and the PC output jack on your computer. 2 Connect a 3.5 mm Stereo plug to the cable. ➢ When using an HDMI/DVI cable connection, ...Audio System. Using the D-Sub Cable 1 Connect a D-Sub Cable between PC IN [AUDIO] jack on the Amplifier/DVD Home Theater. Digital Audio System TV Rear Panel When a Digital Audio System is not output from the Optical jack. Optical Cable (Not supplied) What is OPTICAL? • Converts the electric...
...back panel configuration. ➢ When connecting a PC, match the color of the connection terminal to 2 RCA cable between the [HDMI IN 1] jack on the TV and the PC output jack on your computer. 2 Connect a 3.5 mm Stereo plug to the cable. ➢ When using an HDMI/DVI cable connection, ...Audio System. Using the D-Sub Cable 1 Connect a D-Sub Cable between PC IN [AUDIO] jack on the Amplifier/DVD Home Theater. Digital Audio System TV Rear Panel When a Digital Audio System is not output from the Optical jack. Optical Cable (Not supplied) What is OPTICAL? • Converts the electric...
User Manual (ENGLISH)
Page 15
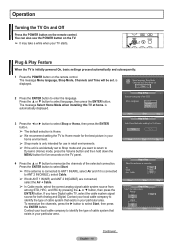
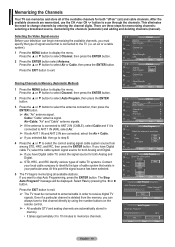
... to identify the type of the OSD. Menu Language :English Spanish French Move Enter Skip Plug & Play Select Home Mode when installing this TV at home. Air Start Cable Start Air + Cable Start Move Enter Skip Plug & Play Select the cable system. Analog STD Start HRC ...Select the antennas to ANT 2 IN(CABLE), select Cable. ➢ If both Analog and Digital. The message Select Home Mode when installing this TV at home. Contact your local cable company to identify the type of the selected connection. Start 2 Press the ENTER button to memorize the channels ...
... to identify the type of the OSD. Menu Language :English Spanish French Move Enter Skip Plug & Play Select Home Mode when installing this TV at home. Air Start Cable Start Air + Cable Start Move Enter Skip Plug & Play Select the cable system. Analog STD Start HRC ...Select the antennas to ANT 2 IN(CABLE), select Cable. ➢ If both Analog and Digital. The message Select Home Mode when installing this TV at home. Contact your local cable company to identify the type of the selected connection. Start 2 Press the ENTER button to memorize the channels ...
User Manual (ENGLISH)
Page 16
.... is not pressed, the message will automatically disappear after several seconds. Cable Channel 67 68% Stop Enter Skip Plug & Play Auto Program is displayed. 5 The TV will begin memorizing all the available channels are stored, the Auto program menu reappears. Newfoundland Atlantic Eastern Central Mountain Pacific Alaska Hawaii Move Enter Skip...
.... is not pressed, the message will automatically disappear after several seconds. Cable Channel 67 68% Stop Enter Skip Plug & Play Auto Program is displayed. 5 The TV will begin memorizing all the available channels are stored, the Auto program menu reappears. Newfoundland Atlantic Eastern Central Mountain Pacific Alaska Hawaii Move Enter Skip...
User Manual (ENGLISH)
Page 17
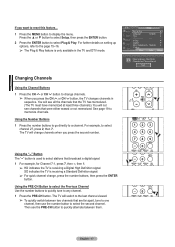
... button. Using the PRE-CH Button to select the Previous Channel Use the number buttons to quickly tune to select Plug & Play. SD indicates the TV is only available in sequence. T V Setup Plug & Play ► Language : English ► Time ► Game Mode : Off ► V-Chip ...Medium ► ▼ More Move Enter Return i Menu language, Shop Mode, Channels and Time will switch to select stations that the TV has memorized. (The TV must have memorized at least three channels). You will not see all the channels that broadcast a digital signal. 1 For example, for ...
... button. Using the PRE-CH Button to select the Previous Channel Use the number buttons to quickly tune to select Plug & Play. SD indicates the TV is only available in sequence. T V Setup Plug & Play ► Language : English ► Time ► Game Mode : Off ► V-Chip ...Medium ► ▼ More Move Enter Return i Menu language, Shop Mode, Channels and Time will switch to select stations that the TV has memorized. (The TV must have memorized at least three channels). You will not see all the channels that broadcast a digital signal. 1 For example, for ...
User Manual (ENGLISH)
Page 18
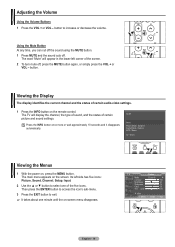
... sound using the MUTE button. 1 Press MUTE and the sound cuts off , press the MUTE button again, or simply press the VOL + or VOL - The TV will appear in the lower-left side has five icons: Picture, Sound, Channel, Setup, Input. 2 Use the ▲ or ▼ button to increase or decrease...
... sound using the MUTE button. 1 Press MUTE and the sound cuts off , press the MUTE button again, or simply press the VOL + or VOL - The TV will appear in the lower-left side has five icons: Picture, Sound, Channel, Setup, Input. 2 Use the ▲ or ▼ button to increase or decrease...
User Manual (ENGLISH)
Page 19
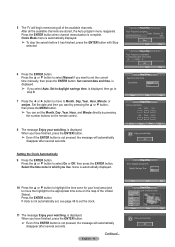
.... Air Start Cable Start Air + Cable Start Move Enter Return T V Auto Program Select the cable system. Memorizing the Channels Your TV can begin memorizing the available channels, you must be displayed. Storing Channels in progress. The Stop Auto Program? Press the ▲ ... button. 3 Press the ▲ or ▼ button to exit. At this point the signal source has been selected. 5 The TV begins memorizing all of the available channels for memorizing channels: selecting a broadcast source, memorizing the channels (automatic) and adding and deleting channels...
.... Air Start Cable Start Air + Cable Start Move Enter Return T V Auto Program Select the cable system. Memorizing the Channels Your TV can begin memorizing the available channels, you must be displayed. Storing Channels in progress. The Stop Auto Program? Press the ▲ ... button. 3 Press the ▲ or ▼ button to exit. At this point the signal source has been selected. 5 The TV begins memorizing all of the available channels for memorizing channels: selecting a broadcast source, memorizing the channels (automatic) and adding and deleting channels...


