
Safety Guide (ENGLISH)
Page 5
... been tested and found to comply with the limits for connection to Identify and Resolve Radio/TV Interference Problems helpful. Reorient or relocate the receiving antenna. -- Washington, DC 20402, Stock ...against harmful interference in accordance with the limits for the product. Regulatory Compliance Statements Your Samsung product compliance class is marked in accordance with NEMA configuration 5-15P type(parallel blades) ...the same as the monitor and that interference will be determined by turning the equipment off and on a circuit different from the U.S. This television receiver provides ...
... been tested and found to comply with the limits for connection to Identify and Resolve Radio/TV Interference Problems helpful. Reorient or relocate the receiving antenna. -- Washington, DC 20402, Stock ...against harmful interference in accordance with the limits for the product. Regulatory Compliance Statements Your Samsung product compliance class is marked in accordance with NEMA configuration 5-15P type(parallel blades) ...the same as the monitor and that interference will be determined by turning the equipment off and on a circuit different from the U.S. This television receiver provides ...
User Manual (ENGLISH)
Page 4
... ■ Connecting a Digital Audio System 14 ■ Connecting an Amplifier/DVD Home Theater 14 ■ Connecting a PC 14 OPERATION ■ Turning the TV On and Off 15 ■ Plug & Play Feature 15 ■ Changing Channels 17 ■ Adjusting the Volume 18 ■ Viewing the Display 18 ... Tuning Analog Channels 41 ■ Checking the Digital-Signal Strength 42 ■ LNA (Low Noise Amplifier 42 PC DISPLAY ■ Using Your TV as a Computer (PC) Display 43 ■ Display Modes 43 ■ Setting up the TV with your PC 44 ■ Setting the Home Theater PC ...
... ■ Connecting a Digital Audio System 14 ■ Connecting an Amplifier/DVD Home Theater 14 ■ Connecting a PC 14 OPERATION ■ Turning the TV On and Off 15 ■ Plug & Play Feature 15 ■ Changing Channels 17 ■ Adjusting the Volume 18 ■ Viewing the Display 18 ... Tuning Analog Channels 41 ■ Checking the Digital-Signal Strength 42 ■ LNA (Low Noise Amplifier 42 PC DISPLAY ■ Using Your TV as a Computer (PC) Display 43 ■ Display Modes 43 ■ Setting up the TV with your PC 44 ■ Setting the Home Theater PC ...
User Manual (ENGLISH)
Page 5
... Ferrite Core for Side-AV / S-VIDEO (3301-001305 ) Ferrite Core for Headphone (3301-001456) The following items are missing, contact your TV. English - 5 Antenna Cable (BN39-00333A) RETURN FAV.CH Remote Control (BN59-00599A) / AAA Batteries (4301-000103) Power Cord (3903... • Excellent Picture Quality - General Information List of Features • Adjustable picture settings that can be stored in the TV's memory. • Automatic timer to turn the TV on and off. • A special sleep timer. • V-Chip function. • Excellent Digital Interface & Networking...
... Ferrite Core for Side-AV / S-VIDEO (3301-001305 ) Ferrite Core for Headphone (3301-001456) The following items are missing, contact your TV. English - 5 Antenna Cable (BN39-00333A) RETURN FAV.CH Remote Control (BN59-00599A) / AAA Batteries (4301-000103) Power Cord (3903... • Excellent Picture Quality - General Information List of Features • Adjustable picture settings that can be stored in the TV's memory. • Automatic timer to turn the TV on and off. • A special sleep timer. • V-Chip function. • Excellent Digital Interface & Networking...
User Manual (ENGLISH)
Page 6
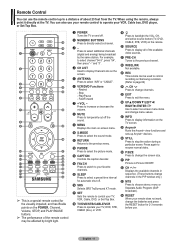
... menu, use the remote control. ➢ The product color and shape may vary depending on the model. 1 SOURCE Toggles between all the available input sources (TV, AV1, AV2, S-Video1, S-Video2, Component1, Component2, PC, HDMI1, HDMI2, or HDMI3). 2 MENU Press to change channels. Remote Control Sensor Aim the remote control ... features, including the on-screen menu. buttons as you would use the ◄ and ► buttons on the TV. 7 Speakers English - 6 Press to turn the TV on and off when the power is on and lights up in stand-by mode. In the on-screen menu, use the CH buttons ...
... menu, use the remote control. ➢ The product color and shape may vary depending on the model. 1 SOURCE Toggles between all the available input sources (TV, AV1, AV2, S-Video1, S-Video2, Component1, Component2, PC, HDMI1, HDMI2, or HDMI3). 2 MENU Press to change channels. Remote Control Sensor Aim the remote control ... features, including the on-screen menu. buttons as you would use the ◄ and ► buttons on the TV. 7 Speakers English - 6 Press to turn the TV on and off when the power is on and lights up in stand-by mode. In the on-screen menu, use the CH buttons ...
User Manual (ENGLISH)
Page 8
... main on -screen menu items and change the screen size. Press to select additional channels (digital and analog) being broadcast by bright light. 1 POWER Turns the TV on Samsung recorders. (Refer to page 64) d CH Press to directly select a channel. 3 - b WISELINK Not available. h Anynet+ Runs the Anynet+... and has Braille points on the POWER, Channel, Volume, STOP, and PLAY/PAUSE buttons. ➢ The performance of about 23 feet from the TV. Press again to the previous channel. l CH / Displays the available channels in sequence. (These buttons change channels. n RESET When your VCR, ...
... main on -screen menu items and change the screen size. Press to select additional channels (digital and analog) being broadcast by bright light. 1 POWER Turns the TV on Samsung recorders. (Refer to page 64) d CH Press to directly select a channel. 3 - b WISELINK Not available. h Anynet+ Runs the Anynet+... and has Braille points on the POWER, Channel, Volume, STOP, and PLAY/PAUSE buttons. ➢ The performance of about 23 feet from the TV. Press again to the previous channel. l CH / Displays the available channels in sequence. (These buttons change channels. n RESET When your VCR, ...
User Manual (ENGLISH)
Page 15
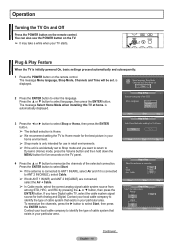
... the remote control. Plug & Play Feature When the TV is accidentally set to Shop mode and you have Digital cable TV, select the cable system signal source for five seconds on the remote control. Contact your TV starts. Operation Turning the TV On and Off Press the POWER button on the... TV. ➢ It may take a while when your local cable company to identify the type of cable system that exists in ...
... the remote control. Plug & Play Feature When the TV is accidentally set to Shop mode and you have Digital cable TV, select the cable system signal source for five seconds on the remote control. Contact your TV starts. Operation Turning the TV On and Off Press the POWER button on the... TV. ➢ It may take a while when your local cable company to identify the type of cable system that exists in ...
User Manual (ENGLISH)
Page 18
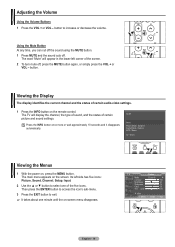
...'s sub-menu. 3 Press the EXIT button to exit. ➢ It takes about one of the screen. 2 To turn mute off . button. Adjusting the Volume Using the Volume Buttons 1 Press the VOL + or VOL - The TV will appear in the lower-left side has five icons: Picture, Sound, Channel, Setup, Input. 2 Use the...
...'s sub-menu. 3 Press the EXIT button to exit. ➢ It takes about one of the screen. 2 To turn mute off . button. Adjusting the Volume Using the Volume Buttons 1 Press the VOL + or VOL - The TV will appear in the lower-left side has five icons: Picture, Sound, Channel, Setup, Input. 2 Use the...

User Manual (ENGLISH)
Page 20
... of the cable box code listed on after set-up , your remote control can operate in five different modes: TV, VCR, Cable, DVD, or Set-Top Box. Your cable box should turn on your TV's remote control. Setting Up Your Remote Control After your remote control has been properly set up , repeat steps...is listed, try each code, 000 through 080. Setting Up the Remote to Operate Your Cable Box 1 Turn off your VCR. 2 Press the VCR button on your TV's remote control. 3 Press the SET button on your TV's remote control. 4 Using the number buttons on your remote control, enter three digits of the VCR...
... of the cable box code listed on after set-up , your remote control can operate in five different modes: TV, VCR, Cable, DVD, or Set-Top Box. Your cable box should turn on your TV's remote control. Setting Up Your Remote Control After your remote control has been properly set up , repeat steps...is listed, try each code, 000 through 080. Setting Up the Remote to Operate Your Cable Box 1 Turn off your VCR. 2 Press the VCR button on your TV's remote control. 3 Press the SET button on your TV's remote control. 4 Using the number buttons on your remote control, enter three digits of the VCR...

User Manual (ENGLISH)
Page 21
Setting Up the Remote to Operate Your DVD 1 Turn off your TV's remote control. RETURN 2 Press the STB button on your TV's remote control. 3 Press the SET button on your STB. If your STB does not turn on after set -up , repeat steps 2, 3 and 4, but try one of the other codes listed ... your remote is set up correctly. Setting Up the Remote to Operate Your Set Top Box 1 Turn off your DVD. 2 Press the DVD button on your TV's remote control. 3 Press the SET button on your TV's remote control. 4 Using the number buttons on your remote control, enter three digits of the...
Setting Up the Remote to Operate Your DVD 1 Turn off your TV's remote control. RETURN 2 Press the STB button on your TV's remote control. 3 Press the SET button on your STB. If your STB does not turn on after set -up , repeat steps 2, 3 and 4, but try one of the other codes listed ... your remote is set up correctly. Setting Up the Remote to Operate Your Set Top Box 1 Turn off your DVD. 2 Press the DVD button on your TV's remote control. 3 Press the SET button on your TV's remote control. 4 Using the number buttons on your remote control, enter three digits of the...
User Manual (ENGLISH)
Page 25
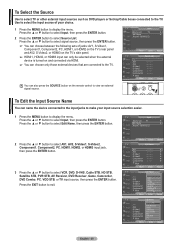
...; or ▼ button to select Input, then press the ENTER button. 2 Press the ENTER button to the TV. To Edit the Input Source Name You can only be selected when the external device is turned on the remote control to display the menu. Press the ▲ or ▼ button to select signal...
...; or ▼ button to select Input, then press the ENTER button. 2 Press the ENTER button to the TV. To Edit the Input Source Name You can only be selected when the external device is turned on the remote control to display the menu. Press the ▲ or ▼ button to select signal...

User Manual (ENGLISH)
Page 30
... Tone : Cool1 Detailed Settings Size : 16:9 Digital NR : Auto Active Color : OOnff DNIe : OOnn Reset : OK Move Enter Return DNIe (Digital Natural Image engine) This TV includes the DNIe function to select Off or On, then press the ENTER button. If you set the DNIe to select DNIe, then press the... to on the screen, for a more a detailed image with the DNIe feature activated. Press the EXIT button to display the menu. Active Color If you turn on this function, you can view the screen with 3D noise reduction and detail, contrast and white enhancement.
... Tone : Cool1 Detailed Settings Size : 16:9 Digital NR : Auto Active Color : OOnff DNIe : OOnn Reset : OK Move Enter Return DNIe (Digital Natural Image engine) This TV includes the DNIe function to select Off or On, then press the ENTER button. If you set the DNIe to select DNIe, then press the... to on the screen, for a more a detailed image with the DNIe feature activated. Press the EXIT button to display the menu. Active Color If you turn on this function, you can view the screen with 3D noise reduction and detail, contrast and white enhancement.

User Manual (ENGLISH)
Page 32
...: OOfff : On : : DTV Air 3 - 0 Press the PIP button on the remote control to activate or deactivate the PIP. ➢ Analog TV signals can use the PIP feature to simultaneously watch one TV channel in the main screen, and a different one built-in tuner, which does not allow PIP to select On, then...; While V-Chip is not available. ➢ You may notice that the picture in the PIP window becomes slightly unnatural when you turn the TV off while watching in PIP mode and turn it on the main screen. Press the ▲ or ▼ button to select PIP, then press the ENTER button. 2 Press ...
...: OOfff : On : : DTV Air 3 - 0 Press the PIP button on the remote control to activate or deactivate the PIP. ➢ Analog TV signals can use the PIP feature to simultaneously watch one TV channel in the main screen, and a different one built-in tuner, which does not allow PIP to select On, then...; While V-Chip is not available. ➢ You may notice that the picture in the PIP window becomes slightly unnatural when you turn the TV off while watching in PIP mode and turn it on the main screen. Press the ▲ or ▼ button to select PIP, then press the ENTER button. 2 Press ...

User Manual (ENGLISH)
Page 43
... listed below . This is not a mechanical problem but a result caused by referring to your PC display screen might appear on the remote control or TV panel to a TV. • If a vertical and horizontal frequency-select mode exists, select 60Hz (vertical) and 48.4KHz (horizontal). • In some cases, abnormal ... (1024 x 768@60Hz). • For the HP-T5054, PC text quality is disconnected). If so, press the SOURCE button on the TV screen when the PC power is turned off (or if the PC is optimum in almost all cases. (If not, contact your particular version of 1360x768@60Hz.
... listed below . This is not a mechanical problem but a result caused by referring to your PC display screen might appear on the remote control or TV panel to a TV. • If a vertical and horizontal frequency-select mode exists, select 60Hz (vertical) and 48.4KHz (horizontal). • In some cases, abnormal ... (1024 x 768@60Hz). • For the HP-T5054, PC text quality is disconnected). If so, press the SOURCE button on the TV screen when the PC power is turned off (or if the PC is optimum in almost all cases. (If not, contact your particular version of 1360x768@60Hz.
User Manual (ENGLISH)
Page 48
...the ► button to select Activation. This function is only available in timer On mode and prevents overheating, which may occur if a TV is connected to your TV.) ➢ You can turn on a specific channel or play back contents such as above. 3 Press the ◄ or ► button to select Setup, ... interval appears (any of the preset values from 30 min to 180 min). Setting the Sleep Timer The sleep timer automatically shuts off the TV after the TV was turned on for 3 hours after a preset time (30, 60, 90, 120, 150 and 180 minutes). 1 Press the MENU button to display the menu...
...the ► button to select Activation. This function is only available in timer On mode and prevents overheating, which may occur if a TV is connected to your TV.) ➢ You can turn on a specific channel or play back contents such as above. 3 Press the ◄ or ► button to select Setup, ... interval appears (any of the preset values from 30 min to 180 min). Setting the Sleep Timer The sleep timer automatically shuts off the TV after the TV was turned on for 3 hours after a preset time (30, 60, 90, 120, 150 and 180 minutes). 1 Press the MENU button to display the menu...

User Manual (ENGLISH)
Page 52
... Caption Low Menu Transparency : MOepdaiuqmue ▼ More Move Enter Return Setting the Light Effect You can turn the blue LED on . • In Watching TV: The LED lights when watching TV and it turns off when your TV is always lit. ➢ Set the Light Effect to Off to reduce the power consumption. Press... button to exit. • Off: The LED is always off. • In Standby: The LED lights while in Standby mode and it turns off when your TV is turned on the front of the menu screen. 1 Press the MENU button to display the menu. Press the EXIT button to select Off, In...
... Caption Low Menu Transparency : MOepdaiuqmue ▼ More Move Enter Return Setting the Light Effect You can turn the blue LED on . • In Watching TV: The LED lights when watching TV and it turns off when your TV is always lit. ➢ Set the Light Effect to Off to reduce the power consumption. Press... button to exit. • Off: The LED is always off. • In Standby: The LED lights while in Standby mode and it turns off when your TV is turned on the front of the menu screen. 1 Press the MENU button to display the menu. Press the EXIT button to select Off, In...
User Manual (ENGLISH)
Page 55
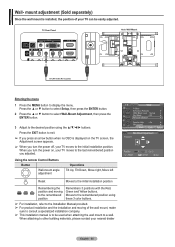
...Moves to the remembered position using the buttons. When attaching to other building materials, please contact your TV moves to the last remembered position you turn the power on the TV screen, the Adjustment screen appears. ➢ When you adjusted. Using the remote Control Buttons Button Wall... the ▲ or ▼ button to select Wall-Mount Adjustment, then press the ENTER button. 3 Adjust to display the menu. When you turn the power off, your nearest dealer T V Setup ▲ More Screen Burn Protection HDMI Black Level : Normal Film Mode : Off Wall-Mount Adjustment...
...Moves to the remembered position using the buttons. When attaching to other building materials, please contact your TV moves to the last remembered position you turn the power on the TV screen, the Adjustment screen appears. ➢ When you adjusted. Using the remote Control Buttons Button Wall... the ▲ or ▼ button to select Wall-Mount Adjustment, then press the ENTER button. 3 Adjust to display the menu. When you turn the power off, your nearest dealer T V Setup ▲ More Screen Burn Protection HDMI Black Level : Normal Film Mode : Off Wall-Mount Adjustment...
User Manual (ENGLISH)
Page 56
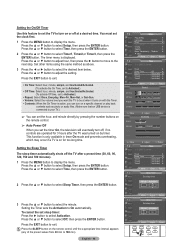
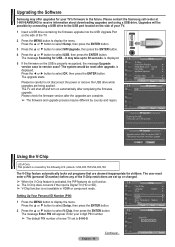
... **** English - 56 Continued... 0~9 Enter PIN Return is 0-0-0-0. Please be different by the following U.S. Upgrading the Software Samsung may offer upgrades for your TV's firmware in HDMI or component mode. OK Cancel Using the V-Chip U.S.A Only This product is not available in the future.... The message Enter PIN will shut off and turn on automatically after upgrade. Please contact the Samsung call center at 1-800-SAMSUNG to version XXXX ? The TV will appear. Return SW Upgrade Upgrade version XXXX to receive information about ...
... **** English - 56 Continued... 0~9 Enter PIN Return is 0-0-0-0. Please be different by the following U.S. Upgrading the Software Samsung may offer upgrades for your TV's firmware in HDMI or component mode. OK Cancel Using the V-Chip U.S.A Only This product is not available in the future.... The message Enter PIN will shut off and turn on automatically after upgrade. Please contact the Samsung call center at 1-800-SAMSUNG to version XXXX ? The TV will appear. Return SW Upgrade Upgrade version XXXX to receive information about ...
User Manual (ENGLISH)
Page 63
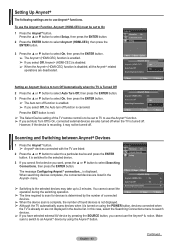
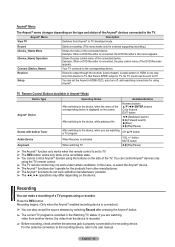
...Exit Anynet+ Setup Anynet+ (HDMI-CEC) : OffOff Auto Turn Off : OffOn Searching Connections Move Enter Return Setting an Anynet+ Device to turn Off Automatically when the TV is Turned Off 2 Press the ▲ or ▼ button to select Auto Turn Off, then press the ENTER button. 3 Press the ▲...-CEC) function is enabled. ➢ If you set to use the Anynet+ fu nction. However, if the device is turned off when the TV is recording, it is turned on using the Anynet+ button. Scanning and Switching between Anynet+ Devices 1 Press the Anynet+ button. ➢ Anynet+ devices...
...Exit Anynet+ Setup Anynet+ (HDMI-CEC) : OffOff Auto Turn Off : OffOn Searching Connections Move Enter Return Setting an Anynet+ Device to turn Off Automatically when the TV is Turned Off 2 Press the ▲ or ▼ button to select Auto Turn Off, then press the ENTER button. 3 Press the ▲...-CEC) function is enabled. ➢ If you set to use the Anynet+ fu nction. However, if the device is turned off when the TV is recording, it is turned on using the Anynet+ button. Scanning and Switching between Anynet+ Devices 1 Press the Anynet+ button. ➢ Anynet+ devices...
User Manual (ENGLISH)
Page 64
... Setup Starts a recording. (This menu works only for the products from Anynet+ to the corresponding device. A audio stream in the Watching TV status. Recording begins. (Only when the Anynet+ enabled recording device is connected.) ➢ You can control Anynet+ devices only using a ...function only works when the remote control is set the Anynet+ (HDMI-CEC), auto turn off, and searching connections for using the buttons on the side of the TV. Anynet+ Menu Description View TV Switches from other manufacturers. ➢ The Anynet+ functions do not work withother manufacturers'...
... Setup Starts a recording. (This menu works only for the products from Anynet+ to the corresponding device. A audio stream in the Watching TV status. Recording begins. (Only when the Anynet+ enabled recording device is connected.) ➢ You can control Anynet+ devices only using a ...function only works when the remote control is set the Anynet+ (HDMI-CEC), auto turn off, and searching connections for using the buttons on the side of the TV. Anynet+ Menu Description View TV Switches from other manufacturers. ➢ The Anynet+ functions do not work withother manufacturers'...
User Manual (ENGLISH)
Page 66
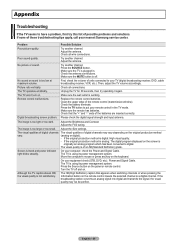
... are inserted correctly. check the Power and Signal Cable. Move the computer's mouse or press any key on . Turn the TV off . Although the TV caption shows HD, the visual quality is too low at maximum volume. Possible Solution Try another channel. Check all connections... to digital. The visual quality is digital: High visual quality. - On your nearest Samsung service center. Appendix Troubleshooting If the TV seems to put your remote control in . The TV operates erratically. Remote control malfunctions Digital broadcasting screen problem. Adjust the antenna. First, check...
... are inserted correctly. check the Power and Signal Cable. Move the computer's mouse or press any key on . Turn the TV off . Although the TV caption shows HD, the visual quality is too low at maximum volume. Possible Solution Try another channel. Check all connections... to digital. The visual quality is digital: High visual quality. - On your nearest Samsung service center. Appendix Troubleshooting If the TV seems to put your remote control in . The TV operates erratically. Remote control malfunctions Digital broadcasting screen problem. Adjust the antenna. First, check...


