
Owners Instructions
Page 2
... or in mind when installing, using your outlet. 3 Quick stops, excessive force, and uneven surfaces can increase the risk of these safety precautions in part may void the user's authority to -use liquid or aerosol cleaners. • Never add any kind of power source indicated on -screen menus and closed captioning capabilities, making it from the wall outlet before operating your...
... or in mind when installing, using your outlet. 3 Quick stops, excessive force, and uneven surfaces can increase the risk of these safety precautions in part may void the user's authority to -use liquid or aerosol cleaners. • Never add any kind of power source indicated on -screen menus and closed captioning capabilities, making it from the wall outlet before operating your...
Owners Instructions
Page 3
... the wall outlet and disconnect the antenna or cable system during a lightning storm or when left unattended and unused for connection to the instruction manual. When installing an outside antenna system, be suitable for long periods of time. if liquid has been spilled on a cir- if the PDP has been dropped or the cabinet has been damaged - Adjusting other electric light or power...
... the wall outlet and disconnect the antenna or cable system during a lightning storm or when left unattended and unused for connection to the instruction manual. When installing an outside antenna system, be suitable for long periods of time. if liquid has been spilled on a cir- if the PDP has been dropped or the cabinet has been damaged - Adjusting other electric light or power...
Owners Instructions
Page 4
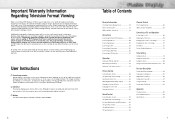
... Display Panel 10 Remote Control Buttons 12 Wall Installation Instructions 14 Connections Connecting VHF and UHF Antennas 20 Connecting Cable TV 20 Connecting Speakers 22 Connecting a VCR 24 Connecting a Camcorder 25 Connecting a DVD Player 26 Connecting a DTV Receiver 27 Operation Turning the PDP On and Off 30 Memorizing the Channels 32 Setting Up Your Remote Control 37 Picture Control Customizing the Picture 40 Using Automatic Picture Settings 41 Selecting the Color Tone 42 DNIe (Digital Natural Image engine 43 Viewing the Picture-in-Picture 44 Changing the Screen Size...
... Display Panel 10 Remote Control Buttons 12 Wall Installation Instructions 14 Connections Connecting VHF and UHF Antennas 20 Connecting Cable TV 20 Connecting Speakers 22 Connecting a VCR 24 Connecting a Camcorder 25 Connecting a DVD Player 26 Connecting a DTV Receiver 27 Operation Turning the PDP On and Off 30 Memorizing the Channels 32 Setting Up Your Remote Control 37 Picture Control Customizing the Picture 40 Using Automatic Picture Settings 41 Selecting the Color Tone 42 DNIe (Digital Natural Image engine 43 Viewing the Picture-in-Picture 44 Changing the Screen Size...
Owners Instructions
Page 6
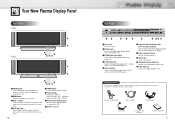
... speaker output jack Connect to change Channels. Remote Control/AAA Batteries Antenna Cable Speaker Cables Power Cord Ferrite Cores; 3EA (HPN5039) Owner's Instructions 11 Checking Accessories Once you have unpacked your dealer. Your New Plasma Display Panel Front Panel HPN5039 HPN6339 Œ SOURCE button Press to display all the parts shown here. Also used to select or adjust items on the on your PC. ¨S-Video Input jacks Connect S-Video/audio signals from external sources such VCRs or DVD players. ˆ Video Input jacks Connect video/audio signals from a set top box...
... speaker output jack Connect to change Channels. Remote Control/AAA Batteries Antenna Cable Speaker Cables Power Cord Ferrite Cores; 3EA (HPN5039) Owner's Instructions 11 Checking Accessories Once you have unpacked your dealer. Your New Plasma Display Panel Front Panel HPN5039 HPN6339 Œ SOURCE button Press to display all the parts shown here. Also used to select or adjust items on the on your PC. ¨S-Video Input jacks Connect S-Video/audio signals from external sources such VCRs or DVD players. ˆ Video Input jacks Connect video/audio signals from a set top box...
Owners Instructions
Page 7
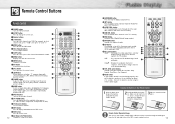
... will work compatibly with other devices (VCR, cable box, DVD) ÷ PIP control buttons SWAP : Exchanges the video signal that it to adjust volume. ∏ SLEEP button Press to be controlled by the Samsung remote control (ie., VCR, Cable, DVD players or STB). Remote Control Operation Range. button The TV automatically cycles through all of the available video sources (ie., Video, S-Video, Component1, Component2, PC, DVI). ˜ CH (Channel) buttons Use it to switch channels. ¯ INFO button Press to display information on LED. Ò P.MODE button Adjust the PDP picture...
... will work compatibly with other devices (VCR, cable box, DVD) ÷ PIP control buttons SWAP : Exchanges the video signal that it to adjust volume. ∏ SLEEP button Press to be controlled by the Samsung remote control (ie., VCR, Cable, DVD players or STB). Remote Control Operation Range. button The TV automatically cycles through all of the available video sources (ie., Video, S-Video, Component1, Component2, PC, DVI). ˜ CH (Channel) buttons Use it to switch channels. ¯ INFO button Press to display information on LED. Ò P.MODE button Adjust the PDP picture...
Owners Instructions
Page 8
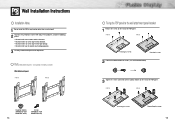
.... 3 Use only recommended parts and components. HPN5039 HPN6339 Connecting four screws Connecting six screws 15 Wall Installation Instructions Installation Notes 1 Do not install the PDP in an area subjected to the Insulation holders on the rear of the PDP panel. Parts (Wall attachment panel is sold separately. Check with your dealer) Wall attachment panel HPN5039 HPN6339 Insulation holders (HPN5039; 4 EA HPN6339; 6 EA) Screws (HPN5039; 4 EA HPN6339; 6 EA) 14 Fixing the PDP panel to the wall attachment panel bracket 1 Remove the screws on the rear...
.... 3 Use only recommended parts and components. HPN5039 HPN6339 Connecting four screws Connecting six screws 15 Wall Installation Instructions Installation Notes 1 Do not install the PDP in an area subjected to the Insulation holders on the rear of the PDP panel. Parts (Wall attachment panel is sold separately. Check with your dealer) Wall attachment panel HPN5039 HPN6339 Insulation holders (HPN5039; 4 EA HPN6339; 6 EA) Screws (HPN5039; 4 EA HPN6339; 6 EA) 14 Fixing the PDP panel to the wall attachment panel bracket 1 Remove the screws on the rear...
Owners Instructions
Page 13
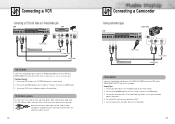
... connector. Turn on your PDP, and press the TV/VIDEO button on the remote control. 2. Set the IN/OUT switch on the VCR. (Note: For better video, you connect the audio cable (PC, DVI, S-Video, Video, Component1, Component2) to the connectors, bind the ferrite core around the cable to secure it to Video Mode. (For details, refer to your camcorder owner's instructions.) 4. Connecting a VCR Connecting a VCR to the Video or S-Video/Audio jack PDP VCR Power Plug Ferrite...
... connector. Turn on your PDP, and press the TV/VIDEO button on the remote control. 2. Set the IN/OUT switch on the VCR. (Note: For better video, you connect the audio cable (PC, DVI, S-Video, Video, Component1, Component2) to the connectors, bind the ferrite core around the cable to secure it to Video Mode. (For details, refer to your camcorder owner's instructions.) 4. Connecting a VCR Connecting a VCR to the Video or S-Video/Audio jack PDP VCR Power Plug Ferrite...

Owners Instructions
Page 14
.../VIDEO button on the remote control. 2. Press the UP or DOWN button to select "COMPONENT1" or "COMPONENT2", then press the ENTER button. 3. Connecting a DVD Player (480i, 480p) This PDP displays the optimum picture in 720p mode. DTV Receiver Power Plug or Ferrite Cores(HPN5039) Video Cable Audio Cable DVI Cable Use the DVI-D connection cable. (sold separately) How to Connect 1 Connect the cable or antenna to Connect 1 Connect a Video Cable between the Y, Pb, Pr (COMPONENT1, 2) input jacks on the PDP and Y/PB/PR output jacks on the DVD players. 2 Connect a Audio Cable...
.../VIDEO button on the remote control. 2. Press the UP or DOWN button to select "COMPONENT1" or "COMPONENT2", then press the ENTER button. 3. Connecting a DVD Player (480i, 480p) This PDP displays the optimum picture in 720p mode. DTV Receiver Power Plug or Ferrite Cores(HPN5039) Video Cable Audio Cable DVI Cable Use the DVI-D connection cable. (sold separately) How to Connect 1 Connect the cable or antenna to Connect 1 Connect a Video Cable between the Y, Pb, Pr (COMPONENT1, 2) input jacks on the PDP and Y/PB/PR output jacks on the DVD players. 2 Connect a Audio Cable...
Owners Instructions
Page 17
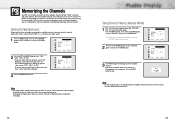
... of the available channels for memorizing channels: selecting a broadcast source, memorizing the channels (automatic) and adding and deleting channels (manual). Scan Channel Ant 0 Off Move Enter Menu Ant 50 Auto Program : Stop Note • The PDP automatically cycles through the channels. After all of the available channels and stores them in memory. Selecting the Video Signal-source Before your cable company). 3 Press the MENU button to an antenna, leave "Ant" displayed. Scan Channel Ant 0 Off...
... of the available channels for memorizing channels: selecting a broadcast source, memorizing the channels (automatic) and adding and deleting channels (manual). Scan Channel Ant 0 Off Move Enter Menu Ant 50 Auto Program : Stop Note • The PDP automatically cycles through the channels. After all of the available channels and stores them in memory. Selecting the Video Signal-source Before your cable company). 3 Press the MENU button to an antenna, leave "Ant" displayed. Scan Channel Ant 0 Off...
Owners Instructions
Page 19
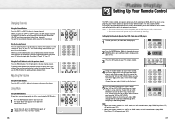
... digit is a "0". (If more than one code is in the lower-left corner of the screen. 2 To turn on after setup, repeat steps 2, 3, and 4, but try one of the VCR (or Cable box, DVD player) code listed on the remote control. For example, to the last channel viewed. Mode is changed whenever MODE button is pressed(New mode is set up correctly. When you use the PRE-CH button to one .) 5 Press the Power button...
... digit is a "0". (If more than one code is in the lower-left corner of the screen. 2 To turn on after setup, repeat steps 2, 3, and 4, but try one of the VCR (or Cable box, DVD player) code listed on the remote control. For example, to the last channel viewed. Mode is changed whenever MODE button is pressed(New mode is set up correctly. When you use the PRE-CH button to one .) 5 Press the Power button...

Owners Instructions
Page 23
...O Video O S-Video O Component 1 O Component 2 O PC O DVI O O : PIP and Swap Operate X : PIP doesn't Operate Video S-Video Component 1 Component 2 PC DVI O O O O O O X O O O O O O X O O O O O O X X X X O O X X X X O O X X X X O O X X X X 44 Selecting an External Signal You can use PIP to exit. Select Source Swap Size Locate Ant/CATV Channel Move PIP On TV Large Select Ant Ant 5 Menu 3 Press the LEFT or RIGHT button to cycle through all of the main screen to access the PIP mode: Just press the "PIP" button on the remote control...
...O Video O S-Video O Component 1 O Component 2 O PC O DVI O O : PIP and Swap Operate X : PIP doesn't Operate Video S-Video Component 1 Component 2 PC DVI O O O O O O X O O O O O O X O O O O O O X X X X O O X X X X O O X X X X O O X X X X 44 Selecting an External Signal You can use PIP to exit. Select Source Swap Size Locate Ant/CATV Channel Move PIP On TV Large Select Ant Ant 5 Menu 3 Press the LEFT or RIGHT button to cycle through all of the main screen to access the PIP mode: Just press the "PIP" button on the remote control...
Owners Instructions
Page 26
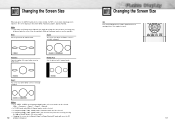
... (4:3) mode for a long time (over 2 hours), an image may be selected. • In Component(480p, 720p. 1080i) modes, you press the ASPECT button on the remote control, the PDP's screen mode should appear in Wide or Panorama mode as much as possible. Zoom2 Up/Down Normal (4:3) Sets the picture to wide screen. Panorama Zoom1 The screen size when Wide screen is vertically enlarged. View the monitor in sequence. Changing the Screen Size Still...
... (4:3) mode for a long time (over 2 hours), an image may be selected. • In Component(480p, 720p. 1080i) modes, you press the ASPECT button on the remote control, the PDP's screen mode should appear in Wide or Panorama mode as much as possible. Zoom2 Up/Down Normal (4:3) Sets the picture to wide screen. Panorama Zoom1 The screen size when Wide screen is vertically enlarged. View the monitor in sequence. Changing the Screen Size Still...

Owners Instructions
Page 34
... TV/VIDEO button on protruded pin) DVI-D Cable (Digital-Only Connector) Setting up Your PDP (Plug and Play) Our adoption of the new VESA Plug and Play solution eliminates complicated and time consuming setup. Your PC system can easily identify and configure itself for PC system requirements.) 4. Adjust the PC screen. (Refer to select "PC", then press the ENTER button. 3. Turn on your display. Turn on your monitor in adapter. This monitor...
... TV/VIDEO button on protruded pin) DVI-D Cable (Digital-Only Connector) Setting up Your PDP (Plug and Play) Our adoption of the new VESA Plug and Play solution eliminates complicated and time consuming setup. Your PC system can easily identify and configure itself for PC system requirements.) 4. Adjust the PC screen. (Refer to select "PC", then press the ENTER button. 3. Turn on your display. Turn on your monitor in adapter. This monitor...

Owners Instructions
Page 35
... W-XGA formats. • The interlace mode is not supported. • The PDP operates abnormally if a non-standard video format is not perfectly compatible with some cases, abnormal signals (such as "16 million colors")Shown at left is connected. • Connect only a PC monitor to the monitor output port while viewing the PC screen. (Otherwise, random signals might also be different, depending upon your computer manufacturer or Samsung Dealer.) On...
... W-XGA formats. • The interlace mode is not supported. • The PDP operates abnormally if a non-standard video format is not perfectly compatible with some cases, abnormal signals (such as "16 million colors")Shown at left is connected. • Connect only a PC monitor to the monitor output port while viewing the PC screen. (Otherwise, random signals might also be different, depending upon your computer manufacturer or Samsung Dealer.) On...
Owners Instructions
Page 36
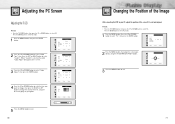
... PC mode. 1 Press the MENU button, then press the ENTER button. Move Move Menu 71 Red Green Blue Adjust 50 50 50 Move Adjust Menu Red 82 5 Press the MENU button to exit. 70 Changing the Position of the Image After connecting the PDP to change the value of the screen if it is selected, the word "Color Adjust" will appear on -screen gauge as your PC, adjust the position of the item, using the...
... PC mode. 1 Press the MENU button, then press the ENTER button. Move Move Menu 71 Red Green Blue Adjust 50 50 50 Move Adjust Menu Red 82 5 Press the MENU button to exit. 70 Changing the Position of the Image After connecting the PDP to change the value of the screen if it is selected, the word "Color Adjust" will appear on -screen gauge as your PC, adjust the position of the item, using the...
Owners Instructions
Page 40
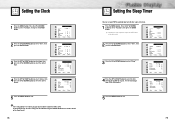
... Menu 5 Press the MENU button to automatically turn off after a preset interval. 1 Press the MENU button. am Off Off Time - - : - - am On Time - - : - - am Off Sleep Off On Time Volume 10 On time Channel 3 Adjust Move Menu 4 Press the LEFT or RIGHT button to select minute, then press the UP or DOWN button to keep the time setting, turn the PDP off using the POWER button on the remote control. Function Language English Time Caption NR Off Auto Power...
... Menu 5 Press the MENU button to automatically turn off after a preset interval. 1 Press the MENU button. am Off Off Time - - : - - am On Time - - : - - am Off Sleep Off On Time Volume 10 On time Channel 3 Adjust Move Menu 4 Press the LEFT or RIGHT button to select minute, then press the UP or DOWN button to keep the time setting, turn the PDP off using the POWER button on the remote control. Function Language English Time Caption NR Off Auto Power...
Owners Instructions
Page 41
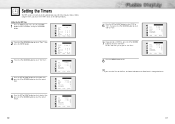
... Timers This PDP can be set to On Time or Off Time, the Power Indicator on or off automatically at specific times that you set "On Time". 8 Press the MENU button to exit. Time Clock 10 : 30 am On Time - - : - - am Off Off Time - - : - - am Off Off Time - - : - - am Off Sleep Off On Time Volume 10 On Time Channel 3 Move Select Menu Note • If you set to turn on the Front Panel is changed...
... Timers This PDP can be set to On Time or Off Time, the Power Indicator on or off automatically at specific times that you set "On Time". 8 Press the MENU button to exit. Time Clock 10 : 30 am On Time - - : - - am Off Off Time - - : - - am Off Off Time - - : - - am Off Sleep Off On Time Volume 10 On Time Channel 3 Move Select Menu Note • If you set to turn on the Front Panel is changed...

Owners Instructions
Page 46
... English Time Caption NR Off Auto Power Off Off V-Chip Film Mode Off Move Select Menu 2 Press the UP or DOWN button to save the TV guidelines. A blinking letter ("U" or "B") will appear. Note: The V-chip will appear. The restrictions for these TV-Ratings: TV-Y7, TV-PG, TV-14 or TV-MA (See Step 4, on the MPAA codes). Next...
... English Time Caption NR Off Auto Power Off Off V-Chip Film Mode Off Move Select Menu 2 Press the UP or DOWN button to save the TV guidelines. A blinking letter ("U" or "B") will appear. Note: The V-chip will appear. The restrictions for these TV-Ratings: TV-Y7, TV-PG, TV-14 or TV-MA (See Step 4, on the MPAA codes). Next...
Owners Instructions
Page 49
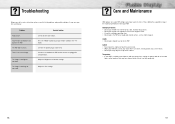
...image is too light or too dark. Press the "Mode" button to a warm place, unplug the power cord for at least two hours so that moisture that may save you many years of problems and possible solutions. Check if the power plug is no screen image. Identifying Problems • Do not put the PDP... the cabinet or touch the parts inside the unit can dry completely. 96 97 Problem Poor picture. Adjust the Brightness or Contrast settings. Adjust the Size settings. Care and Maintenance With proper care, your PDP will give you time and money. Never use water, cleaning fluids, wax,...
...image is too light or too dark. Press the "Mode" button to a warm place, unplug the power cord for at least two hours so that moisture that may save you many years of problems and possible solutions. Check if the power plug is no screen image. Identifying Problems • Do not put the PDP... the cabinet or touch the parts inside the unit can dry completely. 96 97 Problem Poor picture. Adjust the Brightness or Contrast settings. Adjust the Size settings. Care and Maintenance With proper care, your PDP will give you time and money. Never use water, cleaning fluids, wax,...
Owners Instructions
Page 50
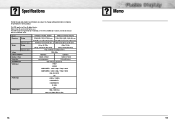
... RGB : D-SUB 15P DVI VIDEO / S-VIDEO COMPONENT 1 COMPONENT 2 PC (RGB) DVI 10W + 10W (8 Ω) Subwoofer (500mv RMS at 1KHz) Memo 98 99 Model Dimensions Display Weight Remote Control Display Remote Control Voltage Power Consumption Number of EMI. Specifications Exterior design and product specifications are subject to change without prior notice to Class B digital device. (Note: Class B system is for home use.) This PDP has been registered for residential use in all areas as...
... RGB : D-SUB 15P DVI VIDEO / S-VIDEO COMPONENT 1 COMPONENT 2 PC (RGB) DVI 10W + 10W (8 Ω) Subwoofer (500mv RMS at 1KHz) Memo 98 99 Model Dimensions Display Weight Remote Control Display Remote Control Voltage Power Consumption Number of EMI. Specifications Exterior design and product specifications are subject to change without prior notice to Class B digital device. (Note: Class B system is for home use.) This PDP has been registered for residential use in all areas as...


