User Manual (ENGLISH)
Page 5
...Using the V-Chip (for USA 118 Using the V-Chip (for Canada 124 Appendix Troubleshooting 134 Care and Maintenance 135 Specifications 136 Dimensions (HP-S4253 137 Dimensions (HP-S5053 139 Note • The information contained in these Owner's Instructions is subject to change without prior notice for improvement, and may vary...105 Selecting the Film Mode 106 Setting the Blue Screen 107 Using Game Mode 108 Viewing Closed Captions (On-Screen Text Messages) - Connecting a PC and Operation Connecting a PC 88 Changing the Position of the TV's software and the regional conditions. 5
...Using the V-Chip (for USA 118 Using the V-Chip (for Canada 124 Appendix Troubleshooting 134 Care and Maintenance 135 Specifications 136 Dimensions (HP-S4253 137 Dimensions (HP-S5053 139 Note • The information contained in these Owner's Instructions is subject to change without prior notice for improvement, and may vary...105 Selecting the Film Mode 106 Setting the Blue Screen 107 Using Game Mode 108 Viewing Closed Captions (On-Screen Text Messages) - Connecting a PC and Operation Connecting a PC 88 Changing the Position of the TV's software and the regional conditions. 5
User Manual (ENGLISH)
Page 10
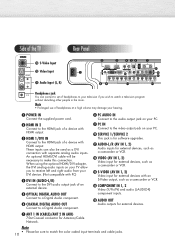
...1, 2) Video input for external devices with an S-Video output, such as a DVI connection with separate analog audio inputs. " PC AUDIO IN Connect to the audio output jack on your PC. ' PC IN Connect to make this connection. Note • Prolonged use of headphones at a high volume may damage your DVI device... jack of an external device. ˆ OPTICAL DIGITAL AUDIO OUT Connect to a Digital Audio component. Ø COAXIAL DIGITAL AUDIO OUT Connect to match the color coded input terminals and cable jacks. 10 Side of the TV Rear Panel Ò S-Video Input Video Input Ô...
...1, 2) Video input for external devices with an S-Video output, such as a DVI connection with separate analog audio inputs. " PC AUDIO IN Connect to the audio output jack on your PC. ' PC IN Connect to make this connection. Note • Prolonged use of headphones at a high volume may damage your DVI device... jack of an external device. ˆ OPTICAL DIGITAL AUDIO OUT Connect to a Digital Audio component. Ø COAXIAL DIGITAL AUDIO OUT Connect to match the color coded input terminals and cable jacks. 10 Side of the TV Rear Panel Ò S-Video Input Video Input Ô...

User Manual (ENGLISH)
Page 28
... high-bandwidth digital content protection High-Definition picture source to Connect 1 Connect the DVI AUDIO (L, R) input jacks on the TV with the AUDIO output jacks on the Set-Top Box using an audio cable. Connecting to HDMI (High Definition Multimedia Interface)/DVI Compatible TV Rear Panel Power cord 1 2 DTV Set-Top Box ... displayed on the Set-Top Box using the HDMI input with PC. 28 Note • The HDMI/DVI IN jack is not compatible with a device that outputs DVI instead of HDMI. 2 Connect the HDMI input jack on the TV and the DVI output jack on the screen in their digital...
... high-bandwidth digital content protection High-Definition picture source to Connect 1 Connect the DVI AUDIO (L, R) input jacks on the TV with the AUDIO output jacks on the Set-Top Box using an audio cable. Connecting to HDMI (High Definition Multimedia Interface)/DVI Compatible TV Rear Panel Power cord 1 2 DTV Set-Top Box ... displayed on the Set-Top Box using the HDMI input with PC. 28 Note • The HDMI/DVI IN jack is not compatible with a device that outputs DVI instead of HDMI. 2 Connect the HDMI input jack on the TV and the DVI output jack on the screen in their digital...

User Manual (ENGLISH)
Page 30
... "AUDIO OUT (AUDIO L/R)" terminals cannot be used for external speakers. Connecting to an Analog Amplifier TV Rear Panel Power cord 1 Audio cable Analog Amplifier How to the "AUDIO OUT (AUDIO L/R)" terminals: Decrease the gain (volume) of the TV, and adjust the volume level with the Amplifier's volume control. Optical Output...Component 480i Yes Yes Component 480p Yes Yes Component 720p Yes Yes Component 1080i Yes Yes S-Video Yes Yes Composite Yes Yes PC Yes Yes 30 Also note about the Internal Mute how does it affect these jacks. You must hook them up to an amplifier....
... "AUDIO OUT (AUDIO L/R)" terminals cannot be used for external speakers. Connecting to an Analog Amplifier TV Rear Panel Power cord 1 Audio cable Analog Amplifier How to the "AUDIO OUT (AUDIO L/R)" terminals: Decrease the gain (volume) of the TV, and adjust the volume level with the Amplifier's volume control. Optical Output...Component 480i Yes Yes Component 480p Yes Yes Component 720p Yes Yes Component 1080i Yes Yes S-Video Yes Yes Composite Yes Yes PC Yes Yes 30 Also note about the Internal Mute how does it affect these jacks. You must hook them up to an amplifier....

User Manual (ENGLISH)
Page 48
...between the following sets of jacks: AV1, S-VIDEO1, COMPONENT1, COMPONENT2, PC, HDMI1, or HDMI2 on the TV's rear panel and AV2 or S-VIDEO2 on the TV's side panel. • Before selecting an input source, connect an external device first. • HDMI input can be selected when ...Video1 S-Video2 Component1 † More Move Enter Return Notes • When you connect equipment to the TV, you can choose between viewing signals from connected equipment, such as VCR, DVD, Samsung Set-Top Box, and the TV source (broadcast or cable). Setting the Signal Source 1 Press the MENU button...
...between the following sets of jacks: AV1, S-VIDEO1, COMPONENT1, COMPONENT2, PC, HDMI1, or HDMI2 on the TV's rear panel and AV2 or S-VIDEO2 on the TV's side panel. • Before selecting an input source, connect an external device first. • HDMI input can be selected when ...Video1 S-Video2 Component1 † More Move Enter Return Notes • When you connect equipment to the TV, you can choose between viewing signals from connected equipment, such as VCR, DVD, Samsung Set-Top Box, and the TV source (broadcast or cable). Setting the Signal Source 1 Press the MENU button...
User Manual (ENGLISH)
Page 58
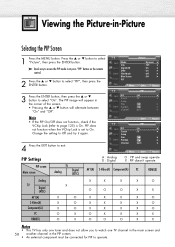
...'t operate AV1(A) S-Video(A) Component(A) PC HDMI(D) Analog TV Digital X (ATSC) X X X X O O O O X X AV1(A) X O X X X X O S-Video(A) X O X X X X O Component(A) X O X X X X O PC O X O X X X X HDMI(D) O X O O O X X Notes • This TV has only one tuner and does not allow you to watch one TV channel in the main screen and 58 another channel in the PIP screen. • An external component must be connected for PIP to page...
...'t operate AV1(A) S-Video(A) Component(A) PC HDMI(D) Analog TV Digital X (ATSC) X X X X O O O O X X AV1(A) X O X X X X O S-Video(A) X O X X X X O Component(A) X O X X X X O PC O X O X X X X HDMI(D) O X O O O X X Notes • This TV has only one tuner and does not allow you to watch one TV channel in the main screen and 58 another channel in the PIP screen. • An external component must be connected for PIP to page...
User Manual (ENGLISH)
Page 59
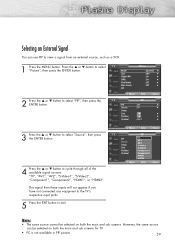
... to view a signal from these inputs will not appear if you have not connected any equipment to the TV's respective input jacks. 5 Press the EXIT button to select "Picture", then press the ENTER button. TV Mode Size Digital NR DNIe Film Mode Blue Screen PIP Picture : Dynamic √... Move Enter Return Notes • The same source cannot be selected on both the main and sub screens for TV. • PC is not available in PIP picture. 59 TV PIP PIP : On √ Source : TV √ Swap Size : √ Position : √ Channel : Air 3 √ 3 Press the ▲ ...
... to view a signal from these inputs will not appear if you have not connected any equipment to the TV's respective input jacks. 5 Press the EXIT button to select "Picture", then press the ENTER button. TV Mode Size Digital NR DNIe Film Mode Blue Screen PIP Picture : Dynamic √... Move Enter Return Notes • The same source cannot be selected on both the main and sub screens for TV. • PC is not available in PIP picture. 59 TV PIP PIP : On √ Source : TV √ Swap Size : √ Position : √ Channel : Air 3 √ 3 Press the ▲ ...

User Manual (ENGLISH)
Page 87
PLASMA DISPLAY PANEL Connecting a PC and Operation Connecting a PC 88 Changing the Position of the Image 92 Picture Quality Adjustment 93 Image Reset 95
PLASMA DISPLAY PANEL Connecting a PC and Operation Connecting a PC 88 Changing the Position of the Image 92 Picture Quality Adjustment 93 Image Reset 95
User Manual (ENGLISH)
Page 88
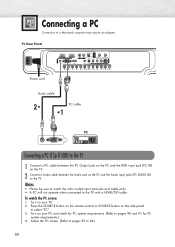
... pages 92 to the TV 1 Connect a PC cable between the PC Output jack on the PC and the RGB input jack (PC IN) on the TV. 2 Connect a Audio cable between the Audio jack on the PC and the Audio input jacks (PC AUDIO IN) on your TV. 2. Turn on the TV. TV Rear Panel Power cord Audio cable 2 PC cable 1 PC Connecting a PC (15p D-SUB) to 94...
... pages 92 to the TV 1 Connect a PC cable between the PC Output jack on the PC and the RGB input jack (PC IN) on the TV. 2 Connect a Audio cable between the Audio jack on the PC and the Audio input jacks (PC AUDIO IN) on your TV. 2. Turn on the TV. TV Rear Panel Power cord Audio cable 2 PC cable 1 PC Connecting a PC (15p D-SUB) to 94...

User Manual (ENGLISH)
Page 90
... below. Click on your computer manufacturer or Samsung Dealer.) 1. Set the Vertical Frequency and Horizontal Frequency individually if you must set the Display Mode by the TV. You do so instead of setting the Screen Refresh Rate. 5. Click on Properties. Shutdown the PC, and connect it to your TV. (See page 88) • The actual...
... below. Click on your computer manufacturer or Samsung Dealer.) 1. Set the Vertical Frequency and Horizontal Frequency individually if you must set the Display Mode by the TV. You do so instead of setting the Screen Refresh Rate. 5. Click on Properties. Shutdown the PC, and connect it to your TV. (See page 88) • The actual...
User Manual (ENGLISH)
Page 91
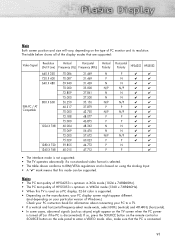
... on the type of Windows.) Check your PC instruction book for information about connecting your PC to IBM/VESA regulations and is based on using the Analog Input. • A "✔" mark means that this TV is used as stripes) might appear different....TV. • If a vertical and horizontal frequency-select mode exists, select 60Hz (vertical) and 48.4KHz (horizontal). • In some cases, abnormal signals (such as a PC display, 32-bit color is connected. 91 Notes • The PC text quality of HP-S4253 is optimum in XGA mode (1024 x 768@60Hz). • The PC text quality of HP-S5053...
... on the type of Windows.) Check your PC instruction book for information about connecting your PC to IBM/VESA regulations and is based on using the Analog Input. • A "✔" mark means that this TV is used as stripes) might appear different....TV. • If a vertical and horizontal frequency-select mode exists, select 60Hz (vertical) and 48.4KHz (horizontal). • In some cases, abnormal signals (such as a PC display, 32-bit color is connected. 91 Notes • The PC text quality of HP-S4253 is optimum in XGA mode (1024 x 768@60Hz). • The PC text quality of HP-S5053...

User Manual (ENGLISH)
Page 92
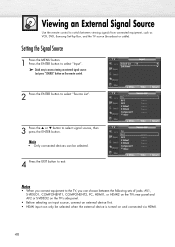
...Position √ Auto Adjustment Image Reset 3 Press the ▲ or ▼ button to select "PC", then press the ENTER button. TV Move Enter Position Return 4 Adjust the position of screen by pressing the button. TV Plug & Play Language Time Game Mode V-Chip Caption † More Setup √ : English ... to select "Position", then press the ENTER button. Press the ▲ or ▼ button to your PC, adjust the position of the screen if it is not well-aligned. Changing the Position of the Image After connecting the TV to select "Setup", then press the ENTER button.
...Position √ Auto Adjustment Image Reset 3 Press the ▲ or ▼ button to select "PC", then press the ENTER button. TV Move Enter Position Return 4 Adjust the position of screen by pressing the button. TV Plug & Play Language Time Game Mode V-Chip Caption † More Setup √ : English ... to select "Position", then press the ENTER button. Press the ▲ or ▼ button to your PC, adjust the position of the screen if it is not well-aligned. Changing the Position of the Image After connecting the TV to select "Setup", then press the ENTER button.

User Manual (ENGLISH)
Page 5
Analog 109 Viewing Closed Captions (On-Screen Text Messages) - Connecting a PC and Operation Connecting a PC 88 Changing the Position of the TV's software and the regional conditions. 5 Digital 110 Menu Transparency Level 112 Using the Energy Saving Feature 113 Preventing ...V-Chip (for USA 118 Using the V-Chip (for Canada 124 Appendix Troubleshooting 134 Care and Maintenance 135 Specifications 136 Dimensions (HP-S4253 137 Dimensions (HP-S5053 139 Note • The information contained in these Owner's Instructions is subject to change without prior notice for improvement, and ...
Analog 109 Viewing Closed Captions (On-Screen Text Messages) - Connecting a PC and Operation Connecting a PC 88 Changing the Position of the TV's software and the regional conditions. 5 Digital 110 Menu Transparency Level 112 Using the Energy Saving Feature 113 Preventing ...V-Chip (for USA 118 Using the V-Chip (for Canada 124 Appendix Troubleshooting 134 Care and Maintenance 135 Specifications 136 Dimensions (HP-S4253 137 Dimensions (HP-S5053 139 Note • The information contained in these Owner's Instructions is subject to change without prior notice for improvement, and ...

User Manual (ENGLISH)
Page 10
...watch a television program without disturbing other people in the room. Note • Please be sure to make this connection. " PC AUDIO IN Connect to the audio output jack on your PC. ' PC IN Connect to the video output jack on your DVI device. (Not compatible with an S-Video output, such as a camcorder... or VCR. Ò S-VIDEO (AV IN 1, 2) Video input for Antenna/Cable Network. Side of the TV Rear Panel Ò S-Video Input ...
...watch a television program without disturbing other people in the room. Note • Please be sure to make this connection. " PC AUDIO IN Connect to the audio output jack on your PC. ' PC IN Connect to the video output jack on your DVI device. (Not compatible with an S-Video output, such as a camcorder... or VCR. Ò S-VIDEO (AV IN 1, 2) Video input for Antenna/Cable Network. Side of the TV Rear Panel Ò S-Video Input ...

User Manual (ENGLISH)
Page 28
... jack is not compatible with the AUDIO output jacks on the TV with PC. 28 Note • Use analog stereo audio inputs when using the HDMI input with a device that outputs DVI instead of HDMI. 2 Connect the HDMI input jack on the TV and the DVI output jack on the screen in their digital... form. Connecting a Digital TV Set-Top Box (480p, 720p, 1080i) By inputting a high-...
... jack is not compatible with the AUDIO output jacks on the TV with PC. 28 Note • Use analog stereo audio inputs when using the HDMI input with a device that outputs DVI instead of HDMI. 2 Connect the HDMI input jack on the TV and the DVI output jack on the screen in their digital... form. Connecting a Digital TV Set-Top Box (480p, 720p, 1080i) By inputting a high-...

User Manual (ENGLISH)
Page 30
... "AUDIO OUT (AUDIO L/R)" terminals cannot be used for external speakers. Connecting to an Analog Amplifier TV Rear Panel Power cord 1 Audio cable Analog Amplifier How to the "AUDIO OUT (AUDIO L/R)" terminals: Decrease the gain (volume) of the TV, and adjust the volume level with the Amplifier's volume control. Optical Output... 480i Yes Yes Component 480p Yes Yes Component 720p Yes Yes Component 1080i Yes Yes S-Video Yes Yes Composite Yes Yes PC Yes Yes 30 Also note about the Internal Mute how does it affect these jacks. You must hook them up to an amplifier....
... "AUDIO OUT (AUDIO L/R)" terminals cannot be used for external speakers. Connecting to an Analog Amplifier TV Rear Panel Power cord 1 Audio cable Analog Amplifier How to the "AUDIO OUT (AUDIO L/R)" terminals: Decrease the gain (volume) of the TV, and adjust the volume level with the Amplifier's volume control. Optical Output... 480i Yes Yes Component 480p Yes Yes Component 720p Yes Yes Component 1080i Yes Yes S-Video Yes Yes Composite Yes Yes PC Yes Yes 30 Also note about the Internal Mute how does it affect these jacks. You must hook them up to an amplifier....
User Manual (ENGLISH)
Page 48
...8224; More Move Enter Return Notes • When you connect equipment to the TV, you can choose between viewing signals from connected equipment, such as VCR, DVD, Samsung Set-Top Box, and the TV source (broadcast or cable). TV Input Source List : TV √ Edit Name √ 2 Press the ENTER button... between the following sets of jacks: AV1, S-VIDEO1, COMPONENT1, COMPONENT2, PC, HDMI1, or HDMI2 on the TV's rear panel and AV2 or S-VIDEO2 on the TV's side panel. • Before selecting an input source, connect an external device first. • HDMI input can only be selected. ...
...8224; More Move Enter Return Notes • When you connect equipment to the TV, you can choose between viewing signals from connected equipment, such as VCR, DVD, Samsung Set-Top Box, and the TV source (broadcast or cable). TV Input Source List : TV √ Edit Name √ 2 Press the ENTER button... between the following sets of jacks: AV1, S-VIDEO1, COMPONENT1, COMPONENT2, PC, HDMI1, or HDMI2 on the TV's rear panel and AV2 or S-VIDEO2 on the TV's side panel. • Before selecting an input source, connect an external device first. • HDMI input can only be selected. ...

User Manual (ENGLISH)
Page 58
... PC HDMI(D) Analog TV Digital X (ATSC) X X X X O O O O X X AV1(A) X O X X X X O S-Video(A) X O X X X X O Component(A) X O X X X X O PC O X O X X X X HDMI(D) O X O O O X X Notes • This TV has only one tuner and does not allow you to watch one TV ...channel in the main screen and 58 another channel in -Picture Selecting the PIP Screen 1 Press the MENU button. Change the setting to Off and try it again. 4 Press the EXIT button to select "On". Viewing the Picture-in the PIP screen. • An external component must be connected...
... PC HDMI(D) Analog TV Digital X (ATSC) X X X X O O O O X X AV1(A) X O X X X X O S-Video(A) X O X X X X O Component(A) X O X X X X O PC O X O X X X X HDMI(D) O X O O O X X Notes • This TV has only one tuner and does not allow you to watch one TV ...channel in the main screen and 58 another channel in -Picture Selecting the PIP Screen 1 Press the MENU button. Change the setting to Off and try it again. 4 Press the EXIT button to select "On". Viewing the Picture-in the PIP screen. • An external component must be connected...

User Manual (ENGLISH)
Page 59
However, the same source can use PIP to view a signal from these inputs will not appear if you have not connected any equipment to the TV's respective input jacks. 5 Press the EXIT button to select "Picture", then press the ENTER button. Selecting an External Signal You ... Move Enter Return Notes • The same source cannot be selected on both the main and sub screens for TV. • PC is not available in PIP picture. 59 TV PIP PIP : On √ Source : TV √ Swap Size : √ Position : √ Channel : Air 3 √ 3 Press the ▲ or &#...
However, the same source can use PIP to view a signal from these inputs will not appear if you have not connected any equipment to the TV's respective input jacks. 5 Press the EXIT button to select "Picture", then press the ENTER button. Selecting an External Signal You ... Move Enter Return Notes • The same source cannot be selected on both the main and sub screens for TV. • PC is not available in PIP picture. 59 TV PIP PIP : On √ Source : TV √ Swap Size : √ Position : √ Channel : Air 3 √ 3 Press the ▲ or &#...
User Manual (ENGLISH)
Page 87
PLASMA DISPLAY PANEL Connecting a PC and Operation Connecting a PC 88 Changing the Position of the Image 92 Picture Quality Adjustment 93 Image Reset 95
PLASMA DISPLAY PANEL Connecting a PC and Operation Connecting a PC 88 Changing the Position of the Image 92 Picture Quality Adjustment 93 Image Reset 95


