
Open Source Guide (ENGLISH)
Page 2
16. You can do so by permitting redistribution under these terms, attach the following notices to most effectively convey the exclusion of warranty; and each file should have at least the "copyright" line and a pointer to where the full notice is safest to attach them to the start of each source file to the library. To apply these terms (or, alternatively, under the terms of the greatest possible use to be of the ordinary General Public License). IN NO EVENT UNLESS REQUIRED BY APPLICABLE LAW OR AGREED TO IN WRITING WILL ANY COPYRIGHT HOLDER, OR ANY OTHER PARTY WHO MAY MODIFY ...
16. You can do so by permitting redistribution under these terms, attach the following notices to most effectively convey the exclusion of warranty; and each file should have at least the "copyright" line and a pointer to where the full notice is safest to attach them to the start of each source file to the library. To apply these terms (or, alternatively, under the terms of the greatest possible use to be of the ordinary General Public License). IN NO EVENT UNLESS REQUIRED BY APPLICABLE LAW OR AGREED TO IN WRITING WILL ANY COPYRIGHT HOLDER, OR ANY OTHER PARTY WHO MAY MODIFY ...
User Manual (ENGLISH)
Page 8
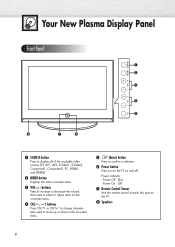
Power indicator - " Speakers 8 Your New Plasma Display Panel Front Panel Œ ´ ˇ ¨ ˆ " ∏ Ø Œ SOURCE button Press to display all of the available video sources (TV, AV1, AV2, S-Video1, S-Video2, Component1, Component2, PC, HDMI1, and HDMI2). ´ MENU button Displays the main on the TV... Press to confirm a selection. Ø Power button Press to turn the TV on -screen menu. ¨ CH( , ) buttons Press CH or CH to change channels. Also used to increase or decrease the volume. Power Off : Blue - Power On : Off ∏ Remote Control Sensor...
Power indicator - " Speakers 8 Your New Plasma Display Panel Front Panel Œ ´ ˇ ¨ ˆ " ∏ Ø Œ SOURCE button Press to display all of the available video sources (TV, AV1, AV2, S-Video1, S-Video2, Component1, Component2, PC, HDMI1, and HDMI2). ´ MENU button Displays the main on the TV... Press to confirm a selection. Ø Power button Press to turn the TV on -screen menu. ¨ CH( , ) buttons Press CH or CH to change channels. Also used to increase or decrease the volume. Power Off : Blue - Power On : Off ∏ Remote Control Sensor...
User Manual (ENGLISH)
Page 9
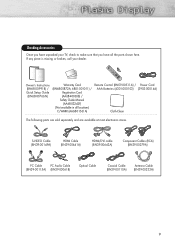
If any piece is missing or broken, call your TV, check to make sure that you have all locations) C/WARR (AA68-01561A) Remote Control (BN59-00511A) / Power Cord AAA Batteries (4301-000103) (3903-000144) Cloth-Clean The following parts are sold separately and are available at most electronics stores. S-VIDEO Cable (BN39-...
If any piece is missing or broken, call your TV, check to make sure that you have all locations) C/WARR (AA68-01561A) Remote Control (BN59-00511A) / Power Cord AAA Batteries (4301-000103) (3903-000144) Cloth-Clean The following parts are sold separately and are available at most electronics stores. S-VIDEO Cable (BN39-...
User Manual (ENGLISH)
Page 10
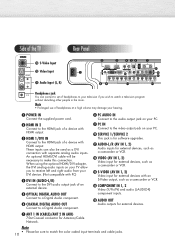
..., the DVI analog audio inputs on your DVI device. (Not compatible with HDMI output. Side of the TV Rear Panel Ò S-Video Input Video Input Ô Audio Input (L, R) Headphones jack You...output jack on your PC. ' PC IN Connect to the video output jack on your TV allow you wish to match the color coded input terminals and cable jacks. 10 An optional...input for Antenna/Cable Network. These inputs can connect a set of headphones to your hearing. Œ POWER IN Connect the supplied power cord. ´ HDMI IN 2 Connect to the HDMI jack of a device with HDMI output. ...
..., the DVI analog audio inputs on your DVI device. (Not compatible with HDMI output. Side of the TV Rear Panel Ò S-Video Input Video Input Ô Audio Input (L, R) Headphones jack You...output jack on your PC. ' PC IN Connect to the video output jack on your TV allow you wish to match the color coded input terminals and cable jacks. 10 An optional...input for Antenna/Cable Network. These inputs can connect a set of headphones to your hearing. Œ POWER IN Connect the supplied power cord. ´ HDMI IN 2 Connect to the HDMI jack of a device with HDMI output. ...
User Manual (ENGLISH)
Page 11
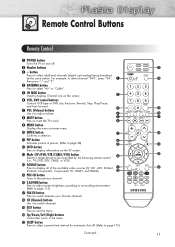
...´ Number buttons ˇ - Remote Control Buttons Remote Control Œ POWER button Turns the TV on the TV screen. Ò Mode (TV/DVD/STB/CABLE/VCR) button Selects a target device to be controlled by the Samsung remote control (i.e., TV, DVD, STB, CABLE, or VCR). Ú SOURCE button Press to ...display all of the available video sources (TV, AV1, AV2, S-Video1, S-Video2, Component1, Component2, PC, HDMI1, and HDMI2). Æ...
...´ Number buttons ˇ - Remote Control Buttons Remote Control Œ POWER button Turns the TV on the TV screen. Ò Mode (TV/DVD/STB/CABLE/VCR) button Selects a target device to be controlled by the Samsung remote control (i.e., TV, DVD, STB, CABLE, or VCR). Ú SOURCE button Press to ...display all of the available video sources (TV, AV1, AV2, S-Video1, S-Video2, Component1, Component2, PC, HDMI1, and HDMI2). Æ...
User Manual (ENGLISH)
Page 12
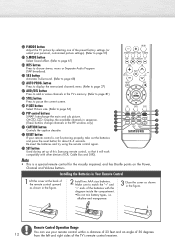
... try using the remote control again. ≥ SET button Used during set up of this Samsung remote control, so that it will work compatibly with the diagram inside the compartment. •...the batteries and press the reset button for the visually impaired, and has Braille points on the Power, Channel and Volume buttons. button Press to display the memorized channels menu. (Refer to match... control is a special remote control for about 2~3 seconds. ˛ P.MODE button Adjust the TV picture by selecting one of the preset factory settings (or select your remote control within a distance...
... try using the remote control again. ≥ SET button Used during set up of this Samsung remote control, so that it will work compatibly with the diagram inside the compartment. •...the batteries and press the reset button for the visually impaired, and has Braille points on the Power, Channel and Volume buttons. button Press to display the memorized channels menu. (Refer to match... control is a special remote control for about 2~3 seconds. ˛ P.MODE button Adjust the TV picture by selecting one of the preset factory settings (or select your remote control within a distance...
User Manual (ENGLISH)
Page 23
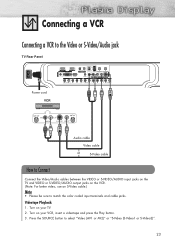
Connecting a VCR Connecting a VCR to the Video or S-Video/Audio jack TV Rear Panel Power cord VCR Audio cable Video cable S-Video cable How to Connect Connect the Video/Audio cables between the VIDEO or S-VIDEO/AUDIO input jacks on the TV and VIDEO or S-VIDEO/AUDIO output jacks on your VCR, insert a videotape... video, use an S-Video cable.) Note • Please be sure to select "Video (AV1 or AV2)" or "S-Video (S-Video1 or S-Video2)". 23 Turn on your TV. 2. Press the SOURCE button to match the color coded input terminals and cable jacks.
Connecting a VCR Connecting a VCR to the Video or S-Video/Audio jack TV Rear Panel Power cord VCR Audio cable Video cable S-Video cable How to Connect Connect the Video/Audio cables between the VIDEO or S-VIDEO/AUDIO input jacks on the TV and VIDEO or S-VIDEO/AUDIO output jacks on your VCR, insert a videotape... video, use an S-Video cable.) Note • Please be sure to select "Video (AV1 or AV2)" or "S-Video (S-Video1 or S-Video2)". 23 Turn on your TV. 2. Press the SOURCE button to match the color coded input terminals and cable jacks.
User Manual (ENGLISH)
Page 24
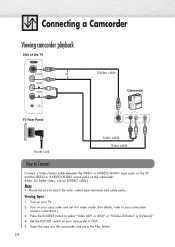
... and cable jacks. Set the IN/OUT switch on your camcorder to OUT. 5. Connecting a Camcorder Viewing camcorder playback Side of the TV S-Video cable Camcorder TV Rear Panel Power cord Audio cable Video cable How to Connect Connect a Video/Audio cable between the VIDEO or S-VIDEO/AUDIO input jacks on the... TV and the VIDEO or S-VIDEO/AUDIO output jacks on your camcorder and set it to video mode. (For details, refer to your...
... and cable jacks. Set the IN/OUT switch on your camcorder to OUT. 5. Connecting a Camcorder Viewing camcorder playback Side of the TV S-Video cable Camcorder TV Rear Panel Power cord Audio cable Video cable How to Connect Connect a Video/Audio cable between the VIDEO or S-VIDEO/AUDIO input jacks on the... TV and the VIDEO or S-VIDEO/AUDIO output jacks on your camcorder and set it to video mode. (For details, refer to your...
User Manual (ENGLISH)
Page 25
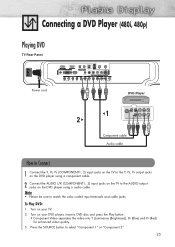
... button. • Component Video separates the video into Y (Luminance (Brightness)), PB (Blue) and PR (Red) for enhanced video quality. 3. Turn on your TV. 2. Connecting a DVD Player (480i, 480p) Playing DVD TV Rear Panel Power cord DVD Player 1 2 Component cable Audio cable How to Connect 1 Connect the Y, PB, PR (COMPONENT1, 2) input jacks on the...
... button. • Component Video separates the video into Y (Luminance (Brightness)), PB (Blue) and PR (Red) for enhanced video quality. 3. Turn on your TV. 2. Connecting a DVD Player (480i, 480p) Playing DVD TV Rear Panel Power cord DVD Player 1 2 Component cable Audio cable How to Connect 1 Connect the Y, PB, PR (COMPONENT1, 2) input jacks on the...
User Manual (ENGLISH)
Page 26
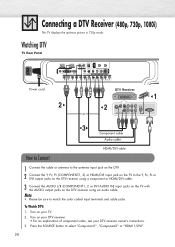
... DTV Receiver (480p, 720p, 1080i) This TV displays the optimum picture in 720p mode. Watching DTV TV Rear Panel Power cord 2 DTV Receiver 1 2 3 Component ...cable Audio cable How to Connect HDMI/DVI cable 1 Connect the cable or antenna to the antenna input jack on the DTV. 2 Connect the Y, PB, PR (COMPONENT1, 2) or HDMI/DVI input jack on the TV... cable. 3 Connect the AUDIO L/R (COMPONENT1, 2 or DVI AUDIO IN) input jacks on the TV with the AUDIO output jacks on your DTV receiver owner's instructions. 3. Turn on your DTV receiver....
... DTV Receiver (480p, 720p, 1080i) This TV displays the optimum picture in 720p mode. Watching DTV TV Rear Panel Power cord 2 DTV Receiver 1 2 3 Component ...cable Audio cable How to Connect HDMI/DVI cable 1 Connect the cable or antenna to the antenna input jack on the DTV. 2 Connect the Y, PB, PR (COMPONENT1, 2) or HDMI/DVI input jack on the TV... cable. 3 Connect the AUDIO L/R (COMPONENT1, 2 or DVI AUDIO IN) input jacks on the TV with the AUDIO output jacks on your DTV receiver owner's instructions. 3. Turn on your DTV receiver....
User Manual (ENGLISH)
Page 27
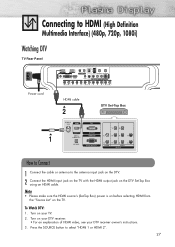
Connecting to HDMI (High Definition Multimedia Interface) (480p, 720p, 1080i) Watching DTV TV Rear Panel Power cord HDMI cable 2 DTV Set-Top Box 1 How to Connect 1 Connect the cable or antenna to select "HDMI 1 or HDMI 2". 27 Turn on the DTV ... jack on the DTV. 2 Connect the HDMI input jack on the TV with the HDMI output jack on your DTV receiver owner's instructions. 3. To Watch DTV: 1. Turn on the TV. Note • Please make sure the HDMI source's (Set-Top Box) power is on before selecting HDMI from the "Source List" on your...
Connecting to HDMI (High Definition Multimedia Interface) (480p, 720p, 1080i) Watching DTV TV Rear Panel Power cord HDMI cable 2 DTV Set-Top Box 1 How to Connect 1 Connect the cable or antenna to select "HDMI 1 or HDMI 2". 27 Turn on the DTV ... jack on the DTV. 2 Connect the HDMI input jack on the TV with the HDMI output jack on your DTV receiver owner's instructions. 3. To Watch DTV: 1. Turn on the TV. Note • Please make sure the HDMI source's (Set-Top Box) power is on before selecting HDMI from the "Source List" on your...

User Manual (ENGLISH)
Page 28
Connecting to HDMI (High Definition Multimedia Interface)/DVI Compatible TV Rear Panel Power cord 1 2 DTV Set-Top Box HDMI/DVI cable Audio cable From cable or Antenna How to the HDMI input jack on the TV, High-Definition pictures can be displayed on the screen in their digital form. Note • Use analog stereo...
Connecting to HDMI (High Definition Multimedia Interface)/DVI Compatible TV Rear Panel Power cord 1 2 DTV Set-Top Box HDMI/DVI cable Audio cable From cable or Antenna How to the HDMI input jack on the TV, High-Definition pictures can be displayed on the screen in their digital form. Note • Use analog stereo...
User Manual (ENGLISH)
Page 29
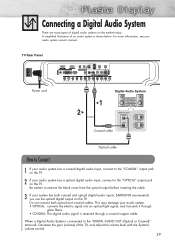
TV Rear Panel Power cord Digital Audio System 1 2 Coaxial cable Optical cable How to Connect 1 If your audio system has a coaxial digital audio input, connect to the "COAXIAL" output jack on the TV. 2 If your system has both optical and coaxial cables. This may damage your audio system owner...'s manual. Do not connect both coaxial and optical digital audio inputs, SAMSUNG recommends you use the optical digital output on the TV. For more information, see your audio system. • OPTICAL: converts the electric signal into an optical light ...
TV Rear Panel Power cord Digital Audio System 1 2 Coaxial cable Optical cable How to Connect 1 If your audio system has a coaxial digital audio input, connect to the "COAXIAL" output jack on the TV. 2 If your system has both optical and coaxial cables. This may damage your audio system owner...'s manual. Do not connect both coaxial and optical digital audio inputs, SAMSUNG recommends you use the optical digital output on the TV. For more information, see your audio system. • OPTICAL: converts the electric signal into an optical light ...

User Manual (ENGLISH)
Page 30
Connecting to an Analog Amplifier TV Rear Panel Power cord 1 Audio cable Analog Amplifier How to the "AUDIO OUT (AUDIO L/R)" terminals: Decrease the gain (volume) of the TV, and adjust the volume level with the Amplifier's volume control. Optical Output & Audio Monitor Output Optical L & R Out Tuner NTSC Yes Yes Tuner HD Yes Yes ...
Connecting to an Analog Amplifier TV Rear Panel Power cord 1 Audio cable Analog Amplifier How to the "AUDIO OUT (AUDIO L/R)" terminals: Decrease the gain (volume) of the TV, and adjust the volume level with the Amplifier's volume control. Optical Output & Audio Monitor Output Optical L & R Out Tuner NTSC Yes Yes Tuner HD Yes Yes ...
User Manual (ENGLISH)
Page 32
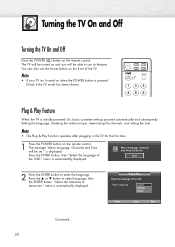
... the channels, and setting the time. Plug & Play Select the language of the OSD." Turning the TV On and Off Turning the TV On and Off Press the POWER ( ) button on the front of the TV. The message "Menu language, Channels and Time will be set . is automatically displayed. i Menu language...to memorize." "Select the antennas to enter the language. Note • The Plug & Play function operates after plugging in the TV for the first time. 1 Press the POWER button on and you will be able to select language, then the ENTER button. Press the ▲ or ▼ button to...
... the channels, and setting the time. Plug & Play Select the language of the OSD." Turning the TV On and Off Turning the TV On and Off Press the POWER ( ) button on the front of the TV. The message "Menu language, Channels and Time will be set . is automatically displayed. i Menu language...to memorize." "Select the antennas to enter the language. Note • The Plug & Play function operates after plugging in the TV for the first time. 1 Press the POWER button on and you will be able to select language, then the ENTER button. Press the ▲ or ▼ button to...
User Manual (ENGLISH)
Page 36
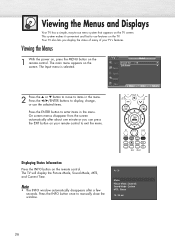
... a simple, easy-to-use menu system that appears on the TV. This system makes it convenient and fast to use the selected items. Press the ENTER button to enter items in the menu. Viewing the Menus 1 With the power on, press the MENU button on the screen. Note • The INFO window... automatically disappears after about one minute or you display the status of many of your remote control to display, change, or use features on the TV screen. The main menu appears on...
... a simple, easy-to-use menu system that appears on the TV. This system makes it convenient and fast to use the selected items. Press the ENTER button to enter items in the menu. Viewing the Menus 1 With the power on, press the MENU button on the screen. Note • The INFO window... automatically disappears after about one minute or you display the status of many of your remote control to display, change, or use features on the TV screen. The main menu appears on...
User Manual (ENGLISH)
Page 41
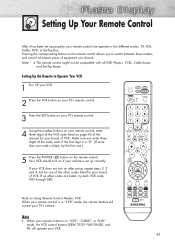
... buttons (REW, STOP, PLAY/PAUSE, and FF) still operate your VCR. 41 If no other codes listed for your remote is in five different modes: TV, VCR, Cable, DVD, or Set-Top Box. Make sure you choose. Pressing the corresponding button on the remote control allows you to Operate Your VCR... Using Remote Control Modes: VCR When your remote control is listed, try the first one of the other codes are listed, try one .) 5 Press the POWER ( ) button on the remote control. Note on if your brand of VCR. Setting Up the Remote to switch between these modes, and control whichever piece...
... buttons (REW, STOP, PLAY/PAUSE, and FF) still operate your VCR. 41 If no other codes listed for your remote is in five different modes: TV, VCR, Cable, DVD, or Set-Top Box. Make sure you choose. Pressing the corresponding button on the remote control allows you to Operate Your VCR... Using Remote Control Modes: VCR When your remote control is listed, try the first one of the other codes are listed, try one .) 5 Press the POWER ( ) button on the remote control. Note on if your brand of VCR. Setting Up the Remote to switch between these modes, and control whichever piece...
User Manual (ENGLISH)
Page 42
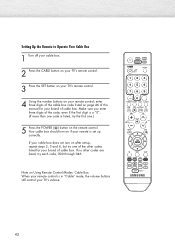
... Remote Control Modes: Cable Box When your remote control is listed, try the first one of the other codes are listed, try one .) 5 Press the POWER ( ) button on the remote control. Setting Up the Remote to Operate Your Cable Box 1 Turn off your cable box. 2 Press the CABLE button on your... brand of the code, even if the first digit is a "0". (If more than one code is in "Cable" mode, the volume buttons still control your TV's volume. 42 Make sure you enter three digits of cable box. Your cable box should turn on after set up , repeat steps 2, 3 and 4, but try each...
... Remote Control Modes: Cable Box When your remote control is listed, try the first one of the other codes are listed, try one .) 5 Press the POWER ( ) button on the remote control. Setting Up the Remote to Operate Your Cable Box 1 Turn off your cable box. 2 Press the CABLE button on your... brand of the code, even if the first digit is a "0". (If more than one code is in "Cable" mode, the volume buttons still control your TV's volume. 42 Make sure you enter three digits of cable box. Your cable box should turn on after set up , repeat steps 2, 3 and 4, but try each...

User Manual (ENGLISH)
Page 43
If your brand of DVD. If no other codes listed for your TV's volume. 43 Make sure you enter three digits of the code, even if the first digit is a "0". (If more than one .) 5 Press the POWER ( ) button on the remote control. Note on Using Remote Control Modes: DVD When your ...remote control is set -up correctly. Setting Up the Remote to Operate Your DVD 1 Turn off your DVD. 2 Press the DVD button on your TV's remote control. 3 Press the SET button...
If your brand of DVD. If no other codes listed for your TV's volume. 43 Make sure you enter three digits of the code, even if the first digit is a "0". (If more than one .) 5 Press the POWER ( ) button on the remote control. Note on Using Remote Control Modes: DVD When your ...remote control is set -up correctly. Setting Up the Remote to Operate Your DVD 1 Turn off your DVD. 2 Press the DVD button on your TV's remote control. 3 Press the SET button...
User Manual (ENGLISH)
Page 44
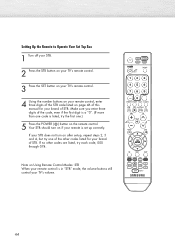
... Remote Control Modes: STB When your brand of STB. Your STB should turn on after set up , repeat steps 2, 3 and 4, but try one .) 5 Press the POWER ( ) button on the remote control. Setting Up the Remote to Operate Your Set Top Box 1 Turn off your STB. 2 Press the STB button on your... TV's remote control. 3 Press the SET button on your TV's remote control. 4 Using the number buttons on your remote control, enter three digits of the STB code listed on page 46...
... Remote Control Modes: STB When your brand of STB. Your STB should turn on after set up , repeat steps 2, 3 and 4, but try one .) 5 Press the POWER ( ) button on the remote control. Setting Up the Remote to Operate Your Set Top Box 1 Turn off your STB. 2 Press the STB button on your... TV's remote control. 3 Press the SET button on your TV's remote control. 4 Using the number buttons on your remote control, enter three digits of the STB code listed on page 46...


