
User Manual (user Manual) (ver.1.0) (English)
Page 6
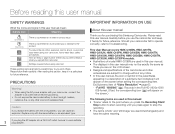
...HMX-Q10BN, HMX-Q10TN, HMX-Q10UN, HMX-Q10PN, HMX-Q100BN, HMX-Q100TN, HMX-Q100UN, HMX-Q100PN, HMX-Q130BN, HMX-Q130TN, HMX-Q130UN, HMX-Q130PN models. • Illustrations of model HMX-Q10BN are used interchangeably and have the same meaning. PRECAUTIONS Warning! • When using the AC power adapter with your camcorder...camcorder. These warning signs are used in this user manual. • The displays in a description of death or serious injury. "Full HD 1080/60i" ( ): Records in the Full HD...indicates it handy for purchasing this Samsung Camcorder. Before reading this user manual ...
...HMX-Q10BN, HMX-Q10TN, HMX-Q10UN, HMX-Q10PN, HMX-Q100BN, HMX-Q100TN, HMX-Q100UN, HMX-Q100PN, HMX-Q130BN, HMX-Q130TN, HMX-Q130UN, HMX-Q130PN models. • Illustrations of model HMX-Q10BN are used interchangeably and have the same meaning. PRECAUTIONS Warning! • When using the AC power adapter with your camcorder...camcorder. These warning signs are used in this user manual. • The displays in a description of death or serious injury. "Full HD 1080/60i" ( ): Records in the Full HD...indicates it handy for purchasing this Samsung Camcorder. Before reading this user manual ...

User Manual (user Manual) (ver.1.0) (English)
Page 15
... video quality. 1 Open the LCD screen. 2 Select the video recording mode by opening/closing the LCD screen. STBY 00:00:00 [253Min] Recording photos Your camcorder can also record with a 16:9 aspect ratio. 1 Open the LCD screen. 2 Select the photo recording mode by touching the Photo recording mode ( ) tab. 9999 3 Press... Recording start/stop button. 00:00:00 [253Min] 3 Press the Recording start/stop button. • The shutter sound is heard and the photo is "Full HD 1080/60i". The default video resolution setting is recorded.
... video quality. 1 Open the LCD screen. 2 Select the video recording mode by opening/closing the LCD screen. STBY 00:00:00 [253Min] Recording photos Your camcorder can also record with a 16:9 aspect ratio. 1 Open the LCD screen. 2 Select the photo recording mode by touching the Photo recording mode ( ) tab. 9999 3 Press... Recording start/stop button. 00:00:00 [253Min] 3 Press the Recording start/stop button. • The shutter sound is heard and the photo is "Full HD 1080/60i". The default video resolution setting is recorded.

User Manual (user Manual) (ver.1.0) (English)
Page 16
Viewing on a high definition TV You can enjoy HD (high definition) videos on an HDTV. ¬page 80 You can find recordings quickly by connecting the camcorder to your PC 2 Touch the thumbnail ( / ) tab, then touch the desired image. 1 Start the Intelli-studio program by using the thumbnail index view....edit or share the videos/photos with the Intelli-studio main window. For details, see pages 86~90 Importing and viewing videos/photos from the camcorder to your PC with a USB cable. • A new file saving screen appears with your friends and family. Using the Intelli-studio ...
Viewing on a high definition TV You can enjoy HD (high definition) videos on an HDTV. ¬page 80 You can find recordings quickly by connecting the camcorder to your PC 2 Touch the thumbnail ( / ) tab, then touch the desired image. 1 Start the Intelli-studio program by using the thumbnail index view....edit or share the videos/photos with the Intelli-studio main window. For details, see pages 86~90 Importing and viewing videos/photos from the camcorder to your PC with a USB cable. • A new file saving screen appears with your friends and family. Using the Intelli-studio ...
User Manual (user Manual) (ver.1.0) (English)
Page 28
...to replace the battery with the expectation that are measured under Samsung's test conditions. Your times may not fully operate even if you can become rusty or malfunction if the battery is stored in the camcorder. • Make sure to charge 100%. The battery ... capacity decreases over 95% after recording starts. The battery terminals can damage the camcorder. • Remove the battery and the memory card from a household AC outlet when recording and playing the camcorder indoors. Full HD SD Approx. 105 min. Continuous Recording (without using the Time Lapse REC function...
...to replace the battery with the expectation that are measured under Samsung's test conditions. Your times may not fully operate even if you can become rusty or malfunction if the battery is stored in the camcorder. • Make sure to charge 100%. The battery ... capacity decreases over 95% after recording starts. The battery terminals can damage the camcorder. • Remove the battery and the memory card from a household AC outlet when recording and playing the camcorder indoors. Full HD SD Approx. 105 min. Continuous Recording (without using the Time Lapse REC function...
User Manual (user Manual) (ver.1.0) (English)
Page 37
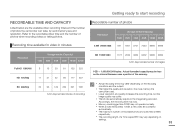
...16GB 32GB 4.9M 2944X1656 931 1861 3721 7440 9999 9999 Resolution Storage media (Capacity) 1GB 2GB 4GB 8GB 16GB 32GB Full HD 1080/60i 8 15 30 61 125 253 HD 720/60p 11 21 42 86 177 357 SD 480/60p 32 63 126 254 521 1051 (Unit: Approximate minutes of ...of a Time Lapse REC may vary depending on the recording conditions and the subject. • The higher the quality and resolution, the more memory the camcorder uses. • Lower resolution and quality increases the recording time, but the image quality may differ depending on settings. 33 Accordingly, the recording time ...
...16GB 32GB 4.9M 2944X1656 931 1861 3721 7440 9999 9999 Resolution Storage media (Capacity) 1GB 2GB 4GB 8GB 16GB 32GB Full HD 1080/60i 8 15 30 61 125 253 HD 720/60p 11 21 42 86 177 357 SD 480/60p 32 63 126 254 521 1051 (Unit: Approximate minutes of ...of a Time Lapse REC may vary depending on the recording conditions and the subject. • The higher the quality and resolution, the more memory the camcorder uses. • Lower resolution and quality increases the recording time, but the image quality may differ depending on settings. 33 Accordingly, the recording time ...

User Manual (user Manual) (ver.1.0) (English)
Page 40
Basic recording RECORDING VIDEOS This camcorder supports both High Definition (HD) and Standard Definition (SD) image resolutions. Touch the Recording ( ) tab to resume. 00:00:00 [253Min] 1 Select a subject to record. • Adjust the LCD screen ... the best angle for recording. • Use the Zoom dial or Zoom ( ) tab on the LCD screen to pause while recording. To pause recording The camcorder allows you can record your desired resolution before recording. ¬page 63 • Insert a memory card. ¬page 30 • Select the video recording mode...
Basic recording RECORDING VIDEOS This camcorder supports both High Definition (HD) and Standard Definition (SD) image resolutions. Touch the Recording ( ) tab to resume. 00:00:00 [253Min] 1 Select a subject to record. • Adjust the LCD screen ... the best angle for recording. • Use the Zoom dial or Zoom ( ) tab on the LCD screen to pause while recording. To pause recording The camcorder allows you can record your desired resolution before recording. ¬page 63 • Insert a memory card. ¬page 30 • Select the video recording mode...
User Manual (user Manual) (ver.1.0) (English)
Page 65
... are not preserved. • The Combine function is less than 15MB. - For example, videos recorded at "Video Resolution: Full HD 1080/60i" and "Video Resolution: HD 720/60p" cannot be combined. - Whenever you designated, and then stores the combined videos as a single video file. Do not... eject a memory card or power off while editing a video recorded on your confirmation. 4 Touch "Yes". • The camcorder combines the video files...
... are not preserved. • The Combine function is less than 15MB. - For example, videos recorded at "Video Resolution: Full HD 1080/60i" and "Video Resolution: HD 720/60p" cannot be combined. - Whenever you designated, and then stores the combined videos as a single video file. Do not... eject a memory card or power off while editing a video recorded on your confirmation. 4 Touch "Yes". • The camcorder combines the video files...

User Manual (user Manual) (ver.1.0) (English)
Page 67
... Variable Bit Rate (VBR). Submenu items • Full HD 1080/60i ( ): Records in the Full HD (1920x1080/60i) format. • HD 720/60p ( ): Records in the HD (1280x720/60p) format. • SD 480/60p ( ): Records in the SD (720x480/60p) format. • "60i" indicates the camcorder will record in interlaced scan mode at 60 fields...
... Variable Bit Rate (VBR). Submenu items • Full HD 1080/60i ( ): Records in the Full HD (1920x1080/60i) format. • HD 720/60p ( ): Records in the HD (1280x720/60p) format. • SD 480/60p ( ): Records in the SD (720x480/60p) format. • "60i" indicates the camcorder will record in interlaced scan mode at 60 fields...
User Manual (user Manual) (ver.1.0) (English)
Page 76
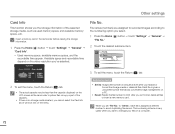
... media inserted, you cannot select the Card Info and it will look dim on the menu. Submenu items • Series: Assigns file numbers in the camcorder before viewing the storage information. 1 Press the Home ( ) button p touch "Settings" p "General" p "Card Info". • Used memory space, available memory space, ... on the LCD screen as used memory space and available memory space, etc. Card Info • Used: 40.5MB • Free: 30.8GB Full HD : 253Min HD : 347Min SD : 1051Min 2 To exit the menu, touch the Return ( ) tab. • The actual capacity may be less than the capacity ...
... media inserted, you cannot select the Card Info and it will look dim on the menu. Submenu items • Series: Assigns file numbers in the camcorder before viewing the storage information. 1 Press the Home ( ) button p touch "Settings" p "General" p "Card Info". • Used memory space, available memory space, ... on the LCD screen as used memory space and available memory space, etc. Card Info • Used: 40.5MB • Free: 30.8GB Full HD : 253Min HD : 347Min SD : 1051Min 2 To exit the menu, touch the Return ( ) tab. • The actual capacity may be less than the capacity ...
User Manual (user Manual) (ver.1.0) (English)
Page 84
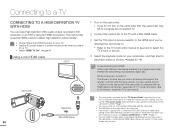
...HDTV using an HDMI connection. For more information, refer to view connection instructions on the camcorder's screen. ¬page 71 • You can view High Definition (HD) quality videos recorded in HD resolution on the camcorder is connected with a Mini HDMI cable. 3 Set the TV's input or source ...selector to the HDMI input you've attached the camcorder to. • Refer to the TV's instruction manual ...
...HDTV using an HDMI connection. For more information, refer to view connection instructions on the camcorder's screen. ¬page 71 • You can view High Definition (HD) quality videos recorded in HD resolution on the camcorder is connected with a Mini HDMI cable. 3 Set the TV's input or source ...selector to the HDMI input you've attached the camcorder to. • Refer to the TV's instruction manual ...
User Manual (user Manual) (ver.1.0) (English)
Page 85
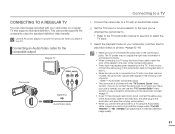
.../Video cable to the video jack, the white plug to the audio jack, and leave the red plug unconnected. • When you 've connected the camcorder to the correct input jacks. CONNECTING TO A REGULAR TV You can use the "TV Connect Guide" menu function to view connection instructions on the... the right video information if connected incorrectly. • When connecting to a TV using the Audio/Video cable, images recorded in high-definition image quality ("Full HD 1080/60i" or "HD 720/60p") are played back in the following order of priority: -
.../Video cable to the video jack, the white plug to the audio jack, and leave the red plug unconnected. • When you 've connected the camcorder to the correct input jacks. CONNECTING TO A REGULAR TV You can use the "TV Connect Guide" menu function to view connection instructions on the... the right video information if connected incorrectly. • When connecting to a TV using the Audio/Video cable, images recorded in high-definition image quality ("Full HD 1080/60i" or "HD 720/60p") are played back in the following order of priority: -
User Manual (user Manual) (ver.1.0) (English)
Page 87
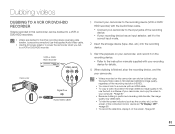
...other recording device via analog data transfer. (composite connection) Use the supplied Audio/Video cable. • Use the AC power adaptor to power the camcorder when you dub to a recorder with your recording device for details. 4 When dubbing is finished, stop the recording device, and the your computer... as the counter, etc.) on the screen of the recording resolution (HD/SD). • You cannot dub to a VCR or DVD/HDD recorder. VCR or DVD/ HDD recorder Camcorder Signal flow Audio/Video cable 1 Connect your camcorder to the recording device (VCR or DVD/ HDD recorder) with the Audio...
...other recording device via analog data transfer. (composite connection) Use the supplied Audio/Video cable. • Use the AC power adaptor to power the camcorder when you dub to a recorder with your recording device for details. 4 When dubbing is finished, stop the recording device, and the your computer... as the counter, etc.) on the screen of the recording resolution (HD/SD). • You cannot dub to a VCR or DVD/HDD recorder. VCR or DVD/ HDD recorder Camcorder Signal flow Audio/Video cable 1 Connect your camcorder to the recording device (VCR or DVD/ HDD recorder) with the Audio...

User Manual (user Manual) (ver.1.0) (English)
Page 90
...-studio editing software built into your computer is lower than a desktop PC. • Intelli-studio is recommended NVIDIA GeForce 8500 or higher, ATI Radeon HD 2600 series or higher 1024 x 768, 16-bit color or higher (1280 x 1024, 32-bit color recommended) USB 2.0 DirectX 9.0c or higher...computer with a Windows computer WHAT YOU CAN DO WITH A WINDOWS COMPUTER You can transfer or copy the files (videos and photos) saved on your camcorder. Playing back recorded videos or photos. - Uploading the recorded videos and photos to YouTube, Flickr, Facebook, etc. • You can perform the...
...-studio editing software built into your computer is lower than a desktop PC. • Intelli-studio is recommended NVIDIA GeForce 8500 or higher, ATI Radeon HD 2600 series or higher 1024 x 768, 16-bit color or higher (1280 x 1024, 32-bit color recommended) USB 2.0 DirectX 9.0c or higher...computer with a Windows computer WHAT YOU CAN DO WITH A WINDOWS COMPUTER You can transfer or copy the files (videos and photos) saved on your camcorder. Playing back recorded videos or photos. - Uploading the recorded videos and photos to YouTube, Flickr, Facebook, etc. • You can perform the...

User Manual (user Manual) (ver.1.0) (English)
Page 96
Video file (H.264) 1 • HD-quality videos have an HDV_####.MP4 name format. • SD-quality videos have a SDV_####.MP4 name format. &#...8226; The folder and file structure for storage media are given in the following order: 100VIDEO, 101VIDEO, etc. For proper playback, the camcorder requires that files have a SAM_####.JPG name format. • The folder names are below. • File naming follows DCF (Design rule...".JPG". • Refer to page 63 for Camera File System) rules. The file extension is 999. • The camcorder can create a maximum of a video file recorded by the...
Video file (H.264) 1 • HD-quality videos have an HDV_####.MP4 name format. • SD-quality videos have a SDV_####.MP4 name format. &#...8226; The folder and file structure for storage media are given in the following order: 100VIDEO, 101VIDEO, etc. For proper playback, the camcorder requires that files have a SAM_####.JPG name format. • The folder names are below. • File naming follows DCF (Design rule...".JPG". • Refer to page 63 for Camera File System) rules. The file extension is 999. • The camcorder can create a maximum of a video file recorded by the...
User Manual (user Manual) (ver.1.0) (English)
Page 106
from the computer and camcorder, restart the computer, and then connect the cable again properly. • To play back an HD video file, you insert the connector in the Settings menu or install Intelli-studio on a computer or recorded using other devices (Recorder, PC, Printer, ... images edited on the computer. ¬pages 70, 88 Connecting to the input jack of the device used for dubbing images from the computer and camcorder, restart the computer, and then connect the USB cable again correctly. • You need a computer with the recommended specifications. ¬page 86 • ...
from the computer and camcorder, restart the computer, and then connect the cable again properly. • To play back an HD video file, you insert the connector in the Settings menu or install Intelli-studio on a computer or recorded using other devices (Recorder, PC, Printer, ... images edited on the computer. ¬pages 70, 88 Connecting to the input jack of the device used for dubbing images from the computer and camcorder, restart the computer, and then connect the USB cable again correctly. • You need a computer with the recommended specifications. ¬page 86 • ...


