User Manual Ver.1.0 (English)
Page 3
... not likely to ensure reliable operation of power source indicated on a bed, sofa, rug, or other ) or a 3-wire grounding type plug, a plug having one blade wider than the other similar surface: on or near a radiator or heat register. Never place your CAMCORDER on the label. Important safety instructions 14 Refer all servicing to replace your outlet. Servicing is required when the...
... not likely to ensure reliable operation of power source indicated on a bed, sofa, rug, or other ) or a 3-wire grounding type plug, a plug having one blade wider than the other similar surface: on or near a radiator or heat register. Never place your CAMCORDER on the label. Important safety instructions 14 Refer all servicing to replace your outlet. Servicing is required when the...

User Manual Ver.1.0 (English)
Page 7
... camcorder using the internal software of this camcorder. • Please note that you copy it from your important recorded data by the camcorder on the storage media in this camcorder or memory card, etc. Before reading this user manual The following terms are used in this manual: • 'Scene' refers to the point where you press the [Recording start/stop] button to start recording until you press again to stop recording. • The terms 'photo...
... camcorder using the internal software of this camcorder. • Please note that you copy it from your important recorded data by the camcorder on the storage media in this camcorder or memory card, etc. Before reading this user manual The following terms are used in this manual: • 'Scene' refers to the point where you press the [Recording start/stop] button to start recording until you press again to stop recording. • The terms 'photo...

User Manual Ver.1.0 (English)
Page 12
... CONTROLS 14 IDENTIFIYING THE SCREEN DISPLAYS 16 Getting started 19 INSERTING/EJECTING THE BATTERY 19 CHARGING THE BATTERY 20 CHECKING THE BATTERY STATE 21 Basic operation of the camcorder 24 TURNING YOUR CAMCORDER ON/OFF 24 SWITCHING TO THE POWER SAVING MODE 24 SETTING THE DATE/TIME FOR THE FIRST TIME 25 SETTING THE OPERATION MODES 26 SWITCHING THE INFORMATION DISPLAY MODE 26 USING THE SHORTCUT MENU (OK GUIDE 27 SELECTING THE LANGUAGES 29 8 Getting ready to start recording 30 INSERTING AND EJECTING A MEMORY CARD...
... CONTROLS 14 IDENTIFIYING THE SCREEN DISPLAYS 16 Getting started 19 INSERTING/EJECTING THE BATTERY 19 CHARGING THE BATTERY 20 CHECKING THE BATTERY STATE 21 Basic operation of the camcorder 24 TURNING YOUR CAMCORDER ON/OFF 24 SWITCHING TO THE POWER SAVING MODE 24 SETTING THE DATE/TIME FOR THE FIRST TIME 25 SETTING THE OPERATION MODES 26 SWITCHING THE INFORMATION DISPLAY MODE 26 USING THE SHORTCUT MENU (OK GUIDE 27 SELECTING THE LANGUAGES 29 8 Getting ready to start recording 30 INSERTING AND EJECTING A MEMORY CARD...

User Manual Ver.1.0 (English)
Page 13
... File Info 73 Other settings 74 Storage Info 74 File No 74 Date/Time Set 75 Date/Time Display 75 LCD Brightness 76 Auto LCD Off 76 Beep Sound 77 Shutter Sound 77 Auto Power Off 78 PC Software 78 Format 79 Default Set 79 Language 79 Connecting to a TV 80 CONNECTING TO A HIGH DEFINITION TV WITH HDMI 80 CONNECTING TO A REGULAR TV 81 VIEWING ON A TV SCREEN 82 Dubbing videos 83 DUBBING TO VCR OR DVD/HDD RECORDERS 83 Using with a windows...
... File Info 73 Other settings 74 Storage Info 74 File No 74 Date/Time Set 75 Date/Time Display 75 LCD Brightness 76 Auto LCD Off 76 Beep Sound 77 Shutter Sound 77 Auto Power Off 78 PC Software 78 Format 79 Default Set 79 Language 79 Connecting to a TV 80 CONNECTING TO A HIGH DEFINITION TV WITH HDMI 80 CONNECTING TO A REGULAR TV 81 VIEWING ON A TV SCREEN 82 Dubbing videos 83 DUBBING TO VCR OR DVD/HDD RECORDERS 83 Using with a windows...
User Manual Ver.1.0 (English)
Page 14
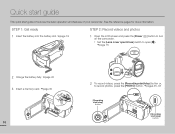
Quick start guide This quick start /stop] button See the reference pages for more information. STEP 1: Get ready 1 Insert the battery into the battery slot. ¬page 19 STEP 2: Record videos and photos 1 Open the LCD screen and press the [Power ( )] button to turn on the camcorder. • Set the [Lens cover open/close] switch to open ( ). ¬page 15 2 Charge the battery fully. ¬page 20 3 Insert a memory card. ¬page 30 CARD CARD 10 2 To record videos, press the...
Quick start guide This quick start /stop] button See the reference pages for more information. STEP 1: Get ready 1 Insert the battery into the battery slot. ¬page 19 STEP 2: Record videos and photos 1 Open the LCD screen and press the [Power ( )] button to turn on the camcorder. • Set the [Lens cover open/close] switch to open ( ). ¬page 15 2 Charge the battery fully. ¬page 20 3 Insert a memory card. ¬page 30 CARD CARD 10 2 To record videos, press the...
User Manual Ver.1.0 (English)
Page 17
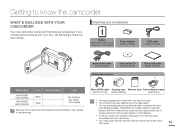
SAMSUNG is not responsible for memory cards compatible with your camcorder. • Your camcorder includes the user manual CD and the printed quick start guide (AD68-06902A) Model name HMX-F80BN HMX-F800BN HMX-F80SN HMX-F800SN Color Internal memory Black - Sliver - Lens 52x (Optical), 65x (Intelli), 130x (Digital) Although the models have some features that are different, they operate in the same way. Micro HDMI cable Carrying case Memory card External battery charger (AD39-00179A) (AD69-00929A) (IA-BC9UA4) •...
SAMSUNG is not responsible for memory cards compatible with your camcorder. • Your camcorder includes the user manual CD and the printed quick start guide (AD68-06902A) Model name HMX-F80BN HMX-F800BN HMX-F80SN HMX-F800SN Color Internal memory Black - Sliver - Lens 52x (Optical), 65x (Intelli), 130x (Digital) Although the models have some features that are different, they operate in the same way. Micro HDMI cable Carrying case Memory card External battery charger (AD39-00179A) (AD69-00929A) (IA-BC9UA4) •...
User Manual Ver.1.0 (English)
Page 20
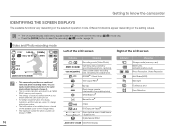
... / Recording mode (Video/Photo) Operating status (standby/ recording/pause/photo capturing) Time counter (video recording time, remaining recordable time) iSCENE / Smart Auto Time Lapse REC 9999 My Clip Photo image counter (total number of functions marked with do not remain when the camcorder turns off. • For enhanced performance, the display indications and the order are based on an 16GB SDHC memory card capacity. • The settings of recordable photos) White Balance Manual focus 1/60 +0.3 C.Nite EV (Exposure Value) Zoom (optical zoom / intelli zoom / digital zoom) Digital...
... / Recording mode (Video/Photo) Operating status (standby/ recording/pause/photo capturing) Time counter (video recording time, remaining recordable time) iSCENE / Smart Auto Time Lapse REC 9999 My Clip Photo image counter (total number of functions marked with do not remain when the camcorder turns off. • For enhanced performance, the display indications and the order are based on an 16GB SDHC memory card capacity. • The settings of recordable photos) White Balance Manual focus 1/60 +0.3 C.Nite EV (Exposure Value) Zoom (optical zoom / intelli zoom / digital zoom) Digital...
User Manual Ver.1.0 (English)
Page 21
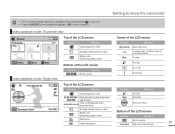
... media (memory card) Battery info (remaining battery level) Bottom of the LCD screen Indicator Meaning Button guide Center of the LCD screen Indicator 0:00:55 1/10 Meaning Recorded time Current video / total number of recorded videos Protect My Clip Error file Scroll bar 0:00:00/0:00:55 Top of the LCD screen Indicator Meaning Indicator Meaning Video playback mode My Clip / / / / Playback status (playback/pause/ / search/skip) 0:00:00/0:00:55 Time code (elapsed recorded time) time / Protect Shortcut menu Thumbnail View 100-0001 Storage media (memory card) Battery...
... media (memory card) Battery info (remaining battery level) Bottom of the LCD screen Indicator Meaning Button guide Center of the LCD screen Indicator 0:00:55 1/10 Meaning Recorded time Current video / total number of recorded videos Protect My Clip Error file Scroll bar 0:00:00/0:00:55 Top of the LCD screen Indicator Meaning Indicator Meaning Video playback mode My Clip / / / / Playback status (playback/pause/ / search/skip) 0:00:00/0:00:55 Time code (elapsed recorded time) time / Protect Shortcut menu Thumbnail View 100-0001 Storage media (memory card) Battery...
User Manual Ver.1.0 (English)
Page 28
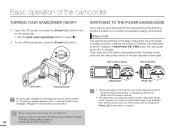
... mode The camcorder switches to the sleep mode when the LCD screen is opened. • The camcorder consumes less battery power in 5 minutes. When using it , the Date/ Time Set screen appears at start-up. 24 Set the date and time. ¬page 25 • The power saving mode does not work in the following functions enable you open ( ). 2 To turn off in the power saving mode. Basic operation of the camcorder TURNING YOUR CAMCORDER ON/OFF 1 Open the LCD screen and press the [Power ( )] button to turn...
... mode The camcorder switches to the sleep mode when the LCD screen is opened. • The camcorder consumes less battery power in 5 minutes. When using it , the Date/ Time Set screen appears at start-up. 24 Set the date and time. ¬page 25 • The power saving mode does not work in the following functions enable you open ( ). 2 To turn off in the power saving mode. Basic operation of the camcorder TURNING YOUR CAMCORDER ON/OFF 1 Open the LCD screen and press the [Power ( )] button to turn...
User Manual Ver.1.0 (English)
Page 31
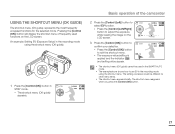
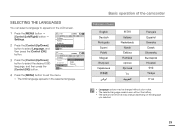
...)] button in the recording mode using the shortcut menu. USING THE SHORTCUT MENU (OK GUIDE) The shortcut menu (OK guide) represents the most frequently accessed functions for other menu items. • The shortcut menu appears briefly. The setting procedure could be used functions on the EV 0.0 LCD screen. [220Min] 9999 3 Press the [Control (OK)] button to STBY confirm your selection. • Press the [Control (OK)] button to adjust the exposure while viewing the image on the LCD screen.
...)] button in the recording mode using the shortcut menu. USING THE SHORTCUT MENU (OK GUIDE) The shortcut menu (OK guide) represents the most frequently accessed functions for other menu items. • The shortcut menu appears briefly. The setting procedure could be used functions on the EV 0.0 LCD screen. [220Min] 9999 3 Press the [Control (OK)] button to STBY confirm your selection. • Press the [Control (OK)] button to adjust the exposure while viewing the image on the LCD screen.

User Manual Ver.1.0 (English)
Page 32
... - Playback / Pause - Moves the cursor up DOWN - Zoom (wide) EV LEFT Face Detection RIGHT 28 Decreases the volume - - Next skip playback Next image Moves the cursor down Moves to the previous menu Moves to the next menu Search playback FPS (Forward Playback Search) rate: x2→x4→x8→x16 - Previous skip playback Previous image - iSCENE - Basic operation of the camcorder SHORTCUT FUNCTION USING THE CONTROL BUTTONS Button Recording ( ) mode Video playback ( Playback ( ) mode ) mode Photo playback ( ) mode Menu...
... - Playback / Pause - Moves the cursor up DOWN - Zoom (wide) EV LEFT Face Detection RIGHT 28 Decreases the volume - - Next skip playback Next image Moves the cursor down Moves to the previous menu Moves to the next menu Search playback FPS (Forward Playback Search) rate: x2→x4→x8→x16 - Previous skip playback Previous image - iSCENE - Basic operation of the camcorder SHORTCUT FUNCTION USING THE CONTROL BUTTONS Button Recording ( ) mode Video playback ( Playback ( ) mode ) mode Photo playback ( ) mode Menu...
User Manual Ver.1.0 (English)
Page 33
... even without the battery. • The date and time format may change depending on the LCD screen. 1 Press the [MENU] button p [Control (Left/Right)] button p Settings. 2 Press the [Control (Up/Down)] button to select Language, and then press the [Control (OK)] button. 3 Press the [Control (Up/Down)] button to select the desired OSD language, and then press the [Control (OK)] button. STBY Settings Format Default Set Language Exit STBY Settings Format Default Set Language Exit [220Min] [220Min] English ⦽ǎᨕ...
... even without the battery. • The date and time format may change depending on the LCD screen. 1 Press the [MENU] button p [Control (Left/Right)] button p Settings. 2 Press the [Control (Up/Down)] button to select Language, and then press the [Control (OK)] button. 3 Press the [Control (Up/Down)] button to select the desired OSD language, and then press the [Control (OK)] button. STBY Settings Format Default Set Language Exit STBY Settings Format Default Set Language Exit [220Min] [220Min] English ⦽ǎᨕ...
User Manual Ver.1.0 (English)
Page 40
... recording, some button operations are unavailable. ([MODE] button, [MENU] button, etc.) • Sound is paused, the camcorder will connect to the PC after it saves the video it has recorded. 36 Basic recording • For on-screen information display, see pages 16~18. • For approximate recording times, see page 33. • Eject the battery when you have finished recording to prevent unnecessary battery power consumption. • For various functions available when you to use a locked memory card...
... recording, some button operations are unavailable. ([MODE] button, [MENU] button, etc.) • Sound is paused, the camcorder will connect to the PC after it saves the video it has recorded. 36 Basic recording • For on-screen information display, see pages 16~18. • For approximate recording times, see page 33. • Eject the battery when you have finished recording to prevent unnecessary battery power consumption. • For various functions available when you to use a locked memory card...
User Manual Ver.1.0 (English)
Page 41
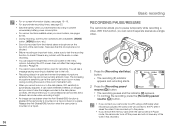
... an error occurs during a video playback. ¬page 46 • The captured photos are saved on the photo thumbnail view. The My Clip function can also capture photos while tagging the scenes. During a video recording 1 Press the [Recording start/stop] button. • The recording (z) indicator appears and recording starts. 2 Press the [PHOTO] button every great moment while recording. • The camcorder tags the scenes as My Clip ( ) and captures photos at the same time. 3 To stop recording...
... an error occurs during a video playback. ¬page 46 • The captured photos are saved on the photo thumbnail view. The My Clip function can also capture photos while tagging the scenes. During a video recording 1 Press the [Recording start/stop] button. • The recording (z) indicator appears and recording starts. 2 Press the [PHOTO] button every great moment while recording. • The camcorder tags the scenes as My Clip ( ) and captures photos at the same time. 3 To stop recording...
User Manual Ver.1.0 (English)
Page 47
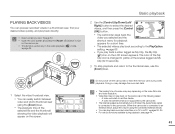
... View 100-0001 shortcut menu for playback appears for 8 seconds). 3 To stop playback and return to the thumbnail view, use the [Zoom] lever. 1 Select the video thumbnail view. • You can easily switch between video and photo thumbnail view using the connected external device.) • You can preview recorded videos in a thumbnail view, find your desired video quickly, and play back directly. • Insert a memory card. ¬page 30 • Open the LCD screen and press the [Power ( )] button to turn on another device...
... View 100-0001 shortcut menu for playback appears for 8 seconds). 3 To stop playback and return to the thumbnail view, use the [Zoom] lever. 1 Select the video thumbnail view. • You can easily switch between video and photo thumbnail view using the connected external device.) • You can preview recorded videos in a thumbnail view, find your desired video quickly, and play back directly. • Insert a memory card. ¬page 30 • Open the LCD screen and press the [Power ( )] button to turn on another device...
User Manual Ver.1.0 (English)
Page 67
On-screen display - • The number of recordable photos depends on the photo's resolution and the memory space. • If an error occurs (Card full, etc.) during continuous shot, the recording stops and an error message appears. 63 Select the recording ( button. ¬page 26 ) mode by pressing the [MODE] 1 Press the [MENU] button p [Control (Left/Right)] button p Cont. While you more photo-taking opportunities when recording moving subjects. Shot. 2 Select the desired submenu...
On-screen display - • The number of recordable photos depends on the photo's resolution and the memory space. • If an error occurs (Card full, etc.) during continuous shot, the recording stops and an error message appears. 63 Select the recording ( button. ¬page 26 ) mode by pressing the [MODE] 1 Press the [MENU] button p [Control (Left/Right)] button p Cont. While you more photo-taking opportunities when recording moving subjects. Shot. 2 Select the desired submenu...

User Manual Ver.1.0 (English)
Page 68
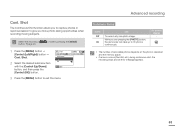
... set the desired total recording time in the Time Lapse REC mode, you must set the recording interval between each scene. Advanced recording Time Lapse REC Using the Time Lapse feature, you can program your camcorder to create a time lapse video by recording a series of frames over a set period of time with [Control (Up/Down)] button. Submenu items Items Off On Use On-screen display To disable the function. - • Interval (Sec): To set the time interval between image captures...
... set the desired total recording time in the Time Lapse REC mode, you must set the recording interval between each scene. Advanced recording Time Lapse REC Using the Time Lapse feature, you can program your camcorder to create a time lapse video by recording a series of frames over a set period of time with [Control (Up/Down)] button. Submenu items Items Off On Use On-screen display To disable the function. - • Interval (Sec): To set the time interval between image captures...
User Manual Ver.1.0 (English)
Page 80
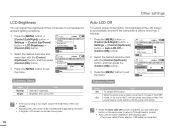
...Settings Auto LCD Off Off LCD Beep Sound On LCD Shutter Sound Exit Submenu Items Items Off On Use To disable the function. STBY Settings Date/Time Set Date/Time Display LCD Brightness Exit [220Min] : 1O2FF : STBY [220Min] Settings Date/Time Set Date/Time Display LCD Brightness Exit Normal Bright Submenu Items Items Normal Bright Use Standard brightness. When the camcorder is connected. If the power cable (Power adaptor, USB cable) is idle for more than 2 minutes. 1 Press the [MENU] button p [Control (Left/Right)] button p Settings p [Control (Up/Down)] button p Auto LCD...
...Settings Auto LCD Off Off LCD Beep Sound On LCD Shutter Sound Exit Submenu Items Items Off On Use To disable the function. STBY Settings Date/Time Set Date/Time Display LCD Brightness Exit [220Min] : 1O2FF : STBY [220Min] Settings Date/Time Set Date/Time Display LCD Brightness Exit Normal Bright Submenu Items Items Normal Bright Use Standard brightness. When the camcorder is connected. If the power cable (Power adaptor, USB cable) is idle for more than 2 minutes. 1 Press the [MENU] button p [Control (Left/Right)] button p Settings p [Control (Up/Down)] button p Auto LCD...
User Manual Ver.1.0 (English)
Page 99
... format the memory card. • You cannot delete the images protected by your camcorder or the card has some problems. The data file name is not indicated correctly. • The file may be deleted. An afterimage remains on the LCD screen looks dark. Storage media Symptom Memory card functions are stored on the screen. ¬pages 91~93 • This occurs if you use SDXC memory cards on the screen. To use a memory card formatted...
... format the memory card. • You cannot delete the images protected by your camcorder or the card has some problems. The data file name is not indicated correctly. • The file may be deleted. An afterimage remains on the LCD screen looks dark. Storage media Symptom Memory card functions are stored on the screen. ¬pages 91~93 • This occurs if you use SDXC memory cards on the screen. To use a memory card formatted...
User Manual Ver.1.0 (English)
Page 108
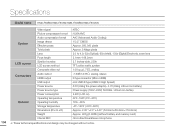
Specifications Model name HMX-F80BN/HMX-F80SN/HMX-F800BN/HMX-F800SN Video signal NTSC Picture compression format H.264/AVC Audio compression format AAC (Advanced Audio Coding) System Image device Effective pixels 1/3.2" CMOS Approx. 920,000 pixels Total pixels Approx. 5 Mega pixels Lens 2.0 to 4.9, 52x (Optical), 65x (Intelli), 130x (Digital) Electronic zoom lens Focal length 2.1mm~109.2mm LCD screen Size/dot number LCD screen method 2.7 inches wide, 230k TFT active matrix system Composite video out 1.0V (p_p), 75Ω...
Specifications Model name HMX-F80BN/HMX-F80SN/HMX-F800BN/HMX-F800SN Video signal NTSC Picture compression format H.264/AVC Audio compression format AAC (Advanced Audio Coding) System Image device Effective pixels 1/3.2" CMOS Approx. 920,000 pixels Total pixels Approx. 5 Mega pixels Lens 2.0 to 4.9, 52x (Optical), 65x (Intelli), 130x (Digital) Electronic zoom lens Focal length 2.1mm~109.2mm LCD screen Size/dot number LCD screen method 2.7 inches wide, 230k TFT active matrix system Composite video out 1.0V (p_p), 75Ω...


