
User Manual (ENGLISH)
Page 4
... Level 54 ■ Setting the Blue Screen Mode 54 ■ Adjusting the Melody Sound 55 ■ Using the Color Weakness Enhancement Feature ... 55 ■ Setting the Light Effect 56 ■ Setting the HDMI Black Level 56 ■ Setting the Film Mode - Digital 36 ■ Choosing ... Problems 73 ■ Replacing the Lamp 74 ■ Cleaning and Maintaining Your TV 75 ■ Using Your TV in the Remote Control 10 CONNECTIONS ■ Connecting VHF and UHF Antennas 10 ■ Connecting Cable TV 11 ■ Connecting a VCR 12 ■ Connecting a Camcorder 13 ■...
... Level 54 ■ Setting the Blue Screen Mode 54 ■ Adjusting the Melody Sound 55 ■ Using the Color Weakness Enhancement Feature ... 55 ■ Setting the Light Effect 56 ■ Setting the HDMI Black Level 56 ■ Setting the Film Mode - Digital 36 ■ Choosing ... Problems 73 ■ Replacing the Lamp 74 ■ Cleaning and Maintaining Your TV 75 ■ Using Your TV in the Remote Control 10 CONNECTIONS ■ Connecting VHF and UHF Antennas 10 ■ Connecting Cable TV 11 ■ Connecting a VCR 12 ■ Connecting a Camcorder 13 ■...

User Manual (ENGLISH)
Page 5
...multi-channel sound decoder for stereo and bilingual listening ● Built-in a shortened component life and degraded performance. 50˝ screen : At least 5.9 feet 56˝ screen : At least 6.6 feet 61˝ screen : At least 7.2 feet ➢ For optimal picture quality, do not place components on top... addition, it away from the side panel or remote control ● Automatic timer to turn the TV on and off at any time you choose ● Adjustable picture and sound settings and the ability to memorize your favorite settings ● Automatic channel tuning for up to 181 channels &#...
...multi-channel sound decoder for stereo and bilingual listening ● Built-in a shortened component life and degraded performance. 50˝ screen : At least 5.9 feet 56˝ screen : At least 6.6 feet 61˝ screen : At least 7.2 feet ➢ For optimal picture quality, do not place components on top... addition, it away from the side panel or remote control ● Automatic timer to turn the TV on and off at any time you choose ● Adjustable picture and sound settings and the ability to memorize your favorite settings ● Automatic channel tuning for up to 181 channels &#...
User Manual (ENGLISH)
Page 7
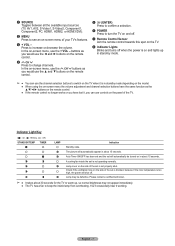
... have the same function as you can use the channel selection buttons to switch on the TV when it is in standby mode depending on the model. ● When using the on-screen menu the volume adjustment and channel selection buttons have lost it working. Indicator Light Key ( : On, : Blinking, : Off) STAND... and turns off . Lamp cover on the side of the set will automatically appear in about 15 seconds. Lamp may not appear immediately. ● The TV has a fan to keep the inside the set is on and lights up , so normal brightness may be turned on in about 15 seconds. You...
... have the same function as you can use the channel selection buttons to switch on the TV when it is in standby mode depending on the model. ● When using the on-screen menu the volume adjustment and channel selection buttons have lost it working. Indicator Light Key ( : On, : Blinking, : Off) STAND... and turns off . Lamp cover on the side of the set will automatically appear in about 15 seconds. Lamp may not appear immediately. ● The TV has a fan to keep the inside the set is on and lights up , so normal brightness may be turned on in about 15 seconds. You...

User Manual (ENGLISH)
Page 15
...Audio Input jack on the Amplifier/DVD Home Theater. When a Digital Audio System is a transmission system of digital audio in the form of the TV, and adjust the volume level with the amplifier's volume control. Amplifier/ DVD Home Theater ➢ Each Amplifier/DVD Home Theater has a different side panel ...configuration. ➢ When connecting an Amplifier/DVD Home Theater, match the color of the TV, and adjust the volume level with the audio system's volume control. Connecting a Digital Audio System The side panel jacks on your...
...Audio Input jack on the Amplifier/DVD Home Theater. When a Digital Audio System is a transmission system of digital audio in the form of the TV, and adjust the volume level with the amplifier's volume control. Amplifier/ DVD Home Theater ➢ Each Amplifier/DVD Home Theater has a different side panel ...configuration. ➢ When connecting an Amplifier/DVD Home Theater, match the color of the TV, and adjust the volume level with the audio system's volume control. Connecting a Digital Audio System The side panel jacks on your...

User Manual (ENGLISH)
Page 17
...home environment. Analog STD HRC Digital STD HRC Enter IRC IRC Skip Plug & Play Auto Program in your particular area. 5 The TV will automatically disappear after several seconds. The message Enter the current date and time. is displayed. ➢ To stop the search ... then press the ENTER button. Plug & Play 3 Press the ◄ or ► button to daylight saving time. After all of the OSD. Adjust Enter Skip Plug & Play Enjoy your watching. is displayed. The message Set the Clock Mode. OK English - 17 Continued... Plug & Play Menu language...
...home environment. Analog STD HRC Digital STD HRC Enter IRC IRC Skip Plug & Play Auto Program in your particular area. 5 The TV will automatically disappear after several seconds. The message Enter the current date and time. is displayed. ➢ To stop the search ... then press the ENTER button. Plug & Play 3 Press the ◄ or ► button to daylight saving time. After all of the OSD. Adjust Enter Skip Plug & Play Enjoy your watching. is displayed. The message Set the Clock Mode. OK English - 17 Continued... Plug & Play Menu language...

User Manual (ENGLISH)
Page 19
... using the MUTE button. 1 Press the MUTE button and the sound cuts off , press the MUTE button again, or simply press the VOL + or VOL - Adjusting the Volume Press the VOL + or VOL - The word Mute is displayed on the screen. 2 To turn mute off . No Time Information Air 3 Viewing the...
... using the MUTE button. 1 Press the MUTE button and the sound cuts off , press the MUTE button again, or simply press the VOL + or VOL - Adjusting the Volume Press the VOL + or VOL - The word Mute is displayed on the screen. 2 To turn mute off . No Time Information Air 3 Viewing the...
User Manual (ENGLISH)
Page 27
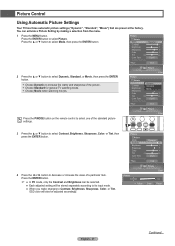
Picture Control Using Automatic Picture Settings Your TV has three automatic picture settings ("Dynamic", "Standard", "Movie") that are preset at the factory. You can be selected. ● Each adjusted setting will be stored separately according to its input mode. ● When you make ...Sharpness 75 Color 55 Tint G50 R50 Color Tone Cool1 Detailed Settings Size 16:9 Picture Enter Picture ▲ Contrast ▼ Adjust Enter 100 Return English - 27 Continued... Picture Enter Picture Return Mode Contrast Brightness Sharpness DyDnaynmaicmic Standard 100 Movie 45 75 ...
Picture Control Using Automatic Picture Settings Your TV has three automatic picture settings ("Dynamic", "Standard", "Movie") that are preset at the factory. You can be selected. ● Each adjusted setting will be stored separately according to its input mode. ● When you make ...Sharpness 75 Color 55 Tint G50 R50 Color Tone Cool1 Detailed Settings Size 16:9 Picture Enter Picture ▲ Contrast ▼ Adjust Enter 100 Return English - 27 Continued... Picture Enter Picture Return Mode Contrast Brightness Sharpness DyDnaynmaicmic Standard 100 Movie 45 75 ...
User Manual (ENGLISH)
Page 29
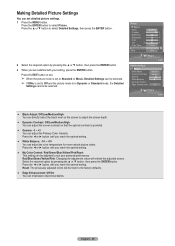
...setting. ● My Color Control: Red/Green/Blue/Yellow/Pink/Reset This setting can be adjusted to suit your setting, press the ENTER button. Reset: The previously adjusted colors will refresh the adjusted screen. Press the ◄ or ► button until you reach the optimal setting. ●... button. Press the ◄ or ► button until you are satisfied with your personal preferences. Red/Blue/Green/Yellow/Pink: Changing the adjustment value will be selected. Press the ▲ or ▼ button to select Detailed Settings, then press the ENTER button. 2 Select the ...
...setting. ● My Color Control: Red/Green/Blue/Yellow/Pink/Reset This setting can be adjusted to suit your setting, press the ENTER button. Reset: The previously adjusted colors will refresh the adjusted screen. Press the ◄ or ► button until you reach the optimal setting. ●... button. Press the ◄ or ► button until you are satisfied with your personal preferences. Red/Blue/Green/Yellow/Pink: Changing the adjustment value will be selected. Press the ▲ or ▼ button to select Detailed Settings, then press the ENTER button. 2 Select the ...
User Manual (ENGLISH)
Page 30
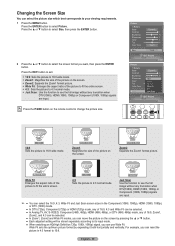
...61559; Zoom2: Expands the Zoom1 format picture. Wide Fit : Enlarges the aspect ratio of 16:9, 4:3 and Wide Fit can be selected. ● In Analog TV, AV, S-VIDEO, Component (480i, 480p), HDMI (480i, 480p), or DTV (480i, 480p) mode, any truncation when DTV(1080i), HDMI (1080i, 1080p) or...the ENTER button to 4:3 normal mode. Wide Fit sets the optimum picture format by pressing the ▲ or ▼ button. ● Each adjusted setting will be selected. ● In Zoom1, Zoom2 and Wide Fit modes, you want, then press the ENTER button. Picture Return Mode Dynamic ...
...61559; Zoom2: Expands the Zoom1 format picture. Wide Fit : Enlarges the aspect ratio of 16:9, 4:3 and Wide Fit can be selected. ● In Analog TV, AV, S-VIDEO, Component (480i, 480p), HDMI (480i, 480p), or DTV (480i, 480p) mode, any truncation when DTV(1080i), HDMI (1080i, 1080p) or...the ENTER button to 4:3 normal mode. Wide Fit sets the optimum picture format by pressing the ▲ or ▼ button. ● Each adjusted setting will be selected. ● In Zoom1, Zoom2 and Wide Fit modes, you want, then press the ENTER button. Picture Return Mode Dynamic ...
User Manual (ENGLISH)
Page 33
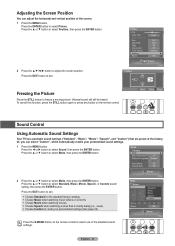
...▼ button to select Position, then press the ENTER button. 2 Press the button to exit. English - 33 Press the EXIT button to adjust the screen position. Press the ▲ or ▼ button to select Standard, Music, Movie, Speech, or Custom sound setting, then press the ...10kHz Reset OK Sound Enter Press the S.MODE button on the remote control. ▼ Move Enter Return Sound Control Using Automatic Sound Settings Your TV has automatic sound settings ("Standard", "Music", "Movie", "Speech", and "Custom") that is mostly dialog (i.e., news). Choose Custom to...
...▼ button to select Position, then press the ENTER button. 2 Press the button to exit. English - 33 Press the EXIT button to adjust the screen position. Press the ▲ or ▼ button to select Standard, Music, Movie, Speech, or Custom sound setting, then press the ...10kHz Reset OK Sound Enter Press the S.MODE button on the remote control. ▼ Move Enter Return Sound Control Using Automatic Sound Settings Your TV has automatic sound settings ("Standard", "Music", "Movie", "Speech", and "Custom") that is mostly dialog (i.e., news). Choose Custom to...

User Manual (ENGLISH)
Page 34
...► button to select OK or Cancel then press the ENTER button. Press the EXIT button to exit. ➢ The equalizer resets to adjust, then press the ENTER button. Press the ◄ or ► button to select a particular frequency to the factory defaults. Resetting the Equalizer... button to suit your personal preference. (Alternatively, you can use one of different bandwidth frequencies. Customizing the Sound The sound settings can be adjusted to select Reset, then press the ENTER button. Press the ▲ or ▼ button to increase or decrease the level of the ...
...► button to select OK or Cancel then press the ENTER button. Press the EXIT button to exit. ➢ The equalizer resets to adjust, then press the ENTER button. Press the ◄ or ► button to select a particular frequency to the factory defaults. Resetting the Equalizer... button to suit your personal preference. (Alternatively, you can use one of different bandwidth frequencies. Customizing the Sound The sound settings can be adjusted to select Reset, then press the ENTER button. Press the ▲ or ▼ button to increase or decrease the level of the ...
User Manual (ENGLISH)
Page 37
...to select Off or On, then press the ENTER button. Press the EXIT button to On, Sound menu except Multi-Track Sound cannot be adjusted. Sound Enter Sound Return Mode SRS TruSurround XT Off Preferred Language English Multi-Track Sound Stereo Auto Volume Off Off Internal Mute On Off Sound... output output output When Internal Mute is set to exit. Press the ◄ or ► button to audio through your sound system instead of the TV. 1 Press the MENU button. This is muted. Press the ▲ or ▼ button to select Internal Mute, then press the ENTER button. ...
...to select Off or On, then press the ENTER button. Press the EXIT button to On, Sound menu except Multi-Track Sound cannot be adjusted. Sound Enter Sound Return Mode SRS TruSurround XT Off Preferred Language English Multi-Track Sound Stereo Auto Volume Off Off Internal Mute On Off Sound... output output output When Internal Mute is set to exit. Press the ◄ or ► button to audio through your sound system instead of the TV. 1 Press the MENU button. This is muted. Press the ▲ or ▼ button to select Internal Mute, then press the ENTER button. ...

User Manual (ENGLISH)
Page 40
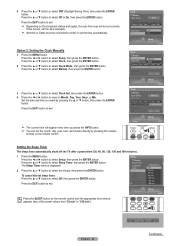
... Add Delete Name Favorite Return 21 4 7-1 10-1 13-1 16 19 22-1 List Mode 1/2 Delete All Press the EXIT button to select the last three digits. Adjust Enter Return ➢ The names of all channels, added channels or your all channels, add channels, or favorite channels, use the red (P.MODE) button on...
... Add Delete Name Favorite Return 21 4 7-1 10-1 13-1 16 19 22-1 List Mode 1/2 Delete All Press the EXIT button to select the last three digits. Adjust Enter Return ➢ The names of all channels, added channels or your all channels, add channels, or favorite channels, use the red (P.MODE) button on...

User Manual (ENGLISH)
Page 41
...or ▼ button to select Reset, then press the ENTER button. Press the ◄ or ► button to adjust the fine tuning. 3 To store the fine tuning setting in the TV's memory, press the ENTER button. 4 To reset the fine tuning setting, press the ▲ or ▼ button...Antenna Air Auto Program Clear Scrambled Channel Channel List Fine Tune ► Signal Strength LNA On Channel Fine Tune Return Air 7 * Reset Enter +3 OK Adjust Fine Tune Return Air 7 * Reset Channel Enter OK +3 CancelOK Channel Enter English - 41 Fine Tuning Analog Channels - Press the ▲ or &#...
...or ▼ button to select Reset, then press the ENTER button. Press the ◄ or ► button to adjust the fine tuning. 3 To store the fine tuning setting in the TV's memory, press the ENTER button. 4 To reset the fine tuning setting, press the ▲ or ▼ button...Antenna Air Auto Program Clear Scrambled Channel Channel List Fine Tune ► Signal Strength LNA On Channel Fine Tune Return Air 7 * Reset Enter +3 OK Adjust Fine Tune Return Air 7 * Reset Channel Enter OK +3 CancelOK Channel Enter English - 41 Fine Tuning Analog Channels - Press the ▲ or &#...

User Manual (ENGLISH)
Page 42
...42 So, unlike analog channels, you will not receive them at all. Channel Enter LNA (Low Noise Amplifier) If the TV is weak, physically adjust your antenna to exit. Channel Return Antenna Air Auto Program Clear Scrambled Channel Channel List Fine Tune Signal Strength LNA On ... Return Press the EXIT button to improve the reception of available digital channels. 1 Press the MENU button. You can, however, adjust your antenna to select Channel, then press the ENTER button. Channel Return Antenna Air Auto Program Clear Scrambled Channel Channel List Fine ...
...42 So, unlike analog channels, you will not receive them at all. Channel Enter LNA (Low Noise Amplifier) If the TV is weak, physically adjust your antenna to exit. Channel Return Antenna Air Auto Program Clear Scrambled Channel Channel List Fine Tune Signal Strength LNA On ... Return Press the EXIT button to improve the reception of available digital channels. 1 Press the MENU button. You can, however, adjust your antenna to select Channel, then press the ENTER button. Channel Return Antenna Air Auto Program Clear Scrambled Channel Channel List Fine ...
User Manual (ENGLISH)
Page 44
... the ◄ or ► button to move to select DST (Daylight Saving Time), then press the ENTER button. Off Adjust Setup Enter Setting the Sleep Timer The sleep timer automatically shuts off the TV after a preset time (30, 60, 90, 120, 150 and 180 minutes). 1 Press the MENU button. Press the ▲...
... the ◄ or ► button to move to select DST (Daylight Saving Time), then press the ENTER button. Off Adjust Setup Enter Setting the Sleep Timer The sleep timer automatically shuts off the TV after a preset time (30, 60, 90, 120, 150 and 180 minutes). 1 Press the MENU button. Press the ▲...
User Manual (ENGLISH)
Page 45
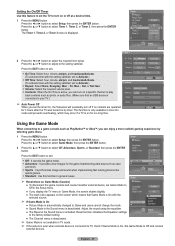
...select Timer 1, Timer 2, or Timer 3, then press the ENTER button. Adjust the sound using the equalizer. ● The Reset in TV mode. ➢ If the picture is poor when external device is connected to TV, check if Game Mode is deactivated. Press the EXIT button to exit...to Activate.) Off Time: Select hour, minute, am Once Inactivate Inactivate Volume 10 Contents TV Cable 3 Contents Adjust Return Source TV Antenna Cable Channel 3 Music None Photo None Adjust Return Using the Game Mode When connecting to a game console such as PlayStationTM or XboxTM, you...
...select Timer 1, Timer 2, or Timer 3, then press the ENTER button. Adjust the sound using the equalizer. ● The Reset in TV mode. ➢ If the picture is poor when external device is connected to TV, check if Game Mode is deactivated. Press the EXIT button to exit...to Activate.) Off Time: Select hour, minute, am Once Inactivate Inactivate Volume 10 Contents TV Cable 3 Contents Adjust Return Source TV Antenna Cable Channel 3 Music None Photo None Adjust Return Using the Game Mode When connecting to a game console such as PlayStationTM or XboxTM, you...
User Manual (ENGLISH)
Page 54
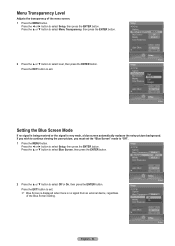
... Effect In Watching HDMI Black Level Normal 2 Press the ▲ or ▼ button to select Blue Screen, then press the ENTER button. Menu Transparency Level Adjusts the transparency of the Blue Screen Setting. Press the ▲ or ▼ button to select Off or On, then press the ENTER button. Setup V-Chip...
... Effect In Watching HDMI Black Level Normal 2 Press the ▲ or ▼ button to select Blue Screen, then press the ENTER button. Menu Transparency Level Adjusts the transparency of the Blue Screen Setting. Press the ▲ or ▼ button to select Off or On, then press the ENTER button. Setup V-Chip...

User Manual (ENGLISH)
Page 55
Adjusting the Melody Sound The TV power on/off melody sound can also select these options (Red, Green, or ...High Off Light Effect In Watching HDMI Black Level Normal Setup Enter Using the Color Weakness Enhancement Feature This feature adjusts the Red, Green or Blue color to exit. English - 55 Color Weakness ▲ Red ▼ Setup...; or ▼ button to select Melody, then press the ENTER button. 2 Press the ▲ or ▼ button to be adjusted. 1 Press the MENU button. Setup Enter Color Weakness Return Color Weakness Red Green Blue Off On 0 0 0 4 Press the ▲...
Adjusting the Melody Sound The TV power on/off melody sound can also select these options (Red, Green, or ...High Off Light Effect In Watching HDMI Black Level Normal Setup Enter Using the Color Weakness Enhancement Feature This feature adjusts the Red, Green or Blue color to exit. English - 55 Color Weakness ▲ Red ▼ Setup...; or ▼ button to select Melody, then press the ENTER button. 2 Press the ▲ or ▼ button to be adjusted. 1 Press the MENU button. Setup Enter Color Weakness Return Color Weakness Red Green Blue Off On 0 0 0 4 Press the ▲...
User Manual (ENGLISH)
Page 56
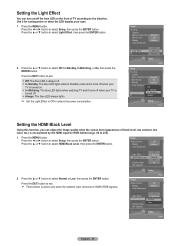
...In Watching HDMI Black Level NormaLlow Film Mode Low Off Function Help On SW Upgrade Setup Enter English - 56 Press the ▲ or ▼ button to select Light Effect, then press the ENTER button. 2 ...LED lights while in Standby mode and it turns off when your TV is turned on. In Watching: The blue LED lights when watching TV and it for RGB limited range (16 to 235). 1 ...Press the ◄ or ► button to HDMI (RGB signals). Setting the Light Effect You can adjust the image quality when the screen burn (appearance of black level, low contrast, low color, etc.) is...
...In Watching HDMI Black Level NormaLlow Film Mode Low Off Function Help On SW Upgrade Setup Enter English - 56 Press the ▲ or ▼ button to select Light Effect, then press the ENTER button. 2 ...LED lights while in Standby mode and it turns off when your TV is turned on. In Watching: The blue LED lights when watching TV and it for RGB limited range (16 to 235). 1 ...Press the ◄ or ► button to HDMI (RGB signals). Setting the Light Effect You can adjust the image quality when the screen burn (appearance of black level, low contrast, low color, etc.) is...


