
User Manual (ENGLISH)
Page 3
... this user manual is High Definition Television (HDTV). • SDTV program formats include 480-line interlaced (480i) and 480-line progressive (480p) video. 480i programs are granted under certain intellectual property rights of our current analog TV programs, while the 480p format offers improved image detail over 480i. This license is a new way of these services can transmit high definition TV (HDTV) images, Dolby digital surround audio, and new services such...
... this user manual is High Definition Television (HDTV). • SDTV program formats include 480-line interlaced (480i) and 480-line progressive (480p) video. 480i programs are granted under certain intellectual property rights of our current analog TV programs, while the 480p format offers improved image detail over 480i. This license is a new way of these services can transmit high definition TV (HDTV) images, Dolby digital surround audio, and new services such...

User Manual (ENGLISH)
Page 5
... widescreen images and high-quality audio. 5. If your TV Guide. You should find out the latest DTV channel assignments for broadcast. I connect an antenna in the TV Guide On ScreenTM Setup. So you already get good UHF reception, your TV while it to receive OTA broadcast DTV programs. The good news is that is a big advantage for DTV? Is the antenna I connect my DTV set -top receiver to watch...
... widescreen images and high-quality audio. 5. If your TV Guide. You should find out the latest DTV channel assignments for broadcast. I connect an antenna in the TV Guide On ScreenTM Setup. So you already get good UHF reception, your TV while it to receive OTA broadcast DTV programs. The good news is that is a big advantage for DTV? Is the antenna I connect my DTV set -top receiver to watch...
User Manual (ENGLISH)
Page 6
... Box 26 Connecting to HDMI (High Definition Multimedia Interface 26 Connecting a Digital Audio System 27 Connecting to an Analog Amplifier 27 Operation 30 Turning the TV On and Off 30 Viewing the Menus and On-Screen Displays 30 Selecting a Menu Language 31 Memorizing the Channels 32 Adding and Erasing Channels 34 Changing Channels 35 Customizing Your Remote Control 36 Remote Control Codes 37 Setting the Clock...38 Setting the On/Off Timer 40 Setting the Sleep Timer 41 Viewing an External Signal...
... Box 26 Connecting to HDMI (High Definition Multimedia Interface 26 Connecting a Digital Audio System 27 Connecting to an Analog Amplifier 27 Operation 30 Turning the TV On and Off 30 Viewing the Menus and On-Screen Displays 30 Selecting a Menu Language 31 Memorizing the Channels 32 Adding and Erasing Channels 34 Changing Channels 35 Customizing Your Remote Control 36 Remote Control Codes 37 Setting the Clock...38 Setting the On/Off Timer 40 Setting the Sleep Timer 41 Viewing an External Signal...
User Manual (ENGLISH)
Page 7
... Viewing Picture-In-Picture 64 Freezing the Picture 71 Setting the Blue Screen Mode 72 Sound Control 74 Sound Control ...74 Setting the SRS TSXT 76 Auto Volume...77 Choosing a Multi-Channel Sound (MTS) track Digital 78 Choosing a Multi-Channel Sound (MTS) track Analog 79 Choosing a Digital Sound Format Digital 80 Selecting the Internal Mute 81 Setting the On/Off Melody 82 Special Features 84 Setting the Function Help 84 Menu Transparency Level 85 Using the V-Chip...86 Viewing Closed Captions...
... Viewing Picture-In-Picture 64 Freezing the Picture 71 Setting the Blue Screen Mode 72 Sound Control 74 Sound Control ...74 Setting the SRS TSXT 76 Auto Volume...77 Choosing a Multi-Channel Sound (MTS) track Digital 78 Choosing a Multi-Channel Sound (MTS) track Analog 79 Choosing a Digital Sound Format Digital 80 Selecting the Internal Mute 81 Setting the On/Off Melody 82 Special Features 84 Setting the Function Help 84 Menu Transparency Level 85 Using the V-Chip...86 Viewing Closed Captions...
User Manual (ENGLISH)
Page 11
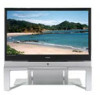
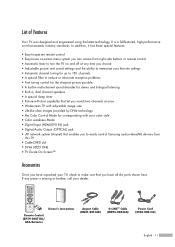
...; Widescreen TV with adjustable image size • Life-like clear images provided by DNle technology • My Color Control Mode for corresponding with your color style • Color weakness Mode • Digital Input (HDMI/DVI IN) jack • Digital Audio Output (OPTICAL) jack • AV network system (Anynet) that enables you to make sure that exceeds industry standards. Owner's Instructions Remote Control (BP59-00071B)/ AAA Batteries Anynet Cable (BN39-00518B) G-LINKTM Cable (MD96-00036A) Power Cord (3903...
...; Widescreen TV with adjustable image size • Life-like clear images provided by DNle technology • My Color Control Mode for corresponding with your color style • Color weakness Mode • Digital Input (HDMI/DVI IN) jack • Digital Audio Output (OPTICAL) jack • AV network system (Anynet) that enables you to make sure that exceeds industry standards. Owner's Instructions Remote Control (BP59-00071B)/ AAA Batteries Anynet Cable (BN39-00518B) G-LINKTM Cable (MD96-00036A) Power Cord (3903...
User Manual (ENGLISH)
Page 13
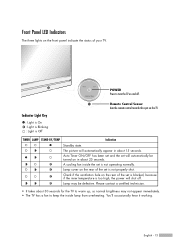
... seconds. Auto Timer ON/OFF has been set and the set will shut off . English - 13 Front Panel LED Indicators The three lights on the front panel indicate the status of the set is Off Remote Control Sensor Aim the remote control towards this spot on the TV. A cooling fan inside lamp from overheating. Indicator Light Key : Light is On : Light is Blinking : Light is not properly shut. You'll occasionally hear it working. Check if the...
... seconds. Auto Timer ON/OFF has been set and the set will shut off . English - 13 Front Panel LED Indicators The three lights on the front panel indicate the status of the set is Off Remote Control Sensor Aim the remote control towards this spot on the TV. A cooling fan inside lamp from overheating. Indicator Light Key : Light is On : Light is Blinking : Light is not properly shut. You'll occasionally hear it working. Check if the...
User Manual (ENGLISH)
Page 14
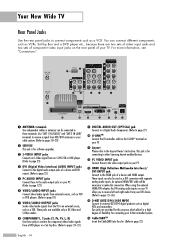
... to connect the component video/audio signals from a DVD player or a Set-Top Box. (Refer to pages 24~25) ' DIGITAL AUDIO OUT (OPTICAL) jack Connect to a Digital Audio Component. (Refer to page 27) ˝ G-LINKTM Connect the IR controller cable to the G-LINKTM terminal on your PC. Ò HDMI (High Definition Multimedia Interface)/ DVI INPUT jack Connect to an external source, such as a VCR. When using the optional HDMI/DVI adapter, the DVI analog audio inputs on the rear panel of...
... to connect the component video/audio signals from a DVD player or a Set-Top Box. (Refer to pages 24~25) ' DIGITAL AUDIO OUT (OPTICAL) jack Connect to a Digital Audio Component. (Refer to page 27) ˝ G-LINKTM Connect the IR controller cable to the G-LINKTM terminal on your PC. Ò HDMI (High Definition Multimedia Interface)/ DVI INPUT jack Connect to an external source, such as a VCR. When using the optional HDMI/DVI adapter, the DVI analog audio inputs on the rear panel of...
User Manual (ENGLISH)
Page 15
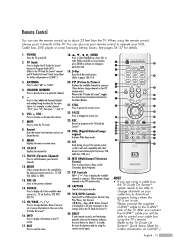
... Demo mode. 25. SET Used during set of screen information to the next in the PIP window only.) 28. When using the remote control, always point it will be able to control your VCR, Cable box, DVD player or some Samsung Set-top boxes, VCR, Cable box, DVD, etc.) 26. POWER Turns the TV on -screen menu. 10. TV Guide Press to display the TV Guide On ScreenTM lnteractive Program Guide (IPG). (Refer to the TV Guide On ScreenTM manual and TV Guide On ScreenTM Quick Setup Sheet...
... Demo mode. 25. SET Used during set of screen information to the next in the PIP window only.) 28. When using the remote control, always point it will be able to control your VCR, Cable box, DVD player or some Samsung Set-top boxes, VCR, Cable box, DVD, etc.) 26. POWER Turns the TV on -screen menu. 10. TV Guide Press to display the TV Guide On ScreenTM lnteractive Program Guide (IPG). (Refer to the TV Guide On ScreenTM manual and TV Guide On ScreenTM Quick Setup Sheet...

User Manual (ENGLISH)
Page 24
... rear panel jacks on your TV make it easy to connect a DVD player to your DVD player's owner's manual. TV Rear Panel Incoming Cable or Antenna 2 To enable Component video viewing, connect a set of video cables between the COMPONENT (1 or 2) VIDEO (Y, PB, PR) IN jacks on the TV and VIDEO (Y/PB/PR or Y/CB/CR) OUT jacks on the DVD player. 2 1 Connecting to Y, PB, PR 1 Connect a set of Component video, see your TV. DVD Player TV Rear Panel Incoming Cable or Antenna 2 1 NOTE • For an explanation of audio cables...
... rear panel jacks on your TV make it easy to connect a DVD player to your DVD player's owner's manual. TV Rear Panel Incoming Cable or Antenna 2 To enable Component video viewing, connect a set of video cables between the COMPONENT (1 or 2) VIDEO (Y, PB, PR) IN jacks on the TV and VIDEO (Y/PB/PR or Y/CB/CR) OUT jacks on the DVD player. 2 1 Connecting to Y, PB, PR 1 Connect a set of Component video, see your TV. DVD Player TV Rear Panel Incoming Cable or Antenna 2 1 NOTE • For an explanation of audio cables...

User Manual (ENGLISH)
Page 25
... Set-Top Box and the ANT 1 IN (CABLE) on the TV. English - 25 Incoming Cable or Antenna 4 Connect a coaxial cable between the Antenna out terminal (i.e., "ANT.OUT") on the Set-Top Box and the ANT 1 IN (CABLE) on the Set-Top Box. DTV Set-Top Box Connecting to DVI (Digital Visual Interface) 1 Connect a set of audio cables between the VIDEO or S-VIDEO/AUDIO input jacks on the TV and VIDEO or S-VIDEO/AUDIO output jacks on the TV. TV Rear Panel 2 Connect a set of video cables between the COMPONENT (1 or 2) VIDEO...
... Set-Top Box and the ANT 1 IN (CABLE) on the TV. English - 25 Incoming Cable or Antenna 4 Connect a coaxial cable between the Antenna out terminal (i.e., "ANT.OUT") on the Set-Top Box and the ANT 1 IN (CABLE) on the Set-Top Box. DTV Set-Top Box Connecting to DVI (Digital Visual Interface) 1 Connect a set of audio cables between the VIDEO or S-VIDEO/AUDIO input jacks on the TV and VIDEO or S-VIDEO/AUDIO output jacks on the TV. TV Rear Panel 2 Connect a set of video cables between the COMPONENT (1 or 2) VIDEO...

User Manual (ENGLISH)
Page 27
A transmission system of digital audio in the TV's Sound Menu and adjust the volume level with the volume control of the amplifier. Audio System Connecting to page 81) TV Rear Panel Amplifier English - 27 NOTE • If using a glass conductor. For more information, see your audio system owner's manual. 1 If your audio system has an optical digital audio input, connect to your digital audio component. TV Rear Panel NOTE • OPTICAL: converts the electric signal into an optical light signal, and transmits it through glass fibers...
A transmission system of digital audio in the TV's Sound Menu and adjust the volume level with the volume control of the amplifier. Audio System Connecting to page 81) TV Rear Panel Amplifier English - 27 NOTE • If using a glass conductor. For more information, see your audio system owner's manual. 1 If your audio system has an optical digital audio input, connect to your digital audio component. TV Rear Panel NOTE • OPTICAL: converts the electric signal into an optical light signal, and transmits it through glass fibers...
User Manual (ENGLISH)
Page 30
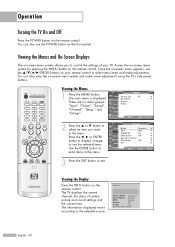
... remote control. Setup Listings Move Enter Exit 2 Press the ... The TV displays the current channel, the status of your remote control to control the settings of certain picture and sound settings and the current time. You can also view the on the front panel. Press the œ, √ or ENTER button to display, change, or use the POWER button on -screen menu system and make adjustments. Cable 3 Picture Mode Standard Sound Mode Custom MTS Stereo Caption Off V-Chip Off No Time Information English - 30 Operation Turning...
... remote control. Setup Listings Move Enter Exit 2 Press the ... The TV displays the current channel, the status of your remote control to control the settings of certain picture and sound settings and the current time. You can also view the on the front panel. Press the œ, √ or ENTER button to display, change, or use the POWER button on -screen menu system and make adjustments. Cable 3 Picture Mode Standard Sound Mode Custom MTS Stereo Caption Off V-Chip Off No Time Information English - 30 Operation Turning...
User Manual (ENGLISH)
Page 40
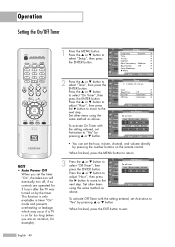
... adjust "Hour", then press the √ button to move to the next step. Set other items using the same method as above . Setup Input Picture Sound Channel Setup Listings Language : English √ Time √ V-Chip √ Caption √ Menu Transparency : Medium √ Blue Screen : Off √ Color Weakness √ ▼ More Move Enter Return Time Input 1/ 1/ 2005/ 12 : 00 am Picture Clock √ Sound Sleep Timer : Off √ Channel On Timer Off Timer : Inactivated √ : Inactivated √ Setup Listings...
... adjust "Hour", then press the √ button to move to the next step. Set other items using the same method as above . Setup Input Picture Sound Channel Setup Listings Language : English √ Time √ V-Chip √ Caption √ Menu Transparency : Medium √ Blue Screen : Off √ Color Weakness √ ▼ More Move Enter Return Time Input 1/ 1/ 2005/ 12 : 00 am Picture Clock √ Sound Sleep Timer : Off √ Channel On Timer Off Timer : Inactivated √ : Inactivated √ Setup Listings...
User Manual (ENGLISH)
Page 41
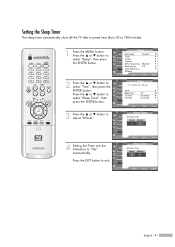
...9660; Activation No Move Adjust Return Input Picture Sound Channel Setup Listings Sleep Timer Set sleep timer. Press the ... or † button to select "Sleep Timer", then press the ENTER button. 3 Press the ... Press the ... or † button to adjust "Minute". 4 Setting the Timer sets the Activation to select "Setup", then press the ENTER button. 2 Press the ... Setup Input Picture Sound Channel Setup Listings Language : English √ Time √ V-Chip √ Caption √ Menu Transparency : Medium √ Blue Screen : Off √ Color Weakness √...
...9660; Activation No Move Adjust Return Input Picture Sound Channel Setup Listings Sleep Timer Set sleep timer. Press the ... or † button to select "Sleep Timer", then press the ENTER button. 3 Press the ... Press the ... or † button to adjust "Minute". 4 Setting the Timer sets the Activation to select "Setup", then press the ENTER button. 2 Press the ... Setup Input Picture Sound Channel Setup Listings Language : English √ Time √ V-Chip √ Caption √ Menu Transparency : Medium √ Blue Screen : Off √ Color Weakness √...
User Manual (ENGLISH)
Page 60
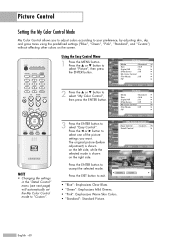
.... My Color Control Input Easy Control : Custom √ Picture Detail Control √ Sound Channel Setup Listings Move Enter Return Original Custom Press the ENTER button to select "My Color Control", then press the ENTER button. Using the Easy Control Menu 1 Press the MENU button. Press the œ or √ button to select one of the picture settings you to adjust colors according to your preference, by adjusting skin, sky, and grass tones using the predefined settings ("Blue", "Green", "Pink...
.... My Color Control Input Easy Control : Custom √ Picture Detail Control √ Sound Channel Setup Listings Move Enter Return Original Custom Press the ENTER button to select "My Color Control", then press the ENTER button. Using the Easy Control Menu 1 Press the MENU button. Press the œ or √ button to select one of the picture settings you to adjust colors according to your preference, by adjusting skin, sky, and grass tones using the predefined settings ("Blue", "Green", "Pink...
User Manual (ENGLISH)
Page 61
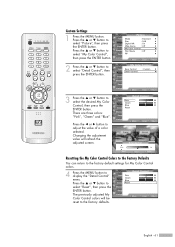
...; button to display the "Detail Control" menu. Detail Control Input Picture Sound Pink Green Blue Reset Channel Setup Listings Move Enter 50 50 50 Return Original Adjusted ▲ Pink ▼ Move Detail Control Adjust 50 Return Resetting the My Color Control Colors to the Factory Defaults You can return to the factory default settings for My Color Control colors. 4 Press the MENU button to select "My Color Control", then press the ENTER button. 2 Press the ... The previously adjusted My Color Control colors will refresh the adjusted screen. Detail Control Input Picture...
...; button to display the "Detail Control" menu. Detail Control Input Picture Sound Pink Green Blue Reset Channel Setup Listings Move Enter 50 50 50 Return Original Adjusted ▲ Pink ▼ Move Detail Control Adjust 50 Return Resetting the My Color Control Colors to the Factory Defaults You can return to the factory default settings for My Color Control colors. 4 Press the MENU button to select "My Color Control", then press the ENTER button. 2 Press the ... The previously adjusted My Color Control colors will refresh the adjusted screen. Detail Control Input Picture...
User Manual (ENGLISH)
Page 86
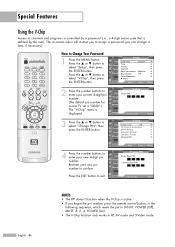
...or † button to Change Your Password 1 Press the MENU button. Picture * (The default pin number for Sound a new TV set is "0000".) Channel The "V-Chip" menu is defined by a password (i.e., a 4-digit secret code that is Setup displayed. Re-enter your new pin number to select "V-Chip", then press the ENTER button. or † button to confirm. Press the ... Setup Input Picture Sound Channel Setup Listings Language : English √ Time √ V-Chip √ Caption √ Menu Transparency : Medium √ Blue Screen : Off √ Color Weakness...
...or † button to Change Your Password 1 Press the MENU button. Picture * (The default pin number for Sound a new TV set is "0000".) Channel The "V-Chip" menu is defined by a password (i.e., a 4-digit secret code that is Setup displayed. Re-enter your new pin number to select "V-Chip", then press the ENTER button. or † button to confirm. Press the ... Setup Input Picture Sound Channel Setup Listings Language : English √ Time √ V-Chip √ Caption √ Menu Transparency : Medium √ Blue Screen : Off √ Color Weakness...

User Manual (ENGLISH)
Page 134
.... There is a "clicking" sound repeatedly in the TV Guide On ScreenTM Setup. • The display panel used for 30 seconds, then try this list of possible problems and solutions. Check all wire connections. Check the antenna connections. Adjust the picture settings. Press the MODE button to put your TV. Make sure the TV is off . No picture or sound. Your remote control does not operate your remote control into TV mode. Please check the digital signal strength and input antenna. Try another channel. Check that the Mute...
.... There is a "clicking" sound repeatedly in the TV Guide On ScreenTM Setup. • The display panel used for 30 seconds, then try this list of possible problems and solutions. Check all wire connections. Check the antenna connections. Adjust the picture settings. Press the MODE button to put your TV. Make sure the TV is off . No picture or sound. Your remote control does not operate your remote control into TV mode. Please check the digital signal strength and input antenna. Try another channel. Check that the Mute...
Brochure
Page 4
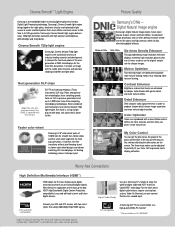
... A Samsung DLP TV can be adjusted to perfectly fit your Samsung TV's remote to enjoy the world of digital cable and HDTV thanks to -date HDCP (High Bandwidth Digital Content Protection), compatibility is covered with tiny mirrors. Next generation DLP chips About the size of DMD microdisplays for more natural-looking motion, thus reducing video noise or blurring. Detail Enhancer DNIe analyzes video signal elements in creating light engines that 's more natural whites...
... A Samsung DLP TV can be adjusted to perfectly fit your Samsung TV's remote to enjoy the world of digital cable and HDTV thanks to -date HDCP (High Bandwidth Digital Content Protection), compatibility is covered with tiny mirrors. Next generation DLP chips About the size of DMD microdisplays for more natural-looking motion, thus reducing video noise or blurring. Detail Enhancer DNIe analyzes video signal elements in creating light engines that 's more natural whites...
Brochure
Page 5
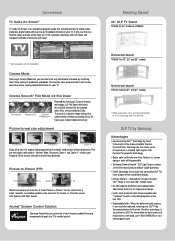
... your image to its single-panel design. • Faster color wheel corrects the perceivable color "rainbows" found in early data projectors of your 4:3 aspect-ratio programming in creating light engines that harness this powerful technology. • Better color uniformity over . Universal stand TR46X3 Fits 46", 50" and 56" models. Cinema Mode Samsung's Cinema Mode lets you see which ones are converted to -30 frames per second video conversion. stretch your TV...
... your image to its single-panel design. • Faster color wheel corrects the perceivable color "rainbows" found in early data projectors of your 4:3 aspect-ratio programming in creating light engines that harness this powerful technology. • Better color uniformity over . Universal stand TR46X3 Fits 46", 50" and 56" models. Cinema Mode Samsung's Cinema Mode lets you see which ones are converted to -30 frames per second video conversion. stretch your TV...


