
Open Source Guide (ENGLISH)
Page 1
... You may charge a fee for this License. 3. However, as expressly provided under the Freetype Project. You may at least three years, to give any patent must cause it . These actions...notice and disclaimer of warranty; It is covered only if its derivative works. The original manual has wrong versions of transferring a copy, and you have. When we speak of free... Foundation; The precise terms and conditions for questions regarding open sources, contact Samsung via Email (vdswmanager@samsung. keep intact all third parties under the scope of this free software. ...
... You may charge a fee for this License. 3. However, as expressly provided under the Freetype Project. You may at least three years, to give any patent must cause it . These actions...notice and disclaimer of warranty; It is covered only if its derivative works. The original manual has wrong versions of transferring a copy, and you have. When we speak of free... Foundation; The precise terms and conditions for questions regarding open sources, contact Samsung via Email (vdswmanager@samsung. keep intact all third parties under the scope of this free software. ...

User Manual (ENGLISH)
Page 3
... 480-line interlaced (480i) and 480-line progressive (480p) video. 480i programs are essentially a digital version of our current analog TV programs, while the 480p format offers improved image detail over 480i. The license only covers the use by end-user consumers for product... HDTV program formats include 1080-line interlaced (1080i) and 720-line progressive (720p). Other countries The product unit accompanying this user manual is licensed under this product unit. No rights are comparable to progressive-scan DVD movies in two different formats. Some 480p programs ...
... 480-line interlaced (480i) and 480-line progressive (480p) video. 480i programs are essentially a digital version of our current analog TV programs, while the 480p format offers improved image detail over 480i. The license only covers the use by end-user consumers for product... HDTV program formats include 1080-line interlaced (1080i) and 720-line progressive (720p). Other countries The product unit accompanying this user manual is licensed under this product unit. No rights are comparable to progressive-scan DVD movies in two different formats. Some 480p programs ...
User Manual (ENGLISH)
Page 15
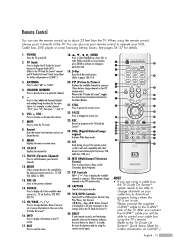
... VCR, DVD, DTV, PC). 15. RESET If your favorite channels. 12. ANTENNA Press to select additional channels (digital and analog) being broadcast by the Samsung remote control (i.e., TV, STB, VCR, CABLE, or DVD). 13. Press to select "AIR" or "CABLE". 4. For example, to change channels in the PIP window only... (IPG). (Refer to change ) a particular item. 19. CH/PAGE / Press to the TV Guide On ScreenTM manual and TV Guide On ScreenTM Quick Setup Sheet for about 23 feet from one set up of the TV. When using the remote control again. EXIT Press to exit the menu. 18 ENTER Press...
... VCR, DVD, DTV, PC). 15. RESET If your favorite channels. 12. ANTENNA Press to select additional channels (digital and analog) being broadcast by the Samsung remote control (i.e., TV, STB, VCR, CABLE, or DVD). 13. Press to select "AIR" or "CABLE". 4. For example, to change channels in the PIP window only... (IPG). (Refer to change ) a particular item. 19. CH/PAGE / Press to the TV Guide On ScreenTM manual and TV Guide On ScreenTM Quick Setup Sheet for about 23 feet from one set up of the TV. When using the remote control again. EXIT Press to exit the menu. 18 ENTER Press...

User Manual (ENGLISH)
Page 24
...Connecting to Audio and Video Jacks 1 Connect a set of audio cables between the VIDEO IN (1 or 2) jack on the TV and the VIDEO OUT jack on the DVD player. DVD Player TV Rear Panel Incoming Cable or Antenna 2 1 NOTE • For an explanation of audio cables between the AUDIO IN (1 or 2) ... the COMPONENT (1 or 2) AUDIO (L, R) IN jacks on the TV and the AUDIO OUT jacks on the DVD player. Connections Connecting a DVD Player The rear panel jacks on your TV make it easy to connect a DVD player to your DVD player's owner's manual. Connecting to Y, PB, PR 1 Connect a set of Component ...
...Connecting to Audio and Video Jacks 1 Connect a set of audio cables between the VIDEO IN (1 or 2) jack on the TV and the VIDEO OUT jack on the DVD player. DVD Player TV Rear Panel Incoming Cable or Antenna 2 1 NOTE • For an explanation of audio cables between the AUDIO IN (1 or 2) ... the COMPONENT (1 or 2) AUDIO (L, R) IN jacks on the TV and the AUDIO OUT jacks on the DVD player. Connections Connecting a DVD Player The rear panel jacks on your TV make it easy to connect a DVD player to your DVD player's owner's manual. Connecting to Y, PB, PR 1 Connect a set of Component ...

User Manual (ENGLISH)
Page 25
... Cable or Antenna NOTES DTV Set-Top Box • For an explanation of Component video, see your Set-Top Box owner's manual. • Requires a Cable Converter. • To use the TV Guide On ScreenTM, you have to DVI (Digital Visual Interface) 1 Connect a set of audio cables between the DVI AUDIO (L, R) IN jacks... on the TV and the AUDIO OUT jacks on the Set-Top Box. TV Rear Panel 2 Connect a set of video cables between the COMPONENT (1 or 2) VIDEO (Y, PB, PR) IN jacks on the TV and VIDEO (Y/PB/PR 3 or Y/CB/CR) OUT jacks on the...
... Cable or Antenna NOTES DTV Set-Top Box • For an explanation of Component video, see your Set-Top Box owner's manual. • Requires a Cable Converter. • To use the TV Guide On ScreenTM, you have to DVI (Digital Visual Interface) 1 Connect a set of audio cables between the DVI AUDIO (L, R) IN jacks... on the TV and the AUDIO OUT jacks on the Set-Top Box. TV Rear Panel 2 Connect a set of video cables between the COMPONENT (1 or 2) VIDEO (Y, PB, PR) IN jacks on the TV and VIDEO (Y/PB/PR 3 or Y/CB/CR) OUT jacks on the...

User Manual (ENGLISH)
Page 26
...jacks on the Set-Top Box. 3 Connect a coaxial cable between the Antenna in the TV menu's source list. • For an explanation of Component video, see your Set-Top Box owner's manual. • To use the TV Guide On ScreenTM, you have to HDMI (High Definition Multimedia Interface) 1 Connect an ...HDMI cable between the HDMI/DVI IN jack on the TV and the HDMI OUT jack on the Set-Top Box. Incoming Cable or Antenna TV Rear Panel 2 Connect the...
...jacks on the Set-Top Box. 3 Connect a coaxial cable between the Antenna in the TV menu's source list. • For an explanation of Component video, see your Set-Top Box owner's manual. • To use the TV Guide On ScreenTM, you have to HDMI (High Definition Multimedia Interface) 1 Connect an ...HDMI cable between the HDMI/DVI IN jack on the TV and the HDMI OUT jack on the Set-Top Box. Incoming Cable or Antenna TV Rear Panel 2 Connect the...

User Manual (ENGLISH)
Page 27
... audio output signal is available only when the TV's Internal Mute is shown below. NOTE • If using a glass conductor. See page 80 to set to on the market today. For more information, see your audio system owner's manual. 1 If your digital audio component. A simplified illustration of an ...has an optical digital audio input, connect to the "DIGITAL AUDIO OUT(OPTICAL)" jack on in the TV's Sound Menu and adjust the volume level with the volume control of the amplifier. TV Rear Panel NOTE • OPTICAL: converts the electric signal into an optical light signal, and transmits it ...
... audio output signal is available only when the TV's Internal Mute is shown below. NOTE • If using a glass conductor. See page 80 to set to on the market today. For more information, see your audio system owner's manual. 1 If your digital audio component. A simplified illustration of an ...has an optical digital audio input, connect to the "DIGITAL AUDIO OUT(OPTICAL)" jack on in the TV's Sound Menu and adjust the volume level with the volume control of the amplifier. TV Rear Panel NOTE • OPTICAL: converts the electric signal into an optical light signal, and transmits it ...
User Manual (ENGLISH)
Page 32
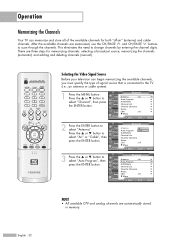
... Channel List Favorite Channels Name LNA : Off ▼ More Move Enter Return 3 Press the ... Operation Memorizing the Channels Your TV can begin memorizing the available channels, you must specify the type of the available channels for memorizing channels: selecting a broadcast source,... memorizing the channels (automatic) and adding and deleting channels (manual). or † button to select "Channel", then press the ENTER button. After the available channels are memorized, use the CH/...
... Channel List Favorite Channels Name LNA : Off ▼ More Move Enter Return 3 Press the ... Operation Memorizing the Channels Your TV can begin memorizing the available channels, you must specify the type of the available channels for memorizing channels: selecting a broadcast source,... memorizing the channels (automatic) and adding and deleting channels (manual). or † button to select "Channel", then press the ENTER button. After the available channels are memorized, use the CH/...
User Manual (ENGLISH)
Page 38
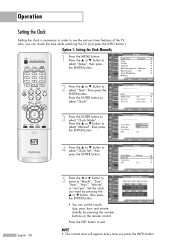
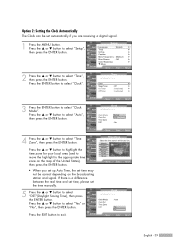
... Time Zone DST :MAauntoual Auto : No Listings Move Enter Return 4 Press the ... Clock Input Picture Sound Channel Setup Clock Mode Clock Set Time Zone DST : Manual : No Listings Move Enter Return 5 Press the œ or √ button to move to "Month", "Day", "Year", "Hour", "Minute", or "am /...Press the ... Input Picture Sound Channel Setup Listings • You can check the time while watching the TV. (Just press the INFO button.) Option 1: Setting the Clock Manually 1 Press the MENU button. English - 38 NOTE • The current time will appear every time you...
... Time Zone DST :MAauntoual Auto : No Listings Move Enter Return 4 Press the ... Clock Input Picture Sound Channel Setup Clock Mode Clock Set Time Zone DST : Manual : No Listings Move Enter Return 5 Press the œ or √ button to move to "Month", "Day", "Year", "Hour", "Minute", or "am /...Press the ... Input Picture Sound Channel Setup Listings • You can check the time while watching the TV. (Just press the INFO button.) Option 1: Setting the Clock Manually 1 Press the MENU button. English - 38 NOTE • The current time will appear every time you...
User Manual (ENGLISH)
Page 39
... Eastern Central Mountain Pacific Alaska Hawaii Move Enter Return • When you set up Auto Time, the set time may not be set the time manually. 5 Press the ... Clock Input Picture Sound Channel Setup Clock Mode Clock Set Time Zone DST : Auto : YNeos No Press the EXIT button to select "Auto...
... Eastern Central Mountain Pacific Alaska Hawaii Move Enter Return • When you set up Auto Time, the set time may not be set the time manually. 5 Press the ... Clock Input Picture Sound Channel Setup Clock Mode Clock Set Time Zone DST : Auto : YNeos No Press the EXIT button to select "Auto...
User Manual (ENGLISH)
Page 51
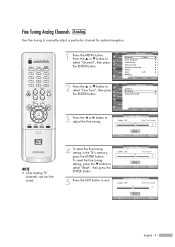
...Fine Tuned 3 Adjust Reset Save Return Cable 26 Fine Tune Not Fine Tuned 0 Move Reset Enter Return English - 51 or † button to manually adjust a particular channel for optimal reception. To reset the fine tuning setting, press the † button to select "Reset", then press the ENTER...26 Fine Tune Not Fine Tuned 3 Adjust Reset Save Return 4 To store the fine tuning setting in the TV's memory, press the ENTER button. NOTE • Only analog TV channels can be fine tuned. 1 Press the MENU button. Channel Input Picture Sound Channel Setup Listings Antenna : ...
...Fine Tuned 3 Adjust Reset Save Return Cable 26 Fine Tune Not Fine Tuned 0 Move Reset Enter Return English - 51 or † button to manually adjust a particular channel for optimal reception. To reset the fine tuning setting, press the † button to select "Reset", then press the ENTER...26 Fine Tune Not Fine Tuned 3 Adjust Reset Save Return 4 To store the fine tuning setting in the TV's memory, press the ENTER button. NOTE • Only analog TV channels can be fine tuned. 1 Press the MENU button. Channel Input Picture Sound Channel Setup Listings Antenna : ...
User Manual (ENGLISH)
Page 80
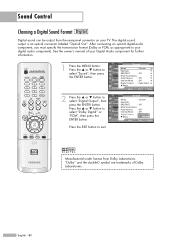
See the owner's manual of Dolby Laboratories. English - 80 The digital sound output is an optical connector labeled "Optical Out". Press the ... or † button to select "Sound", then ...-Track Options Auto Volume : Off Internal Mute : Off Digital Output : DPoClbMy Digital ▼ More PCM Move Enter Return Manufactured under license from the rear-panel connector on your TV. After connecting an optical digital-audio component, you must specify the transmission format (Dolby or PCM, as appropriate to your Digital Audio component...
See the owner's manual of Dolby Laboratories. English - 80 The digital sound output is an optical connector labeled "Optical Out". Press the ... or † button to select "Sound", then ...-Track Options Auto Volume : Off Internal Mute : Off Digital Output : DPoClbMy Digital ▼ More PCM Move Enter Return Manufactured under license from the rear-panel connector on your TV. After connecting an optical digital-audio component, you must specify the transmission format (Dolby or PCM, as appropriate to your Digital Audio component...
User Manual (ENGLISH)
Page 100
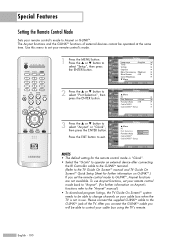
... the "G-Link" to operate an external device after connecting the IR Controller cable to the G-LINKTM terminal. (Refer to the TV Guide On ScreenTM manual and TV Guide On ScreenTM Quick Setup Sheet for the remote control mode is not in use Anynet functions, set the remote control mode...Listings Move Enter Return NOTES • The default setting for further information on Anynet's functions refer to the "Anynet" manual.) • To download program listings, the TV Guide On ScreenTM system needs to be able to G-LINKTM, Anynet functions are not available. The Anynet functions and the...
... the "G-Link" to operate an external device after connecting the IR Controller cable to the G-LINKTM terminal. (Refer to the TV Guide On ScreenTM manual and TV Guide On ScreenTM Quick Setup Sheet for the remote control mode is not in use Anynet functions, set the remote control mode...Listings Move Enter Return NOTES • The default setting for further information on Anynet's functions refer to the "Anynet" manual.) • To download program listings, the TV Guide On ScreenTM system needs to be able to G-LINKTM, Anynet functions are not available. The Anynet functions and the...
User Manual (ENGLISH)
Page 101
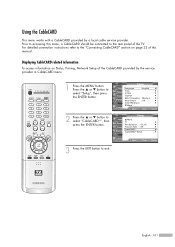
...", then press the ENTER button. English - 101 Displaying CableCARD related information To access information on page 22 of the TV. or † button to the rear panel of this menu, a CableCARD should be connected to select "Setup", then press the ENTER button. 2 Press the... ... Using the CableCARD This menu works with a CableCARD provided by the service provider in CableCARD menu. 1 Press the MENU button. Press the ... Prior to accessing this manual...
...", then press the ENTER button. English - 101 Displaying CableCARD related information To access information on page 22 of the TV. or † button to the rear panel of this menu, a CableCARD should be connected to select "Setup", then press the ENTER button. 2 Press the... ... Using the CableCARD This menu works with a CableCARD provided by the service provider in CableCARD menu. 1 Press the MENU button. Press the ... Prior to accessing this manual...
User Manual (ENGLISH)
Page 104
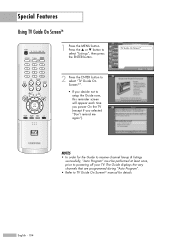
...; In order for the Guide to receive channel lineup & listings successfully, "Auto Program" must be performed at least once, prior to TV Guide On ScreenTM manual for details. The Guide displays the very channels that are programmed during "Auto Program". • Refer to powering off your... TV. or † button to select "Listings", then press the ENTER button. 2 Press the ENTER button to select "TV Guide On ScreenTM". • If you ...
...; In order for the Guide to receive channel lineup & listings successfully, "Auto Program" must be performed at least once, prior to TV Guide On ScreenTM manual for details. The Guide displays the very channels that are programmed during "Auto Program". • Refer to powering off your... TV. or † button to select "Listings", then press the ENTER button. 2 Press the ENTER button to select "TV Guide On ScreenTM". • If you ...
User Manual (ENGLISH)
Page 115
... is displayed on stopping recording 1) In general, you can view it through another device or through a manual operation may cause a malfunction when controlling a device through the TV. Select a source device to discover and remove the defective device from the Program List and press Copy....English - 115 Check that the AVHDD and DVHS devices are connected, the response time may be recorded from satellite, programs on the TV screen and the target device automatically starts recording. • Controlling a device through another device. 13) When multiple devices are connected....
... is displayed on stopping recording 1) In general, you can view it through another device or through a manual operation may cause a malfunction when controlling a device through the TV. Select a source device to discover and remove the defective device from the Program List and press Copy....English - 115 Check that the AVHDD and DVHS devices are connected, the response time may be recorded from satellite, programs on the TV screen and the target device automatically starts recording. • Controlling a device through another device. 13) When multiple devices are connected....

User Manual (ENGLISH)
Page 117
...the maximum connection speed. This message appears when you try to copy protected content. "Authentication is currently being recorded manually or by another device, through the TV. ➔ Stop the recording device and retry. "Recording is not compatible." Check that the connected device supports DTCP...by another device." Although DV Camcorder is in the device list, you select the camcorder as an input source, because the TV supports the MPEG format only. Possible Solution This message appears when the connection speed of S400. Continued... This message appears ...
...the maximum connection speed. This message appears when you try to copy protected content. "Authentication is currently being recorded manually or by another device, through the TV. ➔ Stop the recording device and retry. "Recording is not compatible." Check that the connected device supports DTCP...by another device." Although DV Camcorder is in the device list, you select the camcorder as an input source, because the TV supports the MPEG format only. Possible Solution This message appears when the connection speed of S400. Continued... This message appears ...


