Quick Guide (ENGLISH)
Page 1
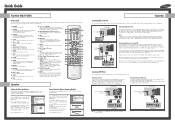
.... 16. PIP Controls SIZE; Press to select the type of the available video sources (i.e., TV, Set-Top box, VCR, DVD, DTV, PC). 14. RESET If your TV there may be controlled by the Samsung remote control (i.e., TV, STB, VCR, CABLE, or DVD). 12. Press the ... or † button to ...to record one of audio cables between the Audio in jacks on the TV and the AUDIO OUT jacks on the DVD player. POWER Turns the TV on -screen menu. 9. PIP (Picture In Picture) Activates PIP. 23. From Cable TV Rear Panel Connecting a Cable Converter Box This connection allows you to watch ...
.... 16. PIP Controls SIZE; Press to select the type of the available video sources (i.e., TV, Set-Top box, VCR, DVD, DTV, PC). 14. RESET If your TV there may be controlled by the Samsung remote control (i.e., TV, STB, VCR, CABLE, or DVD). 12. Press the ... or † button to ...to record one of audio cables between the Audio in jacks on the TV and the AUDIO OUT jacks on the DVD player. POWER Turns the TV on -screen menu. 9. PIP (Picture In Picture) Activates PIP. 23. From Cable TV Rear Panel Connecting a Cable Converter Box This connection allows you to watch ...
Quick Guide (ENGLISH)
Page 2
...on the rear of the lamp container. • If a new lamp is turned off at the same time, you use sun screen and white spot may have an effect on the center of Home Theater, select "AUX2". * Press the FUNCTION button on the front display window. The picture will ...channel to handle the lamp. • Please keep at a short distance, your monitor is defective. Change channels with cable converter. Channels will shut off your projection TV to display on the Home Theater, select "AUX2". Listening to time for a long time DLP model is very hot. Q & A White spot appears on...
...on the rear of the lamp container. • If a new lamp is turned off at the same time, you use sun screen and white spot may have an effect on the center of Home Theater, select "AUX2". * Press the FUNCTION button on the front display window. The picture will ...channel to handle the lamp. • Please keep at a short distance, your monitor is defective. Change channels with cable converter. Channels will shut off your projection TV to display on the Home Theater, select "AUX2". Listening to time for a long time DLP model is very hot. Q & A White spot appears on...
User Manual (ENGLISH)
Page 2
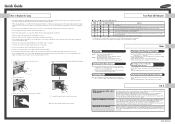
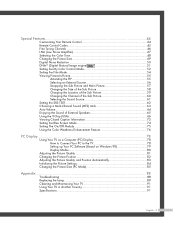
Table of Contents Your New Wide TV 6 List of Features ...6 Accessories ...6 Front Panel Buttons 7 Front Panel Information Window 8 Rear Panel Jacks ...9 Remote Control ...10 Installing Batteries in the Remote Control 11 Connections ...14 Connecting VHF and UHF Antennas 14 Antennas with...the Channels 26 Adding and Erasing Channels 27 Changing Channels 28 Selecting Your Favorite Channels 29 Scanning the Channels 30 Labeling the Channels 31 Picture Control ...32 Sound Control ...34 Setting the Clock 36 Setting the Timers 37 Viewing an External Signal Source 39 Assigning Names to ...
Table of Contents Your New Wide TV 6 List of Features ...6 Accessories ...6 Front Panel Buttons 7 Front Panel Information Window 8 Rear Panel Jacks ...9 Remote Control ...10 Installing Batteries in the Remote Control 11 Connections ...14 Connecting VHF and UHF Antennas 14 Antennas with...the Channels 26 Adding and Erasing Channels 27 Changing Channels 28 Selecting Your Favorite Channels 29 Scanning the Channels 30 Labeling the Channels 31 Picture Control ...32 Sound Control ...34 Setting the Clock 36 Setting the Timers 37 Viewing an External Signal Source 39 Assigning Names to ...
User Manual (ENGLISH)
Page 3
...Codes 45 Fine Tuning Channels 46 LNA (Low Noise Amplifier 47 Selecting the Color Tone 48 Changing the Picture Size 49 Digital Noise Reduction 50 DNIeTM (Digital Natural Image engine) 51 Setting the My Color Control Mode 52 Setting the Film Mode 54 ... Adjusting the Picture Quality 81 Changing the Picture Position 82 Adjusting the Picture Quality and Position Automatically 83 Initializing the Picture Settings 84 Changing the Picture Size (PC Mode 85 Appendix...88 Troubleshooting 88 Replacing the Lamp 89 Cleaning and Maintaining Your TV 91 Using Your TV in Another ...
...Codes 45 Fine Tuning Channels 46 LNA (Low Noise Amplifier 47 Selecting the Color Tone 48 Changing the Picture Size 49 Digital Noise Reduction 50 DNIeTM (Digital Natural Image engine) 51 Setting the My Color Control Mode 52 Setting the Film Mode 54 ... Adjusting the Picture Quality 81 Changing the Picture Position 82 Adjusting the Picture Quality and Position Automatically 83 Initializing the Picture Settings 84 Changing the Picture Size (PC Mode 85 Appendix...88 Troubleshooting 88 Replacing the Lamp 89 Cleaning and Maintaining Your TV 91 Using Your TV in Another ...
User Manual (ENGLISH)
Page 6
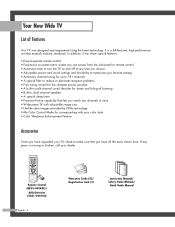
... your color style • Color Weakness Enhancement Feature Accessories Once you have unpacked your TV, check to reduce or eliminate reception problems • Fine tuning control for the sharpest picture possible • A built-in multi-channel sound decoder for stereo and bilingual listening ...• Built-in, dual channel speakers • A special sleep timer • Picture-in-Picture capability that exceeds industry standards. If any time you choose • Adjustable picture and sound settings and the ability to memorize your dealer. It is a full-featured, high...
... your color style • Color Weakness Enhancement Feature Accessories Once you have unpacked your TV, check to reduce or eliminate reception problems • Fine tuning control for the sharpest picture possible • A built-in multi-channel sound decoder for stereo and bilingual listening ...• Built-in, dual channel speakers • A special sleep timer • Picture-in-Picture capability that exceeds industry standards. If any time you choose • Adjustable picture and sound settings and the ability to memorize your dealer. It is a full-featured, high...
User Manual (ENGLISH)
Page 10
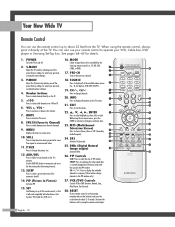
... (Secondary Audio Program). 24. Use the ADD/DEL button to resume normal video. 11. CH , CH Press to change the picture size. 12. PIP (Picture In Picture) Activates PIP. 15. Press to display the available channels in the PIP window. SOURCE Press to display all of PIP window. Press...Cable box, DVD, etc.). 16. Press again to memorize and erase the fine tuning after fine tuning channels. 13. S.MODE Adjust the TV sound by the Samsung remote control (i.e., TV, STB, VCR, CABLE, or DVD). 17. PRE-CH Tunes to exit the menu. 22. SLEEP Press to select a preset time ...
... (Secondary Audio Program). 24. Use the ADD/DEL button to resume normal video. 11. CH , CH Press to change the picture size. 12. PIP (Picture In Picture) Activates PIP. 15. Press to display the available channels in the PIP window. SOURCE Press to display all of PIP window. Press...Cable box, DVD, etc.). 16. Press again to memorize and erase the fine tuning after fine tuning channels. 13. S.MODE Adjust the TV sound by the Samsung remote control (i.e., TV, STB, VCR, CABLE, or DVD). 17. PRE-CH Tunes to exit the menu. 22. SLEEP Press to select a preset time ...
User Manual (ENGLISH)
Page 24
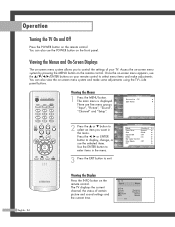
... Access the on-screen menu system by pressing the MENU button on the remote control. Input Input Source List : TV Edit Name √ √ There are five menu groups: Picture "Input", "Picture", "Sound", Sound "Channel" and "Setup". Channel Setup Move Enter Exit 2 Press the ... English - 24 ...Press the MENU button. am Mono Dynamic Standard Stereo Stereo Air 12 Signal V-Chip Picture Sound SRS TSXT MTS - - : - - Operation Turning the TV On and Off Press the POWER button on your TV. The TV displays the current channel, the status of your remote control to exit. Viewing ...
... Access the on-screen menu system by pressing the MENU button on the remote control. Input Input Source List : TV Edit Name √ √ There are five menu groups: Picture "Input", "Picture", "Sound", Sound "Channel" and "Setup". Channel Setup Move Enter Exit 2 Press the ... English - 24 ...Press the MENU button. am Mono Dynamic Standard Stereo Stereo Air 12 Signal V-Chip Picture Sound SRS TSXT MTS - - : - - Operation Turning the TV On and Off Press the POWER button on your TV. The TV displays the current channel, the status of your remote control to exit. Viewing ...
User Manual (ENGLISH)
Page 25
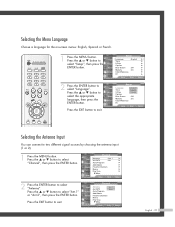
...; button to exit. Press the ... Press the EXIT button to select "Setup", then press the ENTER button. Press the ... Input Picture Sound Channel Setup Channel Antenna : AAnntt..11 Air/CATV : AAirnt.2 Auto Program Add/Delete Favorite Channels Name Fine Tune M More Move ...select "Antenna". Selecting the Menu Language Choose a language for the on-screen menus: English, Spanish or French. 1 Press the MENU button. Input Picture Sound Channel Setup Setup Language : English √ Time √ V-Chip √ Caption √ Blue Screen : Off √ Melody : On...
...; button to exit. Press the ... Press the EXIT button to select "Setup", then press the ENTER button. Press the ... Input Picture Sound Channel Setup Channel Antenna : AAnntt..11 Air/CATV : AAirnt.2 Auto Program Add/Delete Favorite Channels Name Fine Tune M More Move ...select "Antenna". Selecting the Menu Language Choose a language for the on-screen menus: English, Spanish or French. 1 Press the MENU button. Input Picture Sound Channel Setup Setup Language : English √ Time √ V-Chip √ Caption √ Blue Screen : Off √ Melody : On...
User Manual (ENGLISH)
Page 26
... of cable system that is connected to "Storing Channels in your particular area. or † button to exit. Press the ... Input Picture Sound Channel Setup Channel Antenna : AntA.1ir Air/CATV : AirSTD Auto Program HRC Add/Delete IRC Favorite Channels Name Fine Tune M More... Move Enter Return Press the EXIT button to select "Air/CATV", then press the ENTER button. Proceed to the TV (i.e., an antenna or cable system). 1 Press the MENU button. or † button to select "Channel", then press the ENTER button. NOTES ...
... of cable system that is connected to "Storing Channels in your particular area. or † button to exit. Press the ... Input Picture Sound Channel Setup Channel Antenna : AntA.1ir Air/CATV : AirSTD Auto Program HRC Add/Delete IRC Favorite Channels Name Fine Tune M More... Move Enter Return Press the EXIT button to select "Air/CATV", then press the ENTER button. Proceed to the TV (i.e., an antenna or cable system). 1 Press the MENU button. or † button to select "Channel", then press the ENTER button. NOTES ...

User Manual (ENGLISH)
Page 27
...from memory. 1 Press the MENU button. Press the ... Repeatedly pressing the ENTER button will alternate between add channel and delete channel. Input Picture Sound Channel Setup Channel Antenna : Ant.1 Air/CATV : Air Auto Program Add/Delete Favorite Channels Name Fine Tune M More Move Enter Return...press the ADD/DEL button on the previous page. 1 Press the MENU button. or † button to start the auto program. The TV begins memorizing all of the available stations. Press the ENTER button at any time to select "Channel", then press the ENTER button. 2 ...
...from memory. 1 Press the MENU button. Press the ... Repeatedly pressing the ENTER button will alternate between add channel and delete channel. Input Picture Sound Channel Setup Channel Antenna : Ant.1 Air/CATV : Air Auto Program Add/Delete Favorite Channels Name Fine Tune M More Move Enter Return...press the ADD/DEL button on the previous page. 1 Press the MENU button. or † button to start the auto program. The TV begins memorizing all of the available stations. Press the ENTER button at any time to select "Channel", then press the ENTER button. 2 ...
User Manual (ENGLISH)
Page 29
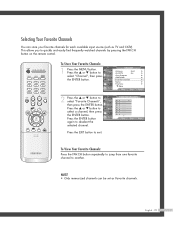
...button to select "Favorite Channels", then press the ENTER button. This allows you to deselect the selected channel. Press the ... English - 29 Input Picture Sound Channel Setup Channel Antenna : Ant.1 Air/CATV : Air Auto Program Add/Delete Favorite Channels Name Fine Tune M More Move Enter Return 2 ... watched channels by pressing the FAV.CH button on the remote control. Selecting Your Favorite Channels You can be set as TV and CATV). To View Your Favorite Channels: Press the FAV.CH button repeatedly to jump from one favorite channel to another. Press ...
...button to select "Favorite Channels", then press the ENTER button. This allows you to deselect the selected channel. Press the ... English - 29 Input Picture Sound Channel Setup Channel Antenna : Ant.1 Air/CATV : Air Auto Program Add/Delete Favorite Channels Name Fine Tune M More Move Enter Return 2 ... watched channels by pressing the FAV.CH button on the remote control. Selecting Your Favorite Channels You can be set as TV and CATV). To View Your Favorite Channels: Press the FAV.CH button repeatedly to jump from one favorite channel to another. Press ...
User Manual (ENGLISH)
Page 30
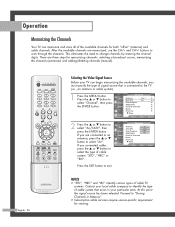
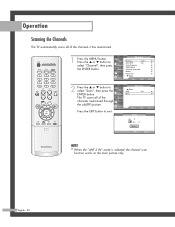
...Scan Air 3 Air 4 Return Enter Return NOTE • When the "ANT 2 IN" mode is selected, the channel scan function works on the main picture only. Press the ... or † button to exit. or † button to select "Scan", then press the Channel Input L More LNA : ...On √ ENTER button. Picture Scan √ The TV scans all of the channels memorized through the sub(PIP) picture. English - 30 Operation Scanning the Channels The TV automatically scans all of the channels it has memorized. 1 Press the MENU button....
...Scan Air 3 Air 4 Return Enter Return NOTE • When the "ANT 2 IN" mode is selected, the channel scan function works on the main picture only. Press the ... or † button to exit. or † button to select "Scan", then press the Channel Input L More LNA : ...On √ ENTER button. Picture Scan √ The TV scans all of the channels memorized through the sub(PIP) picture. English - 30 Operation Scanning the Channels The TV automatically scans all of the channels it has memorized. 1 Press the MENU button....
User Manual (ENGLISH)
Page 31
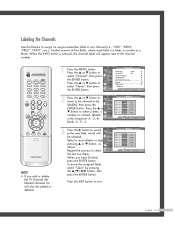
... label consists of five fields, where each field is pressed, the channel label will be selected. or † button to exit. Press the ... Input Picture Air 2 Air 3 Name L CNN2 ---- Clear pressing ... Press the ... or † button to move to the channel to be added or deleted.... or † button, as Channel Air 5 Air 6 ------- Clear Clear ENTER button. When you add or delete the TV channel, the labeled channels list will also be labelled, then press the Input Picture Air 2 Air 3 Name L L A M ---- Press the EXIT button to select "Channel", then press the ENTER...
... label consists of five fields, where each field is pressed, the channel label will be selected. or † button to exit. Press the ... Input Picture Air 2 Air 3 Name L CNN2 ---- Clear pressing ... Press the ... or † button to move to the channel to be added or deleted.... or † button, as Channel Air 5 Air 6 ------- Clear Clear ENTER button. When you add or delete the TV channel, the labeled channels list will also be labelled, then press the Input Picture Air 2 Air 3 Name L L A M ---- Press the EXIT button to select "Channel", then press the ENTER...

User Manual (ENGLISH)
Page 32
... † button to the factory defaults. See next page.) Customizing the Picture 1 Press the MENU button. Input Picture Sound Channel Setup Mode Mode Contrast Brightness Sharpness Color Tint G 50 Reset : Standard √ 90 50 50 60 R 50 Move Enter Return 3 Press the ... The previously adjusted picture settings will be reset to select "Reset", then press the ENTER...
... † button to the factory defaults. See next page.) Customizing the Picture 1 Press the MENU button. Input Picture Sound Channel Setup Mode Mode Contrast Brightness Sharpness Color Tint G 50 Reset : Standard √ 90 50 50 60 R 50 Move Enter Return 3 Press the ... The previously adjusted picture settings will be reset to select "Reset", then press the ENTER...

User Manual (ENGLISH)
Page 33
... "Dynamic" for viewing the TV during the day or when there is a bright light in the room. • Choose "Standard" for the standard factory settings. • Choose "Cinema" when viewing a movie. Input Picture Sound Channel Setup Mode Mode Contrast Brightness Sharpness Color Tint G 50 Reset : Standard √ 90 50 50 60 R 50 Move Enter Return 3 Press...
... "Dynamic" for viewing the TV during the day or when there is a bright light in the room. • Choose "Standard" for the standard factory settings. • Choose "Cinema" when viewing a movie. Input Picture Sound Channel Setup Mode Mode Contrast Brightness Sharpness Color Tint G 50 Reset : Standard √ 90 50 50 60 R 50 Move Enter Return 3 Press...
User Manual (ENGLISH)
Page 34
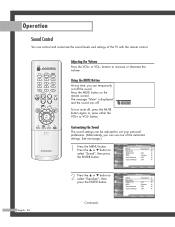
...; button to select "Sound", then press the ENTER button. Press the MUTE button on the remote control. Mute To turn mute off . button. Input Picture Sound Channel Setup Sound Mode Equalizer SRS TSXT MTS Auto Volume Internal Mute : Standard √ √ : Off √ : Stereo √ : Off ...be adjusted to increase or decrease the volume. buttons to suit your personal preference. (Alternatively, you can use one of the TV with the remote control. Continued... Operation Sound Control You can control and customize the sound levels and settings of the automatic settings....
...; button to select "Sound", then press the ENTER button. Press the MUTE button on the remote control. Mute To turn mute off . button. Input Picture Sound Channel Setup Sound Mode Equalizer SRS TSXT MTS Auto Volume Internal Mute : Standard √ √ : Off √ : Stereo √ : Off ...be adjusted to increase or decrease the volume. buttons to suit your personal preference. (Alternatively, you can use one of the TV with the remote control. Continued... Operation Sound Control You can control and customize the sound levels and settings of the automatic settings....
User Manual (ENGLISH)
Page 35
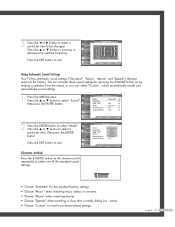
...S.MODE button (or by making a selection from the menu), or you can select "Custom", which automatically recalls your personalized settings. Input Picture Sound Channel Setup Sound Mode Equalizer SRS TSXT MTS Auto Volume Internal Mute : SSttannddaarrdd Music : OfMf ovie : SStepreeeoch : OCfuf stom ... a show that are preset at the factory. Press the ... Balance 100Hz 300Hz 1KHz 3KHz 10KHz Move Adjust Return Using Automatic Sound Settings Your TV has automatic sound settings ("Standard", "Music", "Movie" and "Speech") that is mostly dialog (i.e., news). • Choose "Custom" to ...
...S.MODE button (or by making a selection from the menu), or you can select "Custom", which automatically recalls your personalized settings. Input Picture Sound Channel Setup Sound Mode Equalizer SRS TSXT MTS Auto Volume Internal Mute : SSttannddaarrdd Music : OfMf ovie : SStepreeeoch : OCfuf stom ... a show that are preset at the factory. Press the ... Balance 100Hz 300Hz 1KHz 3KHz 10KHz Move Adjust Return Using Automatic Sound Settings Your TV has automatic sound settings ("Standard", "Music", "Movie" and "Speech") that is mostly dialog (i.e., news). • Choose "Custom" to ...
User Manual (ENGLISH)
Page 36
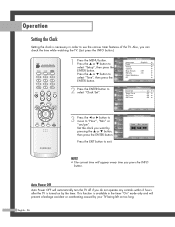
... if you do not operate any controls within 3 hours after the TV is necessary in the timer "On" mode only and will appear every time you press the INFO button. Press the ... Input Picture Sound Channel Setup Setup Language : English √ Time √ V-Chip √ Caption √ Blue Screen : Off √ Melody...
... if you do not operate any controls within 3 hours after the TV is necessary in the timer "On" mode only and will appear every time you press the INFO button. Press the ... Input Picture Sound Channel Setup Setup Language : English √ Time √ V-Chip √ Caption √ Blue Screen : Off √ Melody...
User Manual (ENGLISH)
Page 37
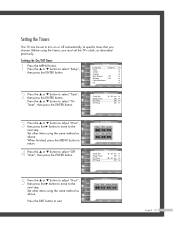
...button to adjust "Hour", then press the √ button to move to the next step. Set other items using the same method as above . Input Picture Sound Time Clock Set Sleep Timer On Timer Off Timer 10 : 30 am √ Off √ 06 : 30 am No Move Adjust Return English ... at specific times that you must set the TV's clock, as above . Setting the On/Off Timer 1 Press the MENU button. Press the ... Press the ... Activation 10 No Move Adjust Return 4 Press the ... Set other items using the timers, you choose. Input Picture Sound Channel Setup Off Timer Hour L 12 ...
...button to adjust "Hour", then press the √ button to move to the next step. Set other items using the same method as above . Input Picture Sound Time Clock Set Sleep Timer On Timer Off Timer 10 : 30 am √ Off √ 06 : 30 am No Move Adjust Return English ... at specific times that you must set the TV's clock, as above . Setting the On/Off Timer 1 Press the MENU button. Press the ... Press the ... Activation 10 No Move Adjust Return 4 Press the ... Set other items using the timers, you choose. Input Picture Sound Channel Setup Off Timer Hour L 12 ...
User Manual (ENGLISH)
Page 38
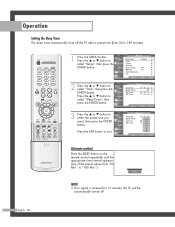
...button. NOTE • If no signal is received for 15 minutes, the TV will be automatically turned off the TV after a preset time (from "30 Min." or † button to select "Sleep Timer", then press the ENTER button. Input Picture Sound Channel Setup Setup Language : English √ Time √ V-Chip...8224; button to select "Setup", then press the ENTER button. Press the ... to exit. Press the EXIT button to "180 Min."). 30 Min. Input Picture Sound Time Clock Set Sleep Timer On Timer Off Timer 10 : 30 am √ Off √ 06 : 30 am OfOf ff 06 : 3030am 11...
...button. NOTE • If no signal is received for 15 minutes, the TV will be automatically turned off the TV after a preset time (from "30 Min." or † button to select "Sleep Timer", then press the ENTER button. Input Picture Sound Channel Setup Setup Language : English √ Time √ V-Chip...8224; button to select "Setup", then press the ENTER button. Press the ... to exit. Press the EXIT button to "180 Min."). 30 Min. Input Picture Sound Time Clock Set Sleep Timer On Timer Off Timer 10 : 30 am √ Off √ 06 : 30 am OfOf ff 06 : 3030am 11...


